Suppose, you’ve started to use Linux recently, and you’re quite new to the command line interface. But one thing is certain if you want to learn about some frequently used Linux commands and practice them on your own then you’ve found the right place. Here, I’ve discussed the 50 most used Linux commands with a brief description and practical examples.
Download 50 Most Used Linux Commands

List of 50 Most Used Linux Commands
1. sudo Command
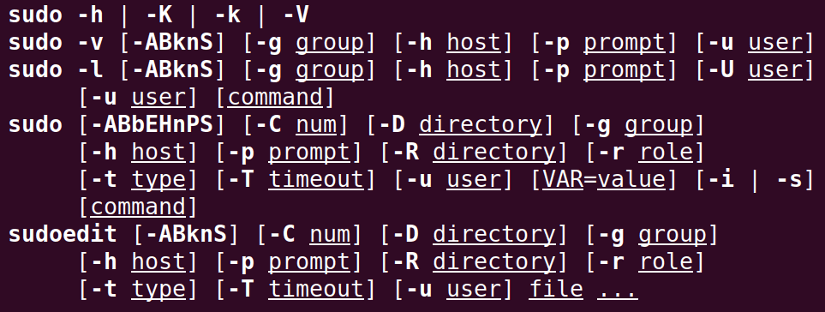
sudo can be referred to as the supreme command. It is the abbreviation for “Super User DO”. It allows a user to act as a superuser and run commands accordingly. One can run certain commands prefixed by sudo with boosted rights. It is considered analogous to the “run as administrator” process of Windows.
Synopsis:
Options:
- -D directory, –chdir=directory (executes the command in the specific directory)
- -e (edits one or multiple files instead of executing commands)
- -l (runs specific commands as the root user)
- -u user, –user=user (executes the command as a user other than the specific default user. )
Example:
apt install <package name> Any general user cannot install any packages on the machine. However, with sudo prefixed with the command, the user can execute his/her task by providing his/her password.
sudo apt install <package name>
2. pwd Command
pwd is the abbreviation for Print Working Directory. As the name suggests, it prints the name of the current/working directory all the way beginning from the root(/) directory.
Synopsis:
pwd [OPTION]...
Options:
- -L, –logical (Even as it carries symlinks, PWD utilizes from the environment. )
- -P, –physical (avoid the symlinks) When no option is mentioned, it is assumed that option -P is being used.
Example:
 Generally, Terminal prompts have a complete directory in the name. Otherwise, pwd becomes a handy command to get insights about the current working directory.
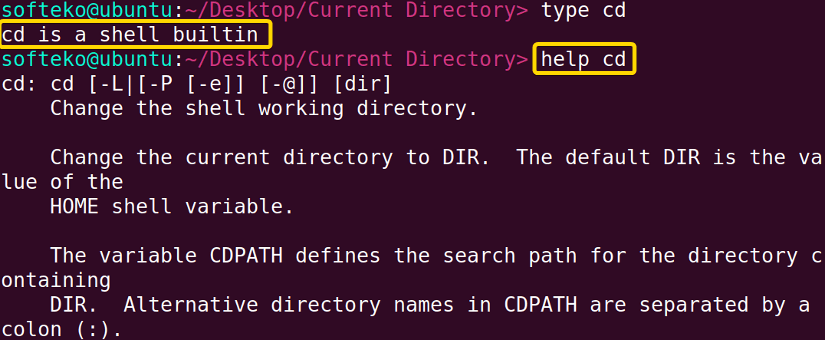
3. cd Command
Change Directory(cd) allows one to change one’s current directory to the desired directory within the terminal.
Synopsis:
Options:
- cd ~[username] — change the directory to the home directory of the specified user.
- cd .. — changes directory one directory up the current directory.
- cd – — changes the directory to the previously changed directory.
Example:
In our Desktop directory, we have a 3-level nested directory. we want to leap forward to the level 3 directory by jumping one level at a time.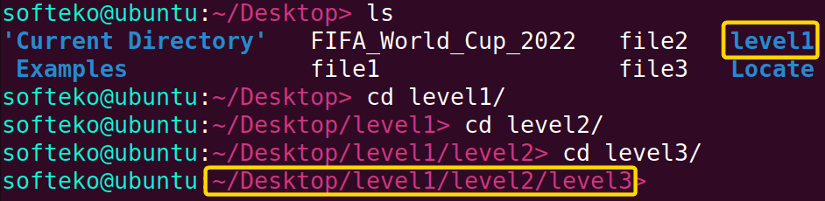 We have changed our mind, now we want to be at level2. Therefore, we just need to go one directory backward which can easily be done by executing the command cd ..
 Lastly, we have concluded that we want to be in the home(~) directory. This can be simply done by executing cd ~ (tilde represents home directory).
4. ls Command
Lists the contents, both files, and subdirectories of the current directory by default. It is one of the most used commands, as one can view the contents of a directory without exiting the terminal and perform their desired tasks on the specific contents.
Synopsis:
ls [OPTION]... [FILE]...
Options:
- -a — doesn’t ignore the hidden files (files named with .(dot) at the beginning).
- -h — print sizes in human-readable forms.
- -l — lists in a long form.
- -S — Sorts according to file size, largest first.
Example:
ls /After being at the root(/) directory, if we run the ls command we can view the contents of the root directory.
5. cat Command
Prints the contents of the file specified. Generally, cat (concatenates) reads the contents of the files fed to its arguments and prints them serially on the terminal.
Synopsis:
cat [OPTION]... [FILE]...
Options:
- -n, –number — Displays line numbers when utilized.
Example:
We can display the contents of a file simply by using the cat command followed by the file name.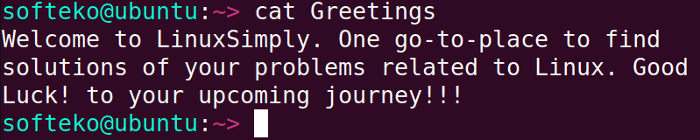
6. mv Command
Mv is the abbreviation for move. As the name suggests it moves things from one place to another place. mv moves one or multiple files to the specified destination directory. If the directory doesn’t exist it just renames the files. mv can also be used to move directories and their contents.
Synopsis

Options:
- -i, –interactive (Displays interactive prompt before completing the modification)
- -t, –target-directory=DIRECTORY (Moves every specified file to the targeted DIRECTORY)
- -v, –verbose (Prints message of what is being performed.)
Example:
mv Folder2/file2 Foder1/In the desktop directory, there are two subdirectories named Folder1 & Folder2 which respectively contain two files named file1 & file2. Now let’s move file2 to folder1.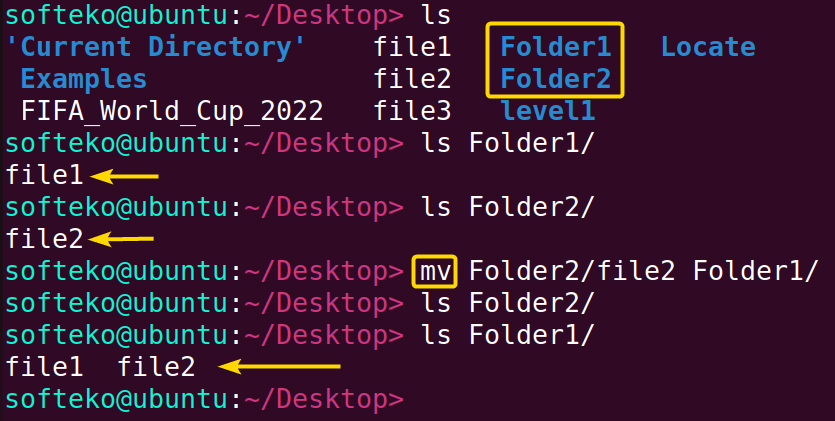
7. cp Command
Cp is the abbreviation for copy. As the name suggests it copies things from one place to another place. cp copies one or multiple files to the specified destination directory. If the directory doesn’t exist it just renames the files. cp can also be used to copy directories and their contents.
Synopsis

Options:
- -i, –interactive (Displays interactive prompt before completing the modification)
- -R, -r, –recursive (Copies the directories as well as their contents recursively)
- -v, –verbose (Prints message of what is being performed.)
Example:
cp Folder1/file2 Folder2/In the desktop directory, there are two subdirectories named Folder1 & Folder2. In folder1 there is a file named file2. Let’s make a copy of file2 in the Folder2 directory.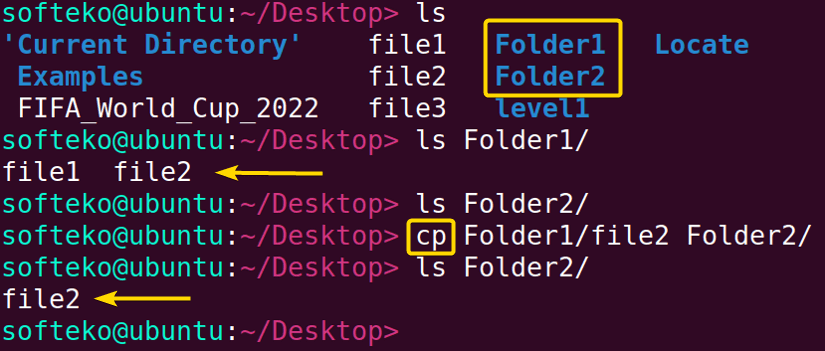
8. rm Command
Rm is the abbreviation for remove. As the name suggests it removes things and the removal is permanent, so be cautious while using it. rm can also be used to remove directories and their contents permanently.
Syntax:
rm [OPTION]... [FILE]...
Options:
- -i (Displays interactive prompt before completing the deletion each time)
- -I (Less intuitive than -i, Only shows prompt while deleting 3 or more files or deleting recursively.)
- -d, –dir (Removes the empty directories)
- -R, -r, –recursive (Removes the directories as well as their contents recursively)
- -v, –verbose (Prints message of what is being performed.)
Example:
In the desktop directory, there are two subdirectories named Folder1 & Folder2. Folder2 contains a file named file2. let’s remove file2.
rm Folder2/file2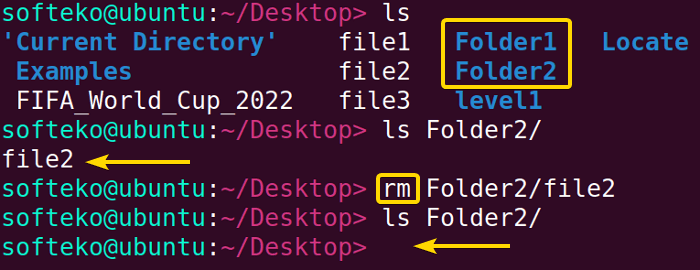 Now, Folder2 is empty let’s remove this directory. To remove an empty directory option -d has to be used.
rm-d Folder2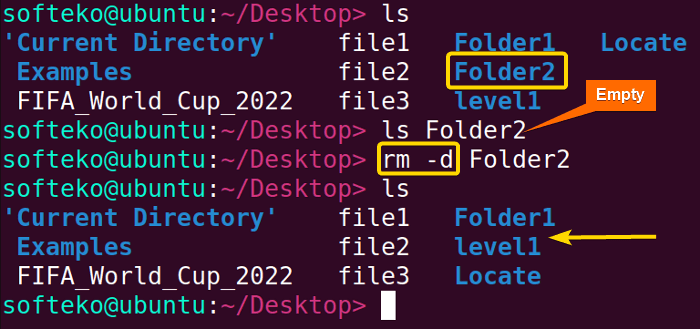 Finally, we have decided that Folder1 is also of no use to us. Let’s remove this directory. However, it is not an empty directory so -d will not work. Instead, we have to use -r.
rm -r Folder1/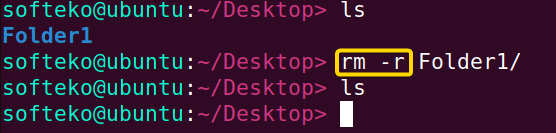
9. touch Command
The touch command allows us to update a file’s access or modification time. However, if the file doesn’t exist we can create that file. This ability to create files makes the touch command one of the most useful commands.
Syntax:
touch [OPTION]... [FILE]...
Options:
- -a (changes only the access time)
- -m (changes only the modification time)
Example:
touch file1 file2 file3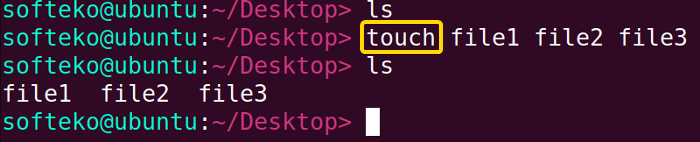 We created 3 files in our current directory, Desktop named file1, file2, and file3 with the help of the touch command.
10. mkdir Command
mkdir is the abbreviation for make directory. As the name suggests the mkdir command can be used to create one or more directories.
Syntax:
mkdir [OPTION]... DIRECTORY...
Options:
- -p – -parents (Creates the necessary parent directories if required)
- -v, –verbose (Prints message of what is being perfmkormed.)
Example:
Let’s make a directory named ‘Examples’ in our desktop directory which will contain one subdirectory named ‘NoExamples’.
mkdir -p Examples/NoExamples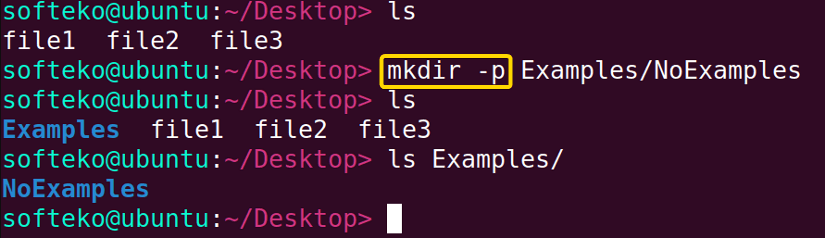
11. locate Command
The locate command performs the search operation from an existing database and prints the results with the exact directory path.
Syntax:
locate [OPTION]... PATTERN...
Options:
- -c (Does not print any matches but rather the total occurring number)
- -e (Only prints the existing match)
- -i (Ignores the sensitivity of cases)
Example:
We have a file named Greetings in our ‘/home’ directory. After changing our current directory from ‘/home’ to ‘/Desktop/Locate’ we operated the locate command.
locate Greetings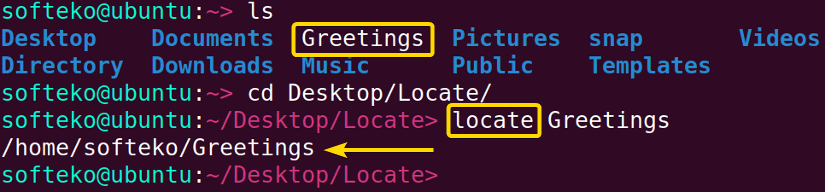
12. find Command
The find command searches in real-time not like the locate command from an existing file.
Synopsis:

Options:
- -type d/f (d(limits the search to only directories), f(limits the search to only files)).
- -size +n,n,-n (Finds for a specific size n.)
- -name pattern (Will search for the given pattern)
- -exec (can be used to perform our customized tasks on the matches.)
Example:
find -type dThis will only the find operation to directory type only.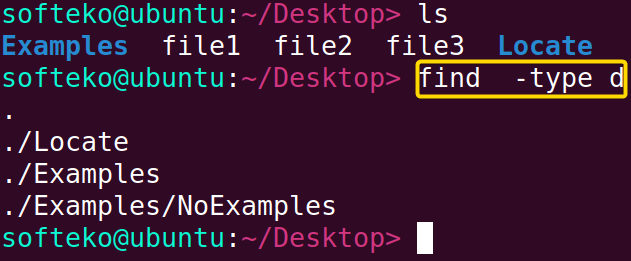
13. grep Command
The grep command can be used to search patterns in specific files or each file. Then prints the entire line containing the match.
Synopsis:

Options:
- -c (Does not print any matches but rather the total occurring number)
- -i (Ignores the sensitivity of cases)
- -w (search for a whole word)
Example:
We have a text file named “FIFA_World_Cup_2022” in our desktop directory. Let’s search for ‘FIFA’ in the file.
grep FIFA FIFA_World_Cup_2022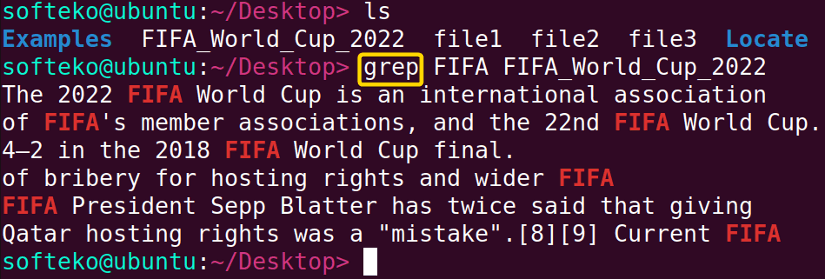 Now, if we want to just know about the occurrence number, we have to use the -c option.
grep -c FIFA FIFA_World_Cup_2022
14. head Command
The head command prints the first(by default 10 lines) few lines of a file.
Syntax:
head [OPTION]... [FILE]...
Options:
- -n (Prints the first n lines.)
- -v, –verbose (Prints message of what is being performed.)
Example:
We want to print the first 5 lines of the “FIFA_World_Cup_2022” text file. It can be simply done using the head command with -n5 option.
head -n5 FIFA_World_Cup_2022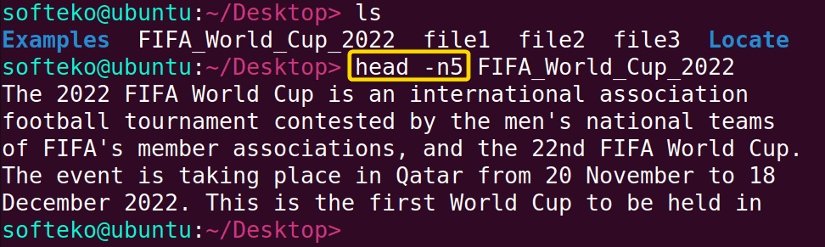
15. tail Command
The tail command prints the last(by default 10 lines) few lines of a file.
Syntax:
tail [OPTION]... [FILE]...
Options:
- -n (Prints the last n lines.)
- -v, –verbose (Prints message of what is being performed.)
Example:
We want to print the first 5 lines of the “FIFA_World_Cup_2022” text file. It can be simply done using the tail command with -n3 option.
tail -n3 FIFA_World_Cup_2022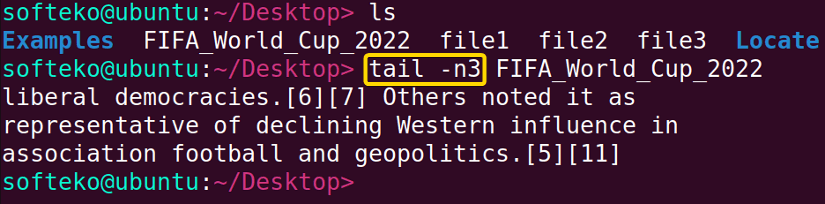
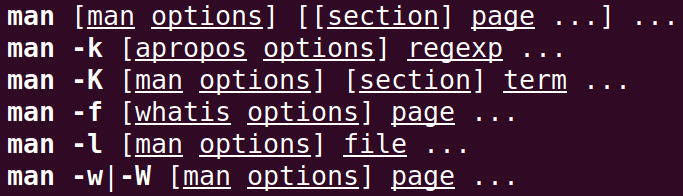
16. man Command
You are whether a beginner or a professional Linux CLI(command line interface) user, the command you will interact with the most is certainly the man command. The man command enables the user to learn more about a specific command i.e. syntax, options and arguments of that command.
Synopsis:
Options:
- -k, –apropos (Displays the short manual page on the terminal)
- -I, –match-case (Performs case-sensitive manual page search)
- /pattern (It is a useful search shortcut built-in inside the man page.)
Example:
You can navigate through the man page using arrow keys and other specific keys. To know more about the man page navigation try pressing h on the man page of any command.
softeko@ubuntu:~/Desktop> man man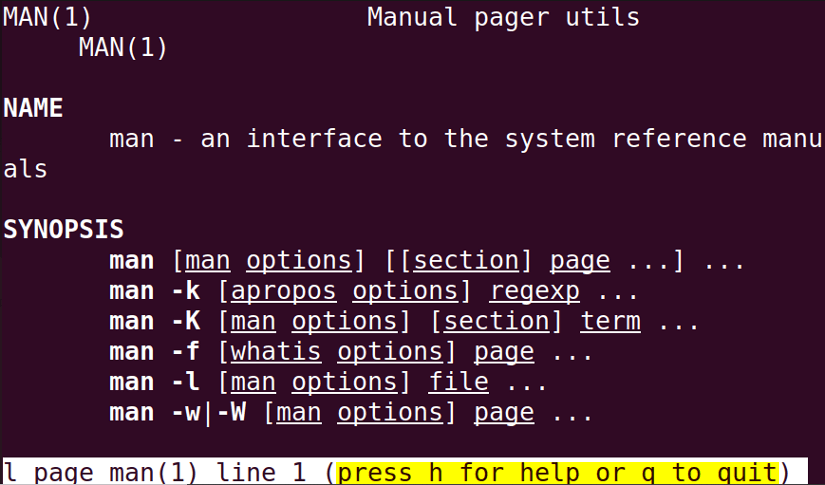 You can print short information from the man page using option -k.
17. history Command
Executing this command one can view the previously used commands in the terminal.
Synopsis:
![]()
Example:
let’s view some of our previously executed commands using the history command.
18. chmod Command
chmod is the abbreviation for change mode. The chmod command can be used to alter the permission attributes of system contents.
Synopsis:

Options:
- u represents user (u+x will empower the user with executable permission.)
- g represents groups (g-w will revoke the modification power of members of the group.)
- o represents others (o+r will empower others to read the contents.)
- a represents all (a=r will grant everyone accessing power however it will revoke everyone from write and execution permissions.)
- -c, –change (reports the occurrence of the change.)
Example:
The modification permission represented by character w of groups for a file named “file.txt” can be revoked using the command:
chmod g-w file.txt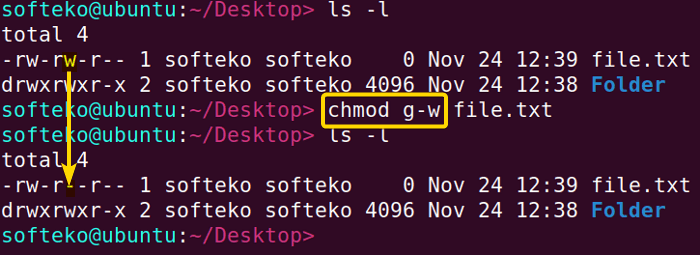 Now, for the directory named “Folder”, we want that everyone only is able to read the file. This can simply be done by using the command:
chmod a=r Folder/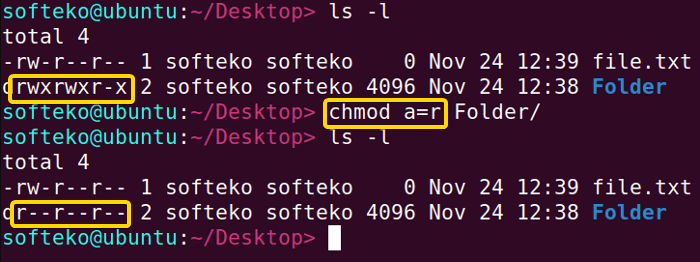
19. chown Command
The chown (change owner) command can be used to alter the owner of system files & directories.
Synopsis:

Options:
- -c, –change (reports the occurrence of the change.)
- -R, –recursive (operates recursively on the desired files & directories)
Example:
We want to change the ownership of a directory named “Folder”. It can be easily done using the chown command. However, we need to use sudo as a prefix of chown as only the root user has permission to do so.
sudo chown sowad Folder/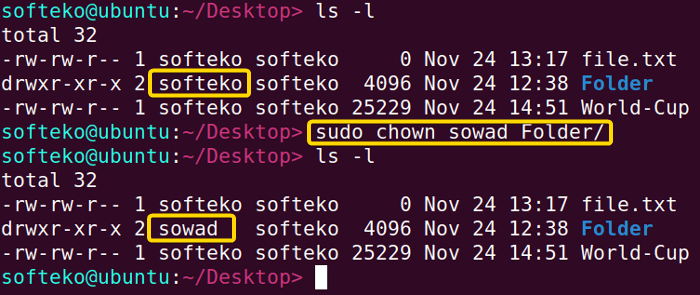
20. echo Command
The echo common is one of the simplest commands, it prints whatever we give to it.
Synopsis:

Example:
Let’s print “whatever we want!”. Let’s print today’s date. However, if we feed ‘date’ to echo it will just literally print ‘date’ so we have to use special syntax $(command).
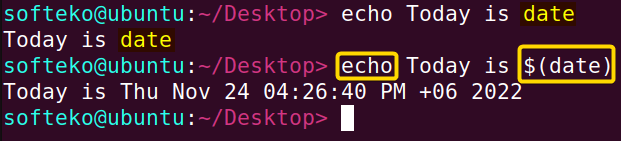
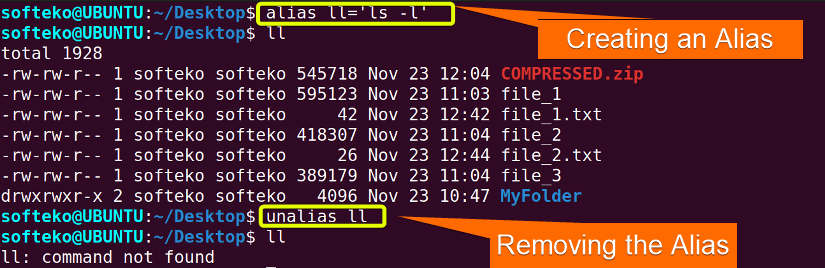
21. alias Command
The alias command can be used to replace a command with user-modified instructions while running the command.
Synopsis:
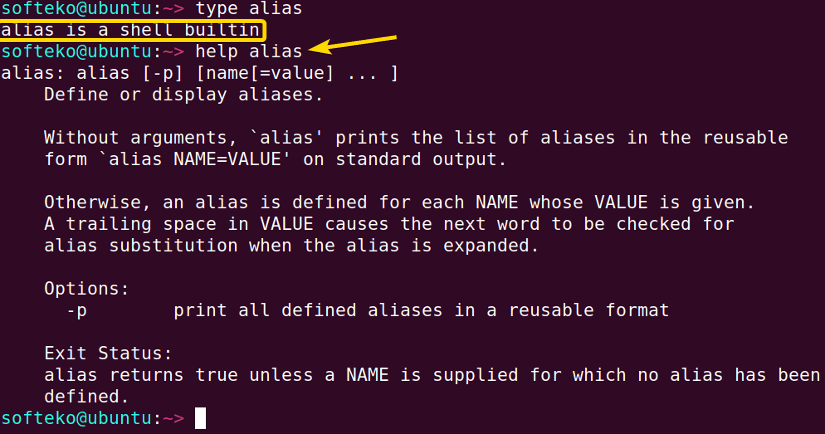
help command can be used here.Example:
If we want to remove directories/files with the rm command while adding a confirmation prompt we need to run rm -ri. Now, we can make just rm sufficient enough to do the task of rm -ri, using the alias command.
alias rm='rm -ri'

rm Folder/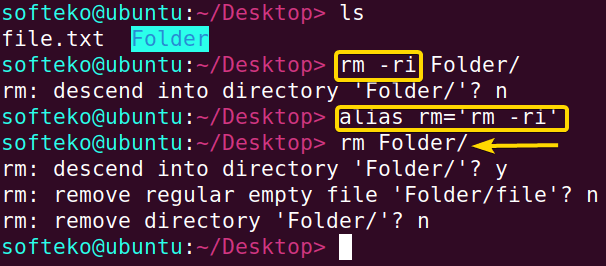
22. passwd Command
The passwd command can be used to change the password of a specific user.
Synopsis:
![]()
Options:
- -d –delete User’s password can be deleted.
- -e –expire Immediately makes the password expire.
- -i –inactive INACTIVE makes the password inactivate after a specific INACTIVATE period.
Example:
We can simply change our password for the current user with passwd command.
23. less Command
The less command is used to display the contents of a file on the terminal screen in page by page manner.
Synopsis:
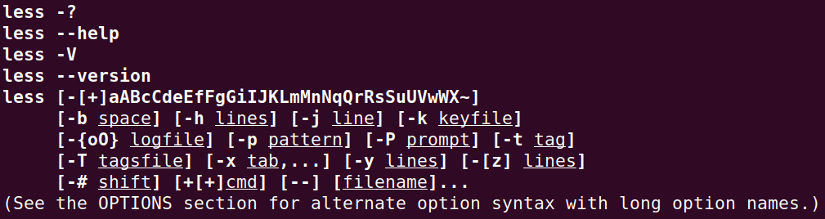
Options:
- -n –line-numbers (when enabled it stops showing line numbers)
- -N –LINE-NUMBERS (displays line numbers at starting points of each line.)
Example:
We want to view the file named “World_Cup” with line numbers. This can be done by using the less -N command.
less -N World-Cup Arrow keys can be used to navigate through the less view.
 Now remember that you have to press q to exit the less display.
24. whoami Command
The whoami command simply displays the currently logged-in user.
Syntax:
whoami [OPTION]...
Example:
The whomai command displays the current user in our case which is softeko.
25. kill Command
Kill is a built-in command that terminates currently running processes. This is a manual command that can forcefully kill a single process or all current processes using the terminal.
Syntax:
kill [options] <pid> [...]
Example:
topThe top command can be referred to as the task manager of Linux. It shows information regarding CPU and memory optimization.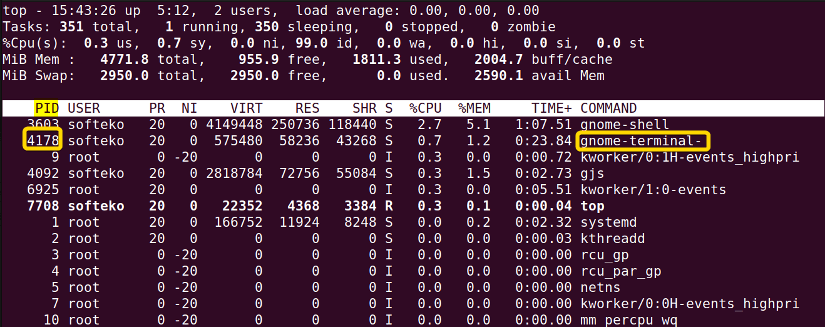 The process ID(PID) of the terminal is 4178 in this case. Now using the kill command with the PID of the terminal as its argument we can close the terminal.
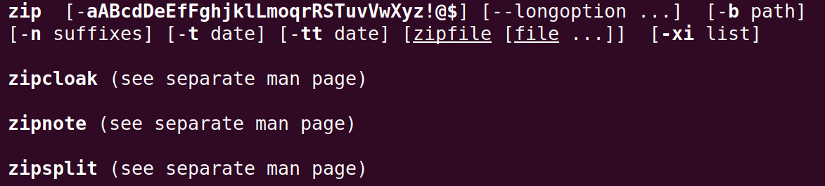
kill 417826. zip Command
zip command is used to compress files or folders into a .zip file in UNIX and UNIX-like operating systems. This allows for reducing the size of files and disk usage. Converting many files, and folders into a .zip file allows sharing and maintaining disk location by reducing file zie without any loss.
Synopsis:
Options:
- -e, –encrypt (encrypt a file with a password that is entered through the prompt)
- -i \*.txt (include the only files with some conditions)
- -m (moves the files into the zip files, deletes the original files after compression)
- -r, –recurse-paths (compression throughout all the files and folders recursively)
- -s, –split-size SIZE (the zip file is split into many different files in a specific size)
Example:
Use zip command to compress a single file.
zip COMPRESSED.zip file_1![]() You can also compress multiple files.
You can also compress multiple files.
zip COMPRESSED.zip file_1 file_2 file_3
 Encrypt a file with a password with -e option.
zip -e COMPRESSED.zip file_1
 We can move the file into a .zip file and delete the original with -m option.
zip -m COMPRESSED.zip file_1
![]()
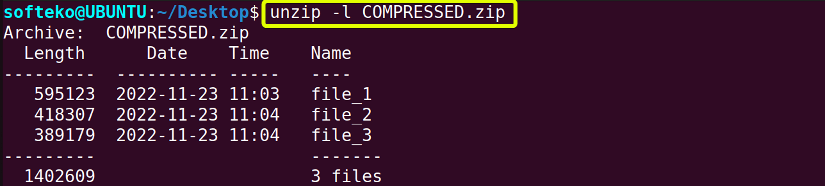
27. unzip Command
unzip command is used to extract files from a .zip file. This command creates a new folder in the current directory where the field inside the zip files is extracted.
Synopsis:

Options:
- -u (update existing files inside the folder and create new ones if required)
- -i (shows the files or folders inside the compressed document)
Example:
To simply extract files from a compressed folder, we use unzip command.
unzip COMPRESSED.zip
 Use
Use -l option to view the files inside the compressed files.
unzip -l COMPRESSED.zip
28. wget Command
wget is a download command that downloads files or webpages non-interactively from the network.
Syntax:
wget [option]... [URL]...
Options:
- -b (downloads a file in the background)
- -c (continues a partially downloaded file)
Example:
To download a webpage, we can use the wget command.
wget www.linuxsimply.com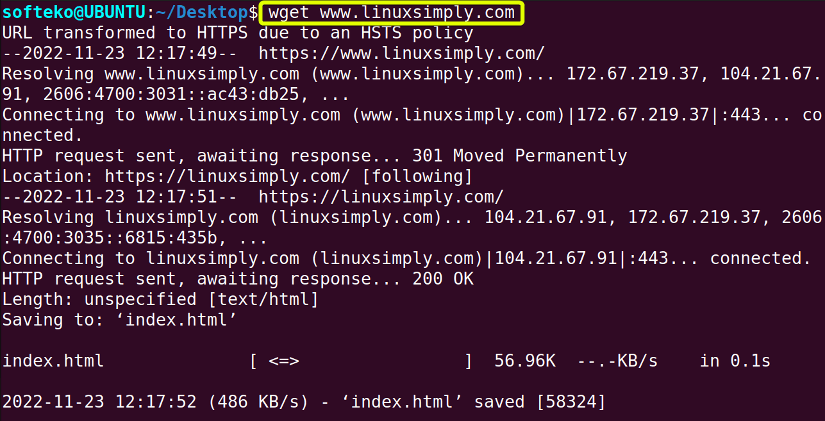 To download a webpage in the background requires
 -b option.
wget -b www.linuxsimply.com
29. df command
df (disk free) command shows the size, used, available space, and mounted on the information of the filesystem.
Syntax:
df [OPTION]... [FILE]...
Options:
- -a, –all (displays all file systems including inaccessible or hidden files)
- -h, –human-readable (displays information in human-readable format)
- -t, –type=file_type (displays files of a certain file type)
- -l, –local (displays local file system)
Example:
Using only df command shows default information.
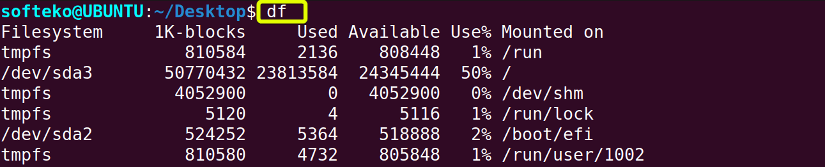 Using
Using df -h shows us the file size in a human-readable format.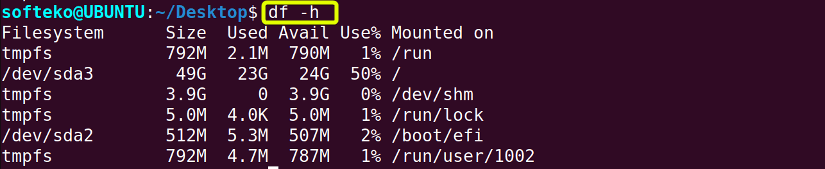 Using df file_name shows information about only the file_name.
df COMPRESSED.zip
30. ping command
ping (Packet Internet Groper) command shows the information about the network information about the host and the server. It can check the internet connection and show the latency between the host and server.
Synopsis:

Options:
- -c COUNT (sends COUNT number of ECHO_REQUEST)
- -i COUNT (sends a packet in every COUNT second interval)
- -f (flood ping with rapid display, sudo permission is needed)
Example:
ping localhostIt finds information about the localhost, exiting the command needed, using ctrl+c.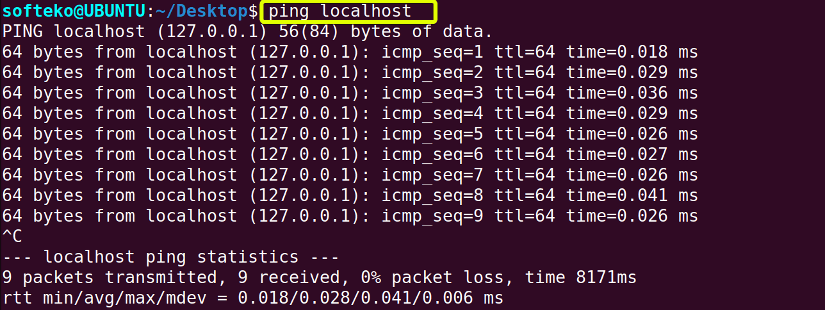 Finds ping information about a website exiting the command needed, using ctrl+c.
ping -c 3 localhost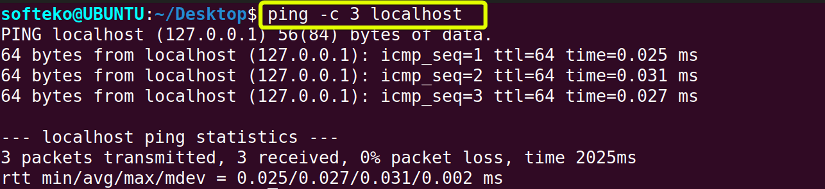 We can add -c NUM option to limit the number of packets using ping.
ping www.linuxsimply.com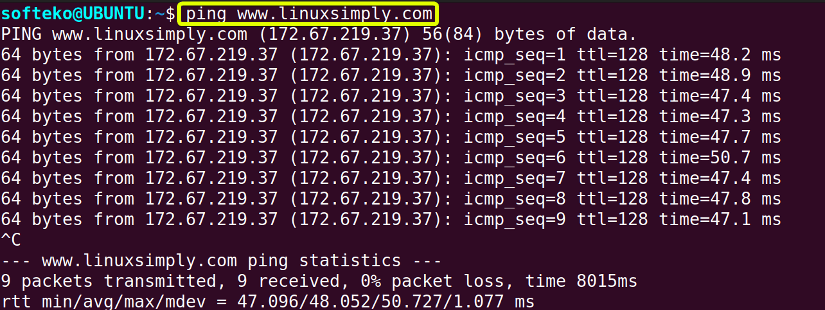
31. diff command
diff command finds checks 2 files and shows the difference between 2 files. Normally, it does not change the content of files, but it can generate a script.
Syntax:
diff [OPTION]... FILES
Options:
- -c (shows the differences between the 2 files in context mode)
- -u, -U, –unified (shows the unified context of the 2 files)
- -r, –recursive (compares files inside any subdirectories)
- -i, –ignore-case (ignore cases)
Example:
diff file_1.txt file_2.txt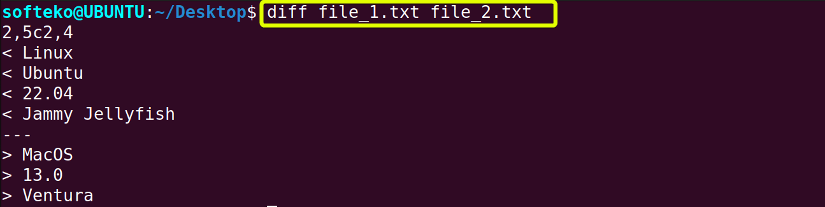 We can use
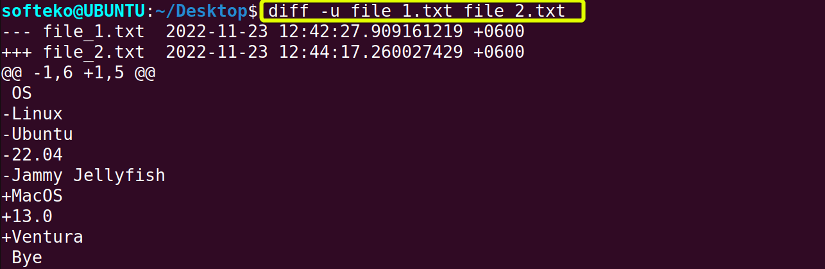
 -u option to see the difference in the unified context of 2 files.
diff -u file_1.txt file_2.txt
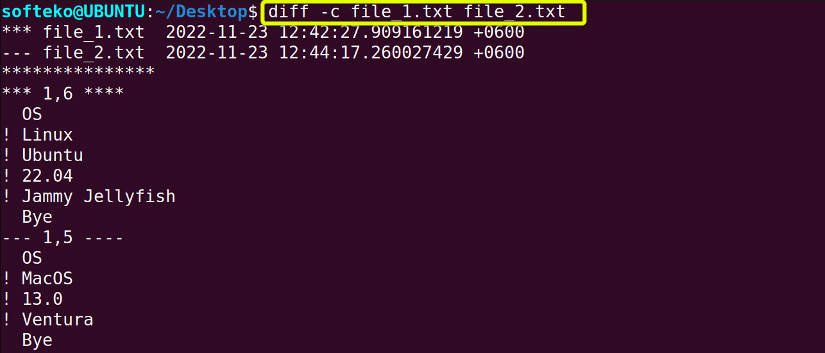
 Option
 -c shows both files in context mode.
diff -c file_1.txt file_2.txt
32. ps command
ps (Process Status) command shows the process status and information about that process.
Syntax:
ps [OPTIONS]
Options:
- -a, –all (shows all the processes including hidden processes)
- -r (shows all the running processes)
- –pid PID (shows the specific process according to PID)
Example:
ps -r Option
 <strong>-a</strong> shows all the processes including hidden processes.
ps -a To look into a specific process,
 --pid command is used.
ps --pid 8794
33. apt command
apt (Advanced Package Tool) command manages different packages including install, remove, update, etc.
Synopsis:

Options:
- apt [install, update, upgrade] (downloads package information and install, update or upgrade the package, sudo permission is required)
- apt full-upgrade ( upgrade all installed packages, even remove some if required)
- apt remove Package_Name (removes a specific package)
- apt autoremove (removes unneeded dependencies)
- apt –only-upgrade install Package_Name (installs or upgrades a specific package)
Example:
sudo apt update command updates all packages.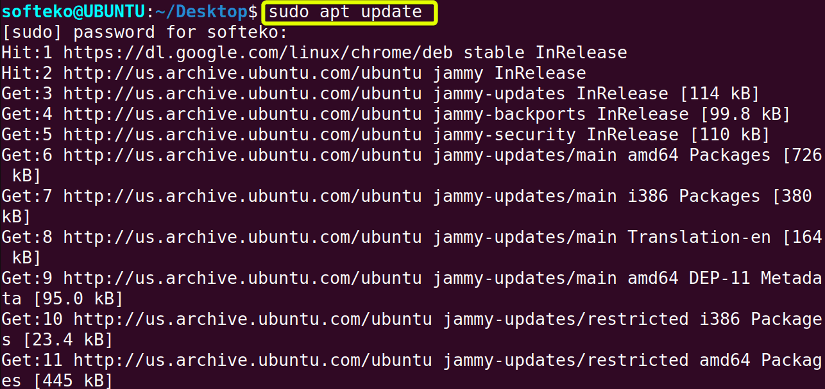 You can use
 sudo apt upgrade command to upgrade all available packages.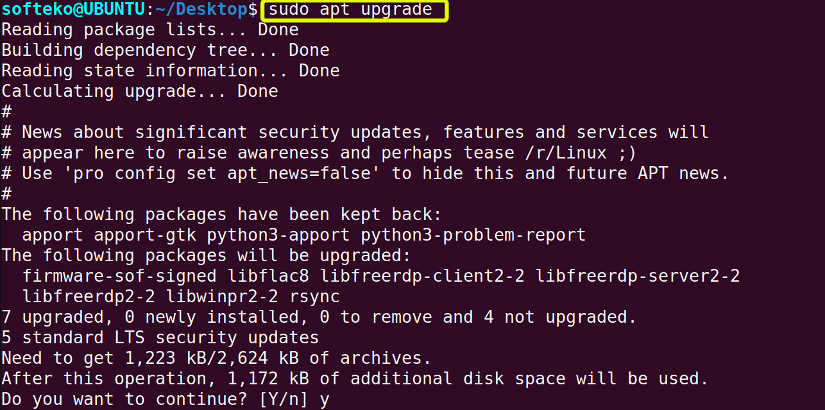 The autoremove option removes all unneeded dependencies.
sudo apt autoremove The
The --only-upgrade <Package_name> option updates a specific package.
sudo apt --only-upgrade install google-chrome-stable
34. dd command
dd command converts and copies a file to another directory. This command can be used to create a backup inside the hard drive or an external hard drive.
Syntax:
dd [OPERAND]...
dd OPTION
Options:
- if (read the file instead of standard input)
- of (write the file instead of standard output)
Example:
sudo dd if=/dev/sda of=~/backup.imgThis command is used to back up a folder into another directory as backup.img file

35. top command
top (Table Of Processes) command shows the currently running process inside Linux. It gives a dynamic but not interactive view of the process.
Synopsis:

Options:
- -n NUM (shows the top NUM number of processes)
- -u PARAS (shows the processes according to PID or User as given as PARAS)
- -d TIME (shows a dynamic view which updates in TIME tenth of seconds)
Example:
Simply running top shows the processes dynamically.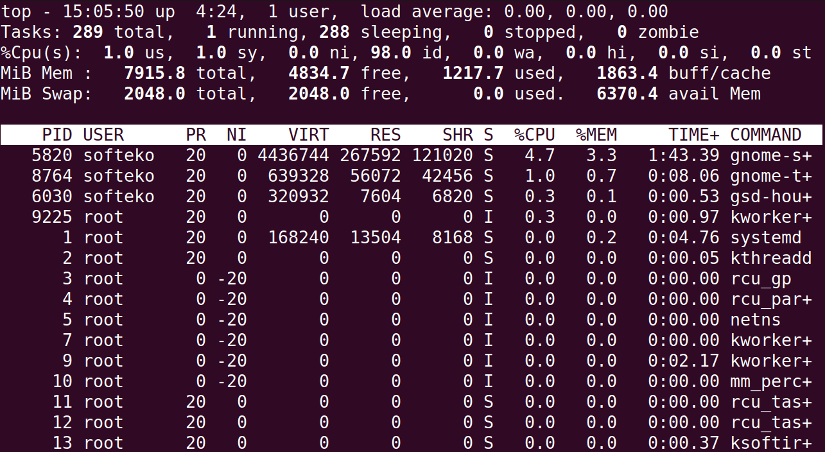 We can use option
 -n 10 to find the top 10 running processes according to CPU usage.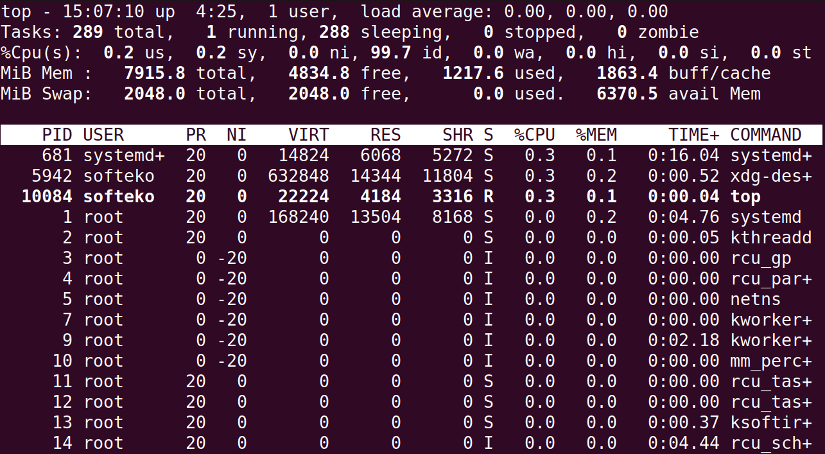
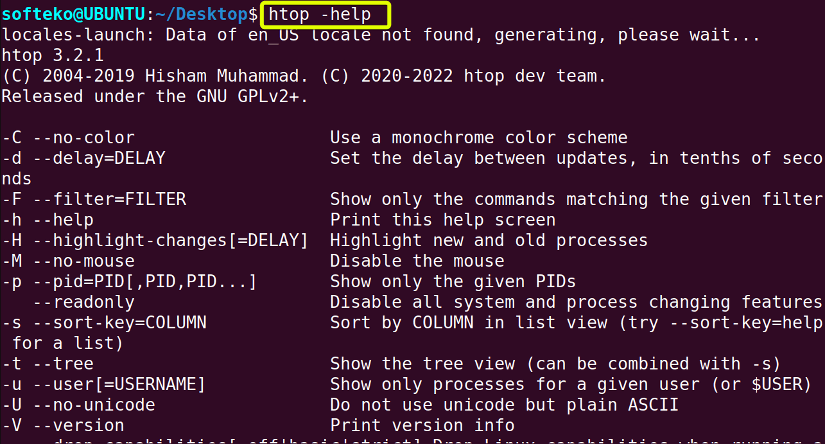
36. htop command
htop process is quite similar to the top process but in htop, the user can have interactive control over the top running processes in Linux. htop may need to be installed in the terminal first for usage.
Synopsis:
There is no manual page for htop, but help, there are different commands and options shown. But before using this command, htop command maye need to be installed using sudo snap install command.![]()
Example:
Simply running htop shows the prompt where each process can be analyzed interactively.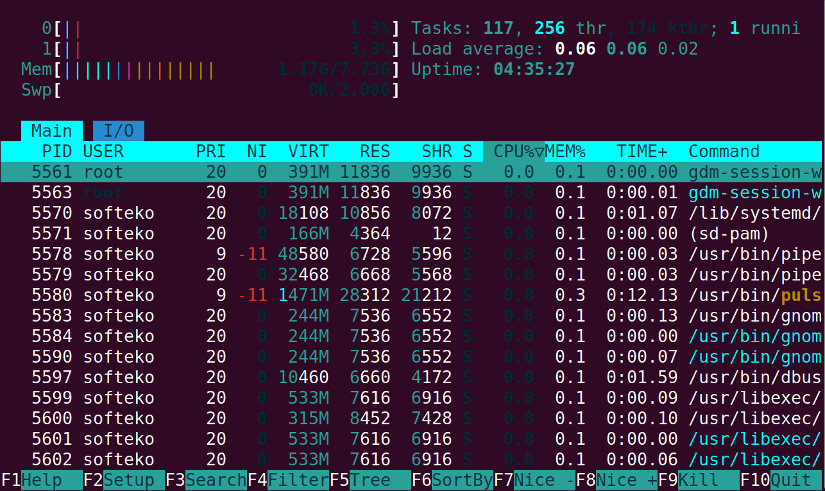
37. useradd command
useradd command is used to add a user to the Linux system. sudo command is needed to create a new user. The superuser sudo command is required to use this command.
Syntax:
useradd [options] LOGIN
useradd -D
useradd -D [options]
Options:
- -d DIRECTORY USER_NAME (creates a user in DIRECTORY)
- -u, –uid ID (creates a user with the user id of ID)
- -g –gid ID (creates a user with a group id of ID)
- -M USER (creates a USER without any home directory)
- -e DATE USER (creates a USER with an expiry DATE)
Example:
Creating a simple user is possible with useradd command.
sudo useradd linuxsimply![]() Option -d creates a user inside a specific directory.
Option -d creates a user inside a specific directory.
sudo useradd -d ~/home/softeko_LS We can also use
 -u NUM to create a user with a specific user id as NUM.
sudo useradd -u 999 LinuxSimply![]()
38. unalias command
unalias command removes alias created before.
Options:
- -a (removes all alias)
Example:
Removes an alias can be done using unalias command.
 Removing all alias requires using
 -a option.
unalias -a![]()
39. uname command
uname command shows information about the system. Without any option it prints Linux.
Syntax:
uname [OPTION]...
Options:
- -a (displays all information about the system)
- -o (displays the operating system name)
- -s (displays the kernel name)
- -p (displays the processor type)
Example:
Option -s displays kernel name.
uname -s Option
 -o displays the operating system name.
uname -o
 We can use
 -a to display all information about the system.
uname -a

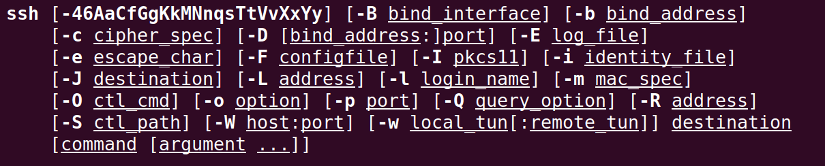
40. ssh command
ssh (Secured Shell) command is used for securely connecting to a remote server.
Synopsis:
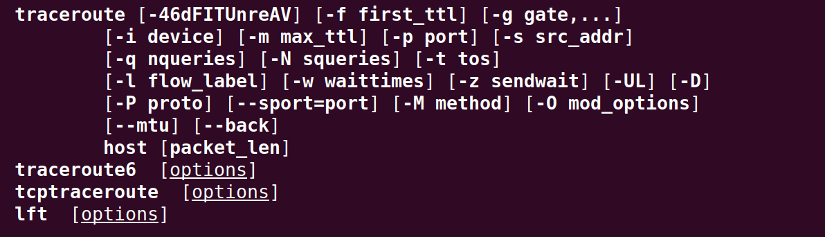
41. traceroute command
traceroute command displays the packet route to reach the host. This command can be used to see the different hops or routes it takes to connect with a particular hostname.
Synopsis:
Options:
- -g Host_name (Routing the packet through a gate or IP address)
- -m Host_name (Fixing the maximum number of packets)
Example:
Simply typing traceroute shows the maximum number of hops and the routes.
traceroute www.linuxsimply.com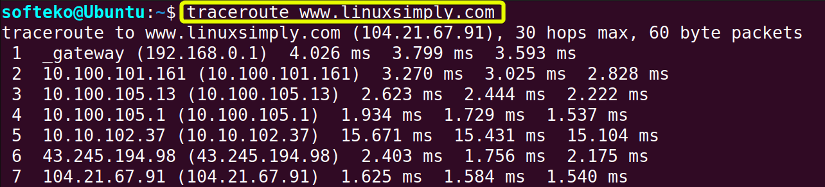 To fix a gate for routing
 -g option is used.
traceroute -g 192.168.43.45 google.com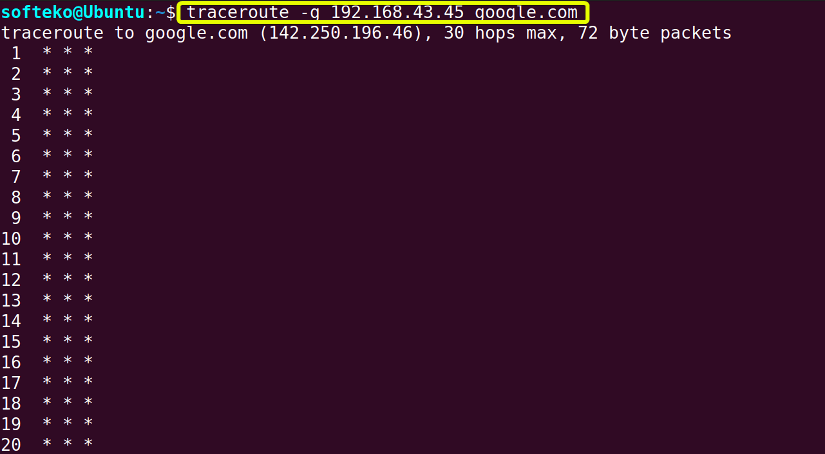 To fix the maximum number of hops,
 -m option is used.
traceroute -m 5 google.com
42. groups command
Groups are used to manage multiple users and permissions. Several users can be members of a group and then the group can have permission for some files or folders to manage permissions.
Syntax:
groups [OPTION]... [USERNAME]...
Example:
Simply typing groups will display all the available groups in the machine. We can use
 id command to find the group’s id.
id softeko
43. shutdown command
shutdown command is used to shut down the system with some conditions. This command can schedule a shutdown at a specific time or cancel an already scheduled shutdown. The superuser sudo permission is required for this command.
Syntax:
shutdown [OPTIONS...] [TIME] [WALL...]
Options:
- –halt Time/Delay (Schedule a shutdown at a specific time or after a certain delay)
- -c (Cancel any shutdown command scheduled beforehand)
- -r Time/Delay (Schedule a restart at a specific Time or after a certain Delay)
Example:
Option --halt can schedule a shutdown at 2:00 PM. The display will also show the date and the region.
sudo shutdown --halt 14:00 We can also schedule a shutdown after a 5 minutes delay –halt option.
sudo shutdown --halt +5
 Option
 -c cancels a shutdown.
sudo shutdown -c
![]()
44. exit command
The exit command exits the terminal. It is a shell command, which means it doesn’t have any man page.
Synopsis:

Example:
exit command terminates or exits a terminal. Now that terminal is not available anymore.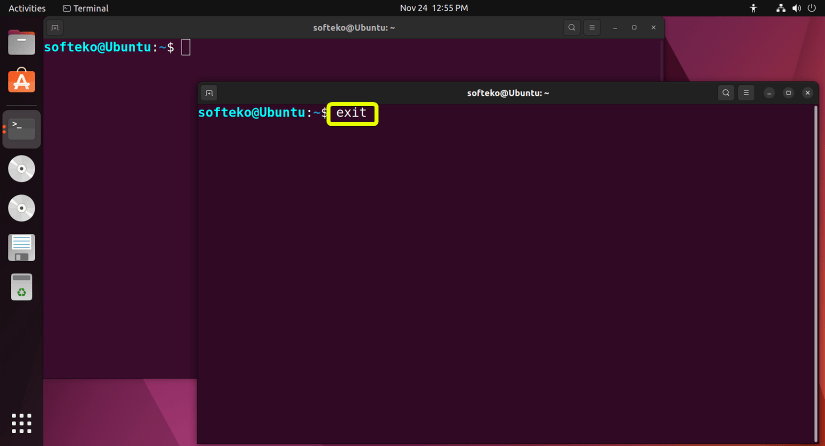
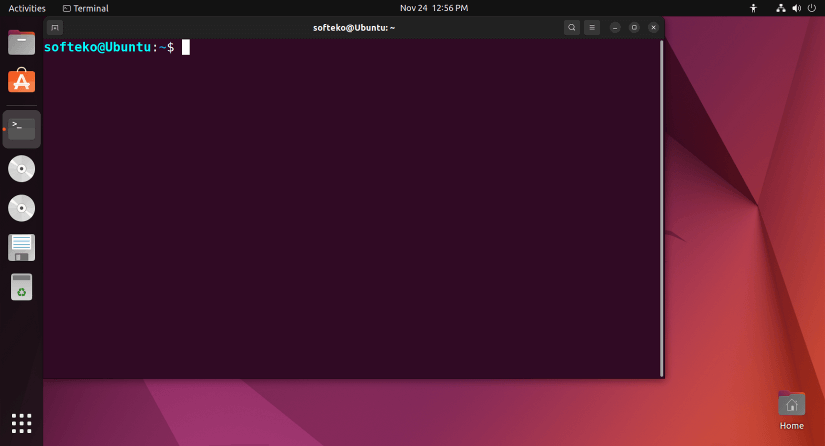 The command exit is also used to exit a script. First, a demo script is created and
 exit 0 is present at the end. Create a demo script using:
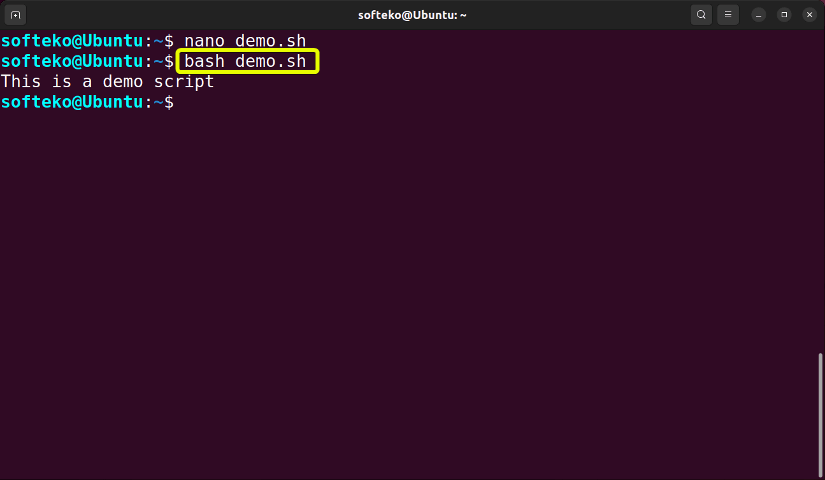
nano demo.sh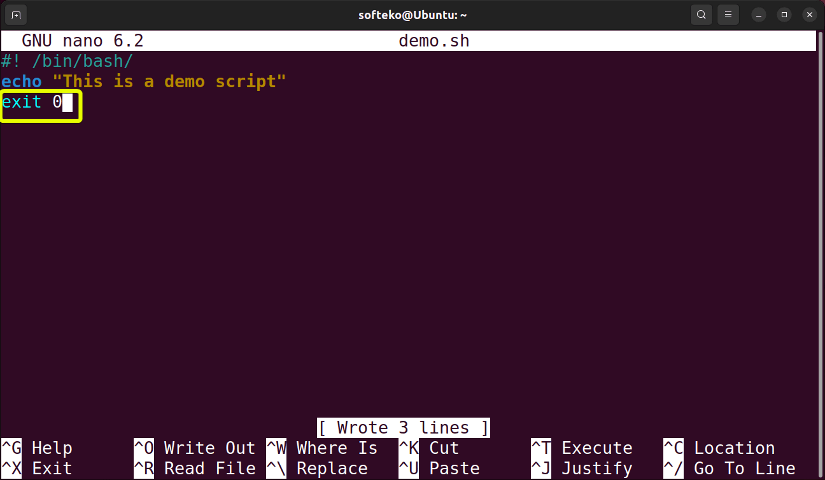 Now running the script using
 bash command, the script will exit at the end.
45. wc command
wc (Word count) command is used to count the number of characters or the number of lines in a file.
Synopsis:
wc [OPTION]... [FILE]...
wc [OPTION]... --files0-from=F
Options:
- -l File.txt (shows the number of lines)
- -w File.txt (shows the number of words)
- -c File.txt (shows the number of characters)
Example:
Run wc <filename> shows the line, word, and character count of the file.
 Using
Using -l option shows the number of lines of that file.
wc -l Frankenstein.txt![]() Using -w option shows the number of words in that file.
Using -w option shows the number of words in that file.
wc -w Frankenstein.txt![]() Using -c options shows the number of characters in the file.
Using -c options shows the number of characters in the file.
wc -c Frankenstein.txt
![]()
46. sort command
sort command sorts the content inside a file and shows it in the display. By default sort command sort alphabetically. But different conditions can be applied for flexibility.
Synopsis:
sort [OPTION]... [FILE]...
sort [OPTION]... --files0-from=F
Options:
- -o Main_file Sorted_File (sort and create a new sorted file)
- -r, –reverse File (sort in reverse order for a specific line, sort in horizontal order)
- -n, –numeric-sort File (sort in numeric order)
- -kNUM (sort by using a key NUM, sorting by NUM column is possible using this option)
Example:
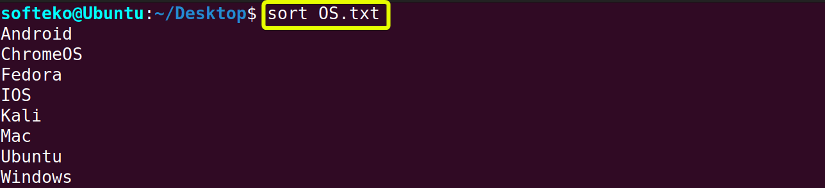
Simply running this command sorts the contents inside a file alphabetically.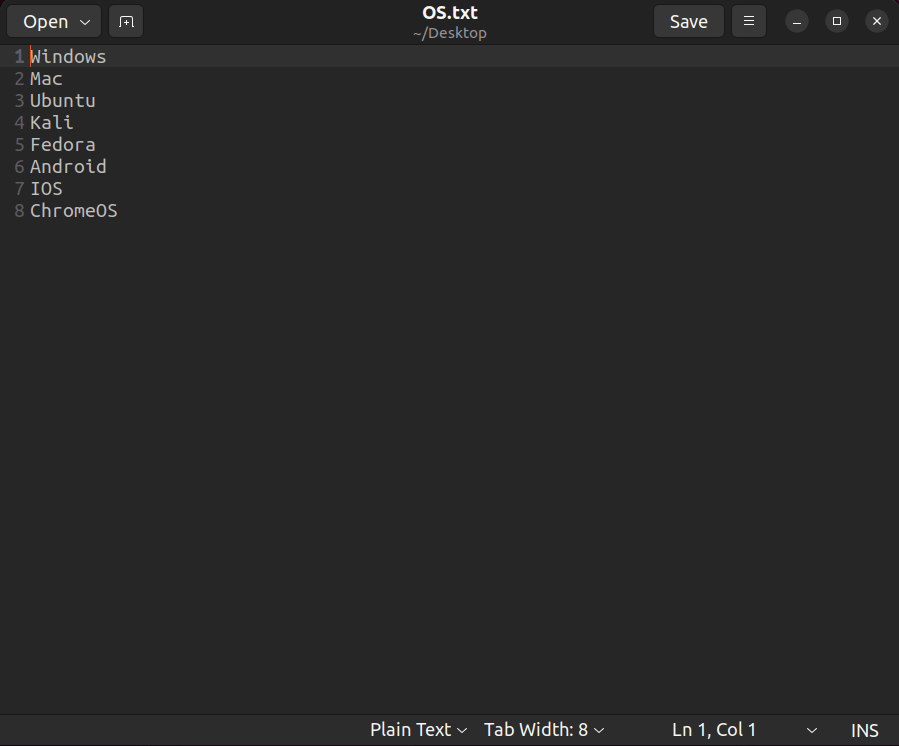
 We can use the
 -o command to sort the content inside a file and create a new sorted file.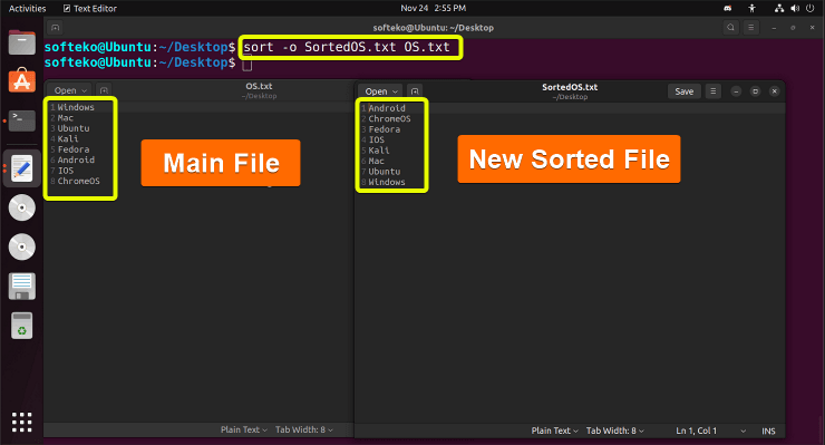
-nk3 option sorts the using the third column numerically.
sort -nk3 purchases.txt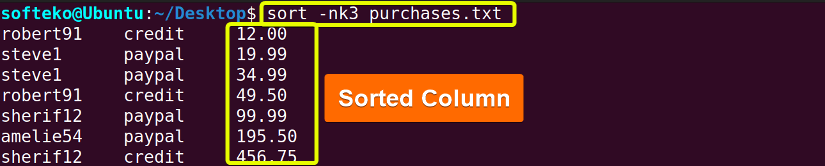
47. cal command
cal command stands for the calendar. It shows calendars in many different formats according to the condition.
Synopsis:

Options:
- -y (shows the whole calendar of the current year)
- cal MM YYYY (shows the calendar of the MM month of YYYY year)
- cal YYYY (shows the calendar of the YYYY year)
- -j (shows the Julian calendar)
Example:
Simply typing cal shows the current month’s calendar.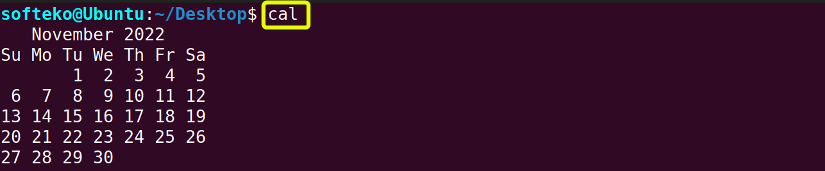 Using
Using cal -y command shows the whole year calendar.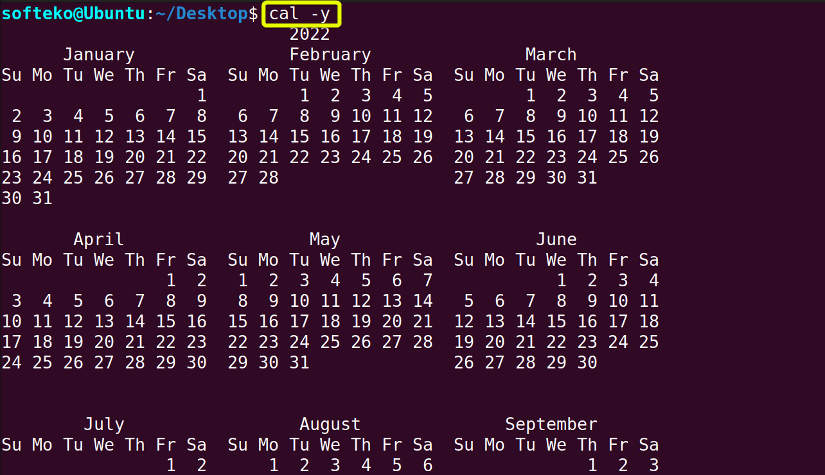 Typing the month MM and year YYYY shows the calendar of that specific month of a year.
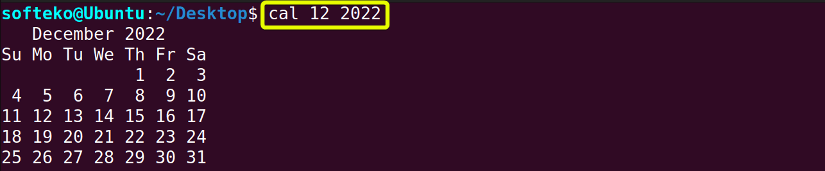 Using
Using <strong>-3 </strong>option shows the calendar of the current, previous, and next month.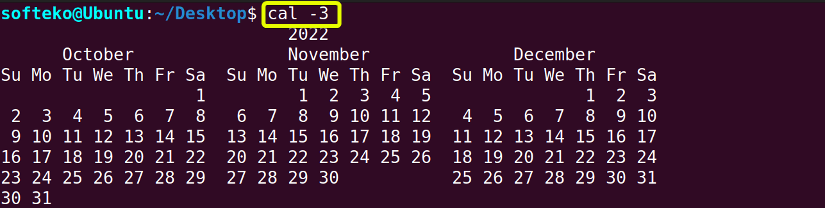 Using
Using cal -j command shows the calendar of the current month in Julian format.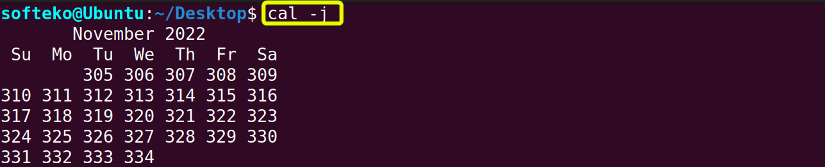
48. nano command
Nano is another text editor. It is a simple and intuitive text editor that has many different shortcuts and is very light. It comes with the basic Ubuntu install.
Synopsis:
Example:
Use nano <filename> to create and open a file with nano.
 Many shortcuts of nano are available at the bottom of the terminal.
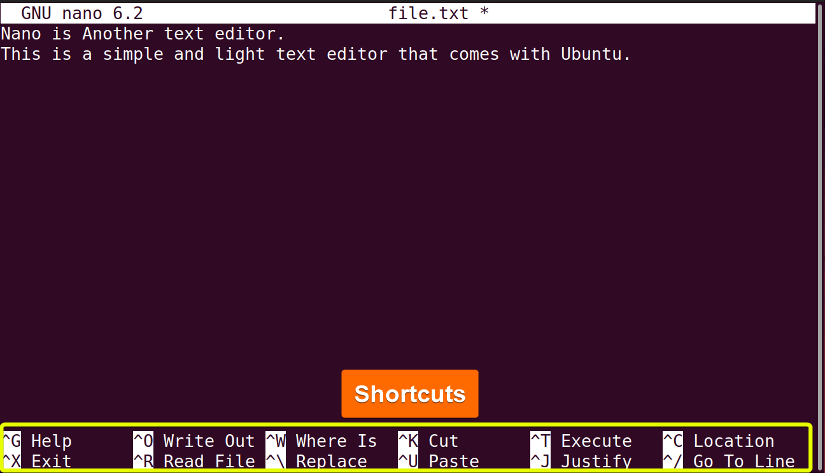
49. du command
du command means disk usage. Using this command the total usage of the disk and the disk usage of the different files are shown in the terminal.
Synopsis:
du [OPTION]... [FILE]...
du [OPTION]... --files0-from=F
Options:
- -a (shows the total disk usage)
- -ah (shows all files disk usage)
- –time (shows the last modification time)
Example:
du displays the disk usage of the current directory.
du -a can be used to find disk usage of individual files inside the current directory.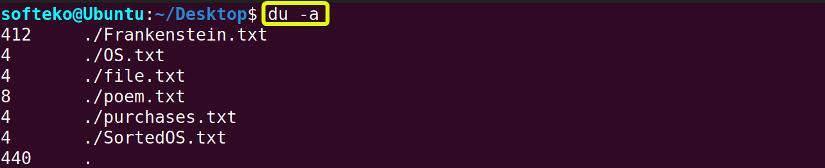
du -ah shows all individual files’ disk usage in a human-readable format.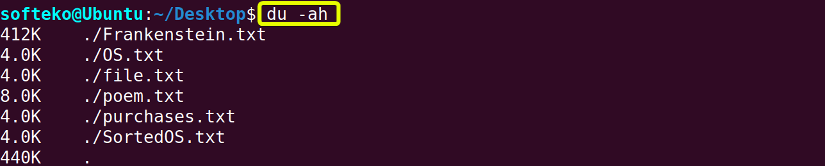
du --time shows the last modification of the directory.
50. apt-get command
apt-get command is quite similar to the apt command. But in apt-get common is generally used in the back-end and has backward compatibility. The apt-get (Advanced Packaging Tool) command is used for retrieving the package and managing (install, upgrade, update, remove) the package.
Synopsis:
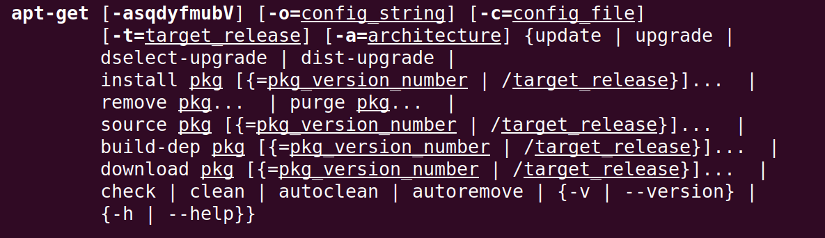
Options:
apt-get [install, update, upgrade, remove] (retrieve the package and install, update, upgrade or remove the package from the system)
- –download-only (downloads a package without installing or updating)
- –autoremove, –auto-remove (removes unnecessary packages from the system)
- –version (shows the version)
Example:
We can use update command to update packages in the system.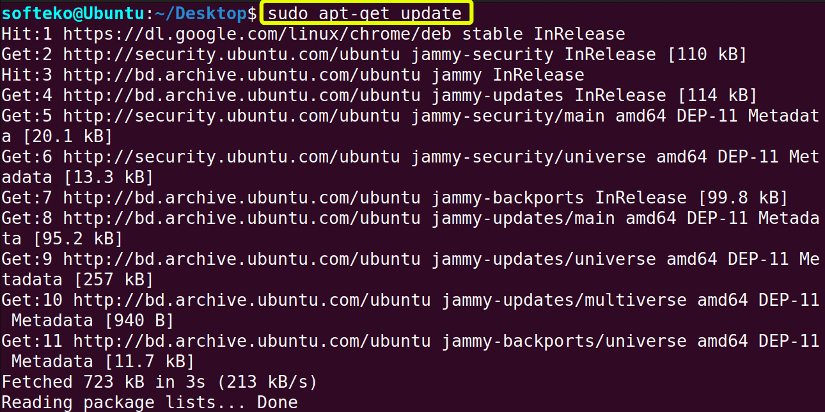 Option
 autoremove removes unnecessary packages from the system.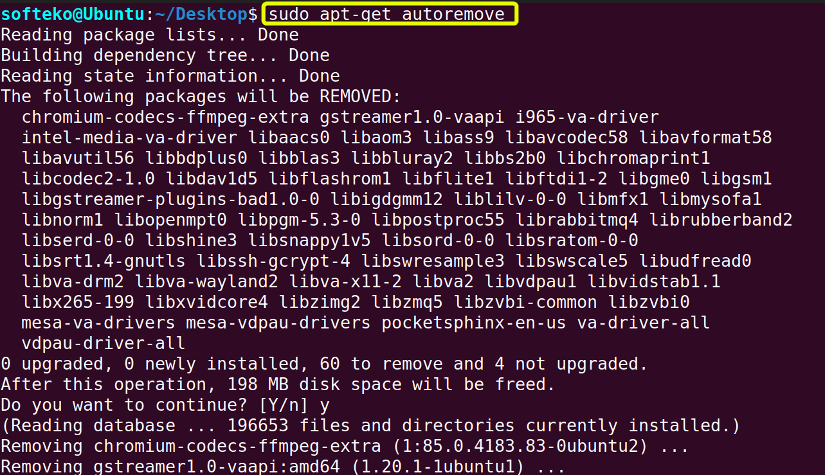 Option
 --version shows the version of the apt-get. Moreover, this option is available for many other commands.
Conclusion
In this article, I have covered the 50 most used Linux commands that a regular user will encounter most of the time. Of course, there are many more of these commands and each of these commands has many more options and functionality available for the user.
You don’t need to memorize every one of them and a free pdf document is available that covers all these commands.
FUNDAMENTALS A Complete Guide for Beginners


