The ping (Packet Internet Groper) command in Linux lets the user check the internet connectivity. This is widely used to find out the network and its latency. Users frequently check the internet quality with this command. In this article, I’ll discuss the ping command and its different examples.
A. Description
The ping command shows the connection latency between the host and servers. The ping command takes a URL, and IP address as arguments and shows the latency between the local machine and the server.
B. Syntax
The syntax of the ping command may look a bit difficult, as there are many options available. But actually, it’s not that difficult if you try it out.
Here is the syntax available for the ping command.

C. Options
There are many options available for the ping command in Linux. You may need different options for different purposes to use this command.
You can use the man command to display the manual page of the ping command.
man pingUseful Options
- -c COUNT (Limits Ping requests for packets after COUNT number)
- -T (Timestamp option)
- -w (Limits the total time)
- -D (Print timestamps before each line)
- -f (Floods the network with packets)
- -i (Fixes the interval between each packet sent)
- -q (Quiet an output, that means nothing is shown in the command line)
- -s (Fixes the packet size sent)
- -v (Provides verbose information)
- -4 (Use IPv4 only)
- -6 (Use IPv6 only)
Practical Examples of the “ping” Command in Linux
There are many practical uses of the ping command in Linux. Here you will find some of the most used examples of the ping command.
Example 1: Display the Localhost Latency
You can show the localhost latency using the ping command. The syntax is also really easy. Follow the steps below to try it out.
Steps to Follow >
➊ Open the Terminal in the Home directory.
➋ Type any of the following commands in the command line to show the latency of the local host.
ping localhostOR,
ping 0OR,
ping 127.0.0.1➌ Press the ENTER key to view the output.
❹ Now, press the CTRL+C key to exit the command.
Output >
As you can see in the image below the output for the command is shown and pressing CTRL+C exits the command.

Similar Readings
- The “ifconfig” Command in Linux [6+ Practical Examples]
- The “iptables” Command in Linux [6 Practical Examples]
- The “netstat” Command in Linux [22 Practical Examples]
- The “nslookup” Command in Linux [12 Practical Examples]
Example 2: Display the Latency of a Website Using the “ping” Command in Linux
The ping command can be used to view the latency with a remote website. The syntax is also quite similar to the syntax of localhost. The general syntax is shown below.
ping URLYou can try the following steps to try this example.
Steps to Follow >
➊ Open the Terminal in the Home directory.
➋ Type any of the following commands in the command line to show the latency of a remote website.
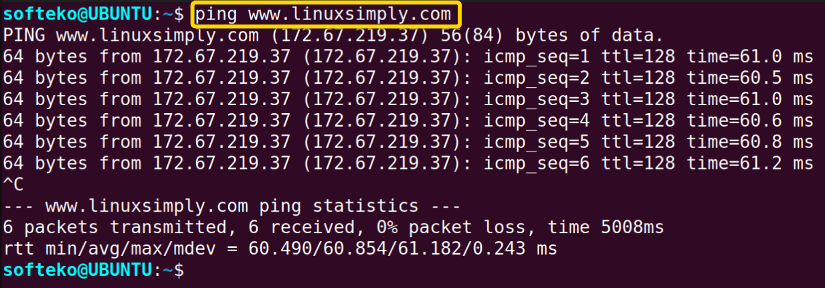
ping www.linuxsimply.com➌ Press the ENTER key to view the output.
❹ Now, press the CTRL+C key to exit the command.
Output >
As you can see in the image below the output for the command is shown and pressing CTRL+C exits the command.
Example 3: Limiting the Ping Requests/Packets
You can limit the number of ping requests or packets using the -c option. The general syntax is in the following.
ping -c NUM URLYou can try the following steps to try this example.
Steps to Follow >
➊ Open the Terminal in the Home directory.
➋ Type any of the following commands in the command line to limit the number of packets.
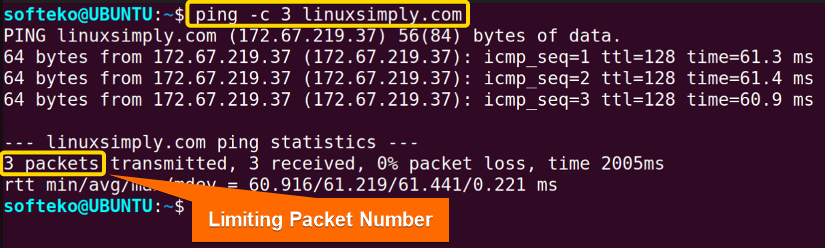
ping -c 3 linuxsimply.com➌ Press the ENTER key.
Output >
In the Command line, you will find the command stop after the 3 requests or packets of data is transferred.
Example 4: Setting the Interval of Packets Using the “ping” Command in Linux
You may want to keep an interval for every packet sent or received. To do that you need to set an interval using the -i option. The general syntax is as follows.
ping -i NUM URLYou can try the steps below to try it out.
Steps to Follow >
➊ Open the Terminal in the Home directory.
➋ Type any of the following commands in the command line to show fix the interval of packets.
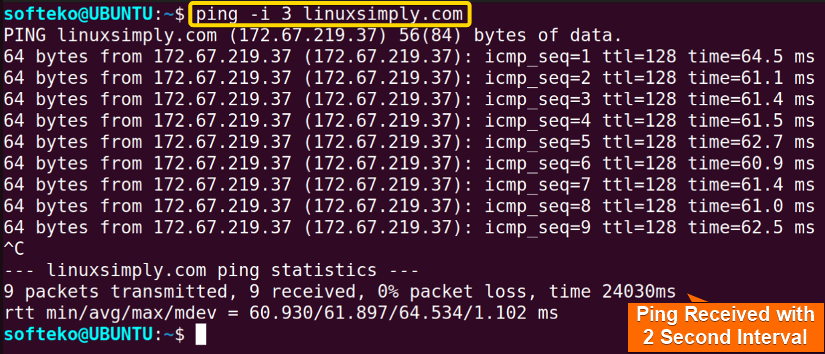
ping -i 3 linuxsimply.com➌ Press the ENTER key to view the output.
❹ Now, press the CTRL+C key to exit the command.
Output >
As you can see in the image below the output for the command is shown and pressing CTRL+C exits the command.
Example 5: Limit the Total Time of Sending Packets Using the “ping” Command
You can also limit the total time of ping requests or packets using the -w option. The general syntax is in the following.
ping -w NUM URLYou can try it out by following the steps below.
Steps to Follow >
➊ Open the Terminal in the Home directory.
➋ Type the following command in the command line to limit the total time to 9 seconds.
ping -w 9 linuxsimply.com➌ Press the ENTER key.
Output >
As you can see the command exits after the 9-second run time.

Example 6: Show the Timestamps While Using the “ping” Command in Linux
Sometimes, you may want to see the timestamps of the packets while using the ping command. To do that, you need to use the -D option of the ping command.
You have to follow the steps to try it.
Steps to Follow >
➊ Open the Terminal in the Home directory.
➋ Type the following command in the command line to show the timesteps of packets.
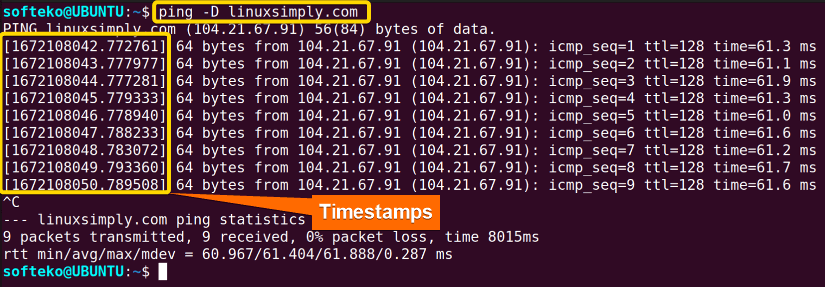
ping -D linuxsimply.com➌ Press the ENTER key to view the output.
❹ Now, press the CTRL+C key to exit the command.
Output >
In the Command line, you will find the timestamps of every packet sent.
Similar Readings
- The “ufw” Command in Linux [12+ Practical Examples]
- The “ssh” Command in Linux [18 Practical Examples]
- The “traceroute” Command in Linux [13 Practical Examples]
- The “rsync” Command in Linux [10 Practical Examples]
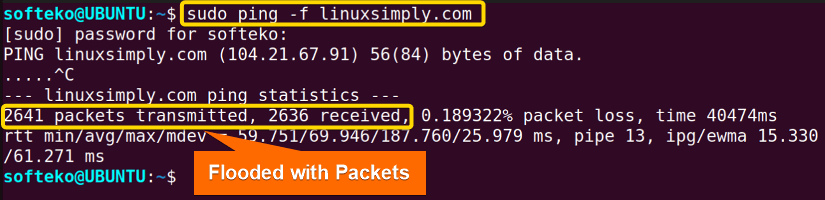
Example 7: Flooding a Host with Packets
Sometimes while checking the performance of a host, you may want to flood the host with massive amounts of packets and see how it handles that. To do that, you need to use the -f option. You also need the superuser’s permission to do that. The general syntax is as follows.
sudo ping -f URLFollow the steps below to try it out.
Steps to Follow >
➊ Open the Terminal in the Home directory.
➋ Type the following command in the command line to flood the host with packets.
sudo ping -f linuxsimply.com➌ Press the ENTER.
❹ Now, press the CTRL+C key to exit the command.
Output >
In the Command line, you will find the timestamps of every packet sent.
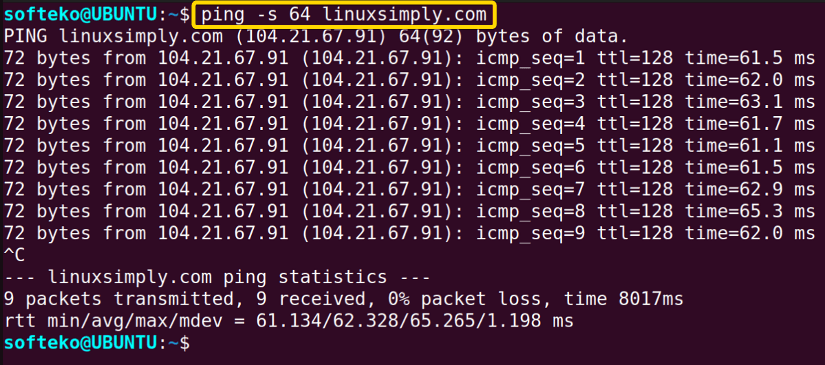
Example 8: Fixing the Packet Size Using the “ping” Command in Linux
You may want to limit the packet size while using the ping command. To do that, you need to use the -s option and specify the size of the pings. Actually, you will get packet sizes a little larger than you specify. The general syntax is as follows.
ping -s SIZE URLFollow the steps below to try it out.
Steps to Follow >
➊ Open the Terminal in the Home directory.
➋ Type the following command in the command line to fix the packet size.
ping -s 64 linuxsimply.com➌ Press the ENTER.
❹ Now, press the CTRL+C key to exit the command.
Output >
In the Command line, you will find the size of every packet sent.
Example 9: Specifying the IP (Internet Protocol)
You can specify the IP you want to use for the ping command using -4 for IPv4 and -6 for IPv6.
You can follow the steps below to try it out.
Steps to Follow >
➊ Open the Terminal in the Home directory.
➋ Type the following command in the command line to specify IPv4.
ping -4 linuxsimply.com➌ Press the ENTER.
❹ Now, press the CTRL+C key to exit the command.
Output >
In the Command line, you will find the packets sent in IPv4 format.

Conclusion
In this article, you have learned about the ping command and its uses with many examples. This command is very important for working with networks and checking network latency and strength. You should try these examples in your own Linux system to get a grasp of the ping command in Linux.
Similar Readings
- The “screen” Command in Linux [13 Practical Examples]
- The “arp” Command in Linux [7 Practical Examples]
- The “ftp” Command in Linux [14 Practical Examples]
- The “host” Command in Linux [10 Practical Examples]
- The “scp” Command in Linux [4 Practical Examples]
- The “sftp” Command in Linux [6 Practical Examples]
FUNDAMENTALS A Complete Guide for Beginners


