The tcpdump command in Linux is a packet sniffing tool that allows users to capture traffic coming to the network. The command captures, filters, and stores network packets for later analysis. In this article, I will demonstrate the frequent applications of the tcpdump command in Linux with practical examples.
A. Description
The tcpdump command in Linux enables users to capture packets and analyze them. It can write and read captured packet data into a .pcap(Packet Capture file) data file. You must run the command as superuser to get access to the network packets.
B. Syntax
The syntax of the tcpdump command in Linux contains single or multiple options and then an expression to match the packets on network traffic.
tcpdump [OPTION]... [EXPRESSION]C. Options
Many useful options are available for the tcpdump command. I have listed some of the most used ones here. However, to learn more about the tcpdump command you can always check the man page.
man tcpdumpUseful Options
- -A: Prints each packet in ASCII format.
- -D: Displays list of available interfaces.
- -c COUNT: Exits after printing COUNT number of packets.
- -i INTERFACE: Displays packets of the specified interface.
- -n: Avoids converting addresses and port numbers into names.
- -r: Reads packets from .pcap files.
- -w: Writes packets into .pcap files.
- -X: Prints each packet in HEX format.
- -XX: Prints each packet in both HEX and ASCII formats.
NB: The options in Linux CLI (Command Line Interface) are all case-sensitive, So be cautious while using them.
Installing the “tcpdump” Command in Linux
Even though most Linux distributions by default have the tcpdump command installed, it may not be readily installed on your machine. You can determine whether you have it on your system by typing the command tcpdump itself.
tcpdumpYour system will print out the following message if you do not have it installed: In this case, don’t be overwhelmed. You can easily install the tcpdump package within a minute by following the instructions given below.
Steps to Follow >
➊ At first, open the Ubuntu Terminal
➋ Type the following in your command prompt:
sudo apt install tcpdump➌ After that, Type your password
➍ Now, press ENTER
Output >
Upon completion of these four steps, tcpdump will be installed on your machine.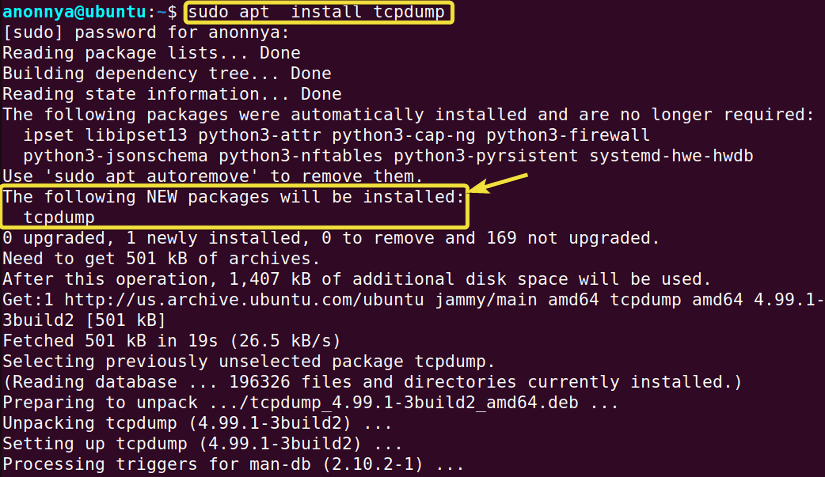
Practical Examples of the “tcpdump” Command in Linux
The tcpdump command in Linux is a command that offers users several packet sniffing features. Some of the most useful applications of the tcpdump command have been illustrated below.
Example 1: Capturing Packets from the Current Network Using the “tcpdump” Command in Linux
You can capture all the packets in the system’s network traffic using the tcpdump command in Linux. However, you will need to run the command using the sudo keyword. In this example, I will capture all the packets in my network. Follow the below instructions to get the same result.
Steps to Follow >
➊ At first, open the Ubuntu Terminal.
➋ Type the following command in the command prompt:
sudo tcpdump➌ Now, press the ENTER button.
Output >
In the image below, you can see that I have displayed the captured packets from my system’s network.
Similar Readings
- The “iptables” Command in Linux [6 Practical Examples]
- The “netstat” Command in Linux [22 Practical Examples]
- The “nslookup” Command in Linux [12 Practical Examples]
- The “ufw” Command in Linux [12+ Practical Examples]
Example 2: Capturing Specified Number of Packets Using the “tcpdump” Command in Linux
You can capture a specified number of packets using the tcpdump command in Linux with the option -c. To do this you will need to mention the number of packets after the -c option. In the example, I will capture only 5 packets from my network traffic. You can do the same by following the steps below.
Steps to Follow >
➊ At first, launch the Ubuntu Terminal.
➋ Type the following command in the command prompt:
sudo tcpdump -c 5➌ Hit the ENTER button.
Output >
In the following image, you can see that I have captured only 5 packets from my network.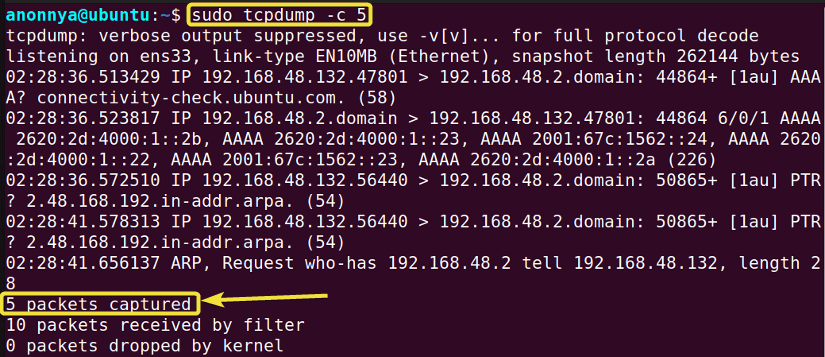
Example 3: Filtering Captured Packets Using the “tcpdump” Command in Linux
You can filter your network traffic depending on various packet attributes such as network interface, network protocol, port number, source and destination IP addresses. The option -i allows you to specify a network interface. You can simply mention a network protocol after the command to filter traffic by the protocol. For extracting packets depending on the port number, source IP address and destination IP address apply the keywords port, src and dst respectively. Follow the below examples to learn about the separate filtering processes.
NOTE: You can use the following command to view the list of available protocols and port numbers on your system.
sudo ss -tulpnCase A: Filtering Packets by Specific Interface Using the “tcpdump” Command in Linux
To filter packets by specified interface follow the steps below.
Steps to Follow >
➊ At first, open the Ubuntu Terminal.
➋ Type the following command in the command prompt:
sudo tcpdump -i ens33➌ Now, press the ENTER button.
Output >
In the image below, you can see that I have captured packets only from the specified “ens33” interface.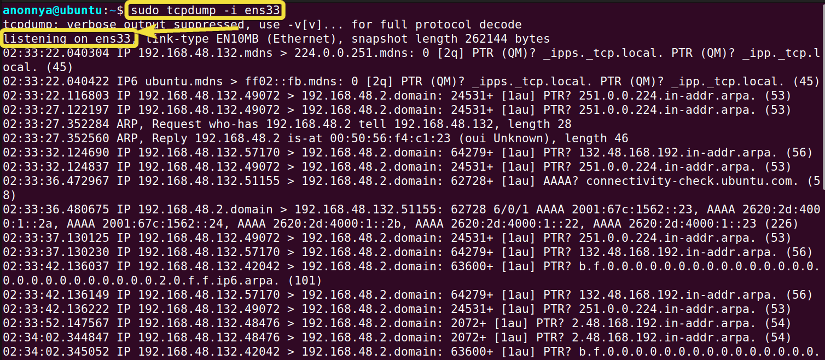
Case B: Filtering Packets by Specific Protocol Using the “tcpdump” Command in Linux
To filter packets by specified protocol follow the given steps.
Steps to Follow >
➊ At first, open the Ubuntu Terminal.
➋ Type the following command in the command prompt:
sudo tcpdump -c 5 tcp➌ Now, press the ENTER button.
Output >
In the given image, you can see that I have captured packets of the specified protocol.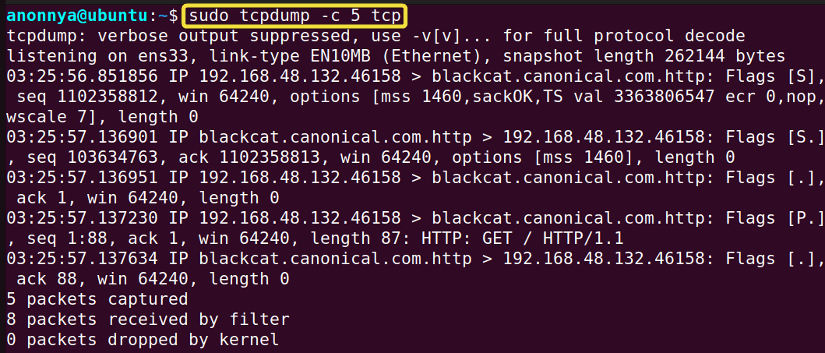
Case C: Filtering Packets by Port Number of a Protocol Using the “tcpdump” Command in Linux
To filter packets by specified port number follow the instructions below.
Steps to Follow >
➊ At first, open the Ubuntu Terminal.
➋ Type the following command in the command prompt:
sudo tcpdump -c 3 port 53➌ Now, press the ENTER button.
Output >
In the following image, you can see that I have captured packets from the specified port number.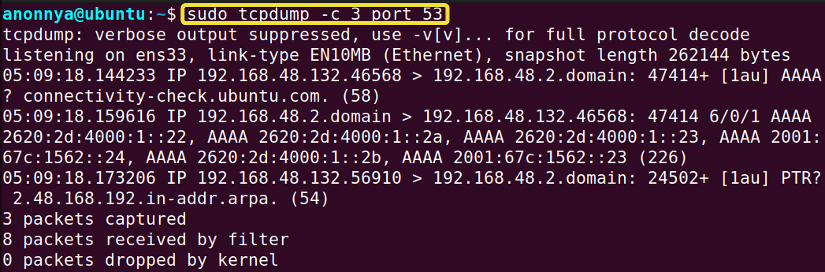
Case D: Filtering Packets by Source IP Address Using the “tcpdump” Command in Linux
To filter packets by source IP address follow the given process.
Steps to Follow >
➊ At first, open the Ubuntu Terminal.
➋ Type the following command in the command prompt:
sudo tcpdump -c 3 src 192.168.48.132➌ Now, press the ENTER button.
Output >
In the image below, you can see that I have filtered packets by their source IP address.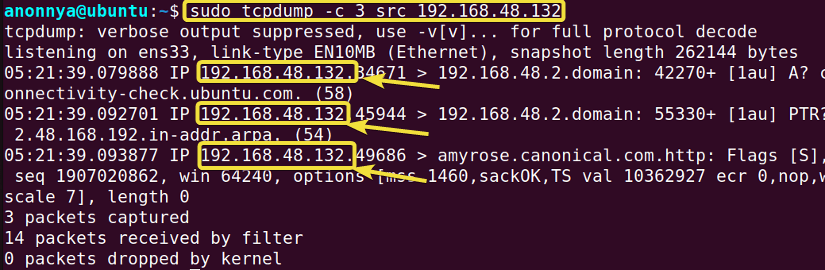
Case E: Filtering Packets by Destination IP Address Using the “tcpdump” Command in Linux
To filter packets by destination IP address follow the steps below.
Steps to Follow >
➊ At first, open the Ubuntu Terminal.
➋ Type the following command in the command prompt:
sudo tcpdump -c 3 dst 192.168.48.2➌ Now, press the ENTER button.
Output >
In the following, you can see that I have filtered packets by their destination IP address.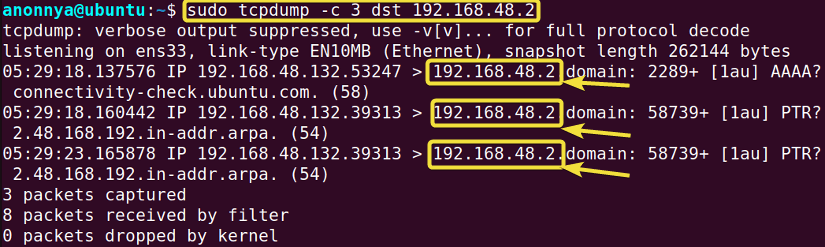
Example 4: Writing and Reading Captured Packet Files Using the “tcpdump” Command in Linux
You can write captured packets to a .pcap file and later read from it using the tcpdump command in Linux. For writing, you will need to use the option -w and for reading the option -r. After both options, you will need to specify the filename. In this example, I will write the captured packets into a file named “packets.pcap” and then read the packets from this file. To do so follow the steps given below.
Steps to Follow >
➊ At first, open the Ubuntu Terminal.
➋ To write captured packets, type the following command in the command prompt:
sudo tcpdump -c 5 -w packets.pcap➌ Now, press the ENTER button.
❹ Read captured packets from the file by typing the following command in the command line:
sudo tcpdump -r packets.pcap❺ Again hit the ENTER button.
Output >
In the given image, you can see that at first I wrote the packets into the “packets.pcap” file. Then, I displayed the packets from this file.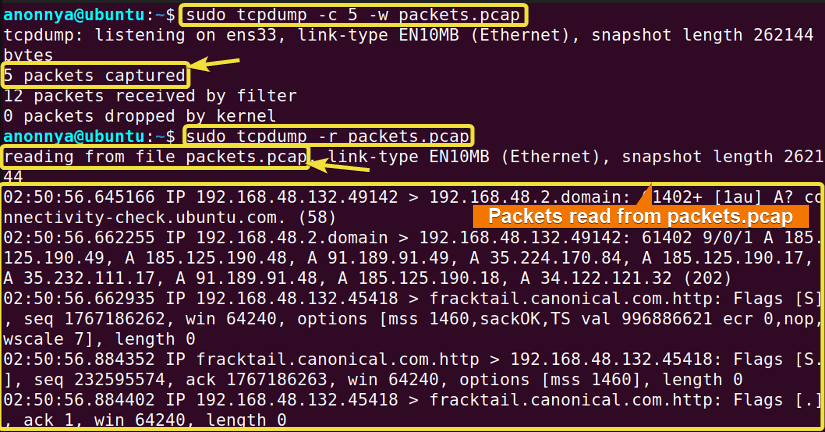
Similar Readings
- The “ftp” Command in Linux [14 Practical Examples]
- The “host” Command in Linux [10 Practical Examples]
- The “scp” Command in Linux [4 Practical Examples]
- The “sftp” Command in Linux [6 Practical Examples]
Example 5: Displaying Captured Packets in HEX and ASCII Format Using the “tcpdump” Command in Linux
You can display the captured packets in HEX and ASCII format using the tcpdump command in Linux. The -A option will print the packets in ASCII format whereas the -XX option prints packets in both HEX and ASCII format. Follow the examples below to learn about these options’ separate applications.
Case A: Converting Captured Packets into ASCII Format Using the “tcpdump” Command in Linux
Follow the instructions below to display captured packets in ASCII format.
Steps to Follow >
➊ Launch the Ubuntu Terminal.
➋ Type the following command in the command prompt:
sudo tcpdump -c 5 -A➌ Hit ENTER.
Output >
In the following image, you can see that I have displayed the captured packets in ASCII format.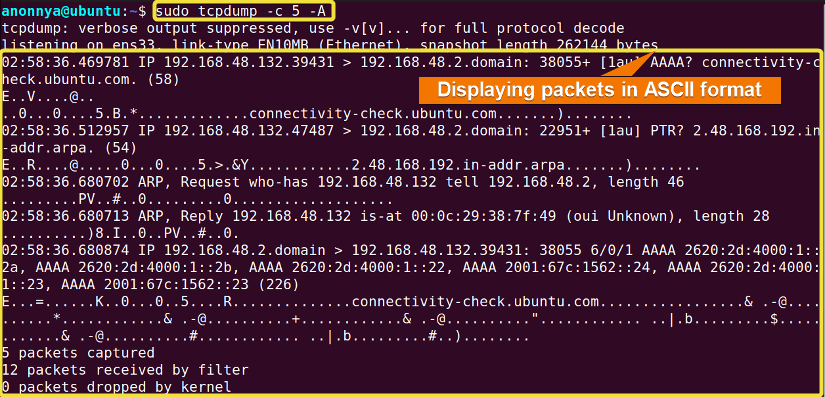
Case B: Converting Captured Packets into both HEX and ASCII Format Using the “tcpdump” Command
Follow the given steps to display captured packets in both HEX and ASCII format.
Steps to Follow >
➊ Open the Ubuntu Terminal.
➋ Type the following command in the command prompt:
sudo tcpdump -c 5 -XX➌ Press ENTER.
Output >
In the image below, you can see that I have displayed the captured packets in both HEX and ASCII format.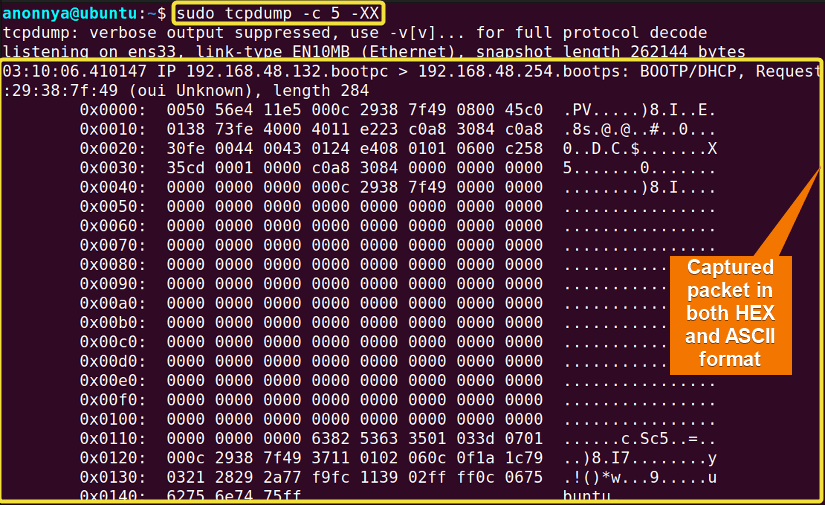
Example 6: Displaying Available Interfaces Using the “tcpdump” Command in Linux
You can display all the available interfaces on your machine using the tcpdump command in Linux with the option -D. In this example, I will show you all the interfaces of my system. You can do the same by following the steps mentioned below.
Steps to Follow >
➊ At first, go to the Ubuntu Terminal.
➋ Type the following command in the command prompt:
sudo tcpdump -D➌ Press the ENTER button.
Output >
In the image below, you can see that I have listed all the interfaces on my system.
Conclusion
This article presents the most frequent uses of the tcpdump command in Linux. Exercising these provided hands-on examples, you will be able to capture traffic in your network and view their information. I hope these illustrated practical applications will aid your experience in the command line and help you become a power user of Linux.
Similar Readings
- The “wget” Command in Linux [14 Practical Examples]
- The “ping” Command in Linux [9 Practical Examples]
- The “curl” Command in Linux [9 Practical Examples]
- The “ dig” Command in Linux [10 Practical Examples]
- The “hostname” Command in Linux [12 Practical Examples]
- The “ip” Command in Linux [9+ Practical Examples]
- The “ifconfig” Command in Linux [6+ Practical Examples]
FUNDAMENTALS A Complete Guide for Beginners


