The wget which stands for web get, is a free command-line utility. Provided and authorized by the GNU General Public License (GPL), this package offers both non-interactive and recursive file-downloading facilities from the internet using protocols like HTTP, HTTPS, FTP, etc. Non-interactive means it can download files when the user is not logged in. The Linux wget command also downloads complete HTML/ XHTML pages and replicates the content structure to browse the websites locally.
This article reviews the wget command in Linux. It also gives 14 practical examples in action for your complete understanding.
The Linux “wget” Command Syntax
The syntax of the wget command simply contains single or multiple options and then the desired URL/s.
wget [Option] … [URL] …The Linux “wget” Command Options
wget Command in Linux offers options to modify your downloading experience. However, you will find the most useful one’s here for your convenience. For any further features, you can always look at the man page.
man wget|
Options |
Description |
| – b | Downloads file in the background |
| – c | Continues interrupted downloads |
| t /- -tries = [number] | Fixes the number of retry attempts for interrupted downloads |
| – m/- – mirror | Mirrors a website locally for offline browsing |
| – r | Turns on Recursive retrieval of files, default value = 5 |
| – A/ – – accept “*.” | Downloads only specific file type |
| – R/- – reject “*.” | Rejects downloads for specific file type |
| – O, Upper case | Downloads file with a different name |
| – p | Downloads in a specific directory |
| – – limit-rate = [amount] | Limits bandwidth/speed while downloading |
| – – no-check-certificate | Ignores SSL certification check |
Install the “wget” Command in Linux
Most versions of Linux have the wget command pre-installed. You can find out whether you have it on your machine by typing the command wget itself:
wgetYour system will print out the following message if you already have it installed: Otherwise, you will get the following text:
 In this case, you can install
 wget within a minute by typing the following command in the prompt and the installation should begin after you press ENTER:
sudo apt-get install wgetAs you can see, upon running the above command, I have installed wget on my Linux system.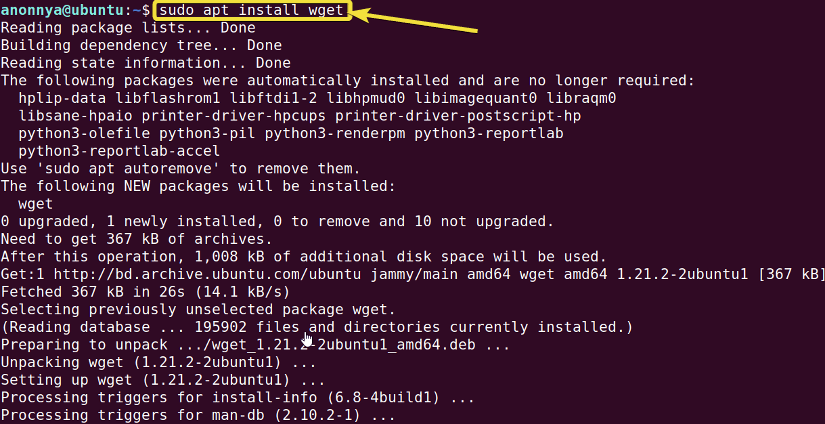
14 “wget” Command Examples in Linux
With the wget Command in Linux, you will be able to enhance your downloading experience to a great extent. To get you started, here are 14 practical examples of the wget command in Linux for your frequent use.
Example 1: Download a Single File or Webpage
You can download a single file or webpage using the wget command in Linux. All you need to do is provide your URL next to the wget command like the syntax below:
Wget <URL>For example, I will download the homepage of the linuxsimply website. To do so you may run the following command on the prompt:
wget https://linuxsimply.com/In this image, you can see that I have downloaded the desired homepage using the wget command. It has been saved in my current directory as “index.html”. You can also see that the wget command shows the progress bar including file size, download speed, file name, and estimated time to download. 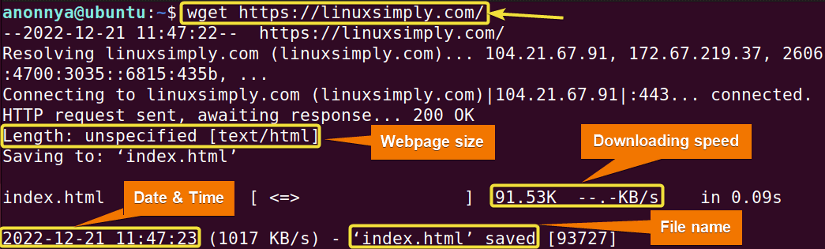
pwd. The command ls will show you the downloaded file in your current directory. In addition, to turn off the output, use the -q option
Similar Readings
- The “iptables” Command in Linux [6 Practical Examples]
- The “netstat” Command in Linux [22 Practical Examples]
- The “nslookup” Command in Linux [12 Practical Examples]
- The “ufw” Command in Linux [12+ Practical Examples]
Example 2: Downloading a Single File with a Different Name
Using the wget command with the -O (Upper Case) option, you can download a single file under a different name from your terminal. To do so you may run the wget command with the below syntax:
Wget -O <URL>For instance, I will again download the homepage of the linuxsimply website. However, this time, I will save it as “homepage.html” using the below command:
wget -O homepage.html https://linuxsimply.com/In this image, you can see that I have downloaded the desired homepage using the wget command. It has been saved in my current directory as “homepage.html”.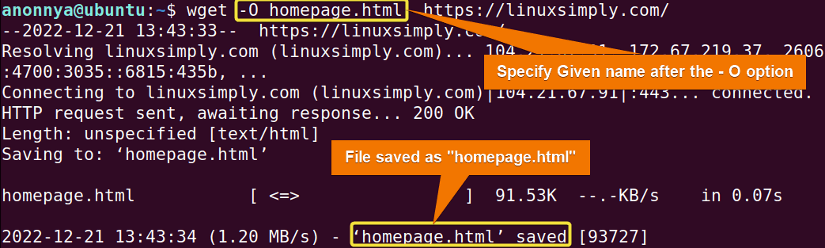
Example 3: Downloading Multiple Files
Using the wget command, you can download multiple files at once. You will be able to download from both HTTP and FTP protocols in a single command. The typical syntax is:
wget <URL1> <URL2>In this example, I will download both the homepage and commands page of the linuxsimply website. To do the same, run the command in the following:
wget https://linuxsimply.com/ https://linuxsimply.com/commands/In this image, you can see that I have downloaded both the homepage and command page using the wget command. The homepage has been saved in my current directory as “index.html” and the command page has been saved as “index.html.1”.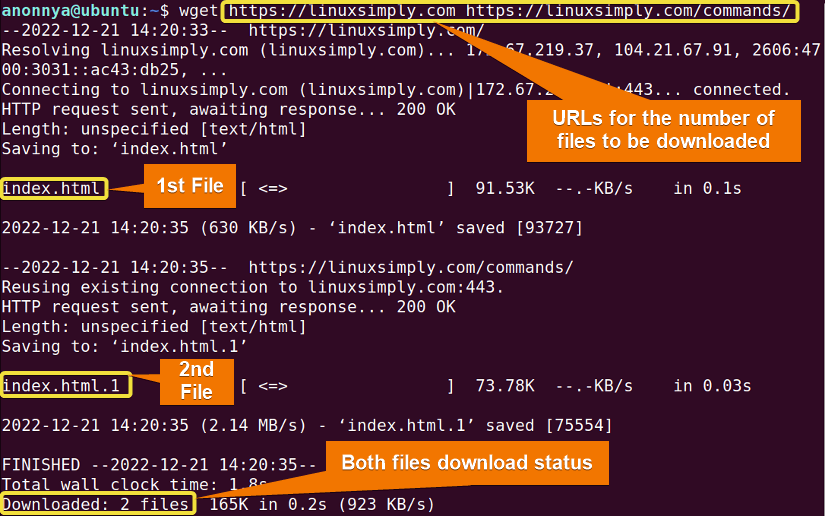
Example 4: Download Multiple Files from Another File
You can use a particular file to download single or multiple files using the -i option with the wget command. The links found in this file will be downloaded directly to your system. You may use a TEXT or HTML file. In this example, I will download 3 pdf files from the URLs provided in the “text.txt” file. In this case, the URLs must be written in separate lines. To do so you can follow the given syntactical format:
wget -i <File>You may type the following command and press ENTER to achieve a similar result like mine:
wget -i text.txtIn this image, you can see that I have downloaded 3 pdf files using the wget command. The files were downloaded on my machine serially one after another.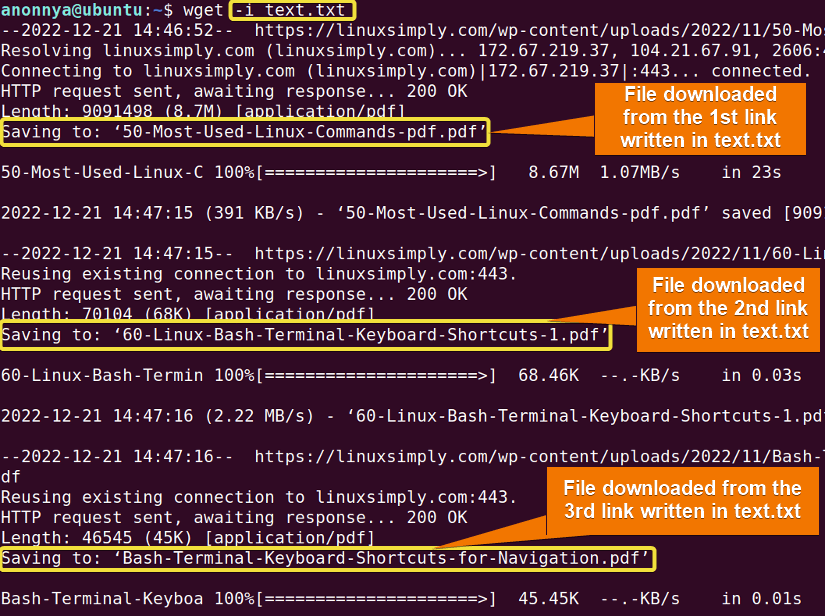
Example 5: Downloading Files to a Specific Directory
You can download files in your desired location using - P (Upper Case) option with the wget command. In this example, I will download the “50 Most Used Linux Commands pdf.pdf” file from the linuxsimply website to my Documents directory. To do so, follow the given syntax employing wget:
wget -P <path> <File>Similarly, you may execute this command to download the above-mentioned .pdf file in the “Documents” directory using wget:
wget -P Documents https://linuxsimply.com/wp-content/uploads/2022/11/50-Most-Used-Linux-Commands-pdf.pdfIn this image, you can see that I have downloaded the file to my desired location using the wget command. Then, I listed the contents of the Documents directory using the ls command to see the downloaded file.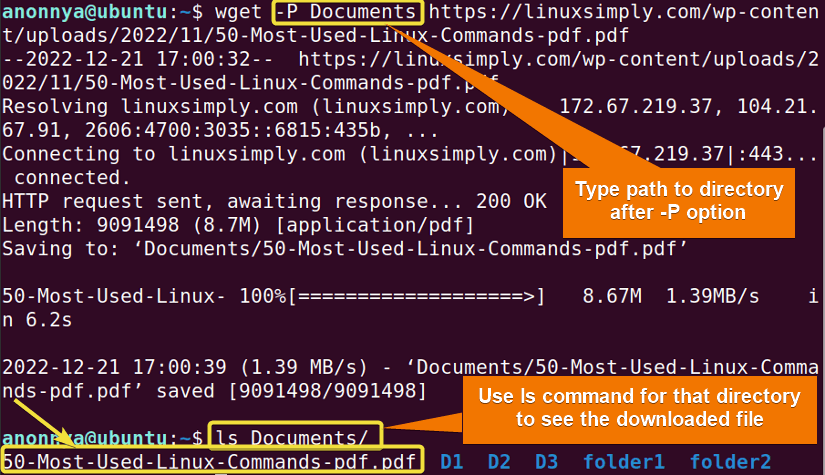
Example 6: Downloading Files in the Background
Using the wget command with the option -b you can download files in the background. You can be disconnected while the download occurs. The output will be saved in a different file in the current directory along with the file. You can open the specific log file to see the downloading details. In this example, I will download the “Bash Terminal Keyboard Shortcuts for Editing.pdf” file from the linuxsimply website. To do so you can go through the following syntax:
wget -P <path> <File>Let’s see the below command to see how it works:
wget -b https://linuxsimply.com/wp-content/uploads/2022/11/Bash-Terminal-Keyboard-Shortcuts-for-Editing.pdfIn this image, you can see that I am downloading the mentioned file in the background using the wget command. The output for my command was saved in the “wget-log.1” file in my current directory.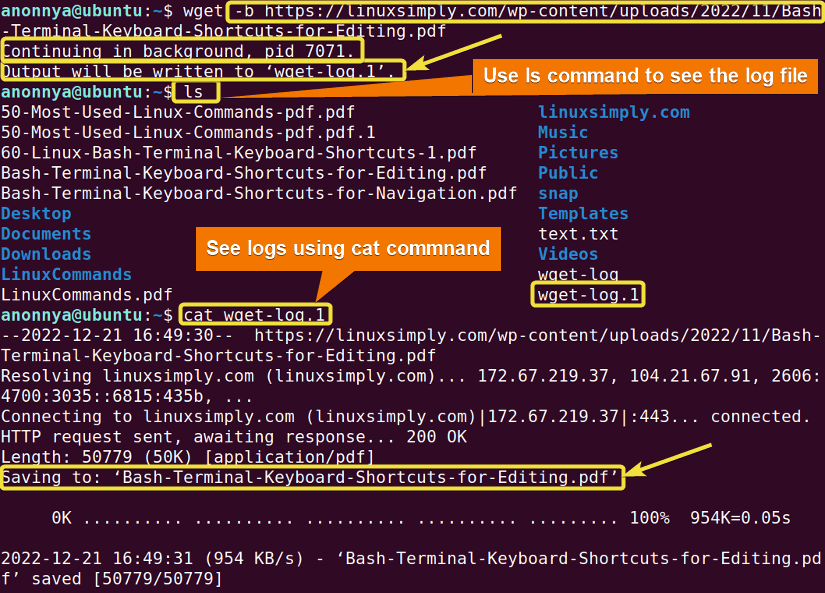
Example 7: Limiting File Download Speed
Using the wget command with the option -- limit-rate you can limit the downloading speed. To do so you can go through the following syntax:
wget --limit-rate=[value] <File>Now, as an example, I will download the Emacs Editor Keybindings or Shortcuts.pdf file from the linuxsimply with a limited bandwidth of 50KBs running the following command on the prompt:
wget --limit-rate=50k https://linuxsimply.com/wp-content/uploads/2022/12/Emacs-Keybindings-or-Shortcuts-in-Linux.pdfSo, in this image, you can see that I am downloading the mentioned file with a bandwidth of almost 50KB/s using the wget command.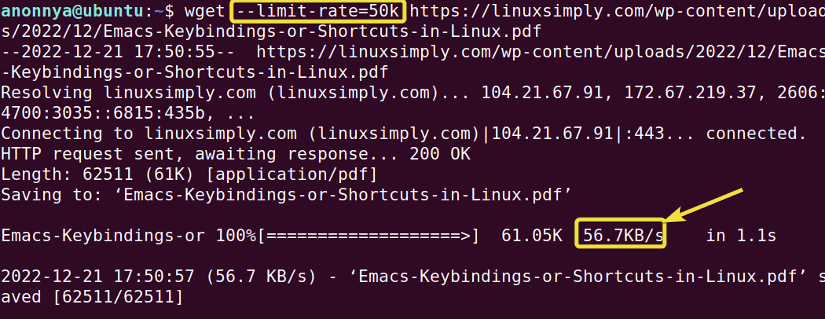
Example 8: Resuming Unfinished Downloads
You can resume your unfinished downloads with option -c of the wget command. In this example, I retrieved the partially downloaded homepage of the linuxsimply website. At first, I interrupted my ongoing download by pressing CTRL+Z. Then, I resumed downloading using the -c option. To do so you can go through the following syntax:
wget -c <File>You can run the following command to achieve similar results using the wget command:
wget -c https://linuxsimply.com/In this image, you can see that the first downloading attempt was interrupted. Then I retrieved the partially downloaded file using the wget command.
Similar Readings
- The “ftp” Command in Linux [14 Practical Examples]
- The “host” Command in Linux [10 Practical Examples]
- The “scp” Command in Linux [4 Practical Examples]
- The “sftp” Command in Linux [6 Practical Examples]
Example 9: Downloading files recursively
You can download files recursively with option -r of the wget command. In this example, I want to download all the files from the Free downloads page of the linuxsimply website recursively. You may do so by following the given syntax:
wget -r <URL>Now, You may follow the given example to execute this command:
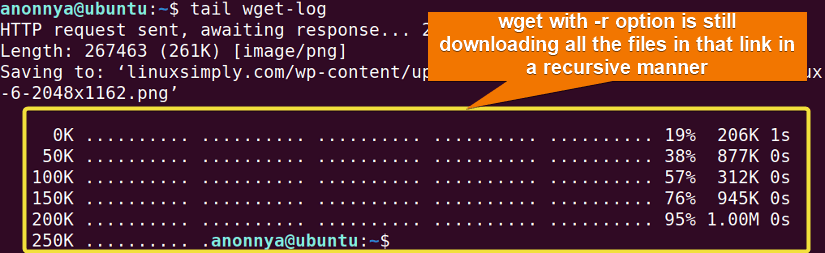
wget -r https://linuxsimply.com/free-downloads/In this image, you can see that at first without any option the wget command downloaded only the Free downloads page and saved it as “index.html.1”. I used the -r option to download all the files recursively. Since the downloads will take a lot of time I am doing it in the background with option -b and saving the output in the “wget-log” file. You can see the latest download output by typing the command tail before your log file. My output shows that the downloads are still occurring recursively with the wget command in Linux.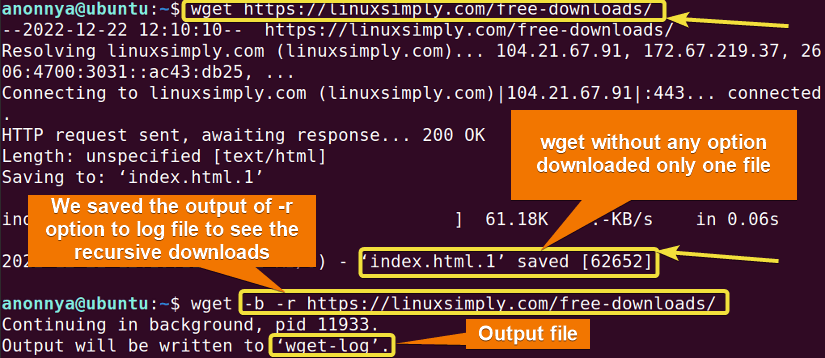
Example 10: Selecting Certain File Types While Downloading
You can select certain types of files while downloading with the option -A/--Accept of the wget command. In this example, I want to download only the .pdf files from the Free downloads page of the Linuxsimply website. The full syntax is:
wget -A”.FileType” <URL>Let’s see an example of running wget command to download the pdf files from Linuxsimply website:
wget -A”*.pdf” https://linuxsimply.com/free-downloads/In this image, you can see that I used the -A option along with the -r option. This is because the command needs to look recursively for the .pdf files. The wget command with the -A option saves each file. If the file does not match .pdf extension, it removes that file immediately. In this way, I am downloading only the .pdf files from the Free downloads page.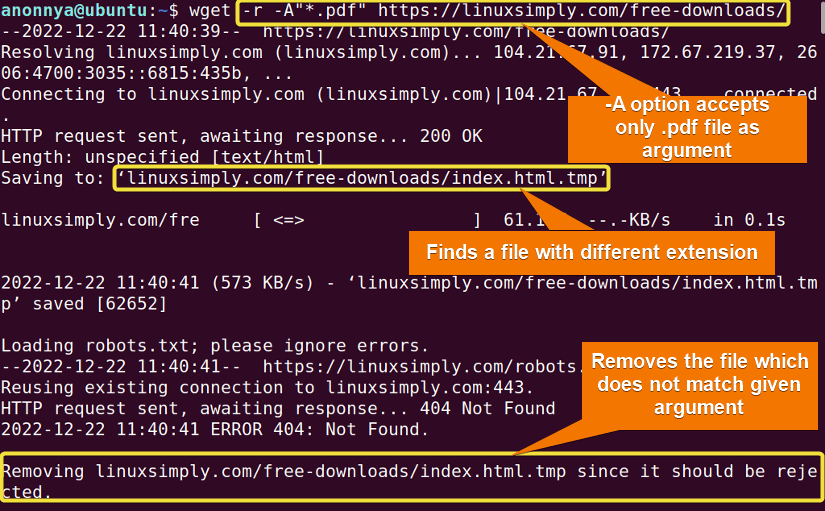
Example 11: Rejecting a Certain File Type While Downloading
You can reject certain types of files while downloading with the option -R/--Reject of the wget command. In this example, I want to reject downloading files with .tmp, .html, .css, and .js extensions from the Free downloads page of the Linuxsimply website. You can follow the syntax below to do so:
wget -R FileType/s <URL>Here’s the example of rejecting downloading the files I mentioned earlier using wget -R:
wget -R tmp,html,css,js https://linuxsimply.com/free-downloads/In this image, you can see that I used the -R option along with the -r option. This is because the command needs to look recursively for the .tmp, .html, .css, and .js extensions. The wget command with the -R option saves each file. If the file matches with any of the .tmp, .html, .css, and .js extensions, it removes that file immediately. In this way, I am not downloading .tmp, .html, .css, and .js files from the Free downloads page.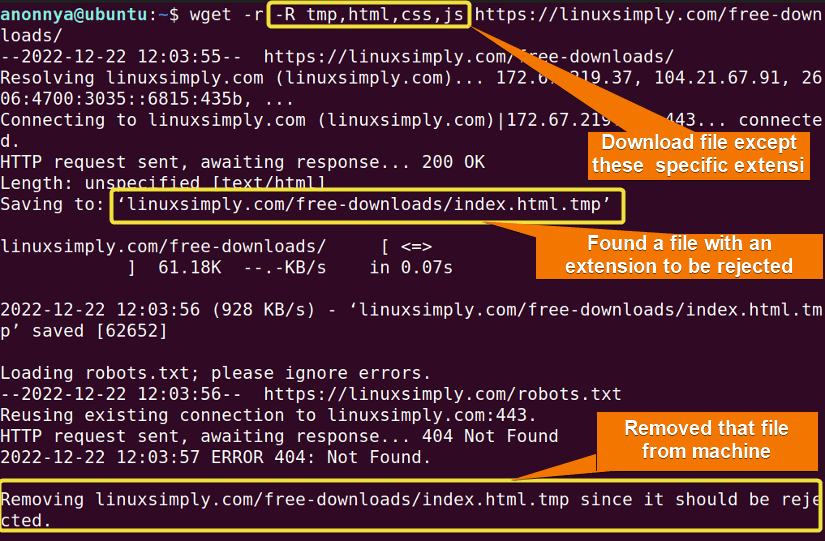
Example 12: Setting Numbers of Retrying Attempts to Download
Using the wget command with the -t/--tries option, you can set the number of retrying attempts for interrupted downloads. In this example, I set the number of attempts to 2. The wget command will try to download the file twice if it faces any interruptions.
wget --tries=[number] <File> You may run the given command and set the number of retrying attempts to 2:
wget -tries=2 --limit-rate=50k https://linuxsimply.com/wp-content/uploads/2022/12/Untitled-design.gifIn this image, you can see that I have fixed the retry attempts for download to 2. I also limited the bandwidth to 50KB/s. The desired file got interrupted after downloading 60%. The wget command tried to retrieve the file twice. After 2 failed attempts the downloading process stopped.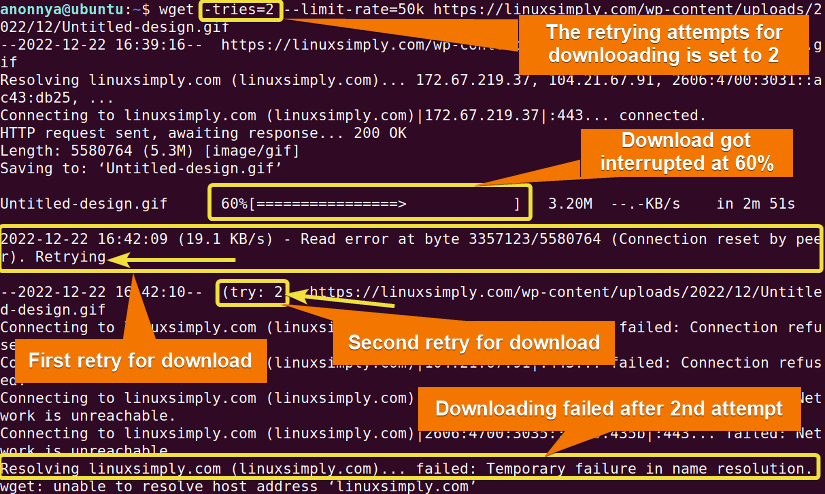
Example 13: Mirroring an Entire Website
Using the wget command with the -m/--mirror option, you can download a full website on your local machine. This is called mirroring a website. You will be able to browse the mirrored website remotely even when you are offline. In this example, I will mirror the Linuxsimply website. To do so you can follow the syntax below:
wget --mirror -p --convert-links <website_URL> - -p ( Downloads all necessary files to display .html pages)
- –convert-links ( After downloading links convert them into documents for local view)
So, to mirror the entire website named, Linuxsimply, run the following command:
wget --mirror -p --convert-links -P Downloads https://linuxsimply.com/So, in the first image, you can see that I have downloaded the desired website in my Downloads directory using the wget command. It mirrored all the hierarchy and files for local browsing in my system.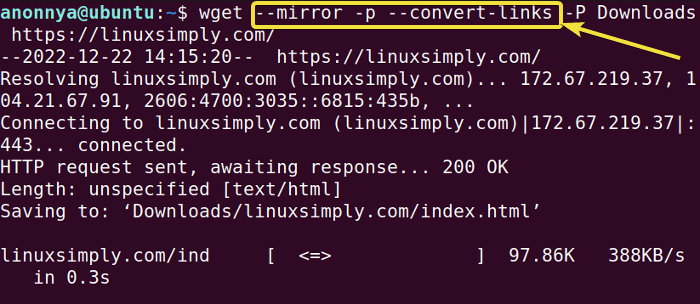 In this image, you can see the local version of the downloaded website.
Example 14: Ignoring SSL Certification Check While Downloading
Using the wget command with the option --no-check-certificate ,you can avoid the SSL certification check of HTML websites. In this example, I will download the homepage of the SOFTEKO website without checking the certificate. The complete syntax is:
wget --no-check-certificate <URL>Now, run the following command and ignore the SSL certification check like the example I mentioned above:
wget --no-check-certificate https://www.softeko.co/In this image, you can see that I am downloading the mentioned website ignoring its SSL certification check using the wget command. The webpage was saved as “index.html.1” in my current directory.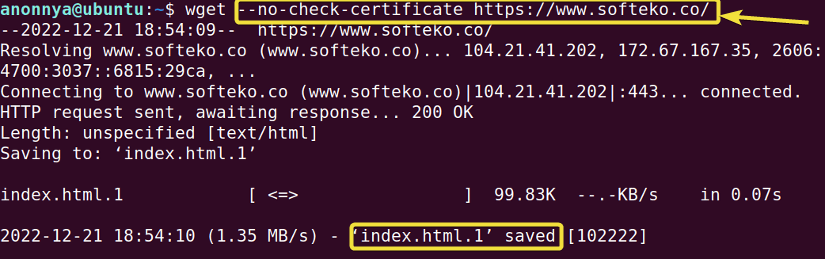
Conclusion
In this article, I have tried to show you the frequent uses of the wget command in Linux. You can always combine one or more options demonstrated here to get a full experience. I hope these practical examples will help you through your journey with the command line and make you a power user of LINUX.
Frequently Asked Questions
What is the version of the “wget” command currently running on my system?
Run the wget --version command on the prompt, to know the version of the wget command in Linux, currently running on your system.
What is the “wget” command used for?
The wget is a command line tool used for downloading files from the web via protocols like HTTP, FTP, etc. Interacting with rest APIs, wget is a non-interactive command also used to download from the internet when the user is not logged in.
How do I download files using “wget”?
To download a file using the Linux wget command is simple. Type the wget command followed by the URL of the file you want to download:
wget <file URL>How to use the “wget” command to download numbered files?
If you intend to download files numbered in a certain list, you can download all of them, simply, by using the wget command with brace expansion {} notation. For example, to download images numbered from 1 to 10 from the website http://example.com, run the command:
wget http://example.com/images/{1..10}.jpgWhat happens if I download an existing file using the Linux “wget” command?
If you download a file using the Linux wget command that already exists in the system, the wget command will again download the file and will add .N (Number) at the end of the file name. For instance, if you download the extant file test.js again, the wget command stores the duplicate copy in the same working directory with the name test.js.1 and so on based on the number of downloads.
Similar Readings
- The “ping” Command in Linux [9 Practical Examples]
- The “curl” Command in Linux [9 Practical Examples]
- The “ dig” Command in Linux [10 Practical Examples]
- The “hostname” Command in Linux [12 Practical Examples]
- The “ip” Command in Linux [9+ Practical Examples]
- The “ifconfig” Command in Linux [6+ Practical Examples]
FUNDAMENTALS A Complete Guide for Beginners


