The nslookup is a network-administrator command tool that stands for Name Server Lookup. It performs queries on DNS (Domain Name System) to obtain domain names, IP address mapping, or any other specific DNS record. We mainly use the nslookup command to troubleshoot DNS-related problems. In this article, I will discuss the basic operations of the nslookup command in Linux with some practical examples. So, Let’s start.
A. Description
The nslookup is an essential tool that allows performing DNS lookup commands on Linux and Windows Operating Systems. To troubleshoot DNS issues we need to access the DNS records of a website. The nslookup command lets us get these pieces of information such as IP addresses, and specific DNS records of that website. So this is a very handy tool for system administrators.
B. Syntax
The nslookup command is an easy tool to use that queries internet domain name servers interactively. It operates in two modes: interactive and non-interactive. The interactive mode allows the user to display a list of hosts in a domain or to query name servers for information about various hosts and domains. Whereas the non-interactive mode is used to display the name and requested information for a host or a domain. The syntax of the nslookup command is very simple. The syntax for interactive mode is,
nslookup [OPTION]... [Name | -] [Server]And the syntax for non-interactive mode is,
nslookup [OPTION]... <Domain_Name>- OPTION⟶ OPTIONs are used to modify the nslookup
- Domain Name ⟶ The name or IP address of the name server whom we want to query. If you don’t specify a server, the nslookup command will use your machine’s pre-configured DNS.
C. Options
When no arguments or options are provided with the nslookup command it performs in the interactive mode by default. Also, the command uses different options in both modes. I will give a small list of them with short details here. Learn more about these options of the nslookup command from the man page.
man nslookupInteractive Options:
- host [server], to look up information for the host using the default or specified server.
- server domain, to lookup information about the domain using the default server.
- Iserver domain, to lookup information about the domain using the initial server.
- set keyword [=value], to change state information that affects the lookups (=all, to display the current values of the frequently used options to set)
- domain=name, to set the search list to name.
- class =value, to change the query class to one of these values, such as (IN (INternet), CH(CHaos), HS(HeSiod), ANY(wildcard)). The default is IN.
- port=value, to change the default TCP/UDP name server port to value, the default is 53.
- type=value (a, any, cname, gid, hinfo, mb, mg, minfo, mr, mx, ns, ptr, soa, txt)
- retry=number, to set the number of retries to number.
- timeout=number, to set the initial timeout interval for waiting for a reply, in seconds.
- [no]debug, to turn on or off the display of the full and intermediate response packets while searching. The default in nobug.
- [no]d2, to turn on or off the debugging mode.
- [no]recurse, to tell the name server to query other servers if it does not have the information.
- [no]fail, to try the next nameserver if a name server responds with SERVFAIL. The default is nofail.
- exit, to exit the program.
Non-Interactive Options:
- -domain=[domain-name], to change the default DNS name.
- -debug, show debugging info.
- -port=[port-number], to change the standard port.
- -timeout=[seconds], to specify the time for the server to respond.
- -type=a, to display all the info about DNS A.
- -type=any, to display info about all types of DNS.
- -type=hinfo, to view hardware-related information about the host.
- -tpe=ns, to display Name Server.
- -type=mx, to display all the info about DNS Mail Exchange.
- -type=ptr, to display Pointer Records.
- -type=soa, to display Start Of Authority.
Some Common DNS record types:
- A ⟶ Address records are one of the basic and most commonly used records used to map a hostname to an IP Address directly. They translate domain names and store them as IP Address records that can only hold IPv4 addresses.
- MX⟶ Stands for Mail Exchange. Which maps message transfer agents for the domain. And it stores instructions to direct emails to mail servers.
- SIG⟶ SIG for the SIGnature record, used for encryption
- TXT ⟶TeXT records are used to store definitive text.
- CNAME ⟶ ( Canonical NAME) record type is used instead of an A (Adress) record if a domain is an alias for another domain.
- SOA ⟶( Start Of Authority) record type holds important information about a domain or zone.
- NS ⟶ (Name Server) record contains the authoritative name servers.
Installing nslookup Command in Linux
Most of the modern versions of Linux have the nslookup command already installed. You can find out whether you have it on your machine or not by simply tying the command on the terminal. Type the following command in the command prompt,
nslookupIt will print out the following message if you have it installed already. Here, the command is in interactive mode. Type ‘exit’ to exit the command mode. If you don’t have it installed, don’t worry. You can install it within a minute. The nslookup command is a part of the DNS utility package. You can install the package by following the instructions below.
Steps to Follow >
➊ At first open the Ubuntu Terminal
➋ Type the following in your command prompt:
sudo apt install dnsutils➌ Type your password
➍ Now, press ENTER
Output >
After completing these four steps, the nslookup command will be installed on your system.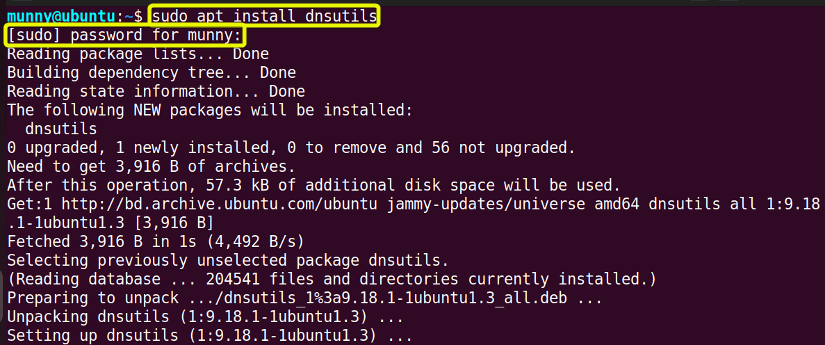
Practical Examples of the “nslookup” Command in Linux
The nslookup command is a useful tool to get information from DNS servers. Even though the network administrators recently prefer using the dig command as it provides more information. Another reason is that the dig command uses the operating system’s local Domain Name System resolver library to perform its queries, whereas the nslookup command uses its internal ones. Nevertheless the nslookup command is still a popular command tool. It performs in two different modes. I will explain how it performs in both modes with some practical examples in the following discussion.
The Interactive Mode
This mode allows users to query the name server’s information about various hosts and domains or to display a list of hosts in a domain. The interactive mode is entered for two cases, first, when no arguments are given with the nslookup command and default name server is used. And the second case is when the first argument is a hyphen (-) and the second argument is the hostname or Internet Address of a name server. To enter an interactive mode just type the nslookup command in the command prompt. Type the following command,
nslookupAfter that press the ENTER button, and we will get the interactive display like the following image where you can see a greater than (>) sign poping.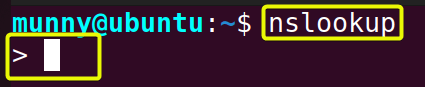
Case 1: Query DNS for a Website
Type any website you want to query. I typed google.com and pressed the ENTER button. After that, you will get the output display like the following image.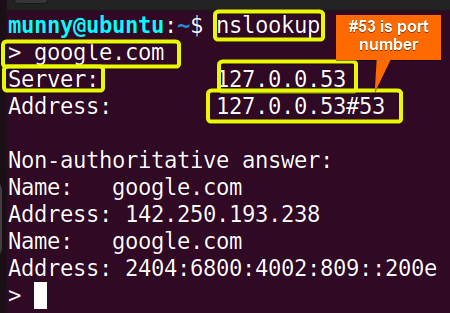 Now, see my output display, where 127.0.0.53 is the address of my system’s Domain Name Server. My system is configured to use this server to translate domain names into IP addresses. And, #53 indicates the port number it is communicating through. Which is the standard port number that the domain name server uses to accept queries. After that, I have the lookup information for google.com and got two searched entries 142.250.193.238 and 2404:6800:4002:809::200e. This indicates, when you access google.com, you may be directed to either one of these servers and your packets are routed to the correct destination.
Case 2: View the List of Current Values of Frequently Used Options
If you set the keyword value “all” like the following image and press the ENTER button, you can see the list of all the current values of the frequently used options. From my output display, you can see the default values of options, such as port no is 53, default query type is A record, no of retry is 3 in case of server fail, etc.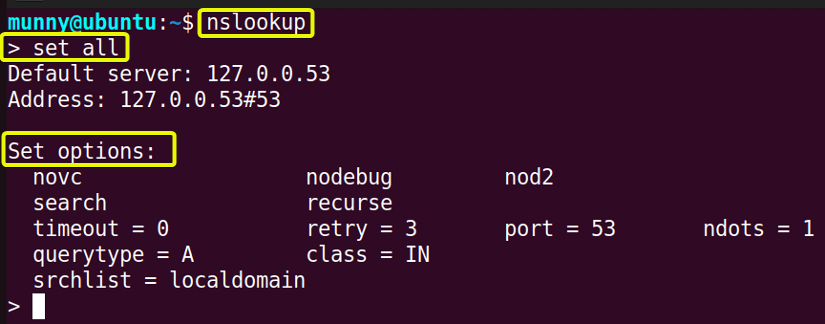
Case 3: View Different DNS Record Types
Set type argument and give a specific value such as ns, mx, soa, etc to query that specified record type. Check the below image. Where I set the query type value as ns, and I hit the ENTER button. After that, I typed the hostname youtube.com whose ns record type I want the command to query. After that, I pressed The ENTER button again and got the returned query results of youtube.com.
From the output, you can see we have two types of returned answers, authoritative and non-authoritative.
Authoritative and Non-Authoritative Answer >
The answer that arises from the DNS server which has the complete zone file information available for the domain is an Authoritative Answer.
Whereas in many cases, DNS servers will not have the complete zone file information available for a given domain rather it maintains a cache file containing the results of past queries. And for which it has gotten an authoritative response. Now, when a DNS query is made, it searches the cache file and returns the information as a “Non-authoritative Answer”.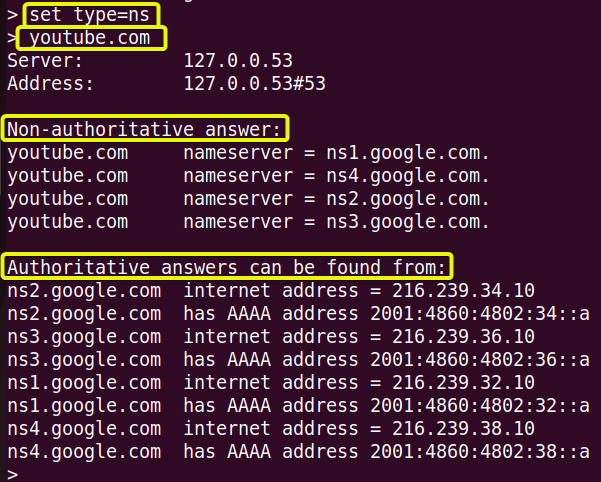
Case 4: Perform Reverse DNS Search
Moreover, you can perform a reverse DNS lookup, just enter the IP address instead of the hostname just like in the below image and you will get the hostname as the output. As you can see I searched for the IP address of Wikimedia and in the output, I got the hostname.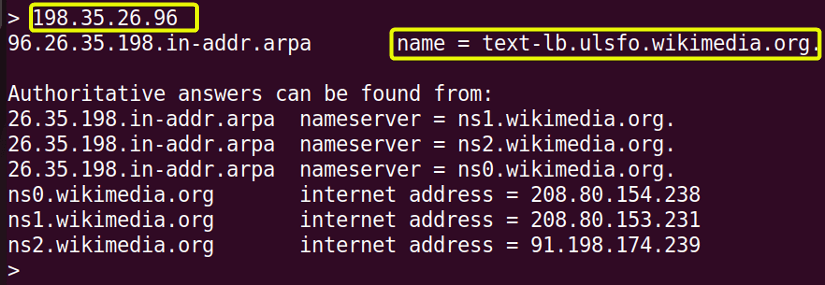 At last, when you have completed your searching with the nslookup command, and you want to exit the interactive mode just type the ‘exit’ option, like the way in the below image and tap the ENTER button. You will exit the program.
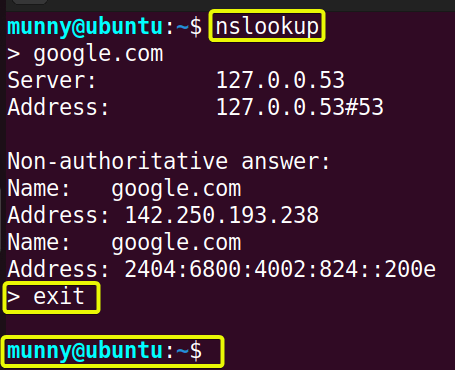
The Non-Interactive Mode:
This mode is initiated with the hostname or internet address as the first argument, preceded by options if present. A secondary argument, which is optional, can also be used to specify a name server instead of the system’s default DNS. Now, I will give some practical examples of how the nslookup command works in non-interactive mode.
Example 1: Find the IP Address of A Domain Name Using the “nslookup” Command in Linux
You can query DNS for any domain name to get its IP address using the nslookup command. While querying if you don’t mention the type of record, the default record type that your machine uses to display is A type record. A stands for Address, these records are the most common & useful DNS record type. This record can only hold IPv4 addresses. You can set the value of type option ‘A’, or you can just type the hostname after the nslookup command to search for the A record types. The syntax is,
nslookup <domain_name>To query DNS for an IP address associated with a domain, follow the below steps:
Steps to Follow >
➊ At first, open the Ubuntu Terminal.
➋ Then, type the following command in the command prompt to search for A record type of google.com:
nslookup google.com➌ Now, press the ENTER button.
Output >
From the output, you can see the list of all the A record types of the specified host google.com.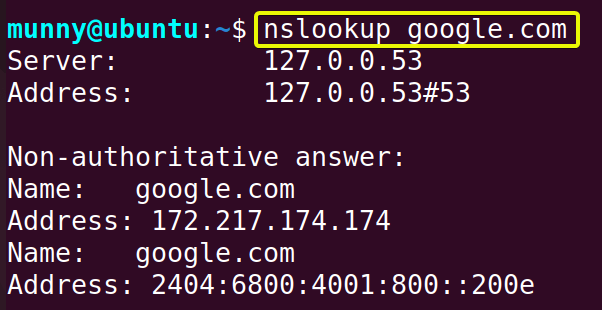
Similar Readings
- The “iptables” Command in Linux [6 Practical Examples]
- The “netstat” Command in Linux [22 Practical Examples]
- The “tcpdump” Command in Linux [6+ Practical Examples]
- The “ufw” Command in Linux [12+ Practical Examples]
Example 2: Query NS Records Using the “nslookup” Command in Linux
The NS record contains all the authoritative Name Servers. They are used to specify which domain name servers are authoritative for the given domain name. To search only the ns record types, set the value=‘ns’ of the option -type after the nslookup command. The syntax is,
nslookup -type=<value> <Domain_name>Go through the below steps to search for the ns record type yourself.
Steps to Follow >
➊ Launch the Ubuntu Terminal.
➋ Type the following command in the command prompt to search ns record types of google.com:
nslookup -type=ns google.com➌ Now, press the ENTER button.
Output >
After running the command, you will see the list of all the ns record types on your output display of the specified domain google.com, returned by the command. Just like in the below picture. The website keeps more than one name server record for safety purposes.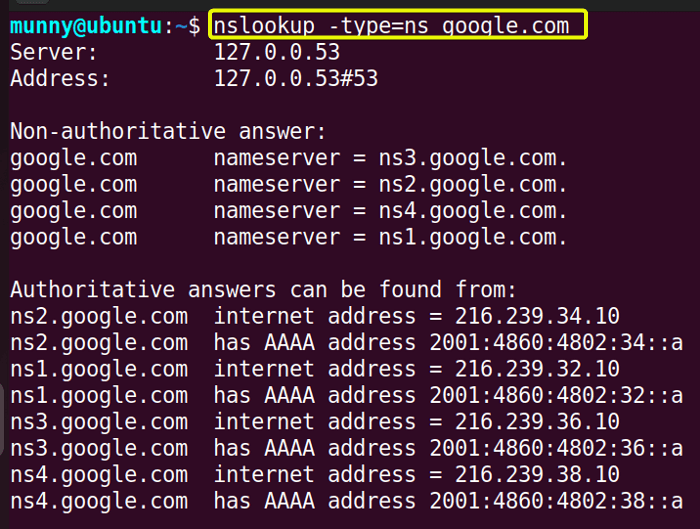
Example 3: View MX Records Using the “nslookup” Command in Linux
MX (Mail eXchange) record type is used to identify the mail servers responsible for accepting email messages on behalf of a domain. Each MX record consists of a preference value and a hostname. This type of record can only point to a name of an email server. That means each referenced email server must also have a valid A (Address) record with an IP address. Also, multiple mx records can be specified for a domain, but they must need to have unique preference values. To view the mx record types, set the -type option value as ‘mx’ after the nslookup command, just like in the upper example. The syntax is,
nslookup -type=<value> <Domain_name>Read the below steps to check yourself.
Steps to Follow >
➊ Start by opening the Ubuntu Terminal.
➋ After that, type the following command in the command prompt to view the MX type records of gmail.com:
nslookup -type=mx gmail.com➌ Finally, press the ENTER button.
Output >
From the output, you can see the mx record types of the gmail.com domain. When you send an e-mail to this domain, that mail will be routed to google’s MX servers. Also, if you notice from the output, the mail exchanger address is prefixed with a preference value and there are five listed addresses, each with a different value. These are priority values. When an email is sent to an address within a domain, the recipient’s mail server will perform a DNS lookup to determine the MX records for that domain, and then use these priority values to choose the best mail server to send the message to. The lower the number, the higher the priority. From the list, you can see 5 is the lowest number, so this is the best mail server to send the message to.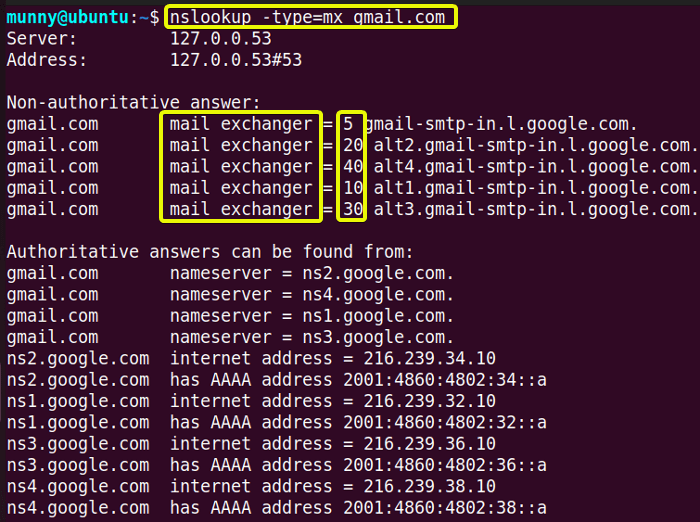
Example 4: View SOA Records Using the “nslookup” Command in Linux
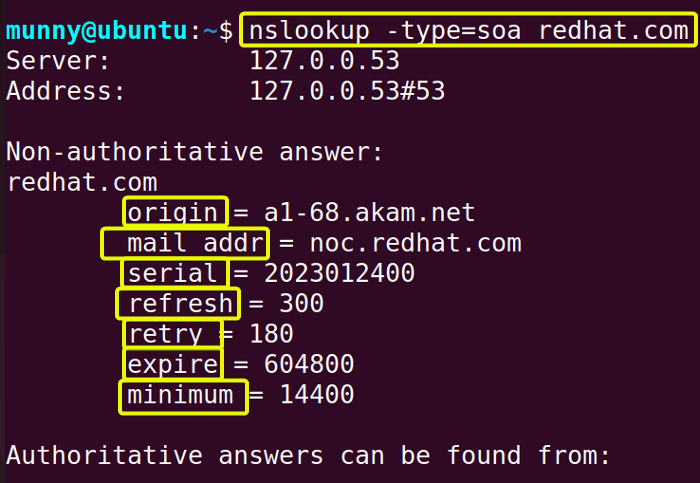
The SOA ( Start Of Authority) record type holds important technical information about a domain or zone. The record specifies the primary name server for the specified domain and the email address of the person responsible for maintaining that domain. It also includes information about the domain’s refresh time, retry time, and expiration time. The SOA records are typically the first record in a DNS zone file and are used to define the beginning of a DNS namespace. Use the nslookup command with the option -type value “soa” to view the list of soa-type records. The syntax is,
nslookup -type=<value> <Domain_name>Proceed to read the below steps to check the list practically.
Steps to Follow >
➊ Begin by opening the Ubuntu Terminal.
➋ Type the following command in the command prompt to view the SOA record type of the redhat.com domain:
nslookup -type=soa redhat.com➌ Now, press the ENTER button.
Output >
The output display will give the list of all SOA-type records of redhat.com, just like the following image. Where you will notice some terms under the non-authoritative answer. Let’s discuss them to clearly understand the output.
Understanding Output >
- Origin ⟶ It says about the authority from which the information originated.
- Mail addr ⟶ Domain administrator e-mail address. The first dot (.) is for @ symbol, so here the email address is [email protected].
- Serial ⟶ The serial number is in the form of YYYYMMDDNN (20230124 00), which is the revision data, the information is current as of 24th January 2023. The last 2 digits (00) indicate it was the initial revision made on that day.
- Refresh ⟶ This number represents the interval time in seconds at which the secondary name server checks the primary name server for an updated revision of the information. The number 300 tells us the secondary redhat name server’s information is not more than 300 seconds out of date.
- Retry ⟶ This is the time period in seconds, the secondary nameserver waits before attempting to reconnect to the primary name server after a failed attempt.
- Expire ⟶ The time interval in seconds after which the second nameserver’s cache of the information of the primary nameserver is considered invalid.
- Minimum ⟶ It specifies the minimum amount of time, the secondary nameserver should have since the last refresh before refreshing its cache of the primary nameserver’s information.
Example 5: Query TEXT Records Using the “nslookup” Command in Linux
TXT (Text) records are used to store information in plain text. Usually, they are used in addition to other record types to provide extra information that doesn’t fit the format of other records. This information includes human-readable information about a host, server, or domain, SPF (Sender Policy Framework) records, and other data such as security keys and signatures. Text records can contain any information in text format. You can view the list of text-type records using the nslookup command. The syntax is,
nslookup -type=<value> <Domain_name>Search for only the TEXT record type associated with a domain by following the below steps:
Steps to Follow >
➊ Start the Ubuntu Terminal application.
➋ Type the following command in the command prompt to search the text type records of google.com:
nslookup -type=txt google.com➌ Now, tab the ENTER key.
Output >
From the output image, you can see the list of all text-type records of the google.com domain.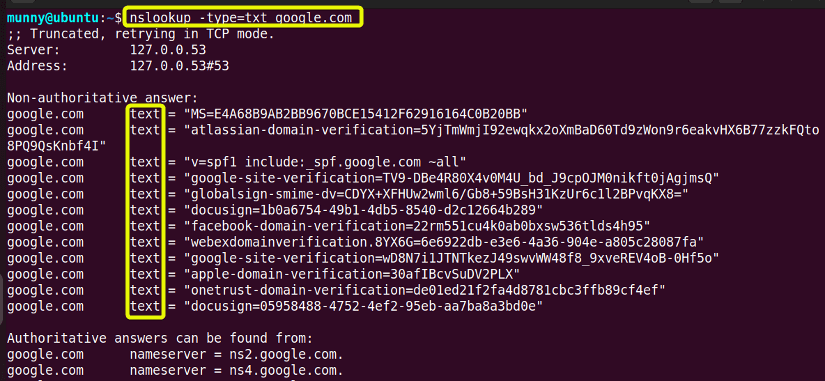
Similar Readings
- The “ftp” Command in Linux [14 Practical Examples]
- The “host” Command in Linux [10 Practical Examples]
- The “scp” Command in Linux [4 Practical Examples]
- The “sftp” Command in Linux [6 Practical Examples]
Example 6: Check for a PTR Record Using the “nslookup” Command in Linux
The PTR (Pointer Record) of DNS provides the domain name associated with an IP address. This record is exactly the opposite of the ‘A’ type record of DNS. As A record provides the IP address associated with a domain name. The PTR records are used in reverse DNS lookups. These records are stored as reversed IP addresses, and typically in the “.in-addr.arpa” domain for IPv4 addresses and the “ip6.arpa” domain for IPv6 addresses. For example, the PTR record for the IPv4 address 118.162.240.54 will be stored under 54.240.162.118.in-addr.arpa. To view the PTR record of any IP address with the nslookup command, set the -type option value “ptr” and then type the IP address you want the record for. The syntax is,
nslookup -type=<value> <IP_Address>Follow the below steps to learn about the PTR records.
Steps to Follow >
➊ Open the Ubuntu Terminal.
➋ Type the following command in the command prompt to view the PTR DNS records for the 118.162.240.54 IP address:
nslookup -type=ptr 118.162.240.54➌ Now, press the ENTER button.
Output >
From the output, you can see the PTR record of the specified IP address 118.162.240.54, which is stored reversed and with added extension (54.240.162.118-addr.arpa). We can also see the hostname of that IP address which is hinet.net, as the command performed the reverse DNS search.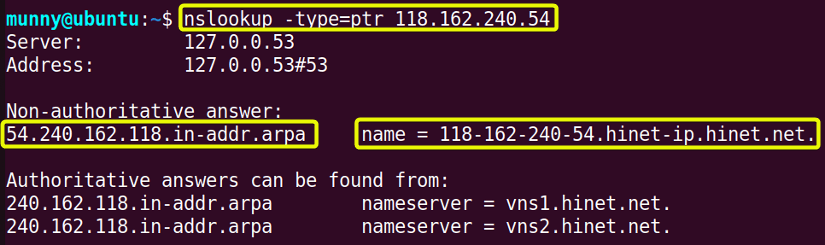
Example 7: View All the Records Using the “nslookup” Command in Linux
You can display all the returned results for your queried server. To do so use the value “any” for the option type with the nslookup command. It will display all types of records available for the specified domain name. The syntax is,
nslookup -type=<value> <Domain_name>Act according to the below steps, to check the list of all types of records for a given domain name.
Steps to Follow >
➊ At first, access the Ubuntu Terminal window.
➋ Then, type the following command in the command prompt to view the list of all types of records of google.com:
nslookup -type=any google.com➌ Now, press the ENTER button.
Output >
After running the command, you can see the long list of all types of records of the domain google.com one by one just like in the below picture. Where you can see the text type records at first, then the ns type, and after that soa type records.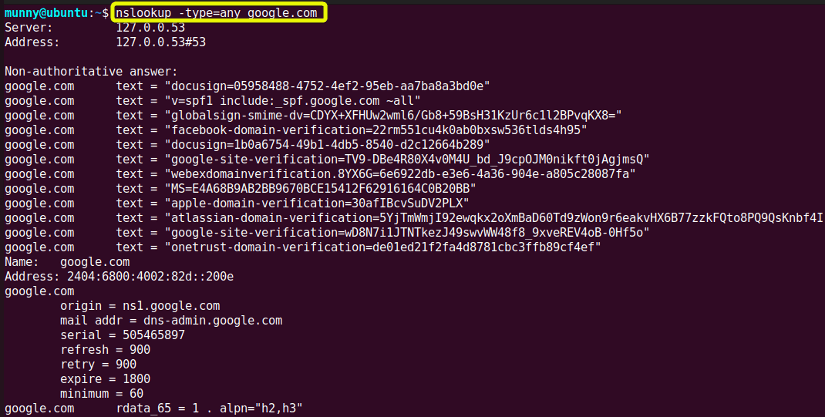
Example 8: Perform Reverse DNS Lookup Using the “nslookup” Command in Linux
In most of the upper examples, we searched for an IP address associated with a domain by typing the domain name with the nslookup command. Now if we want to do a reverse DNS Lookup, in a simple context to lookup a domain name by its IP address just like I did in Example number 6, then we have to type the IP address whose domain name we want to search after the nslookup command. The syntax is:
nslookup <IP address>Follow the steps to perform the reverse DNS lookup with the nslookup command.
Steps to Follow >
➊ At first open the Ubuntu Terminal.
➋ Type the following command in the command prompt:
nslookup 198.35.26.96➌ Now, press the ENTER button.
Output >
After I ran the nslookup command with the IP address 198.35.26.96, the command gave me the hostname related to that IP address in the output. As you can see, the name Wikimedia is in the output display. So that the IP address belongs to that hostname.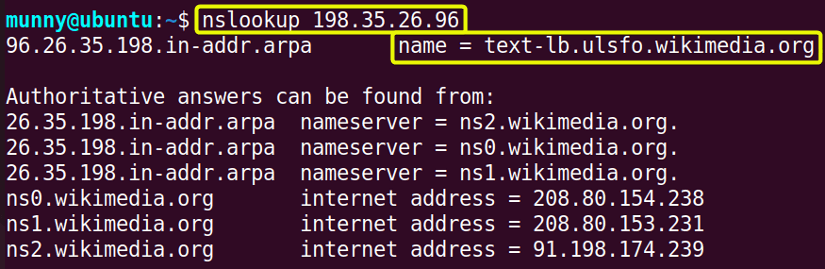
Example 9: View Information of a Specific Name Server
The nslookup command queries the same DNS by default, which one the system is configured to use for all network operations. You can also tell it to use your specified custom DNS. To give the command a specific name server to use instead of letting it use the default one, write the domain name followed by the name server name after the nslookup command. The syntax is,
nslookup <domain_name> <name_server>Go through the following steps to query a domain using a specific name server.
Steps to Follow >
➊ Run the Terminal on your Ubuntu.
➋ Type the following command in the command prompt to tell the command to use ns1.google.com name server:
nslookup google.com ns1.google.com➌ Then tab the ENTER button.
Output >
In the output, you can see the command is now using the specified name server ns1.google.com rather than using the default DNS, which we saw in previous examples. If you also notice that, in the output, we don’t get any non-authoritative answer header. Since the name server ns1.google.com has all the zone information of the domain google.com.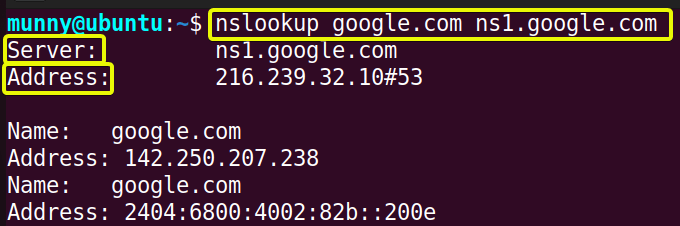
Similar Readings
- The “traceroute” Command in Linux [13 Practical Examples]
- The “rsync” Command in Linux [10 Practical Examples]
- The “screen” Command in Linux [13 Practical Examples]
- The “arp” Command in Linux [7 Practical Examples]
Example 10: Query a Non-Standard port
When we run the nslookup command to check DNS records for any domain name, by default, the domain name servers accept queries on port number 53. If you remember, in the interactive mode section, I used the keyword set with the value “all” to view all the currently used options and their default values. Where the default port number was shown as 53, that is the standard port number on which the DNS accepts queries. Now if you want to change the port number, you can use the option -port and then give a new number as the value with the nslookup command. The syntax is,
nslookup -port=<value> <Domain_name>Proceed according to the following steps to change the standard port number.
Steps to Follow >
➊ Open the Ubuntu Terminal.
➋ Type the following command in the command prompt to check port number 54 to query DNS records for the microsoft.com website:
nslookup -port=54 microsoft.com➌ Now, press the ENTER button.
Output >
After running the command, the following output result was displayed. It is refusing to use port number 54, which is not the standard port number for the servers to use.
Example 11: Change the Timeout Interval for a Reply of the “nslookup” Command in Linux
You can change the timespan for the server to respond to your query result manually. If you want the server to respond more quickly, decrease the timeout interval in seconds or increase it if you want to wait longer for the reply. To change, use the option -timeout and specify its value as per your wish after the nslookup command followed by the domain name you want to perform the search for. The syntax is,
nslookup -timeout=<value> <domain_name>Go through the following steps to change the timeout interval as you want.
Steps to Follow >
➊ Start by opening the Ubuntu Terminal.
➋ Then type the following command in the command prompt:
nslookup -timeout=10 google.com➌ Now, press the ENTER key.
Output >
While running the command, you will notice that you got the queried results back for the google.com domain within 10 seconds.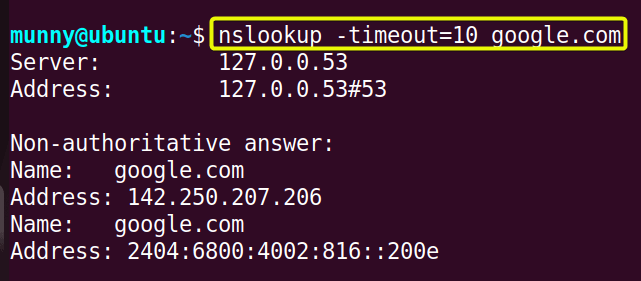
Example 12: Enable Debug Mode of the “nslookup” Command in Linux
The debug mode of the nslookup command displays verbose information about the DNS resolution process, including the request and response messages sent between the client and the server. While troubleshooting, this detailed information is useful. They are also essential to learn how the DNS resolution process works. To enable the debug mode while using the nslookup command type the option -debug followed by the domain name you are querying for. The syntax is,
nslookup -debug <domain _name>Check the following steps to enable the debug mode.
Steps to Follow >
➊ Launch the Ubuntu Terminal.
➋ Write the following command in the command prompt:
nslookup -debug google.com➌Tap the ENTER button.
Output >
After running the command, you can see that the debug mode is activated and we get the verbose output in the display. Where you can see all the detailed query results for the domain google.com. A lot more information than we got before in Example 1, where we didn’t activate the debug mode.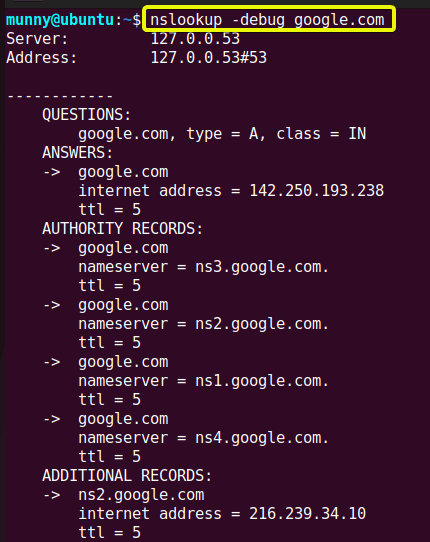
Conclusion
So to sum up, the nslookup is quite an easy networking command tool. Even though you may feel more comfortable using the dig command, there are no hard feelings to learn the basics of the nslookup command too. I hope this article will be enough for that if you practice all the examples I discussed here. Good luck in being a power user of LINUX.
Similar Readings
- The “wget” Command in Linux [14 Practical Examples]
- The “ping” Command in Linux [9 Practical Examples]
- The “curl” Command in Linux [9 Practical Examples]
- The “ dig” Command in Linux [10 Practical Examples]
- The “hostname” Command in Linux [12 Practical Examples]
- The “ip” Command in Linux [9+ Practical Examples]
- The “ifconfig” Command in Linux [6+ Practical Examples]
FUNDAMENTALS A Complete Guide for Beginners


