The rsync command in Linux is used to synchronize files and directories between two computers (local host and remote host). At first, it uses SSH(Secure Shell) to connect to a remote-host and decides which part of local files (or directories) is needed to be copied. The rsync command is an efficient way to transfer files as the manual method is tedious. In this article, I will show all the useful features of the rsync command in Linux with some practical examples.
A. Description
The rsync command in Linux is a tool to transfer and synchronize efficiently. It is used in Unix-Like operating systems, licensed under GPL 3 or later. Paul Mackerras and Andrew Tridgell published this command first in 1996. Then it became part of most of the Linux distributions because of its speed and flexibility. The rsync command in Linux removed the need of sending all the data at once, which can be tricky for large amounts of data.
B. Syntax
The syntax of the rsync command in Linux is quite simple. The syntax is rsync command followed by one or multiple options, then source and destination.
rsync [OPTION]... SOURCE DESTINATIONC. Options
The rsync command in Linux comes with a lot of options. You can check them by coping the command below in Ubuntu Terminal:
man rsyncUseful Options
- -a, copies attributes of data.
- -h, shows data in a human-readable
- -v, enables verbose mode.
- -z, compresses
- –progress, shows progress report.
- –ignore-existing, ignores already existing files in the server.
- –delete, removes files from the server when they are deleted in the client.
- –remove-source-files, automatically deletes files after syncing.
- –chmod, sends file permissions.
- –dry-run, performs a dry run.
- –max-size, sets maximum file size.
- –bwlimit, sets maximum bandwidth.
How to Set Up A Server
As I have mentioned earlier, to use the rsync command in Linux, you need a server computer and a client computer. I installed Ubuntu on WSL (Windows Subsystem for Linux) and I will use that as the client computer. The Terminal of the client computer goes like walid@Client. I also used Windows Terminal to customize the Terminal’s appearance.
I also installed Ubuntu in VMware Workstation Pro and I will use it as the server. The Terminal of the server goes like walid@Ubuntu. Now I will show how to turn it into an ssh server:
- Launch a Terminal in Ubuntu.
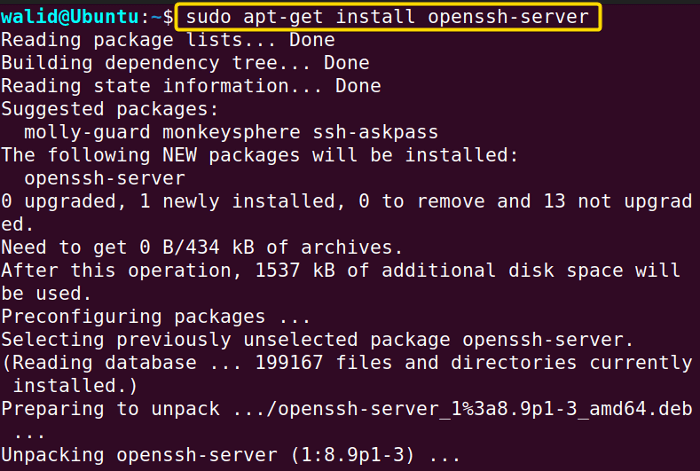
- Write the following command in the Terminal:
sudo apt-get install openssh-serverYou will get an output like below. It will be completed in no time.

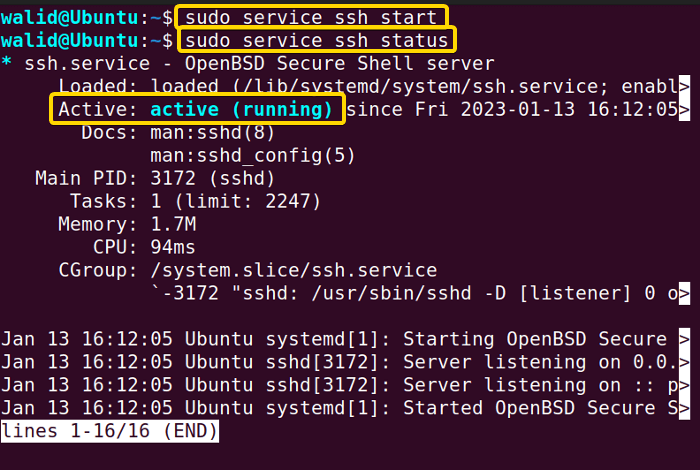
- Now, copy the following two commands in the command prompt:
sudo service ssh start
sudo service ssh status
If you see “active (running)” in the output, then you have successfully turned your Ubuntu in a ssh server.

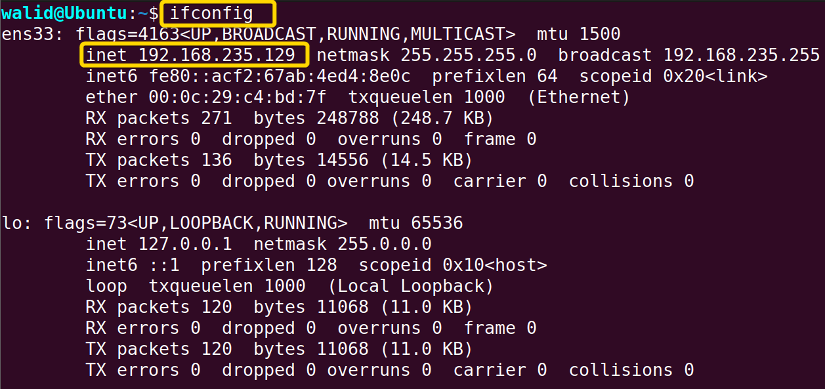
- To find the IP address of your server, type the command below in the Terminal:
ifconfigI will see “inet” followed by your IP address. Choose the first one.

Install the “rsync” Command in Linux
Installing the rsync command in Linux is a simple three steps process as mentioned below:
- At first, launch an Ubuntu Terminal.
- Copy the following command in the command prompt, press ENTER and provide a password (if necessary):
sudo apt-get updateYou will see an output like below. Wait for a little bit.
 Note: You may be able to install the rsync command in Linux without following Step 1. But it is a good practice
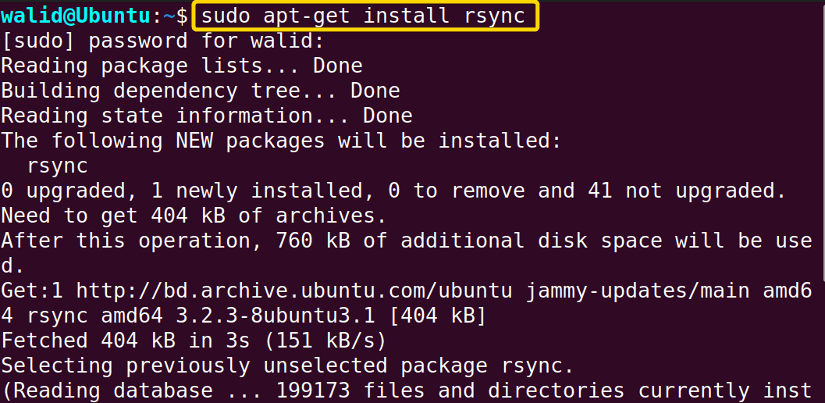
 - Now, type the following command in the Terminal and hit ENTER:
sudo apt-get install rsyncYour output will be like this. Wait for a while and the rsync command in Linux will be installed on your machine.

Practical Examples of the “rsync” Command in Linux
In this section, I will show some basic usage of the rsync command in Linux. As you will see, I have used options “a”,”h”, “v” and “z” throughout these examples. It is not like the rsync command won’t work without those options. But they will help the process run smoothly and help you understand it better. For instance, option “a” will preserve the attributes of the file or directory and option “z” will compress the file which will be useful for a slow internet connection. Moreover, options “h” and “v” show the process in a human-understandable format.
Example 1: Sync Files Locally Using the “rsync” Command in Linux
Firstly, I will show you how to sync a file locally using the rsync command in Linux. In my home directory, there is a file and a folder. Now I want to copy/sync the file to the folder. I can do that by the three steps below:
- At first open the Ubuntu Terminal.
- Type the following command in the command prompt:
rsync -ahvz file folder - Now, press the ENTER button.
At first, I used the “ls” command to show you the content of my home directory. Then I used the rsync command. Now you can see, there is a file named file in the folder named folder.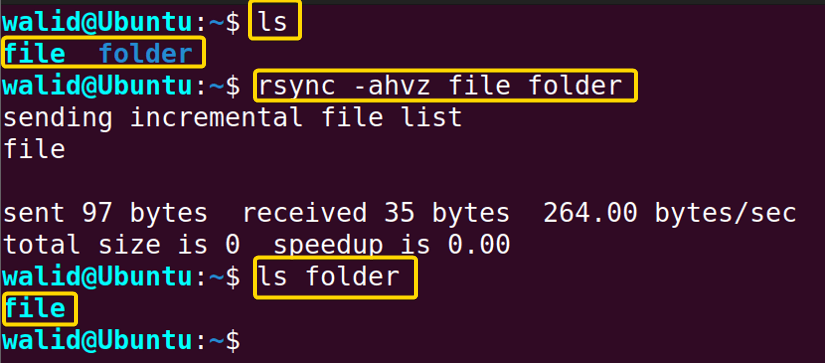
Similar Readings
- The “iptables” Command in Linux [6 Practical Examples]
- The “tcpdump” Command in Linux [6+ Practical Examples]
- The “nslookup” Command in Linux [12 Practical Examples]
- The “ufw” Command in Linux [12+ Practical Examples]
Example 2: Sync a Folder With A Server
In this example, I will work with my server. In the client computer, there is a folder containing five files. I want to sync those files to a remote server.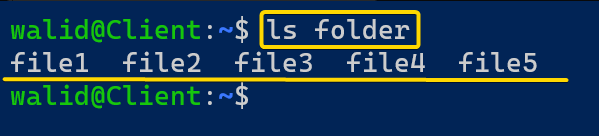 Now do the following:
- Open a Terminal in your client computer.
- Insert the following command in the command prompt:
rsync -ahvz folder [email protected]:~Note: Here folder is the source and the home directory of the server is the destination. The tilde symbol (~) denotes home directory. Moreover, walid is the username whereas 192.168.235.129 is the IP address of the server - Provide the password of the username.
- Press ENTER button from the keyboard.
This image shows the output of the rsync command in Linux. If you don’t enable the verbose mode (option “-v”), you won’t see a detailed output like that. And, in the server there is the folder now, containing exactly the same files.
Example 3: Show Progress Using the “rsync” Command in Linux
If you are syncing a large amount of data, a progress report is necessary. Otherwise, you won’t know whether the process is going properly. The rync command in Linux has an option “–progress” to show you the progress report. You do use that option by following the steps below:
- Press CTRL + ALT + T to open a Ubuntu Terminal in your client computer.
- Write the following command in that Terminal:
rsync -ahvz --progress folder [email protected]:~ - Press ENTER and provide a password.
- Hit ENTER again.
As you can see, it is showing the progress of every step. 100% means syncing is completed.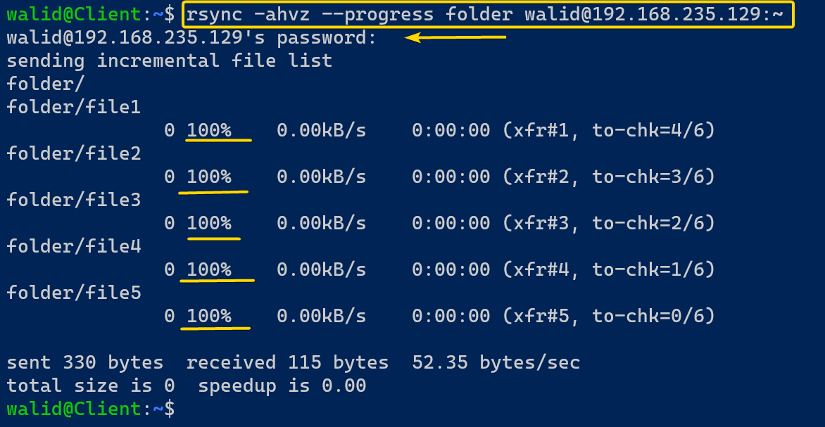
Example 4: Ignore Already Existing Files
In the folder directory of the client computer, there is a new file named newfile. I want to sync that folder to the server computer. However, I don’t want to copy already existing files. You need the “–ignore-existing” option of the rsync command in Linux to do that. I also used the “–progress” option to show you what is really happening. To sync only new files (or directories), follow the steps below:
- At first, go to your client computer and open an Ubuntu Terminal.
- Copy the following command in the command prompt and press ENTER:
rsync -ahvz --ignore-existing --progress folder [email protected]:~ - Provide the password and hit ENTER again.
In the output, as you can see, the rsync command is only copying the newfile as other files already exist in the server.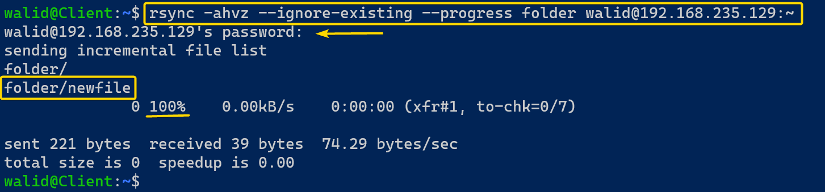
Example 5: Remove Locally Deleted Files
If you remember Example 4, there is a directory name folder in the home directory of the client. Here I deleted the last three files. Now I want to sync the folder in a way that file4, file5 and newfile will be deleted in the server as well. The “–delete” option in the rsync command in Linux makes it possible.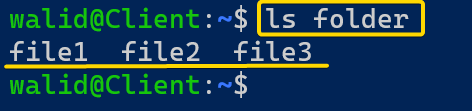 Follow the steps below to remove locally deleted files:
- Lauch Ubuntu Terminal from client computer.
- Write the following command in the command prompt and hit ENTER:
rsync -ahvz --delete folder [email protected] - Give the password and press ENTER again.
This output is showing that the rsync command is deleting those three files from the server.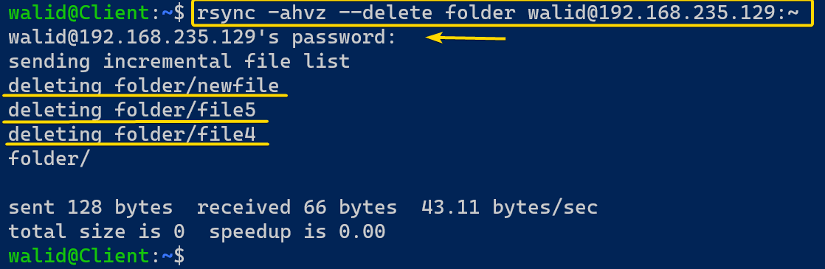 Here I executed the command “ls” in the server. Now see, the server’s folder is similar to the client.
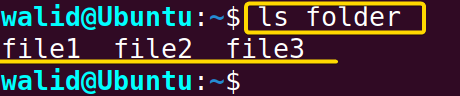
Example 6: Automatically Detele Source Files Using the “rsync” Command in Linux
If you feel like you don’t need the source data after syncing them with the server, then you can automatically delete them using the “–remove-source-files” option in the rsync command in Linux. Do the following:
- Open an Ubuntu Terminal by pressing CTRL + ALT + T.
- Insert the following command in the Terminal and press ENTER:
rsync -ahvz --remvoe-source-files folder [email protected]:~ - Provide the necessary credential and hit ENTER from your keyboard.
I didn’t get any warning or notification in the Terminal while my files are being deleted. But look, when I listed out the content of the folder directory, all the files are gone.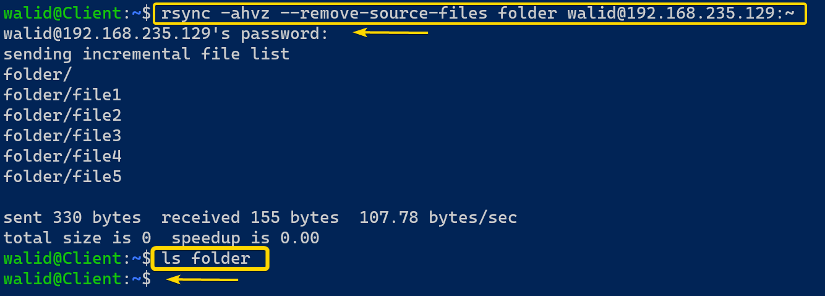
Example 7: Sync with Particular File Permission
In the image below, the file named file has no permission. However, I want to provide reading, writing and executing permissions to the owner of the server. You need to use the “–chown” option of the rsync command in Linux for that purpose. Now do the following with me:
- Go to your Windows and launch an Ubuntu Terminal.
- Type the command below:
sudo rsync -ahvz --chmod=u=rwx file [email protected]:~ - Provide password of the client computer.
Here I had to use “sudo” because only the root user has permission to access this file. I used “chmod=u=rwx” to give the owner(u) reading(r), writing(w) and executing(x) permission. Any groups or others can’t access the file.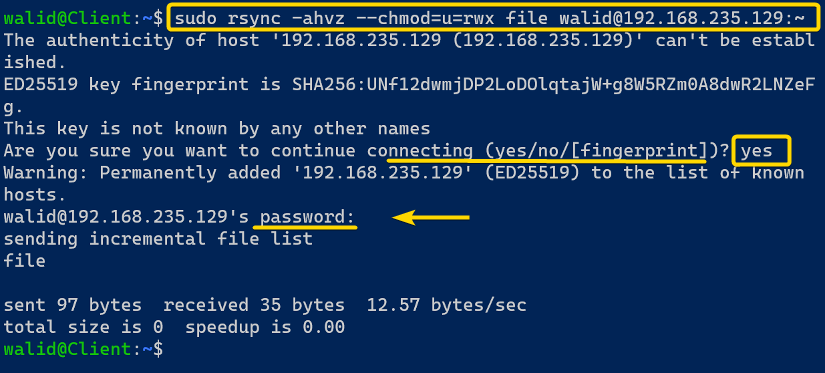 Again, I used the “ls -l” command to see the permissions of the file on the server. See, only the owner has permission now.
Example 8: Perform a Dry Run Using the “rsync” Command in Linux
Let’s you have some sensitive data and want to copy them to a remote server. But before that, you want to check if everything is working fine. You are in luck because you can give a dry run using the option “–dry-run” in the rsync command in Linux. Now follow the proceedings below step by step:
- Open a Terminal in Ubuntu from your client computer.
- Write the following command in the command prompt:
rsync -ahvz --dry-run folder [email protected]:~ - Press ENTER from your keyboard.
- Give the password for your corresponding username in the server and press ENTER again.
The output looks like a normal output of the rsync command in Linux but nothing is happening in reality.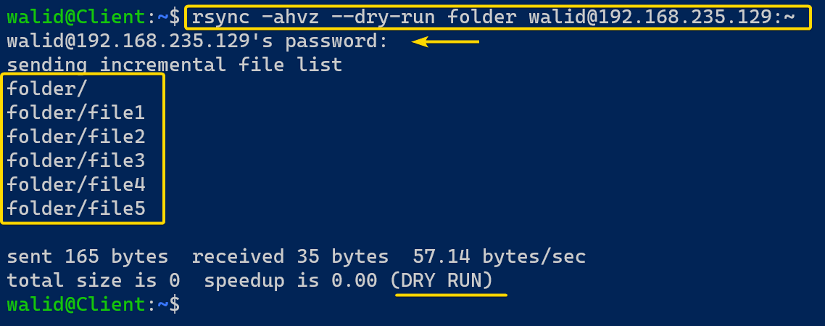 In the server, as you can see, the folder isn’t copied and the home directory is empty.
Similar Readings
- The “traceroute” Command in Linux [13 Practical Examples]
- The “ssh” Command in Linux [18 Practical Examples]
- The “screen” Command in Linux [13 Practical Examples]
- The “arp” Command in Linux [7 Practical Examples]
Example 9: Set Maximum File Size
The “–max-size” option in the rsync command in Linux is used to limit file size. For instance, I have a big file in size named big_file in the folder directory of the client machine. And I want to limit syncing to 500M. But the big_file is obviously bigger than 500M. Now let’s see what happens. Follow the steps below with me:
- Launch an Ubuntu Terminal from the client machine.
- Copy the following command in the Terminal and hit ENTER:
rsync -ahvz --max-size=’500M’ folder [email protected]:~ - Write the necessary password.
- Find the ENTER button on your keyboard and press it.
In this image, I showed you how to provide value for the “–max-size” option. However, if you limit your size to the range of bytes, it may generate an error.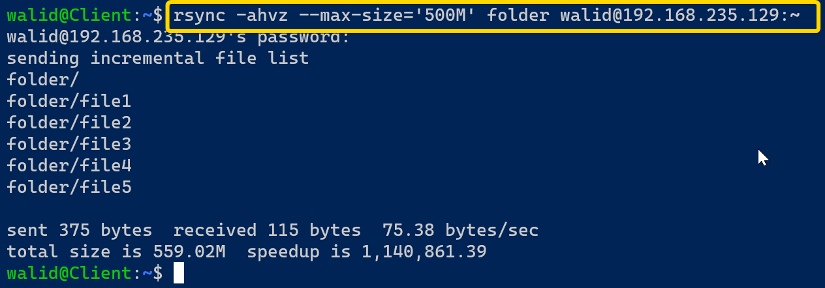 Now see, all the other files are copied except the big_file as it is bigger than 500M.
Example 10: Set Bandwidth Using the “rsync” Command in Linux
Finally, I will end my examples by setting the bandwidth. It is useful for steady communication on a slow internet connection. I will use the option “–bwlimit” for that purpose and set the bandwidth to 1MB/s. In addition, I used the “–progress” option so that you can see the result. Now, do the following with me:
- Press CTRL + ALT + T to lauch an Ubuntu Terminal in the client computer.
- Insert the command below in the Terminal and hit ENTER:
rsync -ahvz --bwlimit=1M --progress folder [email protected]:~ - Give password and press ENTER again.
Here, I provided the option “–bwlimit” value 1M as I want to fix my bandwidth to 1MB/s. You can already see the result. The speed is 1.00MB/s now.
Conclusion
If you are interested in networking, then the rsync command in Linux is a necessary tool. Moreover, you can set up an ssh server anytime, anywhere to copy or sync files or directories. I hope all the examples above have helped to understand the rsync command in Linux.
Similar Readings
- The “wget” Command in Linux [14 Practical Examples]
- The “ping” Command in Linux [9 Practical Examples]
- The “curl” Command in Linux [9 Practical Examples]
- The “ dig” Command in Linux [10 Practical Examples]
- The “hostname” Command in Linux [12 Practical Examples]
- The “ip” Command in Linux [9+ Practical Examples]
- The “ifconfig” Command in Linux [6+ Practical Examples]
FUNDAMENTALS A Complete Guide for Beginners


