The ifconfig command in Linux stands for “Interface Configuration”. It configures the necessary kernel-resident network interfaces at the system boot. Users can also apply this command to configure interfaces as per their needs. In this article, I will illustrate the basic usage of the ifconfig command in Linux.
A. Description
The ifconfig command in Linux is used to configure a network interface. If no argument is passed it lists all the active interfaces on a system.
B. Syntax
The syntax of the ifconfig command in Linux is really simple as it contains the command itself and single or multiple options. The syntax is given below.
ifconfig [OPTION]...C. Options
Many useful options are available for the ifconfig command. I have listed some of the most used ones here. However, to learn more about the ifconfig command you can always check the man page.
man ifconfigUseful Options
- -a: Displays all available interfaces including down ones.
- address: Indicates the IP address to be assigned to an interface.
- -s: Displays a short list of active interfaces.
- -v: Displays verbose output for error conditions.
- interface: Indicates specified interface.
- up: Activates an interface.
- down: Shuts down an interface.
- mtu N: Sets the Maximum Transfer Unit (MTU) of an interface.
- [-]arp: Enables or disables the promiscuous mode of the interface.
- [-]promisc: Enables or disables the promiscuous mode of the interface.
- add addr/prefixlen: Adds an IPv6 address to an interface.
- del addr/prefixlen: Removes an IPv6 address from an interface.
Installing the “ifconfig” Command in Linux
The ifconfig command may not be readily installed on your machine. You can find out whether you have it on your system or not by typing the command ifconfig itself.
ifconfigYour system will print out the following message if you do not have it installed:
In this case, don’t be overwhelmed. The ifconfig command comes with the net-tools package. You can install the net-tools package within a minute by following the instructions below.
Steps to Follow >
➊ At first, open the Ubuntu Terminal
➋ Type the following in your command prompt:
sudo apt install net-tools➌ Type your password
➍ Now, press ENTER
Output >
Upon completion of these four steps, ifconfig will be installed on your machine.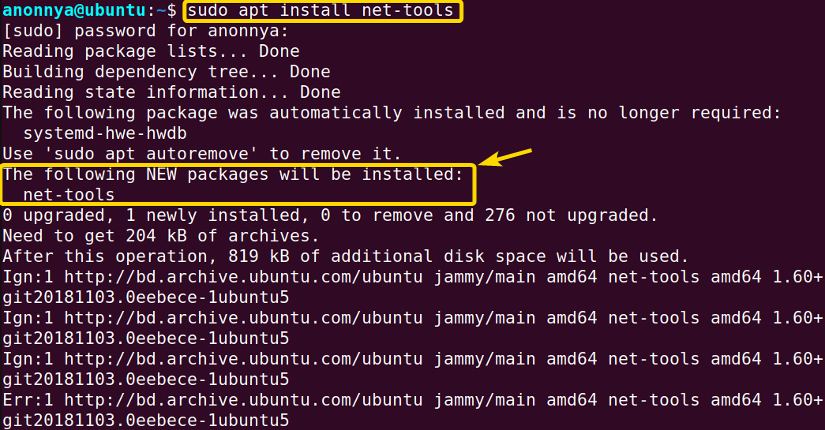
Practical Examples of the “ifconfig” Command in Linux
The ifconfig command in Linux is a command that enables users to configure network interfaces. Some of the most useful applications of the ifconfig command have been illustrated below.
Example 1: Displaying Information on All Network Interfaces Available on the System
You can display information on all networks connected to your system using the ifconfig command in Linux. You will need to use the option –a to get this output. In this example, I will display all the interfaces available on my system. Follow the instructions below to do the same.
Steps to Follow >
➊ At first, open the Ubuntu Terminal.
➋ Type the following command in the command prompt:
ifconfig -a➌ Now, press the ENTER button.
Output >
In the given image, you can see that I have displayed all the network interfaces on my system.
Similar Readings
- The “ftp” Command in Linux [14 Practical Examples]
- The “host” Command in Linux [10 Practical Examples]
- The “scp” Command in Linux [4 Practical Examples]
- The “sftp” Command in Linux [6 Practical Examples]
Example 2: Displaying a Short List of Active Network Interfaces Using the “ifconfig” Command in Linux
You can display a short list of all the active network interfaces using the ifconfig in Linux with the option -s. In this example, I will list the interfaces on my system. You can do the same by following the steps below.
Steps to Follow >
➊ Open the Ubuntu Terminal.
➋ Type the following command in the command prompt:
ifconfig -s➌ Press the ENTER button.
Output >
In the image below, you can see that I have displayed a short list of the active interfaces.
Example 3: Assigning IP Address to an Interface Using the “ifconfig” Command in Linux
You can add a new IP address to your available network device using the ifconfig command in Linux. You must run the command as the superuser using the sudo keyword to achieve this task. The IP address needs to be mentioned after the specified interface. In this example, I will add the address 192.168.242.240 to the ens33 network on my system. You can do so by following the process below:
Steps to Follow >
➊ At first, launch the Ubuntu Terminal.
➋ Type the following command in the command prompt:
sudo ifconfig ens33 192.168.242.240➌ Now, hit the ENTER button.
Output >
In the image below, you can see that I have added the desired IP address to the ens33 interface. You can again use the ifconfig command along with the interface name to view the updated IP address.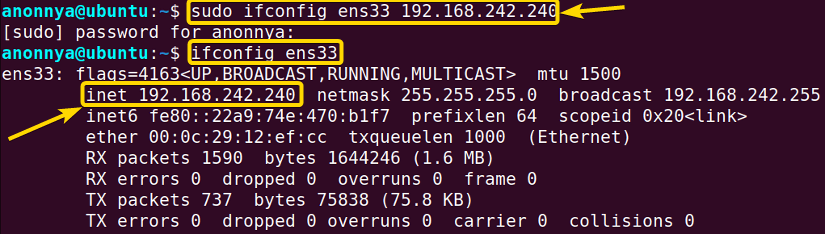
Example 4: Altering Status of Network Interfaces Using the “ifconfig” Command in Linux
You can alter the network interface status from your terminal using the ifconfig command in Linux. You can bring an interface up or down by running commands as a superuser using the sudo command. To do so, you will need to use the options up or down after a specific interface name. Follow the below examples to change the statuses separately.
Case A: Bringing an Interface Up Using the “ifconfig” Command in Linux
To bring an interface up follow the given steps.
Steps to Follow >
➊ At first, open the Ubuntu Terminal.
➋ Type the following command in the command prompt:
sudo ifconfig ens33 up➌ Now, press the ENTER button.
➍ To view the updated status write the following command:
ip link show dev ens33➎ Again, press ENTER.
Output >
In the image below, you can see that I have changed the interface status to UP.
Case B: Bringing an Interface Down Using the “ifconfig” Command in Linux
To bring an interface down follow the given steps.
Steps to Follow >
➊ At first open the Ubuntu Terminal.
➋ Type the following command in the command prompt:
sudo ifconfig ens33 down➌ Now, press the ENTER button.
➍ To view the updated status write the following command:
ip link show dev ens33➎ Again, press ENTER.
Output >
In the following image, you can see that I have changed the interface status to DOWN.
Example 5: Setting MTU size Using the “ifconfig” Command in Linux
You can set the Maximum Transfer Unit of an interface using the mtu option with the ifconfig command in Linux. In this example, I will set the transfer unit of the “ens33” interface to 500. To do the same, you can go through the following steps.
Steps to Follow >
➊ At first, launch the Ubuntu Terminal.
➋ Type the following command in the command prompt:
sudo ifconfig ens33 mtu 500➌ Hit ENTER.
Output >
In the given image, you can see that I have set the mtu amount to the desired value of 500. I again used the ifconfig command along with the interface name to view the updated mtu value.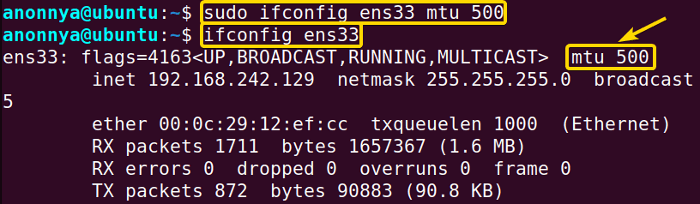
Similar Readings
- The “ dig” Command in Linux [10 Practical Examples]
- The “hostname” Command in Linux [12 Practical Examples]
- The “ip” Command in Linux [9+ Practical Examples]
- The “iptables” Command in Linux [6 Practical Examples]
Example 6: Enabling/Disabling Promiscuous Mode Using the “ifconfig” Command in Linux
You can enable or disable the promiscuous mode of an interface using the ifconfig command in Linux. To do so you have to use the promisc option with or without the “–” to enable or disable the mode. Follow the below examples to achieve the two different modes.
Case A: Enabling Promiscuous Mode Using the “ifconfig” Command in Linux
To enable the promiscuous mode of an interface, follow the given steps.
Steps to Follow >
➊ At first, open the Ubuntu Terminal.
➋ Type the following command in the command prompt:
sudo ifconfig ens33 promisc➌ Hit ENTER button.
Output >
In the following image, you can see that I have enabled the promiscuous mode for the interface “ens33”. You can again use the ifconfig command along with the interface name to view the updated status.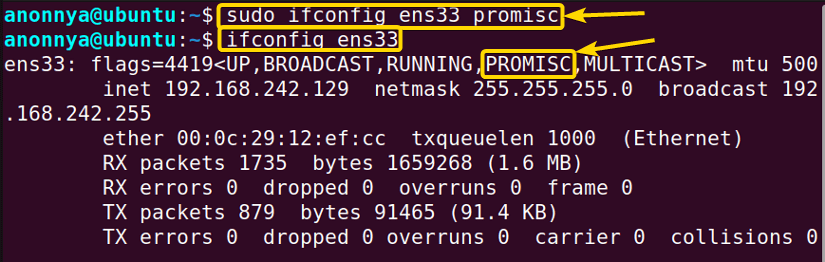
Case B: Disabling Promiscuous Mode Using the “ifconfig” Command in Linux
To disable the promiscuous mode of an interface follow the given steps.
Steps to Follow >
➊ At first, go to the Ubuntu Terminal.
➋ Type the following command in the command prompt:
sudo ifconfig ens33 -promisc➌ Press ENTER.
Output >
In the given image, you can see that I have disabled the promiscuous mode for the interface “ens33”. You can again use the ifconfig command along with the interface name to show you the updated status.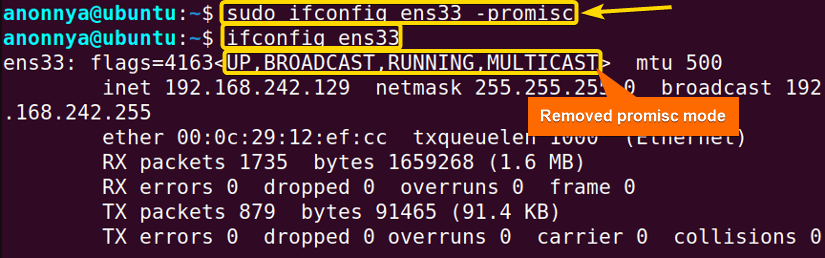
Conclusion
This article presents the most frequent uses of the ifconfig command in Linux. Exercising the provided hands-on examples, you will be able to configure network interfaces along with viewing their information. I hope the demonstrations aid your experience in the command line and help you become a power user of Linux.
Similar Readings
- The “netstat” Command in Linux [22 Practical Examples]
- The “nslookup” Command in Linux [12 Practical Examples]
- The “ufw” Command in Linux [12+ Practical Examples]
- The “ssh” Command in Linux [18 Practical Examples]
- The “traceroute” Command in Linux [13 Practical Examples]
- The “rsync” Command in Linux [10 Practical Examples]
FUNDAMENTALS A Complete Guide for Beginners


