The netstat command in Linux is a network display command tool that stands for Network Statistics. It displays all the network-associated information such as the list of all the network connections on the system, routing tables, interface statistics, multicast memberships, masquerade connections, etc. The command can also display the current state of a network interface, like its IP address, netmask, and status. In this article, I will talk about the most basic usage of the netstat command with some practical examples.
A. Description
The netstat command in Linux is an essential tool for detecting network problems. It is mostly used by system administrators to troubleshoot network issues, monitor network traffic, and view the status of the network status. This command is a handy tool for them as the command displays the list of all the active network connections (including TCP, UDP, UNIX) along with the connections that are pending. It also displays which ports are open or established connections. And by verifying an open port, it can be tested if a webserver is running on the system or not.
B. Syntax
The netstat command is a useful tool for network administrators for troubleshooting network-related issues. The syntax of the netstat command is too simple. The syntax is,
netstat [OPTION]...C. Options
The netstat command itself, without any options, displays all the active connections and open sockets of all the address families of the system network. And it also has several options which you can use to modify the displayed list. I will give a small list of them with short details here. Learn more about these options of netstat command from the man page.
man netstatUseful Options
- -a, –all, to display all active connections.
- -at, to display all active TCP.
- -au, to display all active UDP.
- -l, –listening, to display only listening ports.
- -M, –masquerade, to display all masquerade connections.
- -r, –route, to print the kernel routing tables.
- -g, –groups, to display multicast group membership information.
- -i, –interfaces, to display all network interfaces.
- -ie, to display the statistics for a specific network interface.
- -s, –statistics, to display the summary statistics of each protocol.
- -st, to display the statistics of TCP.
- -su, to display the statistics of UDP.
- -c, –continuous, to print netstat information continuously.
- -n, –numeric, to display numeric addresses defining symbolic hosts, ports, or usernames.
- -v, –verbose, to display the detailed output.
- -A, –protocol=family, to specify the address families for which connections are to be displayed.
- -e, –extend, to display extended output.
- -o, –timers, to include networking timers-related information.
- -p, –program, to display the PID and name of the process of the corresponding sockets.
- -C, to display the routing information from the route cache.
Installing the “netstat” Command in Linux
The installation process of the netstat command in Linux is simple. Just like in the picture below, you can see that the command is not installed on the machine and how to install it. So you can install the command within a few minutes by running the specified command. Follow the below steps to install the netstat command.
Steps to Follow >
➊ At first open the Ubuntu Terminal
➋ Type the following in your command prompt:
sudo apt install net-tools➌ Type your password
➍ Now, press ENTER key.
Output >
After completing these simple four steps, like the below picture within a minute, the netstat command will be installed on your system.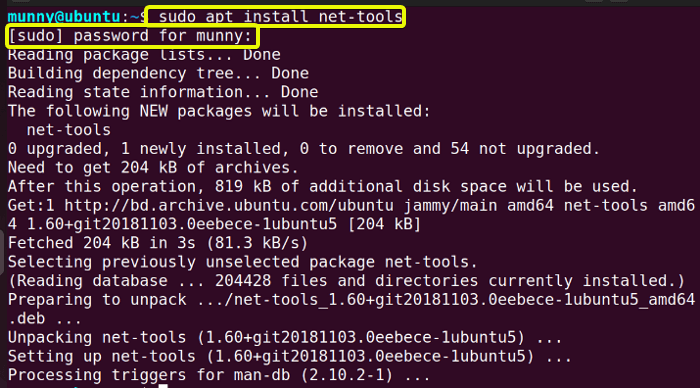
Practical Examples of the “netstat” Command in Linux
The netstat command is one of the most basic network service debugging tools. Even though it has been replaced with the ss command in recent years, it is still a powerful tool. You can use the netstat command in different ways from monitoring the network traffic to troubleshooting the network issues. If you type the command with no arguments or options specified, it will display a list of all the open sockets of all addressed families. Just type the following command in the command prompt:
netstatAfter running the command, you will see the list in your output display just like in the picture below.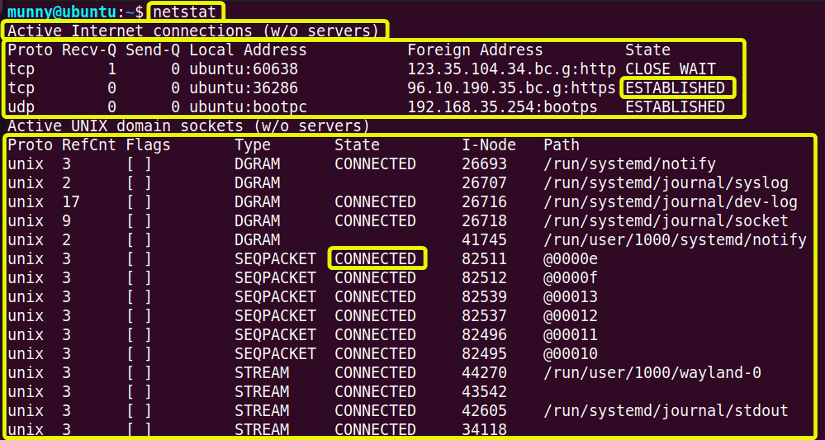
Understanding Output >
The first line of the output displays all the active established internet connections on your computer. And there are 6 columns in this section. These columns are,
- Proto →It shows the Protocol (TCP, UDP) of the connection.
- Recv-Q →This is Receive Queue, which shows bytes received or ready to be received.
- Send-Q →It represents Send Queue, which sends bytes ready to be sent.
- Local Address →It tells about the Address in detail and the port of the local connection. The asterisk sign (*) in the host notifies that the server is listening along with if the port is not established yet.
- Foreign Address→ It gives displays of the address and port details of the remote end connection. The asterisk sign (*) will appear if a port has not been established.
- State→ Shows the State (Established, Listening, Closed, or Blank) of the local socket.
The second list of the output display shows all the active UNIX domain sockets. It has 7 columns of information, that represent the following:
- Proto → Displays Protocol used by the UNIX
- RefCnt→ Gives the Reference Count of the number of attached processes to the UNIX
- Flags→ Normally ACC or blank.
- Type→ Tells the Socket Type.
- State→ Shows the state (Connected, Listening, or Blank) of the socket.
- I-Node→ It means file system Index-Node, associated with the socket.
- Path→ This is the system Path to the socket.
The netstat command has many practical usages. I will discuss some of them with practical examples in this article. Hence, keep reading to learn about them.
Example 1: Display ALL Active Connections Using the “netstat” Command in Linux
The netstat command displays the list of all active network connections. To display the full list of all sockets (both listening and non-listening), and protocols use the option –all, or -a with the netstat command. The syntax is,
netstat -aFollow the below steps to check yourself.
Steps to Follow >
➊ At first open the Ubuntu Terminal.
➋ Type the following command in the command prompt:
netstat -a➌ Now, press the ENTER button.
Output >
After running the command, you will see all the active network connections including TCP, UDP, and UNIX. And it is a long list. Check the below pictures of the first and last pages of my output display.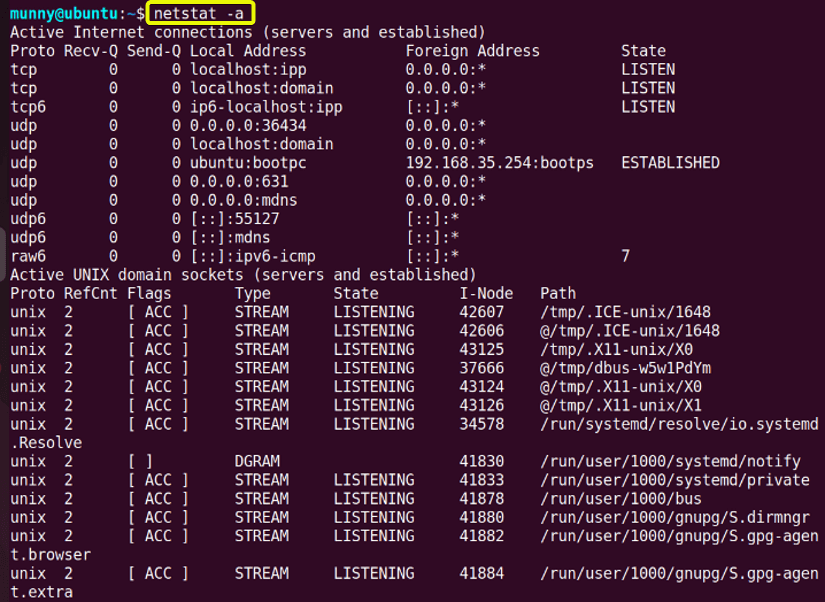 The following image is the last page of the list,
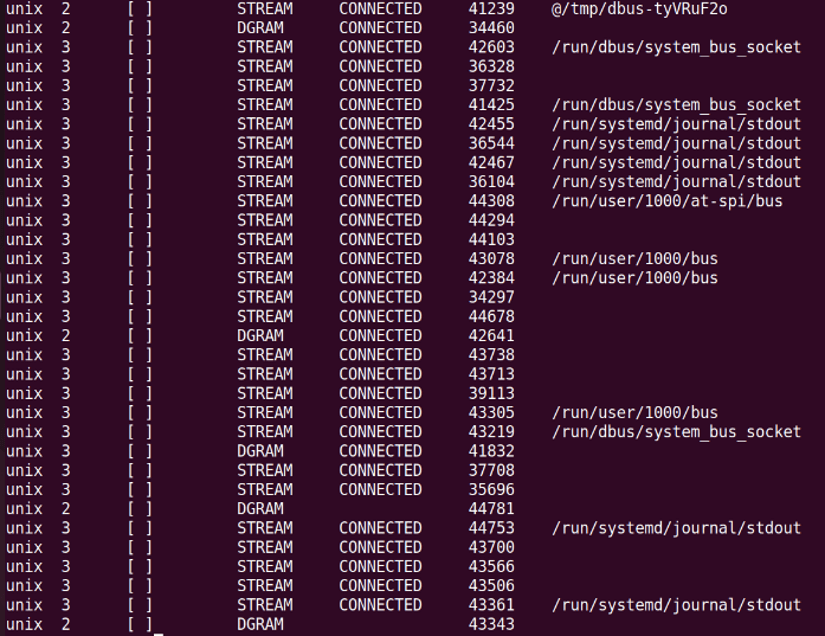
Similar Readings
- The “iptables” Command in Linux [6 Practical Examples]
- The “tcpdump” Command in Linux [6+ Practical Examples]
- The “nslookup” Command in Linux [12 Practical Examples]
- The “ufw” Command in Linux [12+ Practical Examples]
Example 2: Display Only Active TCP Connections
TCP (Transmission Control Protocol) connections are a type of network communication used to create a reliable and error-checked virtual connection between two devices on a network. Here, data is sent in the form of a packet, and each of the packets is acknowledged by the receiving device. It retransmits the packet if not acknowledged to ensure the data is delivered successfully and in order. You can view the list of all the TCP network connections using the netstat command. Just use the option -at with the command. The syntax is,
netstat -atGo through the below steps to view the list yourself.
Steps to Follow >
➊ Open the Ubuntu Terminal.
➋ Type the following command in the command prompt:
netstat -at➌ Finally, hit the ENTER button.
Output >
From the below picture, you can see the list of all the active TCP networks.
Example 3: Display Only Active UDP Connections
UDP (User Datagram Protocol) is a connectionless protocol for sending data packets over the network. It is a faster process than TCP as it does not create a virtual connection before sending the data. But it is less reliable as It does not maintain the order in which they were sent. You can view the list of all the active UDPs of your network using the netstat command. Just use the option -au with the command. The syntax is,
netstat -auSee the below steps to check the UDP list of your network.
Steps to Follow >
➊ First, open the Ubuntu Terminal.
➋ Then type the following command in the command prompt:
netstat -au➌ After that, tap the ENTER button.
Output >
In the output display, you will see the list of all active UDPs of your network just as in the below picture.
Example 4: Display All Active RAW Connections
RAW network connections are used for low-level communication such as ICMP (Internet Message Control Protocol) and other network control protocols leaving the usual protocol layers such as TCP & UDP. Raw connections are typically used for low-level network troubleshooting and custom network protocols that are not based on TCP or UDP. You can view the state of all raw network connections of your system using the option –raw or -w with the netstat command. The syntax is,
netstat -awRead the below steps to see the state of your system’s raw connections.
Steps to Follow >
➊ Open the Ubuntu Terminal.
➋ Type the following command in the command prompt:
netstat -aw➌ Now, srtike the ENTER button.
Output >
From the output, you can see the state of all your raw connections just like in the below picture.
Example 5: Display All the Listening Ports Using the “netstat” Command in Linux
A listening port is a port on the computer that waits for incoming connections. When there is a connection with the port, the assigned program or service of that port becomes active and starts communicating with the connected consumer. You can display the list of the listening ports of your network with the netstat command. Type the option –listening or -l with the netstat command. The syntax is,
netstat -lRead the following steps to check the list of listening ports on your network.
Steps to Follow >
➊ Start by opening the Ubuntu Terminal.
➋ Then type the following command in the command prompt:
netstat -l➌ Now, hit the ENTER key.
Output >
From the output display, you will get the list of all listening ports just like my output display below. It is a long list so keep scrolling to see all of them.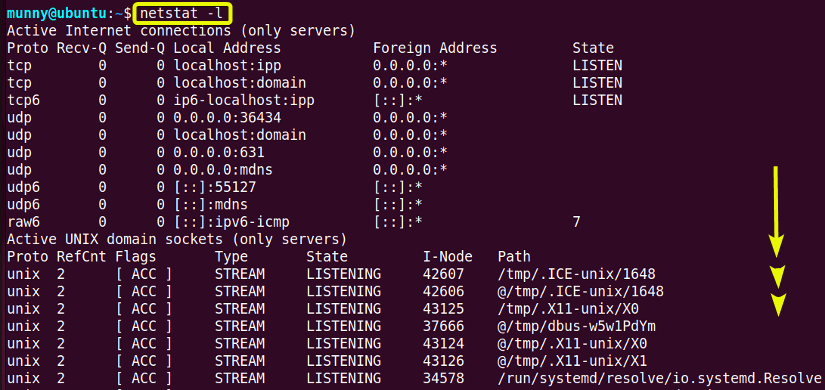
Example 6: Display Only TCP Listening Ports
TCP listening port uses the TCP protocol while waiting for a connection or making communication between the port-assigned program and the client after being connected. To check the list of only TCP listening ports, use the option -l for the listening port and -t for the TCP protocol with the netstat command. The syntax is,
netstat -ltCheck the below steps to view the list of TCP listening ports of your network.
Steps to Follow >
➊ Begin by opening the Ubuntu Terminal.
➋ Type the following command in the command prompt:
netstat -lt➌ Now, tap the ENTER button.
Output >
From the output image, you can see the list of TCP listening ports.
Example 7: Display Only UDP Listening Ports
While using the UDP listening port to make a connection between the port-associated program and the consumer, the port uses the UDP protocol to make the connection. To display only UDP listening ports in a list, use the netstat command with the option -lu. The syntax is,
netstat -luGo through the below steps to display the UDP listening ports.
Steps to Follow >
➊ At first open the Ubuntu Terminal.
➋ Type the following command in the command prompt:
netstat -lu➌ Now, press the ENTER button.
Output >
From the below picture, you can see all the UDP listening ports of your network.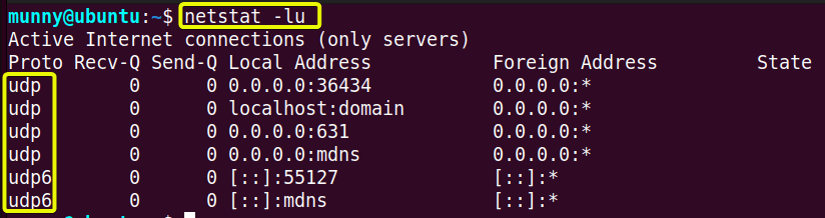
Example 8: Display Only the Listening UNIX Ports
The UNIX sockets allow processes to communicate with each other locally, and within the system through a file-based interface. So this is an Inter-Process Communication (IPC) mechanism in Linux. To display the list of all listening UNIX ports, use the option -l for listening and -x for UNIX, after the netstat command. The syntax is,
netstat -lxSee the below steps to check all the active UNIX domain sockets on your network.
Steps to Follow >
➊ At first open the Ubuntu Terminal.
➋ Type the following command in the command prompt:
netstat -lx➌ Now, strike the ENTER key.
Output >
From the output display, you will notice the list of all active UNIX sockets as in the below picture.
Example 9: Display the Routing Table Using the “netstat” Command in Linux
You can display the Kernel routing table using the netstat command in Linux. The routing table is a data structure used by Kernel that stores information about the routes to various network destinations. It is an important part of the network stack that helps to make routing decisions for all network packets which pass through the kernel. To view the routing table use the option -r with the netstat command. The syntax is,
netstat -rCheck the below steps to see the routing table list yourself.
Steps to Follow >
➊ Start by opening the Ubuntu Terminal.
➋ Then, type the following command in the command prompt:
netstat -r➌ After that, hit the ENTER button.
Output >
After running the command, you will see the Kernel IP routing table in your output display, just like the following image.
Similar Readings
- The “ftp” Command in Linux [14 Practical Examples]
- The “host” Command in Linux [10 Practical Examples]
- The “scp” Command in Linux [4 Practical Examples]
- The “sftp” Command in Linux [6 Practical Examples]
Example 10: List the Statistics of All Ports Using the “netstat” Command in Linux
To understand the overall health and performance of the network, it is necessary to view the statistics of all ports of the network. That generally refers to gathering and analyzing data about the usage and performance of all the network ports on the device. These data include information about the number of packets sent or received, the amount of data transferred, the number of errors and collisions, etc. You can display the statistics of all ports using the netstat command with the option -s. The command displays the statistics of IP, ICMP, TCP, and UDP protocols by default. The syntax is,
netstat -sFollow the below steps to view the statistics list yourself.
Steps to Follow >
➊ At first open the Ubuntu Terminal.
➋ Type the following command in the command prompt:
netstat -s➌ Now, tap the ENTER key.
Output >
From the following output image, you can see the statistics of all ports on your network.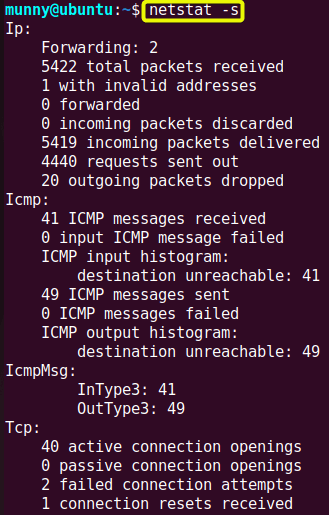
Example 11: List the Statistics of a Specified Protocol
You can also view the statistics of a specified protocol, instead of displaying all the statistics at once. To do that use the option of that specified protocol such as, –tcp or -t, –udp or -u, –ip, –raw with the statistics option -s, after the netstat command. The syntax is,
netstat -s <protocol_option_name>Read through the below steps to view the statistics of specified protocols yourself.
Steps to Follow >
➊ Open the Ubuntu Terminal.
➋ Type the following four commands in the command prompt one by one to view the statistics of TCP, UDP, IP, and raw protocols respectively :
netstat -stnetstat -sunetstat -s --ipnetstat -s --raw➌ Press the ENTER button after typing each command.
Output >
After running the first command, you will get the list of statistics of all TCP protocols like the picture below.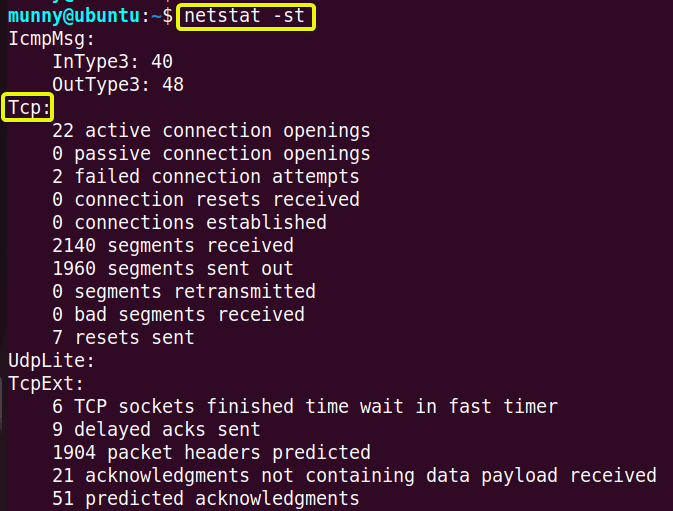 Then, run the second command, and you will get the list of statistics of all UDP protocols like the picture below.
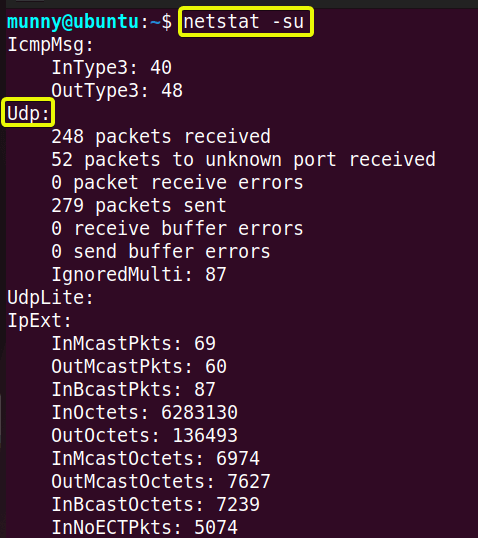 After that run the third command, and you will get the list of statistics of all IP protocols like the picture below.
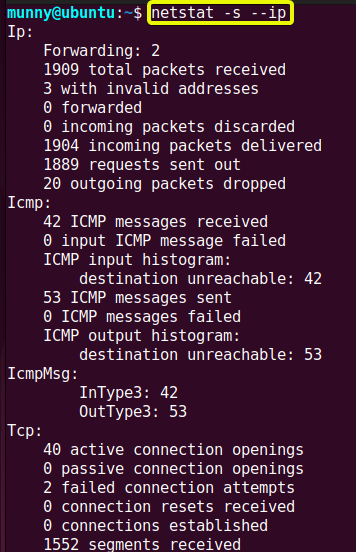 Finally, run the last command, and you will get the list of statistics of all RAW protocols like the picture below.
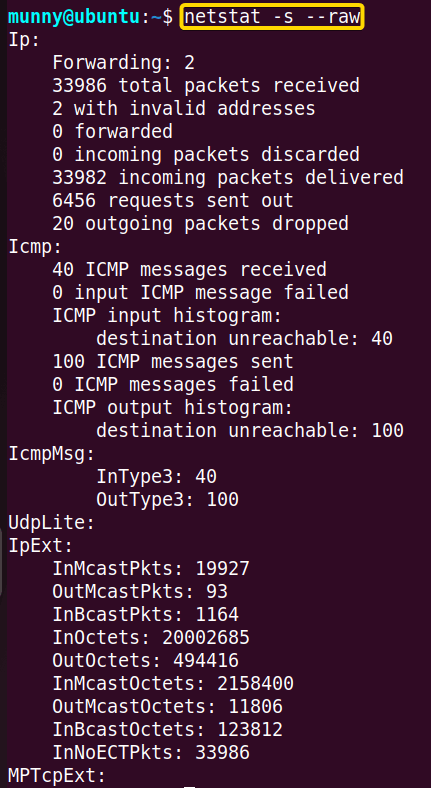
Example 12: Display the PID Numbers and Program Names in the Output
The Operating System assigns a unique number to each process being executed called PID (Process IDentifier). PIDs are used to identify and manage processes. System administrators use them to manage the processes such as killing a process or changing priority. You can view the PID numbers and the program names of your network, using the netstat command with the option -pt. The syntax is,
netstat -ptCarry out the below steps to check your network PID and program names.
Steps to Follow >
➊ At first open the Ubuntu Terminal.
➋ Type the following command in the command prompt:
netstat -pt➌ Now, press the ENTER key.
Output >
When you run the command, you will get an output display like the picture below. And if you check the list you will see the program names with their PID numbers in the last column of the list.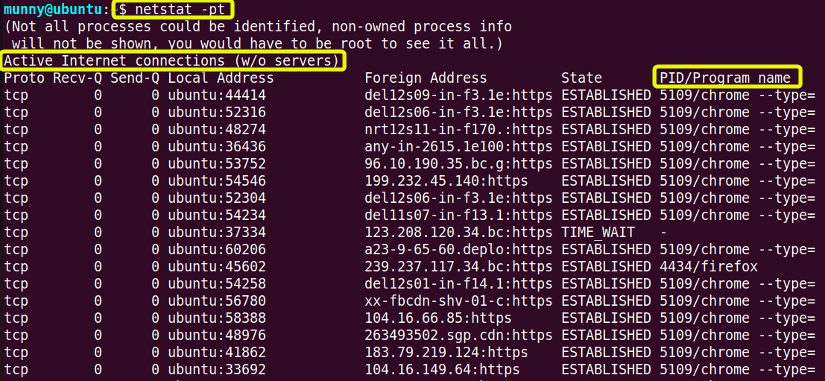
Example 13: Disable DNS Reverse Lookup for Faster Output
The netstat command uses the reverse DNS lookup to resolve IP addresses to hostnames. This makes the command a bit slower. If you don’t need the hostnames, just the IP addresses, you can disable the DNS reverse of the command using the option -n. The option tells the command to display IP addresses and port numbers in numeric form instead of resolving them to hostnames. That way the process becomes faster. The syntax is,
netstat -n [Options]Execute the following steps to display the list of all listening TCP protocols in numeric form.
Steps to Follow >
➊ At first open the Ubuntu Terminal.
➋ Type the following command in the command prompt:
netstat -ant➌ Now, strike the ENTER button.
Output >
After running the command, you can see that the output display is showing the list of IP addresses and port numbers of all the listening TCP protocols in numerics excluding the hostnames. And as the reverse DNS was disabled, the execution of the command was also a bit faster.
Example 14: List of All the Non-Supportive Address Families in the System
In Linux, address families refer to the protocol that is used to communicate over a network. The most common address families are the Internet Protocol (IP) and Internet Packet Exchange (IPX) families. And the non-supportive address family refers to the address family that is not supported by the system or by the network. For example, if a network is using IPv4 and a system tries to connect using IPv6, that would be considered a non-supportive address family. As the network does not support IPv6 and the system can not communicate using the protocol. You can find the list of non-supportive address families using the option –verbose of the netstat command. The syntax is,
netstat --verboseProceed with the following steps to check out the verbose list of address families.
Steps to Follow >
➊ Begin by opening the Ubuntu Terminal.
➋ Then, type the following command in the command prompt:
netstat --verbose➌ After that, press the ENTER key.
Output >
See the output display picture below, from which you can view the list of all address families.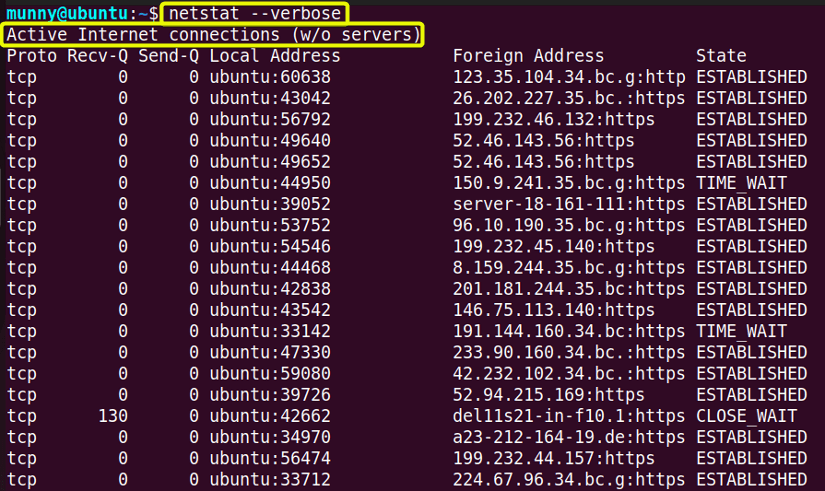 And if check the full list, from the bottom of the list you will the list of all non-supported address families, just like the picture below.
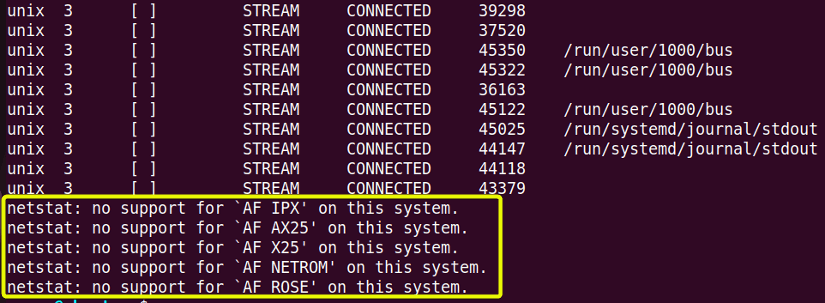
Example 15: Check All the Network Ports Are in Use
Port numbers are used to identify a connection endpoint and to send data to a specific service. You can check all your system network port lists and if they are actively listening and ready to accept connections. Use the netstat command with options -l, -n, -p, -t, -u to check the list of all your system network ports, and then use GREP to search which of them are in LISTEN state. The syntax is,
netstat [Options] | grep LISTENRead the below steps to check your active system network ports.
Steps to Follow >
➊ At first open the Ubuntu Terminal.
➋ Type the following command in the command prompt:
netstat -lnptu | grep LISTEN➌ Now, hit the ENTER button.
Output >
From the output picture, you can notice your network system port number list which is in LISTEN state. These ports are actively listening for incoming traffic and are ready to be connected with other devices.
Example 16: Seek Which Process is Using a Particular Port
You can check which process on your network system is using a particular port using the netstat command. First, display the list of all IP addresses and port numbers of active network connections using the netstat command with option -an and then use grep to search for that specified port number from the list. The syntax is,
netstat -an | grep <’:port_number’>See the below steps to search for a port number and its assigned process on your network system.
Steps to Follow >
➊ First, open the Ubuntu Terminal.
➋ Then, type the following command in the command prompt to search for port number 80:
netstat -an | grep ‘:80’➌ After that, tap the ENTER button.
Output >
From the output, you can see the IP address of the process that is assigned to the specified port number 80.
Similar Readings
- The “traceroute” Command in Linux [13 Practical Examples]
- The “rsync” Command in Linux [10 Practical Examples]
- The “screen” Command in Linux [13 Practical Examples]
- The “arp” Command in Linux [7 Practical Examples]
Example 17: Print the “netstat” Command Information Continuously
You can print the netstat information continuously, without stopping. The output display statistics will be updated continuously. To do so, run the command with the option –continuous or -c. After that, the command will continuously keep displaying the information unless you stop the process. You can stop the process by pressing CTRL+C. The syntax is,
netstat -cSee through the below steps to print netstat information continuously.
Steps to Follow >
➊ Start by opening the Ubuntu Terminal.
➋ After that, type the following command in the command prompt:
netstat -c➌ Finally, press the ENTER button.
Output >
After running the command, you will notice it is displaying the output information continuously. Which will look like the picture below,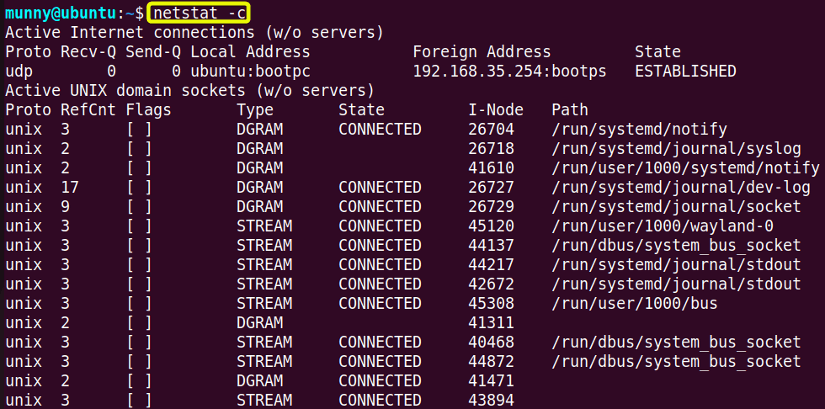
Example 18: Display the “netstat” Command Information With an Interval
You can set a delay time when the netstat command is running and display the output continuously. Suppose, you want to see the information of the command every 5 seconds rather than continuously, in that case, mention the time as an argument after the –continuous option. That way now the command will give you the information every 5 seconds. You can kill the process just like I mentioned in the upper example using the CTRL+C button. The syntax is,
netstat [Options] <time_span>Go through the below steps to set the delay time.
Steps to Follow >
➊ At first, open the Ubuntu Terminal.
➋ Then type the following command in the command prompt to set 5 seconds delay:
netstat -ac 5 | grep udp➌ Now, tap the ENTER key.
Output >
After running the command, you will notice that the command is refreshing its output data every 5 seconds.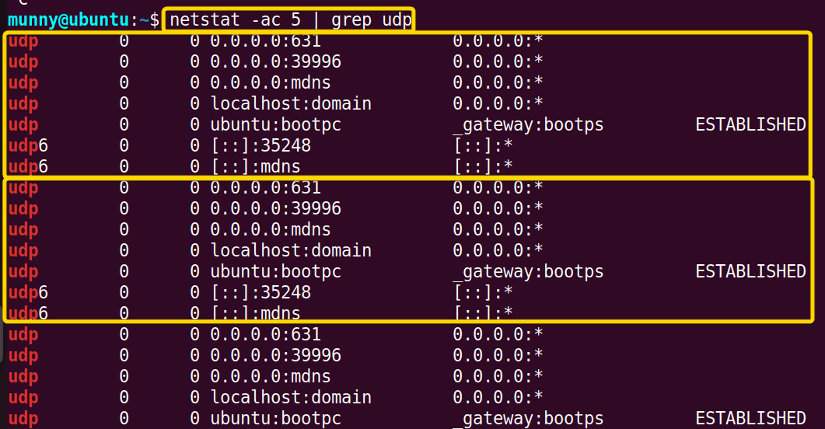
Example 19: Display All Network Interfaces Using the “netstat” Command in Linux
A network interface allows a device to connect to a network and communicate with other devices on that network. Each network interface has a network address. There are different types of network interfaces through which your device connects to a network. You can view the list of all your system network interfaces using the netstat command. Just use the option –interfaces or -i with the command. The syntax is,
netstat -iProceed to follow the below steps to view the list of all network interfaces yourself.
Steps to Follow >
➊ Open the Ubuntu Terminal.
➋ Type the following command in the command prompt:
netstat -i➌ Finally, hit the ENTER button.
Output >
From the output display, you can see the list of all your network interfaces.
Example 20: Display All the Network Interfaces With Detailed Information
You can view more detailed information about all the active network interfaces of your system. For that, use the option –expand with the interface option -i of the netstat command. The syntax is,
netstat -ieAct according to the below steps to check the detailed information of your active network interfaces.
Steps to Follow >
➊ At first open the Ubuntu Terminal.
➋ Type the following command in the command prompt:
netstat -ie➌ Now, tap the ENTER button.
Output >
See the below output display image, it is showing thorough and detailed information about all your active network interfaces.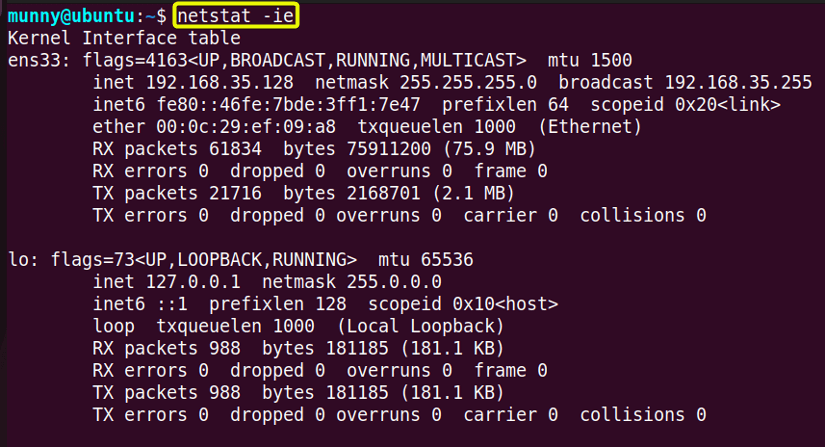
Example 21: Check If a Service Is Running Using the “netstat” Command in Linux
Using the netstat command, you can check if a particular service is running on your network system or not. Just display the list of all active network connections and then use grep to search the server name (such as http, ntp, or smtp) from that list and check the state. This way you can check if that server is running on your system or not. The syntax is,
netstat [Options] | grep <server_name>Follow the below steps to check if the http server is running on your system.
Steps to Follow >
➊ At first open the Ubuntu Terminal.
➋ Type the following command in the command prompt:
netstat -alpe | http➌ Now, strike the ENTER button.
Output >
From my output display, you can see that the server http is running. It is running the firefox program of PID number 2239.
Example 22: Display Information About the Multicast Memberships
Multicast is a networking process with which a single data packet can be sent to multiple destinations simultaneously. Multicast membership refers to joining or leaving a multicast group where a group of devices receives the same multicast traffic. You can view the list of your system network active multicast members and what network interfaces they are using with the netstat command. Type the option –group or -g with the command. The syntax is,
netstat -gCheck the below steps to view your system’s active multicast members.
Steps to Follow >
➊ Begin by opening the Ubuntu Terminal.
➋ Then type the following command in the command prompt:
netstat -g➌ Now, press the ENTER key.
Output >
From the output list, you can see all the multicast members of your network system with their active network interfaces.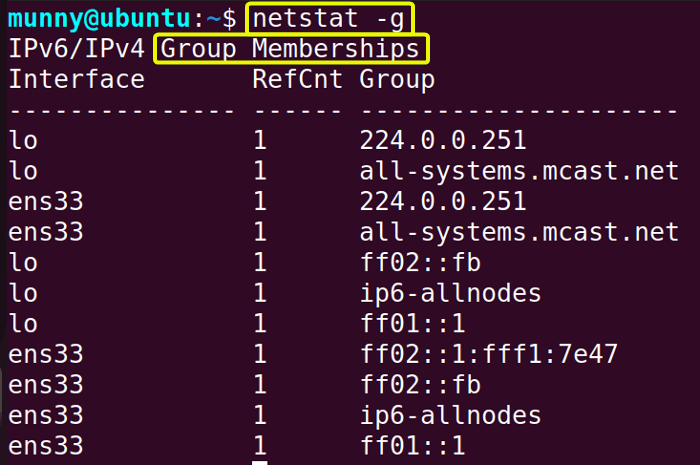
Conclusion
In the entire article, I discussed the networking command tool “netstat” and how it can be used to display various network-related information to monitor network traffic and troubleshoot different issues with some practical examples. Hope you enjoyed reading the article and learned the basics about the netstat command in LINUX.
Similar Readings
- The “wget” Command in Linux [14 Practical Examples]
- The “ping” Command in Linux [9 Practical Examples]
- The “curl” Command in Linux [9 Practical Examples]
- The “ dig” Command in Linux [10 Practical Examples]
- The “hostname” Command in Linux [12 Practical Examples]
- The “ip” Command in Linux [9+ Practical Examples]
- The “ifconfig” Command in Linux [6+ Practical Examples]
FUNDAMENTALS A Complete Guide for Beginners


