The ftp command in Linux uses the FTP (File Transfer Protocol) to transfer files between two computers (server and client). The FTP isn’t secure and it is highly recommended not to use it over the internet as there are other secure protocols available like SFTP (Secure File Transfer Protocol) and FTPS (File Transfer Protocol Secure). However, it is convenient and easy to share files using the ftp command in Linux. In this article, you will learn some basic concepts of the ftp command in Linux with some practical examples.
A. Description
The FTP (File Transfer Protocol), which is used by the ftp command in Linux, was developed in the 1970s and gained a lot of popularity within a very short time. It is still in use today. Even though due to security issues, its usage has become limited over the internet but it is used in large amounts locally. Someone interested in networking should learn this command.
Nowadays, the ftp command in Linux uses two modes to transfer files, active mode and passive. In active mode, the client computer initiates data connection by sending the server a port number and then the file transformation is done through that port. However, in the passive mode, the port number is decided by the server. Passive mode is more firewall-friendly and less likely to have a connection blocked by a firewall. In addition, accessing a new port by a client or server makes data transformation in the ftp command in Linux more secure. For your information, the ftp command uses port 21 to communicate and port 20 to transfer files by default.
B. Syntax
You can provide multiple options for the ftp command in Linux. The syntax of the ftp command goes like the following:
ftp [OPTION]... username@ip_address [PORT]C. Options
As I have mentioned earlier, the ftp command in Linux provides a lot of options. You can check them by inserting the following command in an Ubuntu Terminal:
man ftpUseful Options
- -4, only uses IPv4.
- -6, only uses IPv6.
- -v, enables verbose mode.
- -P, is used to provide port numbers.
- -p, enables passive mode
- -A, forces active mode
How To Set Up an FTP Server
To use the ftp command in Linux, you must first have a client and a server computer. I have used Ubuntu on WSL(Windows Subsystem for Linux) as the client computer. The Terminal of the client computer goes like walid@Client. Moreover, I installed Windows Terminal to customize the appearance of the Terminal.
In addition, I have used Ubuntu in VMWare Workstation Pro as the server. The server Terminal goes like walid@Ubuntu. This section I will show you how to set up an FTP server.
Steps to Set Up the FTP Server
❶ At first, launch an Ubuntu Terminal on the server computer.
❷ Copy the following command in the Terminal to install “vsftpd” package and press ENTER:
sudo apt-get install vsftpdI will see an output like below. The package will be installed within a very short time.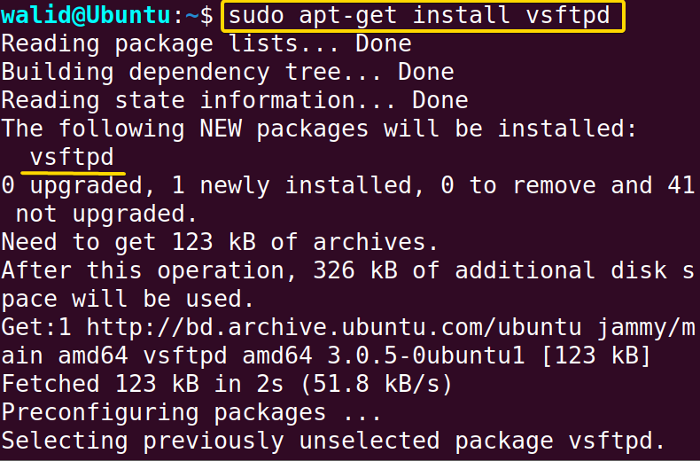 ❸ Insert the following command to open the vsftpd.conf file and hit ENTER.
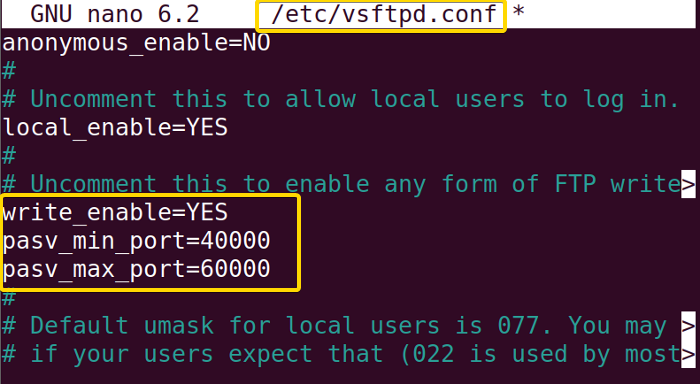
sudo nano /etc/vsftpd.conf❹ Add the following three lines in the vsftpd.conf file, press CTRL+O, followed by CTRL+X to save and exit:
write_enable=YES

pasv_min_port=40000

pasv_max_port=60000
The “write_enable=YES” line will allow uploading to the FTP server. And the next two lines will make the server use a port in the range of 40000 to 60000 in the passive mode for data transformation.
 ❺ Execute the following commands in the command prompt one by one:
sudo ufw allow 20/tcpsudo ufw allow 21/tcpsudo ufw allow from any to any port 40000:60000 proto tcpsudo service vsftpd startsudo service vsftpd statusHere, the first three commands have added necessary rules in the firewall to allow communication through port 20,21 and 40000 to 60000. The next command has started the vsftpd service on the server. Finally, I checked the server status of the server. It is showing “active (running)”. 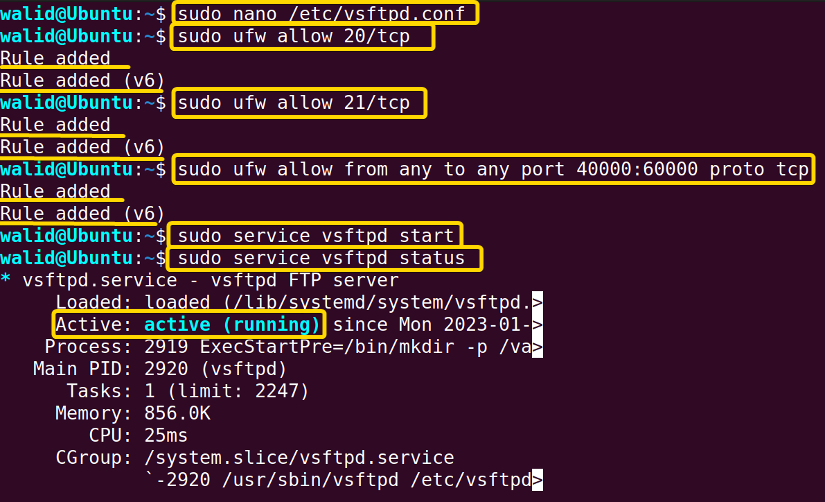 ❻ To find the IP address of the FTP server, insert the following command in the terminal and hit ENTER:
ifconfigsudo apt-get install net-toolsYou will get an IP address like below followed by inet. You may notice there are two inet, use the first one. Now you are ready to access your server with an IP address.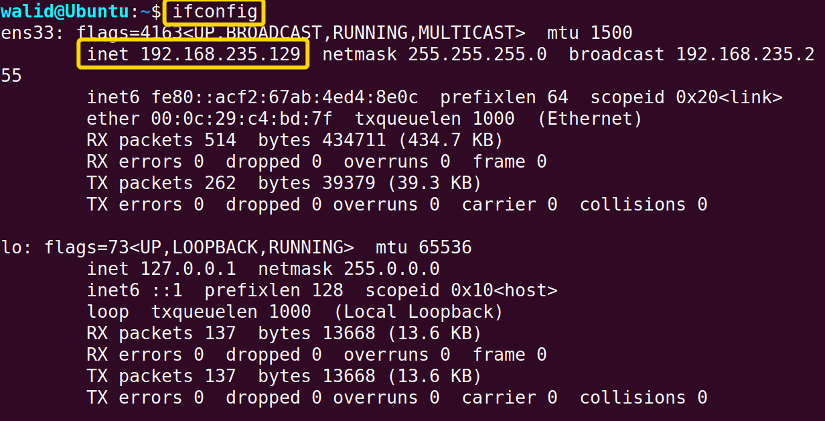
Practical Examples of the “ftp” Command in Linux
In this section, I will show you multiple examples of the ftp command in Linux. I will only use passive mode here.
Example 1: Connect to an FTP Server Using the “ftp” Command in Linux
First of all, if you want to do anything on an FTP server using the ftp command in Linux, you need to connect to it. Here I will show how to connect to a FTP server using a username and IP address. For instance, my username is walid and IP address is 192.168.0.104. Now do the following to connect to an FTP server:
Steps to Follow >
❶ Launch an Ubuntu Terminal on your client computer.
❷ Copy the following command in the command prompt and press ENTER:
ftp [email protected]❸ Provide password associated with the username.
❹ Hit ENTER again.
Output >
At first, you will see the “connected to 192.168.0.104” message. Your connection is working just fine. Then it will tell you to specify a password. Finally, it will show you “Login successful”. Now you can see the “walid@Client” is replaced with “ftp>”. So you are ready to execute any FTP command.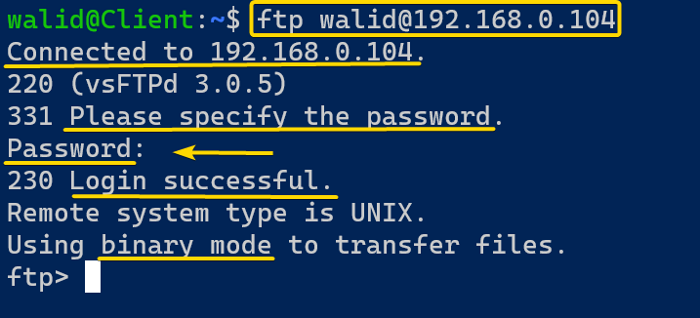
Similar Readings
- The “iptables” Command in Linux [6 Practical Examples]
- The “netstat” Command in Linux [22 Practical Examples]
- The “nslookup” Command in Linux [12 Practical Examples]
- The “ufw” Command in Linux [12+ Practical Examples]
Example 2: Quit the FTP Session
Here I will show how to quit an FTP session because you will be doing it a lot. To quit an FTP session, you need to type the word “exit”. Follow the simple steps below:
Steps to Follow >
❶ Open an Ubuntu Terminal on your client computer.
❷ Write the following command to start an FTP session and hit ENTER:
ftp [email protected]❸ Provide your password and press ENTER again.
❹ Now, insert the following command to quit the session:
exit❺ Then, go to your keyboard and press the ENTER button.
Output >
You will see a “Goodbye” message after executing the command “exit“. Moreover, you will see your username and computer name again. For instance, the “ftp>” is replaced by “walid@Client” in my case.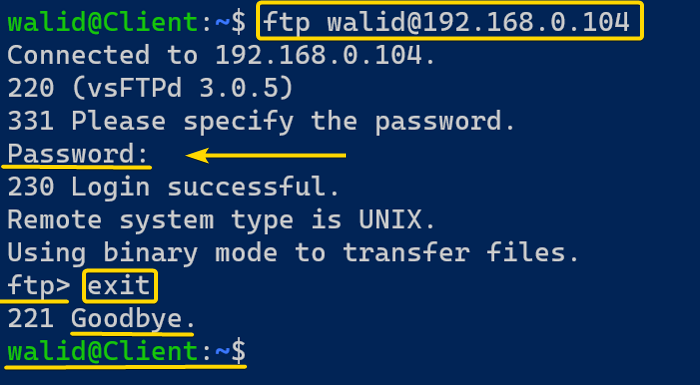
Example 3: Upload a File to the FTP Server Using the “ftp” Command in Linux
In this example, you will learn to upload a file using the ftp command in Linux. At first, I used the following command to list out all the contents in my home directory of the client computer:
lsAs you can see, there is a file named local_file and I want to upload it to the server computer.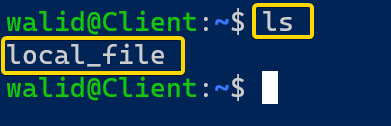 To upload a file to the FTP server, do the following:
Steps to Follow >
❶ Go to your client computer and open an Ubuntu Terminal.
❷ Copy the following command in the Terminal to connect to the server and press ENTER:
ftp [email protected]❸ Provide the password and hit ENTER again.
❹ To upload a file, insert the following command and press ENTER:
put local_fileOutput >
As I have mentioned earlier, I am using passive mode. That’s why it is showing “Entering Extended Passive Mode“. And the number followed by the message is the port it is using. You will see data transmission speed in KiB/s (kibibytes per second). 1KiB/s is equivalent to 1024 bytes.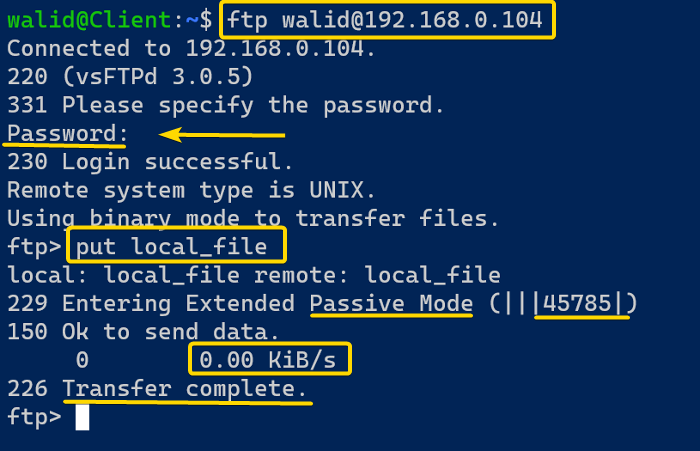 To see, whether the file is really uploaded, I executed the following command on the server:
lsyou can see, the local_file is here!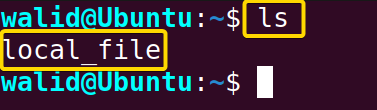
Example 4: Upload Multiple Files to the FTP Server
It is less likely you will upload a single file all the time. Here, I will show you how to upload multiple files using the ftp command in Linux. Firstly, I wrote the following command in the Terminal to view all the files on the client computer:
lsI have three files and the name goes like myfile1, myfile2, myfile3. I will use the “mput” command to upload these files. Follow the steps below to upload multiple files:
Steps to Follow >
❶ At first, launch an Ubuntu Terminal from your client computer.
❷ Insert the following command to access the FTP server and hit ENTER:
ftp [email protected]❸ Provide a password and hit ENTER again.
❹ Copy the following command to upload multiple files:
mput myfile1 myfile2 myfile3❹ Find the ENTER key from your keyboard and press it.
Output >
In the output, it will ask your permission for every single file. You need to type “y” if you want to upload or “n” to discard it. Then you will see an “Ok to send data” message, which means data transfer is initiated. You will also see data transfer speed. Finally, you will get the “Transfer complete” message. Now it will ask permission for the next file and so on.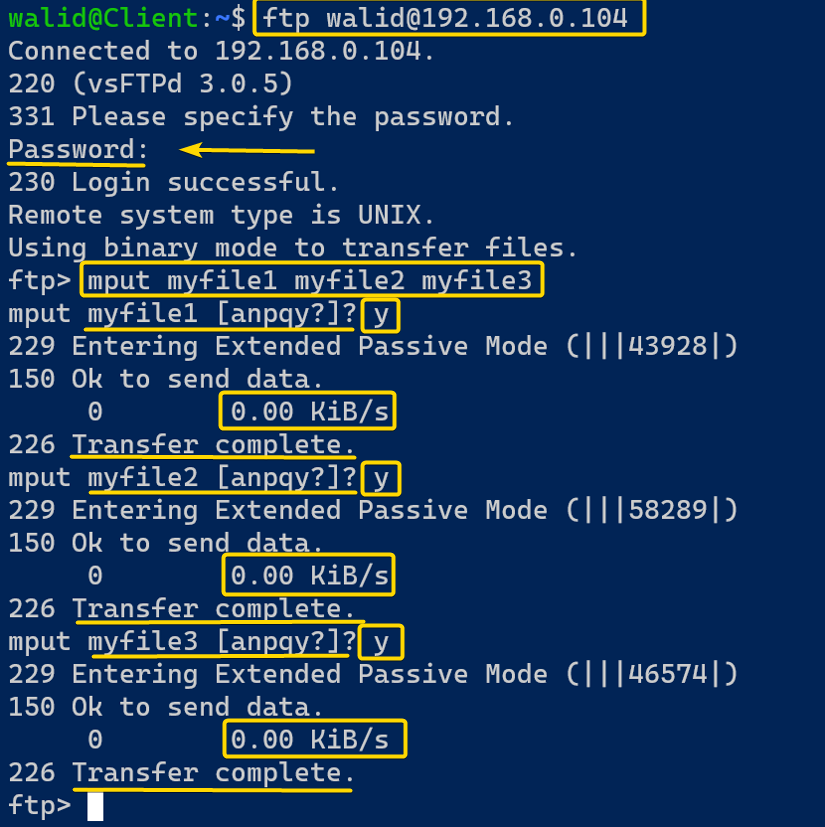
mput -n myfile1 myfile2 myfile3In the server, I inserted the following command to view files in my home directory:
lsYou can see myfile1, myfile2, myfile3 here as expected.
Example 5: Download a File From the FTP Server Using the “ftp” Command in Linux
Now it’s time to download a file from a server using the ftp command in Linux. At first, I used the following to view all the files on my server:
lsThere is a file named remote_file on my server and I want to download it to my client’s computer.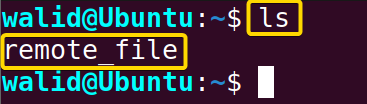 Do the following to download a file to your client’s computer:
Steps to Follow >
❶ First, open an Ubuntu Terminal from your client’s computer.
❷ Write the following command to initiate a communication with the server and hit ENTER:
ftp [email protected]❸ Provide your password and press ENTER again.
❹ Now, copy the following command to download a file:
get remote_file❺ On your keyboard, press the ENTER key.
Output >
The output will be similar to Example 3, where you uploaded a file. Your file will be transferred using the passive mode of the ftp command in Linux. You will see your download speed. Finally, you will get a “Transfer complete” message. Then, I typed the following two commands to quit the FTP session and to view the existing files in the home directory of the client computer respectively:
exitlsAnd, you can see, there is that remote_file in my client computer.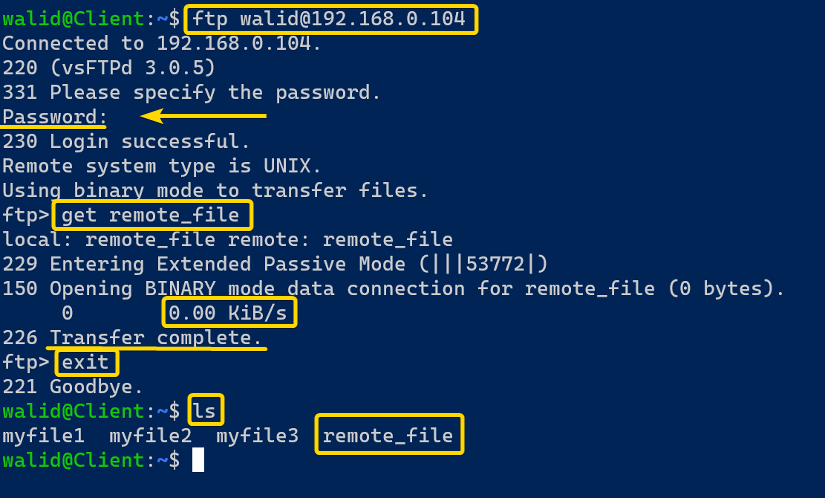
Example 6: Download Multiple Files From the FTP Server
You will learn to download more than one file using the ftp command in Linux as well. Firstly, I executed the following command to view all the files on my server:
lsThere are three files on the server and their name goes like photo1, photo2 and photo3. I will download them all using the “mget” command.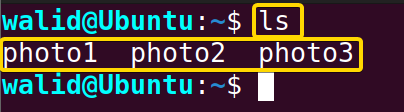 Follow the steps below to download multiple files from an FTP server:
Steps to Follow >
❶ Launch an Ubuntu Terminal from your client computer first.
❷ Copy the command below to log into the FTP server and press ENTER:
ftp [email protected]❸ Provide the password associated with the username and hit ENTER.
❹ Finally, insert the following command in the command prompt to download files:
mget photo1 photo2 photo3❺ Press the ENTER button from your keyboard.
Output >
The output is quite similar to Example 4, where you have uploaded multiple files. For every single file, it will ask your permission to download. You will see a “Transfer complete” message when a download is completed. After completing of the whole download process, I executed the following two commands to quit the session and list all the contents of the home directory of my client computer:
exitlsUndoubtedly, there are three files in the home directory of the client which are photo1, photo2 and photo3.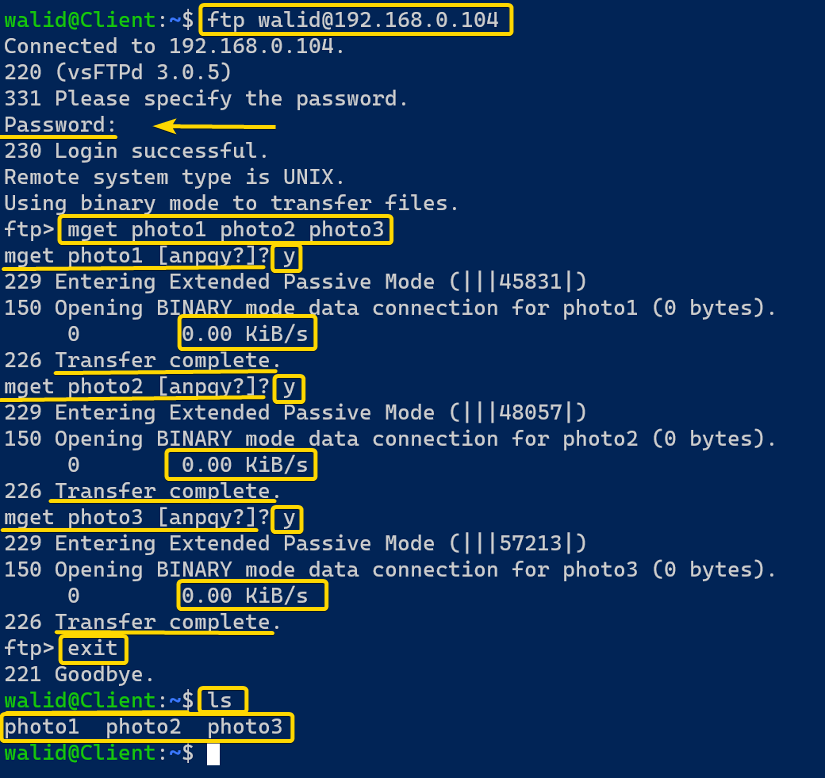
mget -n photo1 photo2 photo3Similar Readings
- The “tcpdump” Command in Linux [6+ Practical Examples]
- The “host” Command in Linux [10 Practical Examples]
- The “scp” Command in Linux [4 Practical Examples]
- The “sftp” Command in Linux [6 Practical Examples]
Example 7: Making a Directory Using the “ftp” Command in Linux
In this example, I will show you how to make a directory using the ftp command in Linux. For this purpose, I will use the “mkdir” command. Some of you are familiar with the mkdir command in Linux, which is used to make a directory. However, the difference is you will learn to make a directory inside from the FTP session. Now do the following with me:
Steps to Follow >
❶ Go to your client computer and open an Ubuntu Terminal.
❷ Write the following command to initiate an FTP session and hit ENTER:
ftp [email protected]❸ Now, provide the password of your account and press ENTER again.
❹ Finally, insert the following command to make a directory:
mkdir walid❺ Press the ENTER button from your keyboard.
Output >
In this example, I have created a directory named walid. After executing the command of Step 4, I got the “/home/walid/walid” message. Here “/home/walid” is the home directory associated with the user walid. As I have created another walid directory, the path goes like that.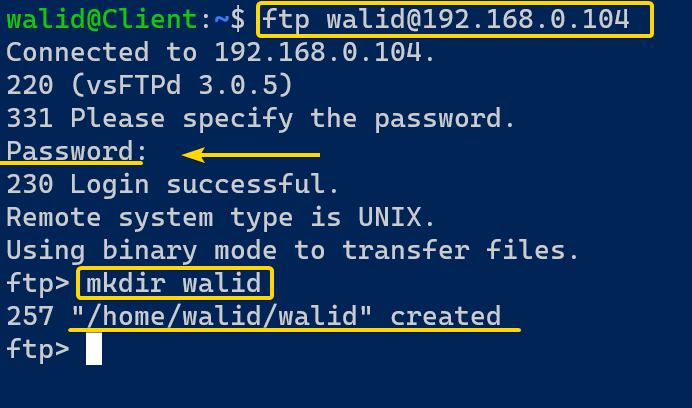 Then, I executed the command below to view all the files and directories of my client’s home directory:
lsSee, the walid is blue marked, so it is a directory that I made earlier.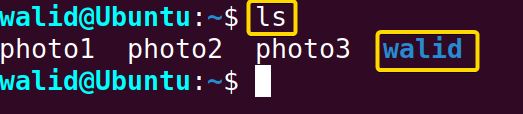
Example 8: List the Files in a Directory Using the “ftp” Command in Linux
In the previous example, you have seen how to make a directory. Now you learn to list all the contents in a directory using the ftp command in Linux. You can do it by two commands, “ls” and “dir”. I will show you examples of both. Now follow the steps below:
Steps to Follow >
❶ At the beginning, launch an Ubuntu Terminal.
❷ Copy the following command to log into the FTP server and press the ENTER key:
ftp [email protected]❸ Provide the password and hit ENTER again.
❹ Now, write the command below to view all the contents of a directory:
lsOR,
dir❺ Find the ENTER button on your keyboard and hit it.
Output >
When you log into an FTP server, you will be in the home directory of the corresponding username by default. Here, I will see all its files and directories as I have executed the “ls” and “dir” commands in the home directory. Notice that the output for both commands is exactly similar. The first column denotes file type and permissions. The second one shows the number of hard links. The next two columns express user and group. The number 1000 is my user ID(UID) and group ID(GID). The last four columns denote size, last modification time and date, followed by the name.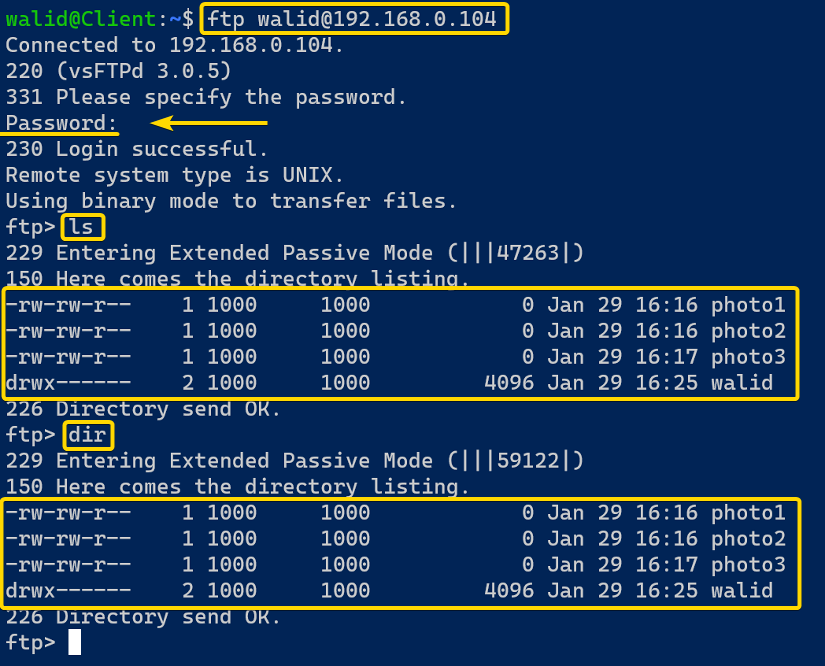
ls walidExample 9: Change to a Specific Directory
In this example, I will show you how to change to a specific directory using the ftp command in Linux. First of all, I executed the command below in my server to see the available directory:
lsYou can see, there is a directory named walid. Now I will change to that directory.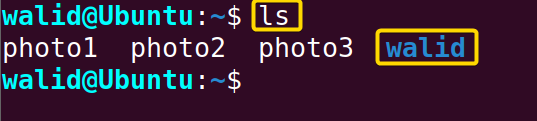 Now do the following:
Steps to Follow >
❶ Firstly, open an Ubuntu Terminal on your client computer.
❷ Insert the command below to start a FTP session and press ENTER:
ftp [email protected]❸ Give the password and hit ENTER.
❹ Now, copy the following command to change to a directory:
cd walid❺ Then press the ENTER button from your keyboard.
Output >
When you change to a directory, you will get this “Directory successfully changed” message. Unlike Ubuntu command prompt, it is hard to tell which directory you are currently in right now. That’s why I used the following command to print my current directory:
pwdNow see, the remote directory is “/home/walid/walid”. Before that, I was in the “/home/walid” directory. So I have successfully changed my directory.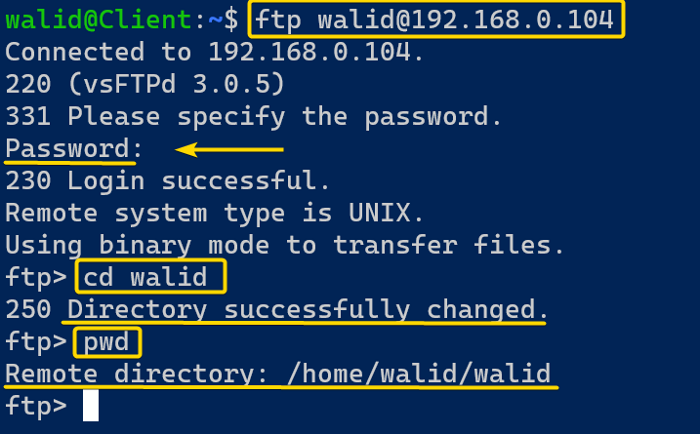
Example 10: Rename a File
Renaming a file in the ftp command in Linux is easy to remember as it uses the “rename” command. To demonstrate to you how to rename a file, I created a file named oldfile in the home directory of the client computer. I used the following command to print the current file name in the terminal:
lsNow I am going to change the oldfile name to newfile.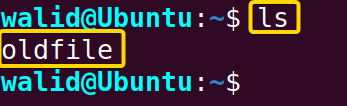 To rename a file, follow the step below:
Steps to Follow >
❶ For starter, launch an Ubuntu Terminal from the client computer.
❷ Write the command below in the Terminal to start communication with the server and hit ENTER:
ftp [email protected]❸ Provide your password and press ENTER again.
❹ Then insert the following command in the command prompt to rename a file and press the ENTER button:
rename oldname❺ Now type the new name like below:
newfile❻ At last, hit the ENTER key from the keyboard.
Output >
In the output, you need to write the new name after the message “(to-name)”. Finally, you will get a confirmation message saying “Rename successful”.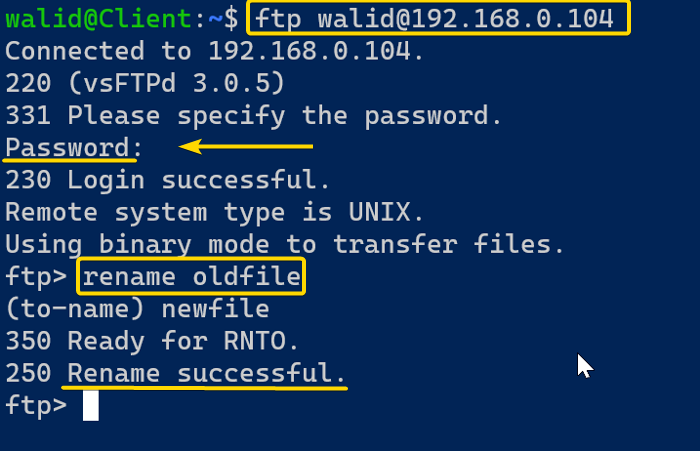 In the server, I executed the following command to view the filename:
lsAs you can see, the name of the oldfile is newfile now.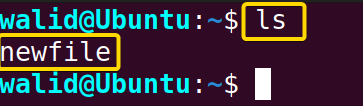
Similar Readings
- The “traceroute” Command in Linux [13 Practical Examples]
- The “rsync” Command in Linux [10 Practical Examples]
- The “screen” Command in Linux [13 Practical Examples]
- The “arp” Command in Linux [7 Practical Examples]
Example 11: Delete a Directory Using the “ftp” Command in Linux
In this example, I will show you how to delete a directory using the ftp command in Linux. First of all, I executed the following command to print all the available files and directories home directory of the server:
lsThere is a directory named walid and I am going to delete it.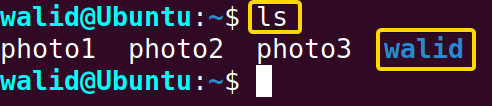 To delete a directory follow the step below:
Steps to Follow >
❶ Firstly, go to your client computer and launch an Ubuntu Terminal.
❷ Copy the following command to log into the FTP server and press ENTER:
ftp [email protected]❸ Give your password and press ENTER again.
❹ Then insert the following command to delete a directory:
rmdir walid❺ Hit the ENTER button.
Output >
In the output, if deleting the directory is successful, you will get the “Removing directory operation successful” like below.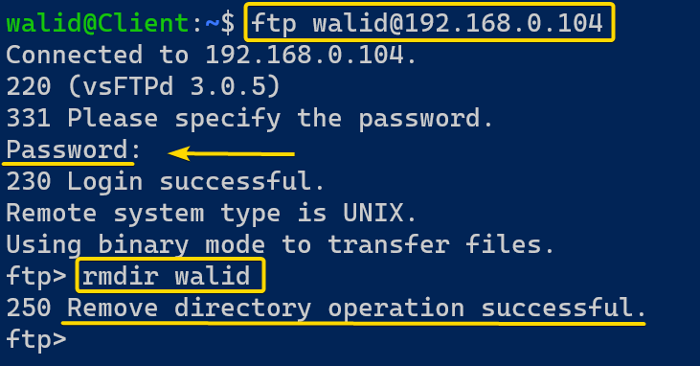 Here, I used the command below to view all the contents in the home directory of the server:
lsAnd you can see, the walid directory is gone.
Example 12: Delete Multiple Files
In earlier examples, you have learned to upload or download multiple files at once using the ftp command in Linux. In this example, you will know how to delete multiple files using a single command. At beginning of this example, I run the command below on the server:
lsYou can see there are three files in the home directory of that server. Now I will delete them all.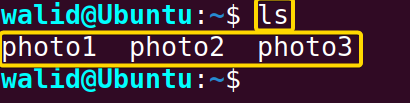 To delete multiple files, do the following:
Steps to Follow >
❶ Firstly, open an Ubuntu Terminal.
❷ Type the following command to connect to the FTP server and hit ENTER:
ftp [email protected]❸ Provide the password and press ENTER again.
❹ Now copy the following command in the command prompt to delete multiple files:
mdelete photo1 photo2 photo3Note: To delete a single file, you use the “delete” command followed by the name of that file.
❺ Finally, find the ENTER button on your keyboard and press that.
Output >
In the output, it will ask your permission for every single file. Type “y” to delete that file or “n” to discard. You will also get the “Delete operation successful” for every single file.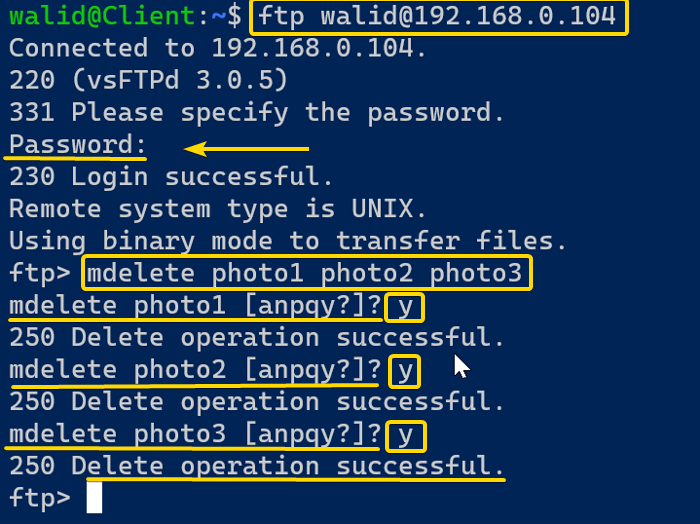 In the server, I executed the command below to check whether the files have been really deleted or not:
lsYou can see, the home directory is empty.
Example 13: Set Up a Port
I have mentioned earlier that the ftp command in Linux uses port 21 by default. What if you want to use a different port? Yes, it is possible. Firstly I will show you how to set up a port and then in the next example how to use it. I will set up port 4527. It can be anything you want but a big number is recommended. Now follow the steps below carefully:
Steps to Follow >
❶ At first, launch an Ubuntu Terminal in your server computer.
❷ Insert the following command in the Terminal to open the vsftpd.conf file and press ENTER:
sudo nano /etc/vsftpd.conf❸ Provide the password(if necessary) and hit ENTER again.
❹ Find and edit or add a line below in the vsftpd.conf file:
listen_port=4527❺ Press CTRL + O to save the file and CTRL + X to exit.
❻ Now copy the following two commands in the command prompt and press ENTER:
sudo ufw allow 4527/tcpsudo service vsftpd restartOutput >
In this image, I have shown you how to edit the vsftpd.conf file. Remember the “listen_port” might be already there. In that case, you can just edit. Otherwise, you need an extra line. It could be anywhere you want.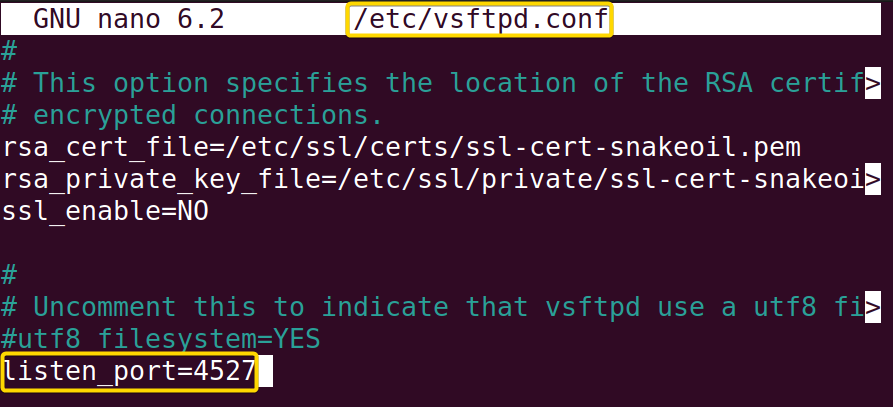 I have added two rules in the firewall of my server to allow communication through port 4527. Moreover, I have restarted the vsftpd service so that the changes can take action.
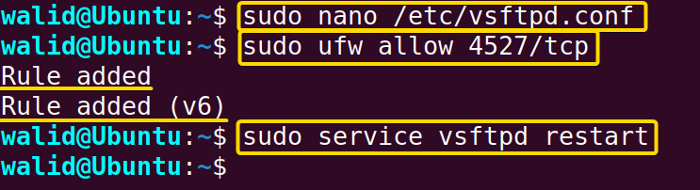
Example 14: Connect to an FTP Server With a Specific Port Using the “ftp” Command in Linux
In the previous example, I have set up a port. Now let’s connect to the FTP server through that port. The ftp command in Linux doesn’t have any option for that. You just need to put the port number after the IP address. Do the following to connect to server with a specific port:
Steps to Follow >
❶ Launch an Ubuntu Terminal in the client computer at first.
❷ Write the command below in the command prompt and hit ENTER:
ftp [email protected] 4527❸ Give the password associated with the username.
❹ Press the ENTER button from the keyboard.
Output >
You can see, I have successfully connected to the server. Now it is ready to communicate and transfer data.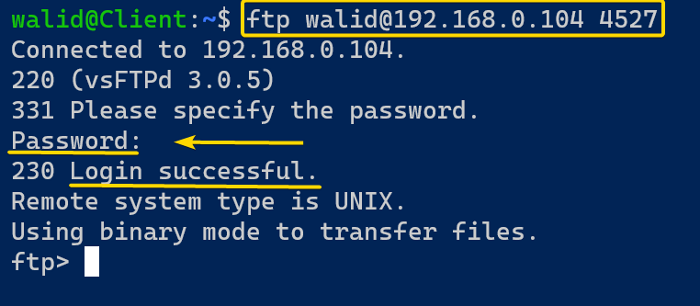
Conclusion
The ftp command in Linux might be overwhelming at first. However, practicing the command will make it more approachable over time. I hope this article has helped you with your journey in the ftp command in Linux.
Similar Readings
- The “wget” Command in Linux [14 Practical Examples]
- The “ping” Command in Linux [9 Practical Examples]
- The “curl” Command in Linux [9 Practical Examples]
- The “ dig” Command in Linux [10 Practical Examples]
- The “hostname” Command in Linux [12 Practical Examples]
- The “ip” Command in Linux [9+ Practical Examples]
- The “ifconfig” Command in Linux [6+ Practical Examples]
FUNDAMENTALS A Complete Guide for Beginners


