The dig command in Linux is a network administration command-line tool that stands for Domain Information Groper. It is used to gather DNS ( Domain Name System) information. The command performs tasks related to DNS lookups to query DNS name servers. This article will discuss how to use the Dig command with practical examples. So let’s dig in.
A. Description
The dig command retrieves information about DNS name servers. Mainly it is used by network administrators to verify and troubleshoot DNS problems and perform DNS lookups. Then it displays the search results returned from the queried name servers.
B. Syntax
The dig command is a flexible tool because of its ease of use and clarity of output. The syntax for the dig command is:
dig [server] [name] [type]- Server ⟶ The name or IP address of the name server whom we want to query. If you don’t specify a server, the dig command will use your machine’s pre-configured DNS.
- Name ⟶ It is the name of the resource record that is to be looked up using the DNS name server.
- Type ⟶ The type of query or DNS record you are looking for. The type argument must be valid. If no type argument is applied, the dig command performs a lookup on the A record by default.
Some Common DNS Record Types
- A ⟶ Address records are one of the basic and most commonly used records, which are used to directly map a hostname to an IP Address. They translate domain names and store them as IP addresses. Address records can only hold IPv4 addresses.
- MIX⟶ Stands for Mail Exchange. Which maps message transfer agents for the domain. And it stores instructions to direct emails to mail servers.
- SIG⟶ SIG for the SIGnature record, used for encryption protocol.
- TXT ⟶TeXT records are used to store definitive text.
- CNAME ⟶ ( Canonical NAME) record type is used instead of an A (Adress) record if a domain is an alias for another domain.
- SOA ⟶( Start Of Authority) record type holds important information about a domain or zone.
- NS ⟶ (Name Server) record contains the authoritative name servers.
C. Options
There are several options and query options for the dig command. These options affect how lookups are made and results are displayed. Every query option is identified by a keyword preceded by a plus sign (+). Some keywords add or remove an option and some assign values to options. They have the form like +keyword=value. You can check the man page to read more about them.
man digI will list some of the most useful ones here and discuss them in detail with some practical examples throughout the article.
Useful Options
- -4 (used for IPv4 only)
- -6 (used for IPv6 only)
- -b address (to set the source IP address of the query)
- -c class (to set the query class)
- -f file ( used for Batch mode. The dig command gets lookup requests from the specified files and processes each line systematically as they are organized in the file.
- -i (used for reverse IPv6 lookups)
- -m (used to enable the memory usage debugging)
- -u (to display the query time in microseconds)
- -v (to display the version information)
- -x (to reverse lookups for mapping the addresses to names)
- -t type (to specify the resource record type to query)
Some Useful Query Options
- +[no]aaonly (to sets the “aa” flag in the query)+[no]short ( to display a brief answer. The default is to print the answer in verbose form.)
- +[no]answer ( to display or not the answer section of a reply. The default is to display it. )
- +[no]question ( to print or not the question section of a query when an answer is returned. The default is to print )
- +[no]all ( to set or clear all display flags.)
- +[no]cl ( to display or not the CLASS when printing the record.)
- +[no]qr ( to print or do not print the query as it is sent. By default, the query is not printed.)
- +time=T ( to set the timeout for a query to T seconds. The default timeout is 5 seconds. If you try to set the T value to less than 1 then results in a query timeout of 1 second. )
- +[no]fail (to not try the next server if you receive a SERVFAIL. The default is not to try the next server)
- +[no]comments (to switch the display of comment lines in the output. The default is to print comments.)
- +[no]ttlid (to display or not the TTL-(Time To Live) when printing the record.)
- +[no]trace ( to switch tracing of the delegation path from the root name servers for the name being looked up which is disabled by default. When it is enabled, the dig command makes iterative queries to resolve the name being looked up)
- +[no]cmd (toggle the printing of the initial comment. This comment is printed by default. )
- +[no]stats (to switch the printing of the statistics section. By default, it prints the query statistics.)
- +[no]authority (to display or not the authority section of a reply. The default is to display)
- +[no]additional (to display or not the additional section of a reply. The default is to display)
Installing dig Command in Linux
Most of the modern versions of Linux have the dig command already installed. You can find out whether you have it on your machine or not by checking the version. Type the following command in the command prompt,
dig -vIt will print out the following message if you have it installed already. If you don’t have it installed, don’t worry. You can install it within a minute. The dig command is a part of the DNS utility package that is installed with BIND name servers. You can install the dig package by following the instructions below.
Steps to Follow >
➊ At first open the Ubuntu Terminal
➋ Type the following in your command prompt:
sudo apt-get install dnsutils➌ Type your password
➍ Now, press ENTER
Output >
After completing these four steps, the dig command will be installed on your system.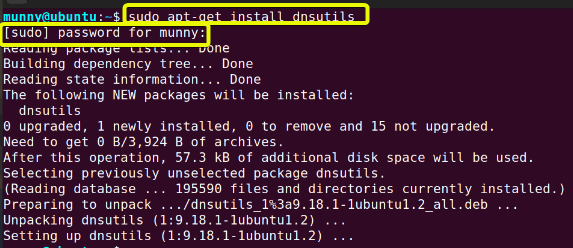 To check if the command has been installed successfully, check the version like before using the -v option with the dig command.
Practical Examples of the “dig ” Command in Linux
The dig command is a very useful command due to its flexibility. It deals with troubleshooting DNS-related problems. This command performs DNS lookups and results are displayed. It is more functional than other lookups. Below I am giving a list of practical examples where you can learn how to use the dig command for different functions.
Example 1: Query a Domain Name Using the “dig” Command
We can operate a DNS lookup on a domain name by using the dig command. We just have to type the domain name after the dig command. The syntax is:
dig <domain_name>I will show you a practical example. To do it yourself, follow the below steps below:
Steps to Follow >
➊ At first open the Ubuntu Terminal.
➋ Type the following command in the command prompt:
dig google.com➌ Now, press the ENTER button.
Output >
From the below image, you can see the displayed output when you search for a domain name. As you can notice, there are different sections with a lot of information. To understand better, you have to know which section represents what. Let’s learn about them.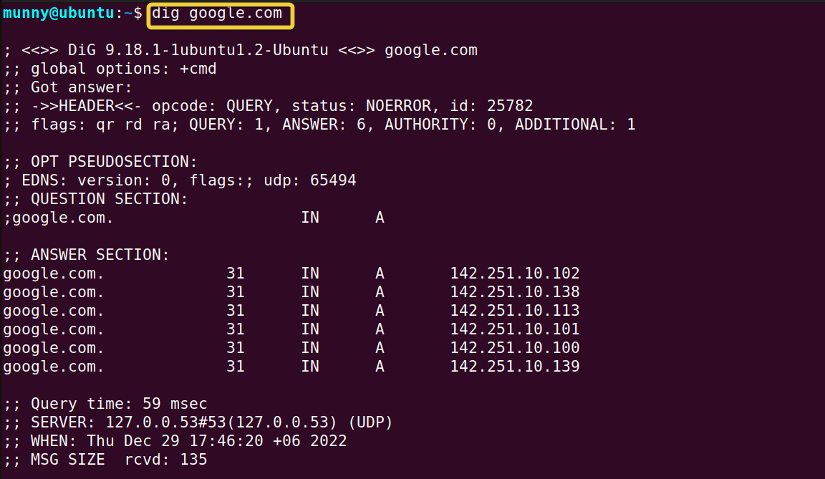
Understanding Output >
The first line of the output shows the version of the dig command.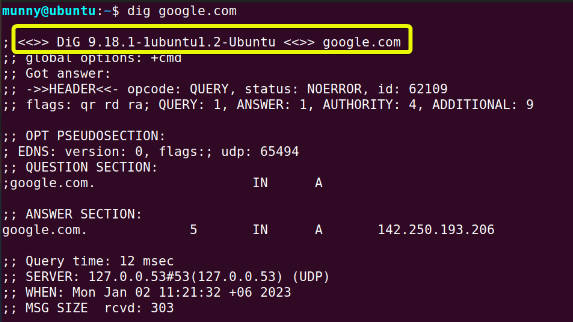 Next, the HEADER section shows the information it received from the server. Flags indicate how the answer format will be in the ANSWER section.
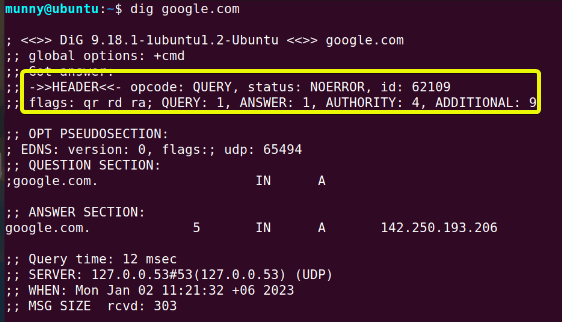 The OPT PSEUDOSECTION shows advanced data. Whether EDNS (Extension system for DNS), flags were used and UDP packet size.
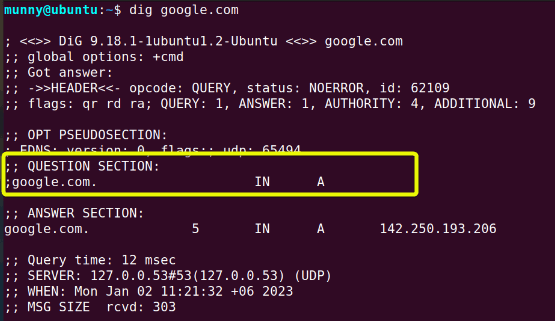
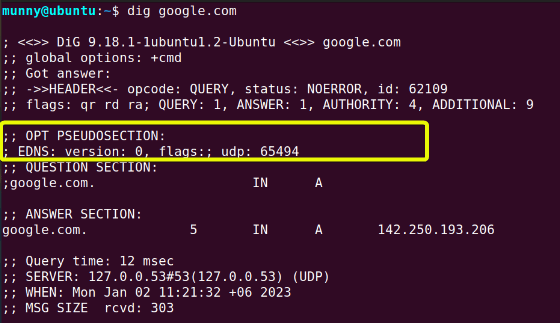 The QUESTION section prints the query data sent by the dig command.
- The first column is the domain name we searched for.
- The second column is the type of query. Here, IN stands for Internet.
- The third column specifies the record. Here A stands for the Address.
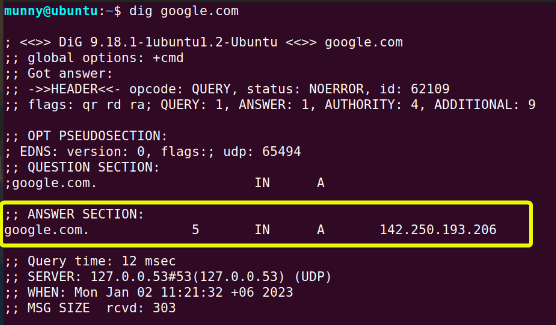
 The most important section is the ANSWER section. And we can see five columns in this section.
- The first column lists the name of the server we queried.
- The second column shows a set time, after which the record is refreshed.
- The third & fourth column is just like the QUESTION section, displaying the class & record of the query.
- The final column prints the IP address related to the domain name we queried.
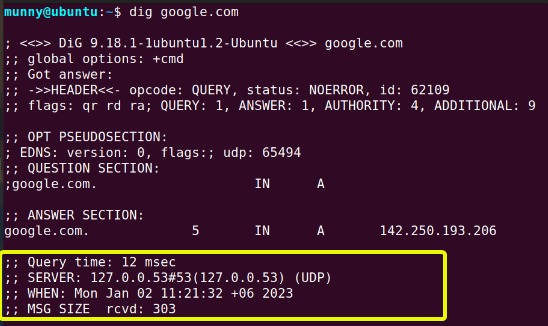
 The final section is STATISTICS. It shows metadata about the query
- Query time: Time it took for a response.
- SERVER: The port & IP address of the responding DNS.
- WHEN: Time when the command was run.
- MSG SIZE rcvd: The size of the reply from the DNS.
- The “ftp” Command in Linux [14 Practical Examples]
- The “host” Command in Linux [10 Practical Examples]
- The “scp” Command in Linux [4 Practical Examples]
- The “sftp” Command in Linux [6 Practical Examples]
Example 2: Query Detailed Output of a Specific Section Using the “dig” Command in Linux
When we want to set or clear all display flags, we use the +noall option. Now, if we want to view detailed information on any specified section, first we stop the display of all sections using the +noall option. Then we query that specified section only by using the plus sign (+) before that section name and put it as an option after the dig command. And then the +noall option. The syntax is:
dig <domain_name> +noall +<section_name>Follow the below steps to do it yourself.
Steps to Follow >
➊ At first open the Ubuntu Terminal.
➋ Type the following command in the command prompt for the detailed information in the ANSWER section:
dig google.com +noall +answer➌ Now, press the ENTER button.
➍ Next, type the following command in the command prompt for the detailed information of the QUESTION section:
dig google.com +noall +question➎ Again press the ENTER button.
➏ After that, type the following command in the command prompt for only the STATISTICS
section as output:
dig google.com +noall +stats➐ Finally, press ENTER button.
Output >
From the below image, we can see that, for the first command, only the answer section is in the display output.![]() For the second command, only the question section is in the display output.
For the second command, only the question section is in the display output.![]() And for the third command, we will see the statistics section in the command output display. Which we can see from the below image.
And for the third command, we will see the statistics section in the command output display. Which we can see from the below image.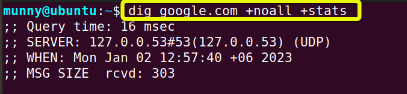
Example 3: Display Short Output & Remove Comments Using Query Options With the “dig” Command
The dig command displays the verbose output. A lot of information and comments are displayed at once. But you can reduce the display information to only the IP address associated with the domain name. Just use the +short option with the dig command. The syntax is:
dig <domain_name> +short
Remove comment lines using the dig command with the +nocomments option. The syntax is
dig <domain_name> +nocommentsFollow the below steps to check how these options work.
Steps to Follow >
➊ At first open the Ubuntu Terminal.
➋ Type the following command in the command prompt for the short output:
dig google.com +short➌ Now, press the ENTER button.
➍ Next, type the following command in the command prompt for the output with no comments:
dig google.com +nocomments➎ Again press the ENTER button.
Output >
From the below image, you can see the output display is showing only the IP address of the domain name. It is because of the +short option.![]() And for the +nocomments, we will see output without any comment line. Check the below image.
And for the +nocomments, we will see output without any comment line. Check the below image.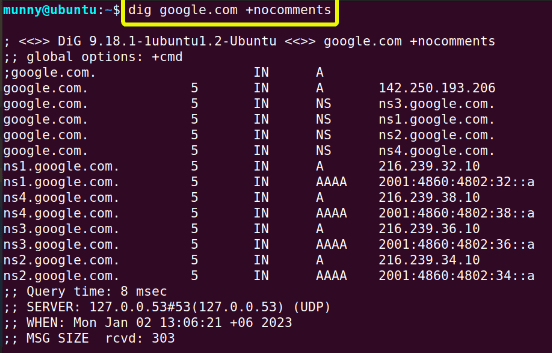
Example 4: Tracing the DNS Path Using the “dig” Command in Linux
The +trace option is used with the dig command to trace the DNS lookup path. It lists each different server the query goes through until it reaches the final destination. The option makes iterative queries starting from the root and subsequently traveling down the namespace tree. The syntax is:
dig <domain_name> +traceTo see how it works with a practical example, follow the below steps.
Steps to Follow >
➊ At first open the Ubuntu Terminal.
➋ Type the following command in the command prompt.
dig google.com +trace➌ Now, press the ENTER button.
Output >
From the below image, you can see the list of the different servers the query has gone through.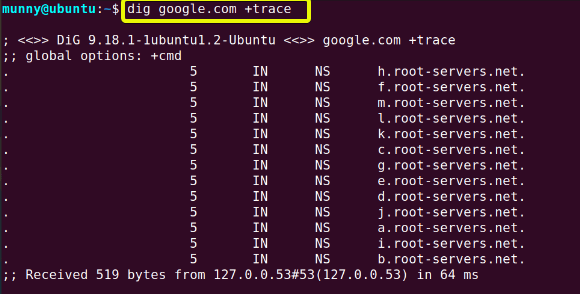
Example 5: Display All of the Results of the Query Using the “dig” Command in Linux
You can display all the returned results for your queried server. To do so use the ANY option with the dig command. This option displays all the available DNS record types associated with the searched domain. The syntax is:
dig <domain_name> ANYTo check with a practical example follow the below steps.
Steps to Follow >
➊ At first open the Ubuntu Terminal.
➋ Type the following command in the command prompt.
dig google.com ANY➌ Now, press the ENTER button.
Output >
The output image shows all the returned results for the specified domain name. We can see all the record types in the display.
Example 6: Query a Record Type Using the “dig” Command in Linux
Instead of searching all the record types at once, you can look up a specific record. Just add the type name at the end of the dig command. The syntax is:
dig <domain_name> <type>I will discuss some common record types with examples below.
6.1 Query A Record
A for Address records are the most common & useful DNS record type. Whenever you don’t mention the type of record while querying, the default record type that your machine uses is A type record. A record can only hold IPv4 addresses.
To search for only the A record type associated with a domain, follow the below steps:
Steps to Follow >
➊ At first open the Ubuntu Terminal.
➋ Type the following command in the command prompt.
dig google.com A +noall +answer
➌ Now, press the ENTER button.
Output >
From the below image, you can see the A record type for the specified domain google.com.![]()
6.2 Query TXT Record
TXT (Text) records are used to store definitive text. Usually, they are used in addition to other record types to provide extra information that doesn’t fit the format of other records.
Search for only the TXT record type associated with a domain by following the below steps:
Steps to Follow >
➊ At first open the Ubuntu Terminal.
➋ Type the following command in the command prompt.
dig google.com TXT +noall +answer➌ Now, press the ENTER button.
Output >
From the below image, you can see the TXT record type for the specified domain google.com.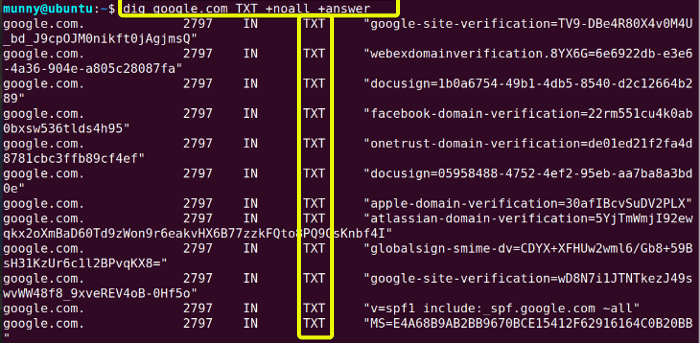
6.3 Query MX Record
MX (Mail eXchange) record type store instructions for directing emails to mail servers. An MX record can only point to a name of an email server. That means each referenced email server must also have a valid A (Address) record with an IP address.
Search for only the MX record type associated with a domain by following the below steps:
Steps to Follow >
➊ At first open the Ubuntu Terminal.
➋ Type the following command in the command prompt.
dig google.com MX +noall +answer➌ Now, press the ENTER button.
Output >
From the below image, you can see the MX record type for the specified domain google.com.![]()
6.4 Query NS Record
The NS record contains the authoritative name servers. To find the NS record type for the specified domain name type NS at the end of the command. Follow the below steps to do it yourself.
Steps to Follow >
➊ At first open the Ubuntu Terminal.
➋ Type the following command in the command prompt.
dig google.com NS +noall +answer➌ Now, press the ENTER button.
Output >
From the below image, you can see the NS record type for the specified domain google.com.
6.5 Query SOA Records
The SOA ( Start Of Authority) record type holds important information about a domain or zone. These records are an important element of zone transfers. Use the dig command to look up only the SOA record type by following the below steps.
Steps to Follow >
➊ At first open the Ubuntu Terminal.
➋ Type the following command in the command prompt.
dig google.com SOA +noall +answer➌ Now, press the ENTER button.
Output >
Now, you can see the SOA record type for the specified domain google.com.
- The “iptables” Command in Linux [6 Practical Examples]
- The “hostname” Command in Linux [12 Practical Examples]
- The “ip” Command in Linux [9+ Practical Examples]
- The “ifconfig” Command in Linux [6+ Practical Examples]
Example 7: Query Specific Nameservers Using the “dig” Command in Linux
When no name server is used with the dig command, by default it uses the servers listed in /etc/resolv.conf file. To use a specific name server instead of one from the default list, use at the rate (@) symbol followed by the name server IP address or hostname. The syntax is:
dig <domain_name> @<Name_server_IP_address>Suppose, you want to query the Google name server(8.8.8.8) for information about the youtube.com domain. To do so follow the below steps.
Steps to Follow >
➊ At first open the Ubuntu Terminal.
➋ Type the following command in the command prompt.
dig youtube.com @8.8.8.8➌ Now, press the ENTER button.
Output >
Now you can see, to query the dig command used the specific name server 8.8.8.8 (google). Which we mentioned in the command prompt. And we found our result for the specified domain youtube.com.![]()
Example 8: Reverse DNS Lookup Using the “dig” Command in Linux
In the upper examples, we searched for an IP address associated with a domain by typing the domain name with the dig command. Now if we want to do reverse DNS Lookup, in a simple context to lookup a domain name by its IP address then we use the option -x with the dig command. The syntax is:
dig -x <IP address>Suppose, you want to query the IP address 8.8.8.8 for a domain name. To do so follow the below steps.
Steps to Follow >
➊ At first open the Ubuntu Terminal.
➋ Type the following command in the command prompt.
dig -x 8.8.8.8➌ Now, press the ENTER button.
Output >
Now, you can see we gave an IP address (8.8.8.8) in the command and found the associated domain name (google) in the result.![]()
Example 9: Query Multiple Domain Names Using the “dig” Command in Linux
We can query multiple domain names at once. Instead of performing the dig command on each domain at a time, we can create a file containing a list of domain names. And then perform a query on the file using the dig command with the option -f. Remember to put only one domain name in each line of the file. The syntax is:
dig -f <file_name>Let’s perform the dig command on a file. Follow the below steps to do it yourself.
Steps to Follow >
➊ At first open the Ubuntu Terminal.
➋ Type the following command in the command prompt to create a txt file.
nano file.txt➌ Now, press the ENTER button.
➍ Nano text editor will pop up. Here type the domain names you want to keep in the list. I will keep these domain names,
google.com

youtube.com

yahoo.com

facebook.com
➎ After writing the domain names, save the file by pressing (CTRL+S) and then quit by (CTRL+X).
➏ Now, type the following command in the command prompt.
dig -f file.txt +short➐ Finally, press the ENTER button.
Output >
From the first command, we will create a nono file named file.txt. After pressing the ENTER button we will get the editor page. Where we will write our domain names. See the below picture for my list of domains.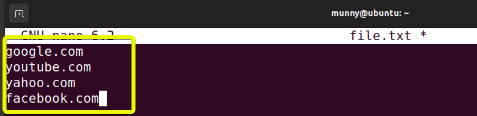 After closing the editor, type the second command. And you will see the below image. Where you can see that dig has queried all the domain names at once & displayed the result one by one. Check the below image.
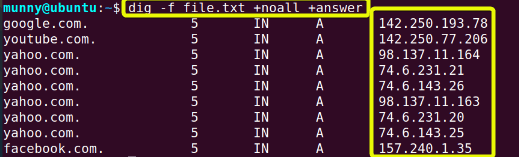
Example 10: Permanently Adjust Default Options For the Output Display
The information displayed by the dig command can be changed in the ~/.digrc file. Open the file and edit it with the options for the way you want to modify the display. Suppose you always want only the ANSWER to display. This way you can permanently change that. Follow the below steps to make a change in your output display.
Steps to Follow >
➊ At first open the Ubuntu Terminal.
➋ Type the following command in the command prompt to edit the ~/.digrc file.
nano ~/.digrc➌ Now, press the ENTER button.
➍ Now in the editor type the options you want to modify your display with. I want all the detailed information for the ANSWER section only. So, type the following options.
+noall+answer➏ After writing the options, save the file by pressing (CTRL+S) and quit by (CTRL+X).
➐ Now, type the following command in the command prompt to check the display.
dig google.com➑ Finally, press the ENTER button.
Output >
After tying the first command you will see the nano text editor. Which will look like the below picture, Now type the options according to your desired output display. I want only the answer section in my display. So first I typed the +noall option, to clear all the flags & then wrote the +answer option in the next line for only the ANSWER section.
 Now check if the output display looks changed by typing the second command. Check the below image for the output.
Conclusion
Throughout the article, I discussed the dig command and how it can be used with practical examples. If you go through the examples one by one, hope you will learn most of the stuff related to the command tool. And leap a step ahead in becoming a power user of LINUX.
- The “netstat” Command in Linux [22 Practical Examples]
- The “nslookup” Command in Linux [12 Practical Examples]
- The “ufw” Command in Linux [12+ Practical Examples]
- The “ssh” Command in Linux [18 Practical Examples]
- The “traceroute” Command in Linux [13 Practical Examples]
- The “rsync” Command in Linux [10 Practical Examples]
FUNDAMENTALS A Complete Guide for Beginners


