The dd command in Linux is used for copying and converting files. It can copy, convert, and format a certain file according to the provided operand and options. Since in the Linux distribution, most of the components are treated as files the application of the dd command covers a greater range. Besides, It can backup, compress, and convert files. In this article, I will demonstrate the most useful applications of the dd command in Linux with practical examples.
The syntax of the dd command is quite basic. You will need to write the command along with the desired operand/s or option:
dd [OPERAND]...dd OPTIONOperands of “dd” Command
The dd command in Linux offers a variety of operands to work with files. Some of the most useful operands are described below. However, you can look at the man page of the command for more details:
man ddList of Useful Operands of dd Command
- bs=BYTES: Reads/Writes up to a given number of BYTES at a time i.e. block size.
- cbs=BYTES: Converts a given number of BYTES at a time.
- conv=CONVS: Converts file as per the following symbols-
- ascii: from EBCDIC to ASCII.
- ebcdic: from ASCII to EBCDIC.
- lcase: changes upper case to lower case.
- ucase: changes lower case to upper case.
- sync: Synchronizes I/O for both data and metadata.
- count: Indicates the number of blocks
- ibs=BYTES: Reads up to a given number of BYTES at a time.
- of=FILE: Writes to FILE.
- if =FILE: Reads from FILE.
- seek=N: skips N obs-sized blocks at the start of the output.
- skip=N: skips N obs-sized blocks at the start of input.
NB: These operands in Linux CLI (Command Line Interface) are all case-sensitive, So be cautious while using them. The mentioned N and BYTES can have values from the following multiplicative suffixes:
- c=1,
- w=2,
- b=512,
- kB=1000,
- K=1024,
- MB=1000*1000,
- M=1024*1024,
- xM=M,
- GB=1000*1000*1000,
- G=1024*1024*1024, and so on for T, P, E, Z, Y.
- Binary prefixes can be used, too:
- KiB=K,
- MiB=M, and so on.
Options of “dd” Command
The dd command in Linux has two very basic options. These are listed below:
- – -help: Display this help page.
- – -version: Display version information.
7 Practical Examples of the “dd” Command in Linux
Using the dd command in Linux you can convert and copy a file. In case, the destination file does not exist, the command can also create a file under the given name. Some of the frequent uses of the dd command with practical examples are illustrated in this section.
1. Back Up Entire Hard Disk/Disk Partition Using “dd” Command in Linux
You can copy your entire hard disk or a particular disk partition to create a backup using the dd command in Linux. To achieve this you must use the operands if and of indicating input and output files respectively. Additionally, you can use the bs operand to specify the number of bytes to read/write at a time and the conv operand with the sync parameter to synchronize the I/O. In this example, I will back up my entire hard disk. You can do the same by following the given instructions:
-
At first, open the Ubuntu Terminal.
-
Type the following command in the command prompt:
sudo dd if=/dev/sda of=/dev/sdb bs=4096 conv=sync -
Now, press the ENTER button.

In the image, you can see that I have created a backup file of my hard disk and saved it in an output file named “sdb”. If the output location is smaller than the provided input file, then it will show an error message as below.

2. Create a Disk Image Using “dd” Command in Linux
You can create a disk image using the dd command in Linux. You will need to use the operand if to specify the desired disk space. As the output file, you must use a file name with “.img” extension along with the of operand. In this example, I will create an image file of my entire hard disk and save it in a file named “sdadiskimg.img”. To do the same follow the steps below:
-
At first, launch the Ubuntu Terminal.
-
Type the following command in the command prompt:
sudo dd if=/dev/sda of=/tmp/sdadiskimg.img -
Now, hit the ENTER button.

From the image, you can see that I have created an image file of my hard disk.

3. Restore a Disk Image Using “dd” Command in Linux
You can restore a disk image using the dd command in Linux. To do so, you will need to use the operand if to specify a disk image file. To indicate the output file you must use the of operand. In this example, I will restore the disk image file “sda1img.img” and save it in a file called “sda1”. Follow the given steps to do the same:
-
Open the Ubuntu Terminal.
-
Type the following command in the command prompt:
sudo dd if=/tmp/sda1img.img of=/dev/sda1 -
Hit the ENTER button.

In the output image, you can see that I have restored the desired image file.

4. Compress Disk Image Using “dd” Command in Linux
You can compress a disk image using the dd command in Linux. You will need to use the operand if to specify the desired disk space and then redirect it to the gzip command using piping. In this case, mentioning the “.img.gz” extension in the output file name is a must. Moreover, you can use the -c option of gzip to keep the original file unchanged. In this example, I will compress the disk partition “sda1” and save it in a file named “sda1comp.img.gz”. To do the same follow the steps below:
-
At first, go to the Ubuntu Terminal.
-
Type the following command in the command prompt:
sudo dd if=/dev/sda1 | gzip -c >/tmp/sda1comp.img.gz -
Now, press the ENTER button.

From the output image, you can see that I have compressed the desired file using the dd command.

5. Restore Compressed Disk Image Using “dd” Command in Linux
You can restore a compressed disk image using the dd command in Linux. To do so, you will need to use the operand if to specify the compressed disk image file. To indicate the output file you must use the of operand. In this example, I will restore the disk image file “sda1comp.img.gz” and save it in a file called “sda2”. Follow the given steps to do the same:
-
Launch the Ubuntu Terminal.
-
Type the following command in the command prompt:
sudo dd if=/tmp/sda1comp.img.gz of=/dev/sda2 -
Hit ENTER.

In the given image, you can see that I have restored the “sda1comp.img.gz” compressed disk image file.

6. Create a Virtual Filesystem Using “dd” Command in Linux
You can create a virtual file system using the dd command in Linux. To achieve this you must use the operands if and of indicating input and output files respectively. As an input, you will need to write /dev/zero which will create a filesystem of the required size but with no data. Additionally, you can use the bs and count operands to specify the number of bytes to read/write at a time. In this example, I will create a virtual filesystem named “file”. At a time, I will copy 100 blocks of size 512K (total = 512KB x100 = 51200 KB = 51.2 MB). To do the same follow the process below:
-
At first, open the Ubuntu Terminal.
-
Type the following command in the command prompt:
sudo dd if=/dev/zero of=/file bs=512K count=100 -
Now, hit the ENTER button.

In the image, you can see that I have created a virtual filesystem named “file”.

7. Convert File Formats Using the “dd” Command in Linux
You can perform conversions on the cases of a text file using the dd command in Linux. To do so, you must use the operands conv with parameters ucase or, lcase indicating uppercase and lowercase conversions respectively. Follow the below examples to learn more about the conversion.
Case A: Convert File Data to Uppercase Using “dd” Command in Linux
To convert textfile data from lowercase to uppercase follow the given steps:
-
At first, go to your Ubuntu Terminal.
-
Type the following command in the command prompt:
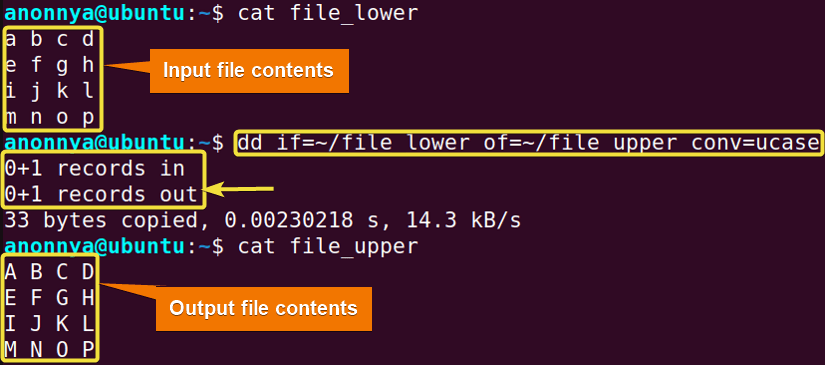
dd if=~/file_lower of=~/file_upper conv=ucase -
Now, press the ENTER button.

In the image, you can see that I have converted the “file_lower” contents to uppercase and saved it in a file called “file_upper”. Furthermore, I have used the cat command to show you the file contents.
Case B: Convert File Data to Lowercase Using “dd” Command in Linux
To convert textfile data from uppercase to lowercase follow the below steps:
-
At first open the Ubuntu Terminal.
-
Type the following command in the command prompt:
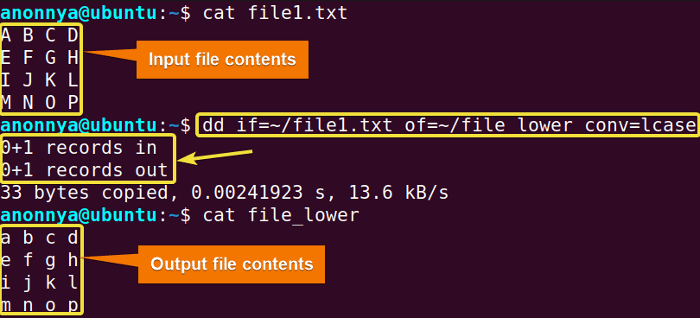
dd if=~/file1.txt of=~/file_lower conv=lcase -
Hit the ENTER button.

In the image, you can see that I have converted the “file1.txt” contents to lowercase and saved it in a file called “file_lower”. Moreover, I have used the cat command to show you the file contents.
Conclusion
In this article, I have provided you with the most convenient uses of the dd command in Linux. You will be able to copy, create, and convert files according to your needs upon practicing these hands-on examples. I hope, thoroughly learning this command will help you with the command line and make you a power user of Linux.
Similar Readings
- The “shred” Command in Linux [9 Practical Examples]
- The “du” Command in Linux [14 Practical Examples]
- The “mount” Command in Linux [15 Practical Examples]
- The “mke2fs” Command in Linux [10 Practical Examples]
- The “mkfs” Command in Linux [4+ Practical Examples]
FUNDAMENTALS A Complete Guide for Beginners


