The mkfs command in Linux stands for “Make File System”. It creates a filesystem in the specified disk space/partition passed as an argument. In this article, I will demonstrate how you can utilize the mkfs command with practical examples.
A. Description
The mkfs command in Linux is actually a frontend for the various filesystems available in Linux. It builds a filesystem of the specified type.
B. File Systems
There are a number of filesystems that can be created using the mkfs command in Linux. The filesystem is basically the structure of how the data is stored and retrieved. You can list the available filesystems under Linux by typing the mkfs command and then pressing the TAB button twice. For clarity, follow the instruction to generate the list of the filesystems.
Steps to Follow >
➊ At first, open the Ubuntu Terminal.
➋ Type the following command in the command prompt:
mkfs➌ Now, press the TAB button twice.
Output >
In the image below, you can see a list of filesystems related to the mkfs command has been generated.
Useful Filesystems
Below are the descriptions of some useful filesystems in Linux.
- EXT2: The first file system used in Linux distributions. It tends to lose data in case of power failure.
- EXT3: An improved version of the ext2 that includes journaling support. In case of power failure, it can check and repair the file system.
- EXT4: The ext4 file system is a further improvement of the ext3. Introduced new and robust integral features offering better performance and support for larger filesystems.
- BFS: It stands for the Boot File System (BFS) on Linux, originally developed for the BeOS operating system. Used for boot partition of the system.
- FAT: The File Allocation Table (FAT) was developed to use on floppy disks. This is a non-journaling filesystem and is not compatible with different operating systems. However, It is used for USB drives and other removable devices.
- CRAMFS: A compressed filesystem designed for read-only uses. It is a small and fast filesystem for embedded systems and bootable Linux images.
- MSDOS: A variant of the FAT that stands for Microsoft Disk Operating System. It is a compatible filesystem for both Windows and Linux operating systems.
- VFAT: The Virtual File Allocation Table (VFAT) is an extended version of the FAT. It supports long file names and is compatible with other operating systems.
- MINIX: Found on older Linux distributions. It was a “mini-Unix” operating system designed for a simplified version of the Unix OS.
- NTFS: The default file system for Windows NT that offers several advanced features. It is a Microsoft journaling filesystem and stands for The New Technology File System.
C. Syntax
The syntax of the mkfs command in Linux can contain multiple options and arguments. The DEVICE is an argument that usually refers to a hard disk partition or, a regular file where the desired filesystem should be created. The SIZE is another argument referring to the number of Blocks specified to build a filesystem. Enclosed by the square brackets, it is an optional parameter. However, some programs may not automatically detect the device’s SIZE and require the parameter to be specified.
mkfs [option]... [fs-option]... device [size]D. Options
There are several options for the mkfs command in Linux. Some of the most useful options are described below. However, you can look at the man page for more details.
man mkfsUseful Options
- -b block-size: Specifies the size of blocks in bytes. The value ranges from 1024-65536 and must be a power of 2.
- -c: Checks the device space for bad blocks.
- fs-options: Passes filesystem-specific options.
- -t type: Specifies the type of filesystem to be created.
- -V: Displays verbose output including filesystem-specific commands.
Prerequisites for Using the “mkfs” Command in Linux
The mkfs command can be destructive since it creates a new filesystem on the mentioned device space. If you mistakenly specify a wrong partition the existing data will be overwritten. Therefore, while exercising this command it is recommended to apply the commands to a backup image file. Performing mkfs commands in a backup file mitigates the risk of data loss. Follow the steps below to create the image file for further experimentation.
Steps to Follow >
➊ At first, open the Ubuntu Terminal.
➋ Type the following command in the command prompt:
dd if=/dev/zero of=~/backup.img bs=1M count=100➌ Now, press the ENTER button.
Output >
In the image below, you can see that I have created an image file using the dd command in Linux. I used 100 blocks (count = 100) of size 1MB (bs = 1MB) which generated an image file of size 100MB.
Practical Examples of the “mkfs” Command in Linux
You will be able to create various filesystems in Linux using the mkfs command. In this section, I will present some practical uses of the command to modify your experience with the Linux filesystem.
Example 1: Creating a File System Using the “mkfs” Command in Linux
You can create a file system using the mkfs command in Linux. By default, the command will create an ext2 file system. In this example, I will create a filesystem in the backup.img disk space. To do the same you can follow the steps below.
Steps to Follow >
➊ Open the Ubuntu Terminal.
➋ Type the following command in the command prompt:
mkfs ~/backup.img➌ Now, press the ENTER button.
Output >
In the image below, you can see that I have created a file system using the mkfs command in Linux.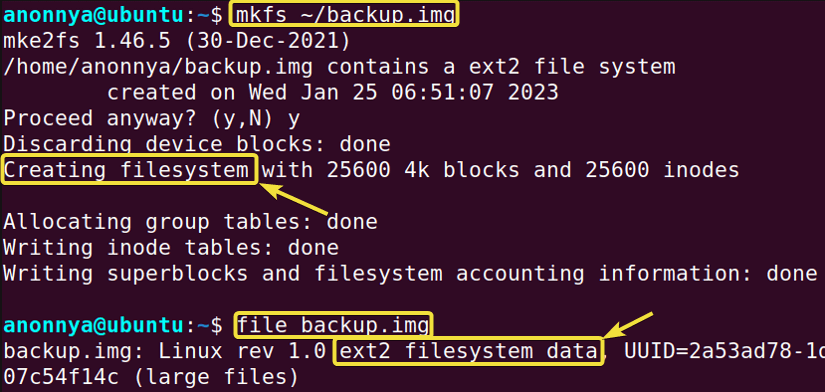
Example 2: Creating a File System of Specified Size Using the “mkfs” Command in Linux
You can create a file system of a specified block size using the mkfs command in Linux. You will need to use option -b and mention the desired block size. In this example, I will create a file system of block size 1024. You can do the same by following the given instructions.
Steps to Follow >
➊ At first, open the Ubuntu Terminal.
➋ Type the following command in the command prompt:
mkfs -b 1024 ~/backup.img➌ Press ENTER.
❹ Now, type the below command to display the file size on the terminal:
tune2fs -l ~/backup.img | grep "Block size"❺ Again, hit ENTER.
Output >
In the following image, you can see that I have created a file system of a specified block size. You can use the tune2fs command to verify the size of the newly created file system.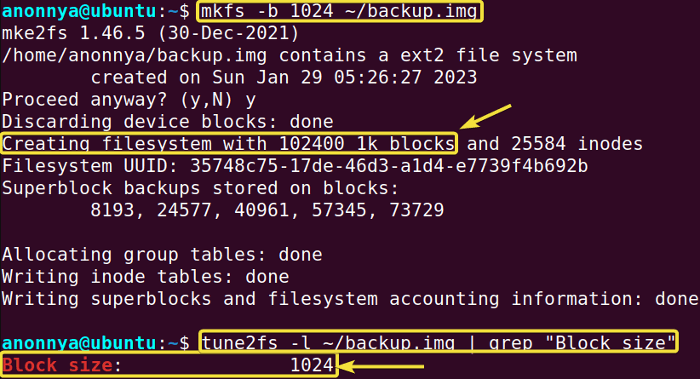
Example 3: Creating a File System of Specified Type Using the “mkfs” Command in Linux
You can specify the filesystem type you want to create using the mkfs command in Linux. You will need to use the option -t along with the file type. In this example, I will create a filesystem of the type FAT. You can do the same by following the steps below.
Steps to Follow >
➊ Open the Ubuntu Terminal.
➋ Type the following command in the command prompt:
mkfs -t fat ~/backup.img➌ Press the ENTER button.
Output >
In the below image, you can see that I have created a fat file system. You can use the file command to view the type of the filesystem.
Example 4: Checking for Bad Blocks While Creating a File System Using the “mkfs” Command
You can check for a bad block while creating a file using the mkfs command in Linux. To do so you will need to use option -c. In this example, I will look for bad blocks while creating a file system. Follow the steps below to do the same.
Steps to Follow >
➊ At first, launch the Ubuntu Terminal.
➋ Type the following command in the command prompt:
mkfs -c ~/backup.img➌ Hit the ENTER button.
Output >
In the given image, you can see that I have checked for bad blocks while creating the file system.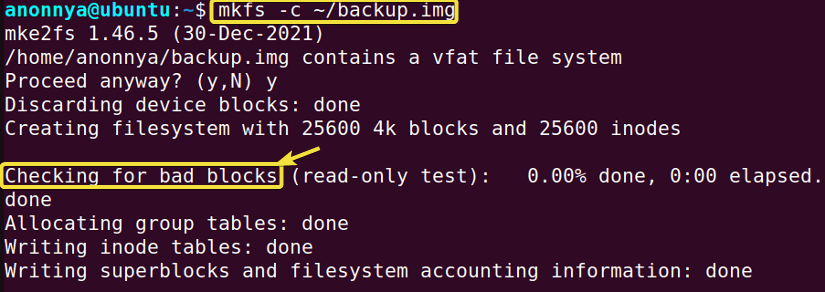
Miscellaneous: Creating a Mount Point for the Newly Created File System
In the above examples, I have created filesystems with temporary setup points. Besides this, you can also create a mount point for the desired filesystem. In this example, I will first create a directory named mybackup to use as the mount point of the filesystem backup.img. Then, I will give permission to my current user “anonnya” to access the mount point. You can follow the steps below to do the same.
Steps to Follow >
➊ At first, open the Ubuntu Terminal.
➋ Then, type the command below to create a directory:
sudo mkdir /mnt/mybackup➌ Hit ENTER.
❹ Type your Password.
❺ Again, hit ENTER
❻ Write the given command to mount the filesystem:
sudo mount ~/backup.img /mnt/mybackup❼ Press ENTER.
❽ After that, type the following command to set user permissions:
sudo chown anonnya:users /mnt/mybackup❾ Finally, press ENTER.
Output >
In the following image, you can see that I have mounted the filesystem to the mybackup directory. Furthermore, you can use the ls command with -l option to view the updated user permissions.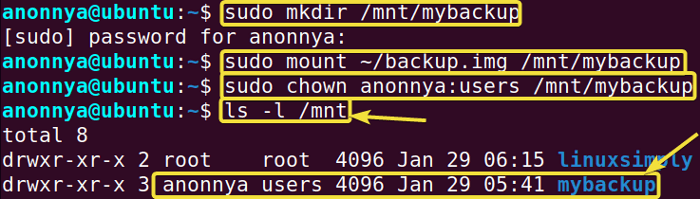
Conclusion
In this article, I have illustrated the most common uses of the mkfs command in Linux. Learning these practical examples will help you create different filesystems from the command line. I hope the completion of the given tasks helps you with your experience in Linux and makes you a power user.
Similar Readings
- The “shred” Command in Linux [9 Practical Examples]
- The “dd” Command in Linux [7+ Practical Examples]
- The “du” Command in Linux [14 Practical Examples]
- The “mount” Command in Linux [15 Practical Examples]
- The “mke2fs” Command in Linux [10 Practical Examples]
FUNDAMENTALS A Complete Guide for Beginners


