The mke2fs command in Linux is used for creating new extended file systems. It can only create the ext2, ext3, or ext4 file systems on a specified disk space. In this article, I will demonstrate how you can utilize the mke2fs command with practical examples.
A. Description
The mke2fs command in Linux creates an ext2/ext3/ext4 file system in a specified disk partition. By default, the command uses the device size to create the file system, but you can also specify a file size.
Note: The ext2, ext3, and ext4 file systems are based on the original extended file system in Linux. Below is a summary of these different extensions.
- ext2: The first file system used in Linux distributions. It tends to lose data in case of power failure.
- ext3: An improved version of the ext2. In case of power failure, it can check and repair the file system.
- ext4: A further improvement over the ext3 file system. Introduced new and robust integral features offering better performance.
B. Syntax
The syntax for the mke2fs command in Linux is pretty simple as given below.
mke2fs [OPTION]... ARGUMENTC. Options
There are several options for the mke2fs command in Linux. Some of the most useful options are described below. However, you can look at the man page for more details.
man mke2fsUseful Options
- -b block-size: Specifies the size of blocks in bytes. The value ranges from 1024-65536 and must be a power of 2.
- -c: Checks the device space for bad blocks.
- -F: Force creates a file system.
- -i bytes-per-node: Specifies the bytes/node ratio.
- -I inode-size: Specifies inode size in bytes. The value of size must be greater than or equal to 128 and a power of 2.
- -j: Creates a file system with an ext3 journal.
- -L: Sets volume label for the file system. The maximum length is 16 bytes.
- -M directory: Sets the last mounted directory for the file system.
Prerequisites for Using the “mke2fs” Command in Linux
The mke2fs command can be destructive if it is not used correctly. Because it creates a new file system on the mentioned device space. If you mistakenly specify a wrong partition the existing data will be overwritten. Therefore, while exercising this command it is recommended to apply the commands to a backup image file. Performing mke2fs commands in a backup file mitigates the risk of data loss. Follow the steps below to create the image file for further experimentation.
Steps to Follow >
➊ At first, open the Ubuntu Terminal.
➋ Type the following command in the command prompt:
dd if=/dev/zero of=~/backup.img bs=1M count=100➌ Now, press the ENTER button.
Output >
In the image below, you can see that I have created an image file using the dd command in Linux. I used 100 blocks (count = 100) of size 1MB (bs = 1MB) which generated an image file of size 100MB.
Practical Examples of the “mke2fs” Command in Linux
You will be able to create extended file systems in Linux using the mke2fs command. In this section, I will present some practical uses of the command to modify your experience with the Linux file system.
Example 1: Creating a File System Using the “mke2fs” Command in Linux
You can create a file system using the mke2fs command in Linux. By default, the command will create an ext2 file system. In this example, I will create a file system in the backup.img disk space. To do the same you can follow the steps below.
Steps to Follow >
➊ Open the Ubuntu Terminal.
➋ Type the following command in the command prompt:
mke2fs ~/backup.img➌ Now, press the ENTER button.
Output >
In the image below, you can see that I have created a file system using the mke2fs command in Linux.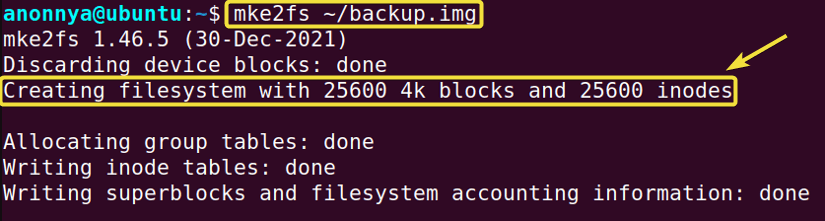
Example 2: Creating a File System of Specified Size Using the “mke2fs” Command in Linux
You can create a file system of a specified block size using the mke2fs command in Linux. You will need to use option -b and mention the desired block size. In this example, I will create a file system of block size 1024. You can do the same by following the given instructions.
Steps to Follow >
➊ At first, open the Ubuntu Terminal.
➋ Type the following command in the command prompt:
mke2fs -b 1024 ~/backup.img➌ Press ENTER.
❹ Now, type the below command to display the file size on the terminal:
tune2fs -l ~/backup.img | grep "Block size"❺ Again, hit ENTER.
Output >
In the following image, you can see that I have created a file system of a specified block size. You can use the tune2fs command to verify the size of the newly created file system.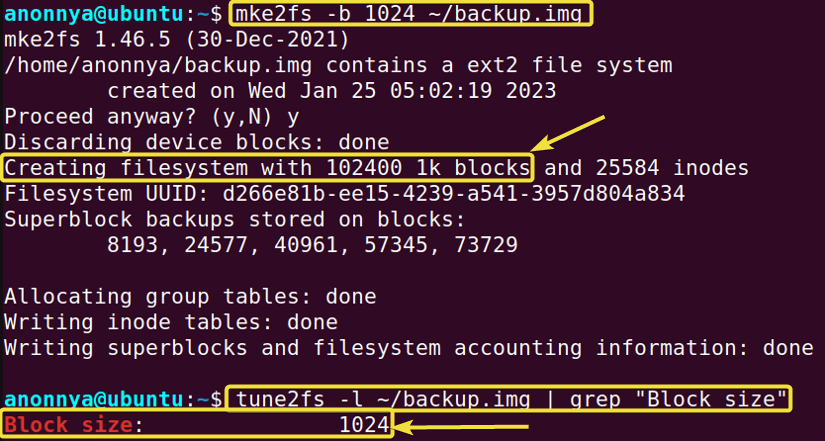
Example 3: Checking for Bad Blocks While Creating a File System Using the “mke2fs” Command
You can check for a bad block while creating a file using the mke2fs command in Linux. To do so you will need to use option -c. In this example, I will look for bad blocks while creating a file system. Follow the steps below to do the same.
Steps to Follow >
➊ At first, go to the Ubuntu Terminal.
➋ Type the following command in the command prompt:
mke2fs -c ~/backup.img➌ Now, hit the ENTER button.
Output >
In the given image, you can see that I have checked for bad blocks while creating the file system.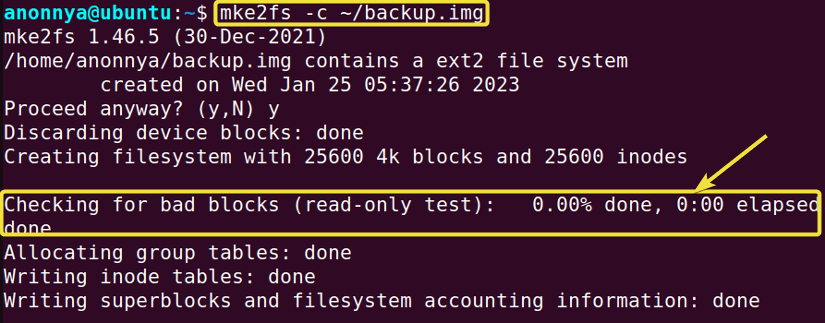
Example 4: Creating a File System of Specified Type Using the “mke2fs” Command in Linux
You can specify the filesystem type you want to create using the mke2fs command in Linux. You will need to use the option -t along with the file type. In this example, I will create a filesystem of type ext4. You can do the same by following the steps below.
Steps to Follow >
➊ At first, launch the Ubuntu Terminal.
➋ Type the following command in the command prompt:
mke2fs -t ext4 ~/backup.img➌ Hit the ENTER button.
Output >
In the below image, you can see that I have created an ext4 file system. You can use the file command to view the type of file system.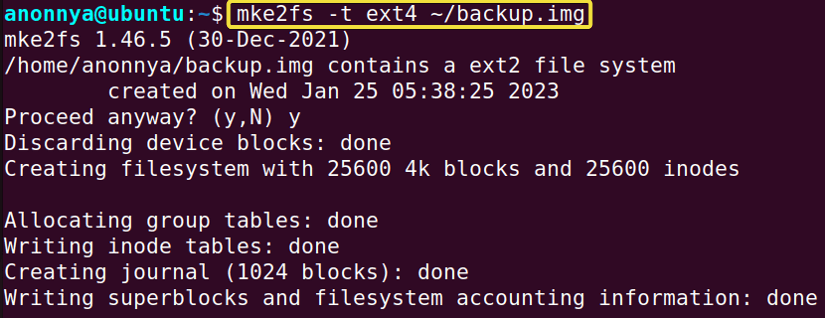
Example 5: Creating a File System with Volume Label Using the “mke2fs” Command
You can create a file system with a specified volume label using the mke2fs command in Linux. To do so you must use option -L and then the desired level. In this example, I will create a file system of volume label linuxsimply. Follow the given process to do the same.
Steps to Follow >
➊ Open the Ubuntu Terminal.
➋ Type the following command in the command prompt:
mke2fs -L linuxsimply ~/backup.img➌ Press ENTER.
❹ Now, type the below command to display the file size on the terminal:
tune2fs -l ~/backup.img | grep "Filesystem volume name"❺ Again, press ENTER.
Output >
In the image below, you can see that I have created a file system of desired volume label. You can use the tune2fs command to view the volume name.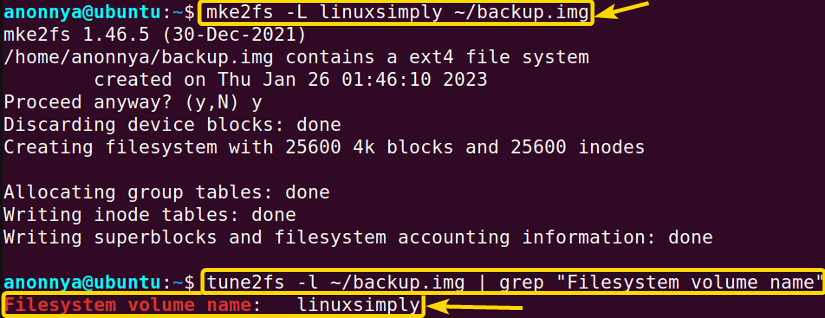
Example 6: Creating a File System of Specified inode Size Using the “mke2fs” Command in Linux
You can create a file system of specified inode size using the mke2fs command in Linux. You will need to use the option -i and mention the desired inode size. In this example, I will create a file system of block size 512. You can do the same by following the given instructions.
Steps to Follow >
➊ Launch the Ubuntu Terminal.
➋ Type the following command in the command prompt:
mke2fs -I 512 ~/backup.img➌ Hit ENTER.
❹ Now, type the below command to display the file size on the terminal:
tune2fs -l ~/backup.img | grep "Inode size"❺ Again, tap ENTER.
Output >
In the following image, you can see that I have created a file system of specified inode size.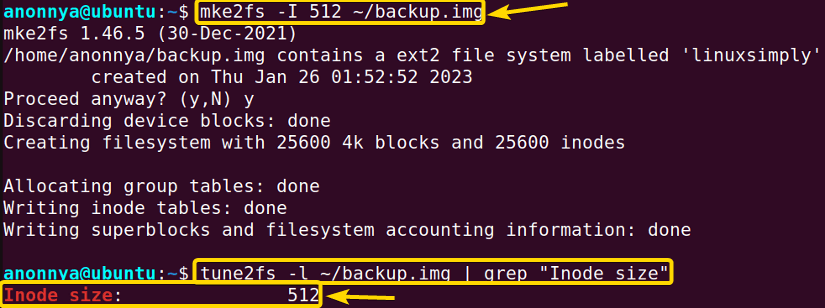
Example 7: Specifying byte/inode Ratio While Creating a File System
You can specify the number of bytes per inode of the file system you want to create using the mke2fs command in Linux. You will need to use the option -i along with the desired ratio. In this example, I will create a filesystem with a byte/inode ratio of 1024. You can do the same by following the steps below.
Steps to Follow >
➊ At first, open the Ubuntu Terminal.
➋ Type the following command in the command prompt:
mke2fs -i 1024 ~/backup.img➌ Now, press the ENTER button.
Output >
In the given image, you can see that I have created a file system with a specified byte/inode ratio.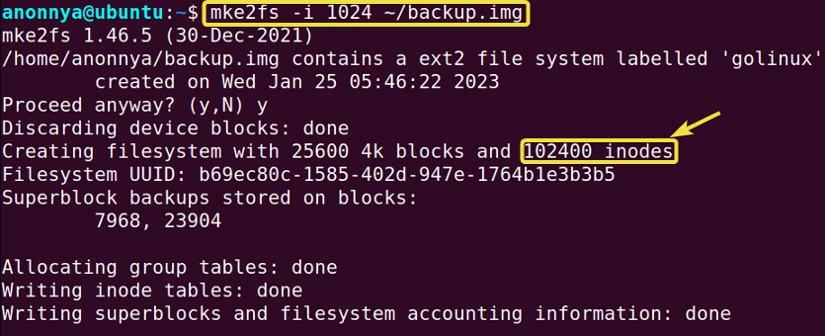
Example 8: Creating an ext3 Journal File System Using the “mke2fs” Command in Linux
You can create an ext3 journal file system using the mke2fs command in Linux. You will need to use the option -j along with the command. In this example, I will create an ext3 journal file system in the backup.img disk space. To do the same you can follow the steps below.
Steps to Follow >
➊ At first, launch the Ubuntu Terminal.
➋ Type the following command in the command prompt:
mke2fs -j ~/backup.img➌ Now, hit the ENTER button.
Output >
In the image below, you can see that I have created the desired ext3 journal file system.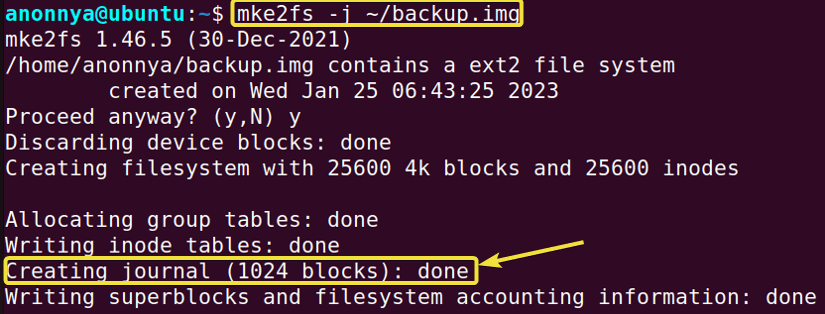
Example 9: Setting the Last Mounted Directory Using the “mke2fs” Command in Linux
You can determine where the file system should be mounted using the mke2fs command in Linux. To do so you must use the option -M and then the directory. In this example, I will mount the file system in the /mount_backup directory. Follow the given process to do the same.
Steps to Follow >
➊ At first, open the Ubuntu Terminal.
➋ Type the following command in the command prompt:
mke2fs -M /mount_backup ~/backup.img➌ Press ENTER.
❹ Now, type the below command to display the file size on the terminal:
tune2fs -l ~/backup.img | grep "Last mounted on"❺ Again, hit ENTER.
Output >
In the image below, you can see that I have set the last mounted directory for the created filesystem.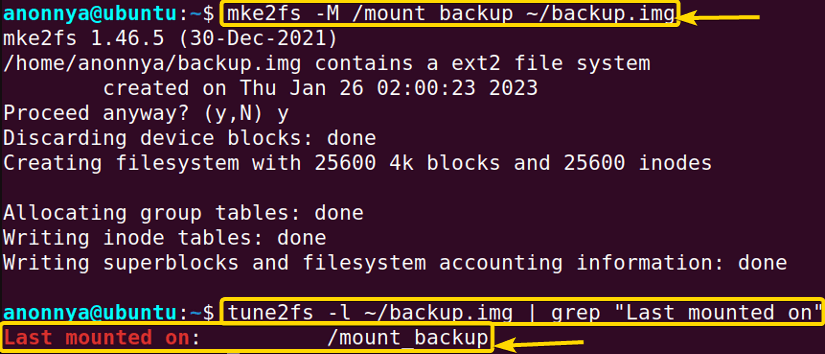
Example 10: Force Create a File System Using the “mke2fs” Command in Linux
You can force create a file system using the mke2fs command in Linux with option -F. Force creation avoids displaying a confirmation message on the terminal for creating the file system. In this example, I will force create a file system in the backup.img disk space. To do the same you can follow the steps
Steps to Follow >
➊ At first, go to your Ubuntu Terminal.
➋ Type the following command in the command prompt:
mke2fs -F ~/backup.img➌ Press the ENTER button.
Output >
In the image below, you can see that I have created a file system using the mke2fs command in Linux.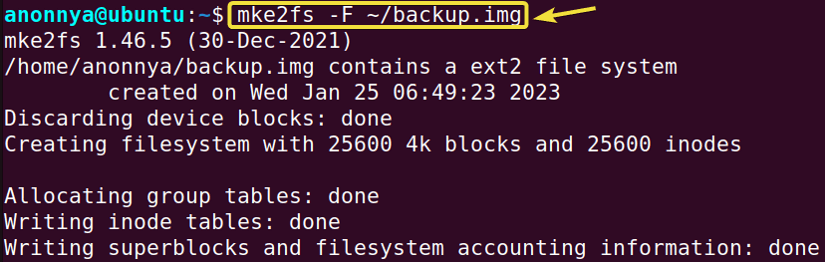
Conclusion
In this article, I have illustrated the most common uses of the mke2fs command in Linux. Learning these practical examples will help you create file systems from the command line. I hope the completion of the given tasks will help you with your experience in Linux and make you a power user.
Similar Readings
- The “shred” Command in Linux [9 Practical Examples]
- The “dd” Command in Linux [7+ Practical Examples]
- The “du” Command in Linux [14 Practical Examples]
- The “mount” Command in Linux [15 Practical Examples]
- The “mkfs” Command in Linux [4+ Practical Examples]
FUNDAMENTALS A Complete Guide for Beginners


