The du command in Linux is used to view disk space consumed by files and directories. It can be handy to keep track of how much space is used by whom, especially for systems with low storage. Moreover, it has a lot of options so that anyone can customize it according to his needs. In this article, I will show you how to use the du command in Linux with a lot of practical examples.
A. Description
The “du” in the du command in Linux stands for “Disk Usage” which is literary what the command does, shows disk usage. It is a standard program in Unix/Unix-like operating systems. Currently, it is part of GNU Coreutils. By default, the du command shows space in the unit of 1KB. However, the availability of different options makes it highly useful.
B. Syntax
The du command in Linux is simple to use. It can take multiple options and arguments at the same time.
du [OPTION]... [FILE]...C. Options
The du command in Linux has a lot of options. You can use those options to customize your output. You can check them yourself by typing the command below in the Ubuntu terminal, it will take you to the manual page of the du command in Linux.
man duUseful Options
- -a, –all ( shows all files including directories)
- –apparent-size ( displays apparent sizes rather than disk usage)
- -B, –block-size ( is used to define a new scale)
- -c, –total (shows grand total at the end)
- -h, –human-readable ( prints disk usage in human-readable format)
- -S, –separate-dirs ( doesn’t show subdirectories)
- –si ( uses 1000 as the scale)
- -s, –summarize ( shows only total disk usage)
- –time ( is used to show last modification time, access time etc.)
Practical Examples of the “du” Command in Linux
In this section, I will show you some practical examples of the du command in Linux. I used the directory tree below.
To download all those materials, click on the button below.
Example 1: Disk Usage of a Single File
For the starter, I will show you how to view the amount of disk space used by a single file using the du command in Linux. I will use the hello file here. Now follow the steps below:
- At first open a Ubuntu Terminal
- Type the following command below in the command prompt:
du hello - Now, press the ENTER button.
You will see an output like the one below. The number on the left is the size of the file. As I have mentioned earlier, The du command in Linux shows the size in the scale of 1KB by default. So, the file hello is 4KB in size.
Example 2: Disk Usage for a Single Directory Using the “du” command in Linux
Now, you will see the space usage by a directory. I will use the walid directory for this purpose. You can also do that with me by following the steps below:
- At first launch, an Ubuntu terminal
- Now type the following command in the command prompt:
du walid - Then press the ENTER button on the keyboard
As you can see, the du command has listed out space usage of the walid directory and its subdirectory as well.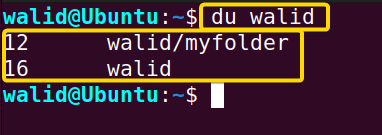
Example 3: Disk Usage of a Directory Without Subdirectories
From example 2, you can see the du command in Linux lists the disk usage of subdirectories as well. But what if you want to know space usage excluding subdirectories? You can do that by doing the following. I will use the walid directory in this example too.
- At the beginning, press CTRL + ALT + T to open an Ubuntu Terminal
- Now input the following command in the command prompt:
du -S walid - Then Press the ENTER button.
If you remember, in the previous example, the size of the walid directory was 20, but now it is 4. why? Because you are seeing the size without the size of the subdirectory myfolder.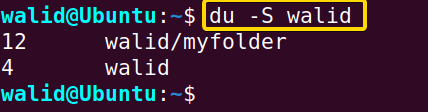
Example 4: Disk Usage in Human Readable Format Using the “du” command in Linux
As humans, we are used to certain types of data units (like Kilo, Mega, Giga). Here, you can present your size unit in a human-readable format by using the du command in Linux. I will use the walid directory as well. Follow the steps below with me.
- At first, launch an Ubuntu Terminal
- Type the following command in the command prompt:
du -h walid - Now press the ENTER button on the keyboard.
Here, you can see the numbers 12K, and 16K which are pretty easy to understand and soothing for the eyes.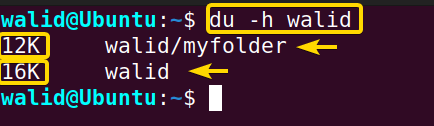
Example 5: Disk Usage of Each File a Directory
In the du command in Linux, it is also possible to list each and every file and folder in a directory. I used the option “-a” here, for that purpose. Also, I used the option “-h” to show you that you can combine multiple options. I used the walid directory as usual. Now follow these steps below:
- First of all, press CTRL + ALT + T to launch the Ubuntu terminal.
- Then type the following command in the command prompt:
du -a -h walidOR,
du -ah walid - Now press the ENTER key.
You can clearly see all the files and subdirectories are shown here with their specific disk space size.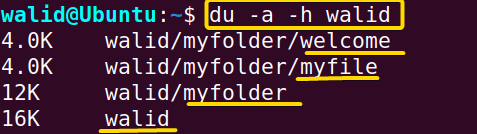
Example 6: Summary of Disk Usage Using the “du” command in Linux
You may not always desire to see the sizes of all directories and subdirectories, but rather the size of a particular directory. You will need to use the option “-s” for that purpose. I used the walid directory for the sake of this example. You can follow the steps with me below:
- Launch a Ubuntu terminal first.
- Type the following command in the command prompt:
du -s -h walidOR,
du -sh walid - Now press the ENTER button from your keyboard.
Now the summary of disk usage of the walid directory is visible in the terminal. This example is useful for a directory with a lot of subdirectories and files.
Example 7: Total Disk Usage Using the “du” command in Linux
The du command in Linux provides an option to print grand total at the end of a list. You need to use the option “-c” which is quite hard to remember. I used the walid directory as the previous one. Now do the following:
- At the beginning, open a terminal in Ubuntu
- Type the following command in the command prompt:
du -c walid - Now press the ENTER button.
As you can see, there is an extra line at the end of the list with the title total.
Example 8: Disk Usage to a Particular Level
I guess it is safe to assume that you will see some directories with a lot of subdirectories and those subdirectories may have some subdirectories as well and so on. While using the du command in Linux, it is up to you to which length you want to print the disk usage. To understand it better, follow the steps below with me. As you have guessed, I will use the walid directory here:
- At first press CTRL + ALT + T on your keyboard
- Type the following command in the command prompt:
du -d 1 walid - Now press the ENTER button from your keyboard.
You will see an output like below. Now I have a question for you. What would happen if I put the number 0 instead of 1. You would only see the walid directory. I put the number 1, that’s why it is showing the myfolder subdirectory of walid directory. If I put the number 3, it would have shown the subdiretories of the myfolder subdirectory as well (if available).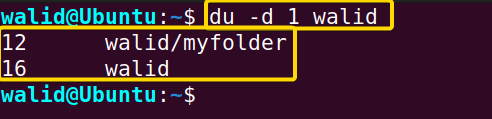
Example 9: Last Modification Time Using the “du” command in Linux
It is also possible to view the last modification time of a file or directory using the du command in Linux. I will use the option “–time” here. I used the file hello here. Now the steps below with me:
- At first, launch an Ubuntu terminal.
- Type the following command in the command prompt:
du --time hello - Press the ENTER button.
In the output, you will two new columns, one showing the date and the other one time of the last modification.
Example 10: Last Access Time
To view the last access time, you need to provide a value to the option “–time”. The value can be atime, access, use, ctime or status (see the manual page for more). As I want to see the last access time, I will use the value access. I used the file hello here as well:
- At first, open a terminal in Ubuntu
- Type the following command in the terminal:
du --time=access hello - Press ENTER from your keyboard
Now you can see the last access time. And in our case, the last access time is different from the last modification time.
Example 11: Apparent Size Using the “du” command in Linux
Apparent and disk usage can be different. Disk usage means the physical space consumed by a file whereas apparent size counts the data on that file. I used the file hello here so that you can compare the result with example 1. You can do the following to know the apparent size:
- At first open an Ubuntu terminal by pressing CTRL + ALT +T.
- Now type the following command in the command prompt:
du --apparent-size hello - Now press the ENTER button.
So, you can see, the disk usage of the hello file is 4 and the apparent size is 1.
Example 12: Disk Usage in Specific Block Size
The “–block-size” option in the du command in Linux is used to define your own scale. Let’s say I want to see the disk usage on a scale of 100, I need to provide 100 as the value of that option. I will use the walid directory here. Now do the following with me:
- Launch an Ubuntu Terminal first.
- Type the following command in the command prompt:
d --block-size=100 -s walid - Then press the button ENTER from your keyboard.
See, the output is on a scale of 100 now. You can compare it with previous examples and see the difference.
Note: I used the option “-s” to view the summary. Using it is not mandatory.
Example 13: Disk Usage in Human-Readable Format with Power of 1000
Now let’s say you want to view disk usage on a scale of 1000. You can use the option “–block-size” from example 12 and provide it a value of 1000. Or, you can use the option “–si” which I will do here. I used the directory walid here. Follow the steps below:
- At first, open a terminal in Ubuntu.
- Type the command below in the command prompt:
du --si -s walid - Now press the ENTER button.
Now you can see the output on the scale of 1000 which is 17k. When the scale 1024 was used it was 16k. So it totally makes sense.
Example 14: Disk Usage in the scale of 1MB Using the “du” command in Linux
Viewing disk usage in the scale of 1MB is also possible using the du command in Linux. For this purpose, you need to use the option “-m”. I used the walid directory here as well. You can do it with me by following the steps below:
- Press CTRL + ALT + T to open an Ubuntu Terminal
- Type the following command in the command prompt:
du -m -s walidOR,
du -ms walid - Press the ENTER button from your keyboard.
As you can see, the output is now in the scale of 1MB.
Conclusion
The du command in Linux is a useful command and you can use it on a day-to-day basis. Practicing the examples above will help you to have a farm grep on the du command in Linux.
Similar Readings
- The “shred” Command in Linux [9 Practical Examples]
- The “dd” Command in Linux [7+ Practical Examples]
- The “mount” Command in Linux [15 Practical Examples]
- The “mke2fs” Command in Linux [10 Practical Examples]
- The “mkfs” Command in Linux [4+ Practical Examples]
FUNDAMENTALS A Complete Guide for Beginners


