The mount command in Linux is used to attach a removable storage device or filesystem to an existing directory making them accessible. All files on the device are placed in a big tree-like hierarchy, starting from the root directory (noted as / ). Just like the root holds the tree, all the child filesystems emerge like the branches from the root directory. And the mount command helps to mount the device filesystem to the Linux filesystem (large tree structure). In this article, I will write about the mount command with some practical examples.
A. Description
The mount command plays a vital role in shaping the Linux file system hierarchy (tree structure). To access a file to the filesystem hierarchy, you have to mount it with the mount command. The command is capable of detecting a filesystem. Remember you need root permissions to mount a filesystem. Also, the mount command looks for a mount point or a device to attach the file. And after the filesystem has been mounted the previous contents of that file and owner and mode become invisible as long as it stays mounted. The pathname of the mounted file now refers to the root of the filesystem.
B. Syntax
The mount command loads a filesystem to a specific directory making it accessible to users and applications. You must specify the filesystem or device to mount along with the target mount point. In simple context the source and the destination. The basic syntax of the mount command is,
mount [OPTION]... <device> <target>C. Options
The mount command in Linux is a crucial command tool. It helps you to expand your storage and attach external data drives. There are several options to use with the command to modify its usage. I will list some of the most useful ones with their purposes here. You can check the man page to read more about them.
man mountUseful Options
- -a –all to mount all files listed in /etc/fstab.
- -o –options to limit the file system set that -a applies to.
- -t –type to indicate the file system type.
- -T to specify an alternative /etc/fstab file.
- -l to list all the files mounted and added labels to each device.
- -L –label to mount the partition with the specified label.
- -M to move the mounted file to another location.
- -r to mount the filesystem in read-only mode.
- -R to remount a filesystem to a different location, making its contents available in both places.
- -v to mount verbosely, describing each operation.
- -V to display program version information.
- -h to display the help page with all command options.
NB: The options in Linux CLI(Command Line Interface) are all case-sensitive, So be cautious while using them.
Practical Examples of the “mount” Command in Linux
The mount command offers a lot of utility for numerous situations. Whenever you are running the mount command, it reaches the kernel to complete the operation. Below I will talk about the usage of this command with some practical examples.
Example 1: List All the Mounted Files Using the “mount” Command in Linux
You can see the list of all mounted files on your device. Use the mount command without any options and arguments and it will display all the mounted files on your device. The syntax is:
mountFollow the below steps to check it practically.
Steps to Follow >
➊ Start by opening the Ubuntu Terminal.
➋ Type the following command in the command prompt:
mount➌ Now, press the ENTER button.
Output >
You can see the list of all the mounted files on your device from the output image. As it is a long list, all of them did not fit on one page. So you have to scroll down to check them all.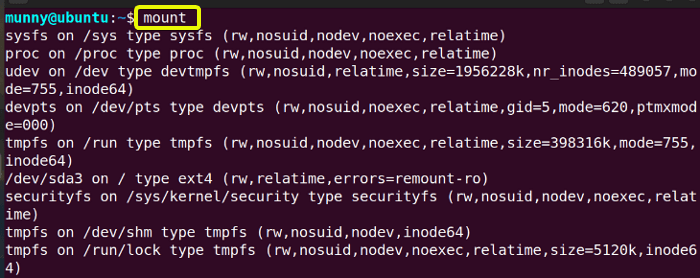
Example 2: Check the Version of the “mount” Command in the Linux System
To check the software version for the mount command in your Linux OS, use the –version or -V option. The syntax is:
mount -VSteps to Follow >
➊ At first, open the Ubuntu Terminal.
➋ Then, type the following command in the command prompt:
mount -V➌ Finally, tap the ENTER button.
Output >
As in the display, you can see the software version information for the mount command.
Example 3: Get Help While Using the “mount” Command in Linux
You can get information about the mount command. Even though you will get every detail about the command from the man page you can get more concise and more arranged info using the –help option. It will display all the options and arguments available for the command with a short description. Type the –help option or -h with the mount command. The syntax is:
mount -hFollow the below steps to check yourself.
Steps to Follow >
➊ Open the Ubuntu Terminal.
➋ Type the following command in the command prompt:
mount -h➌ Now, tap the ENTER button.
Output >
From the output display, you will see all the information about the mount command as in the following picture.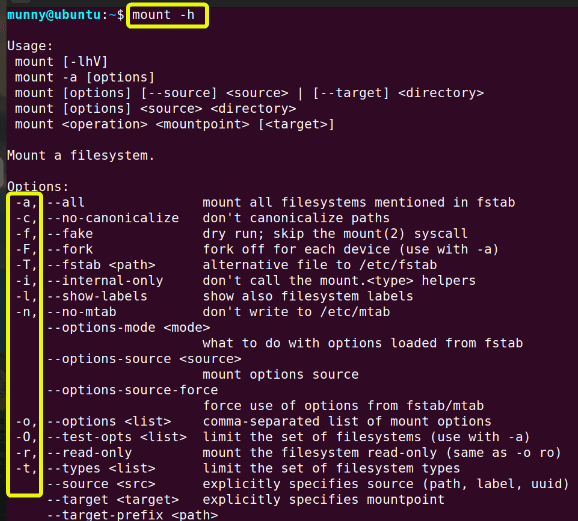
Example 4: List Specific Mounted File Systems Using the “mount” Command in Linux
You can display the list of a specific mounted file system instead of displaying all of them at once as I showed in Example 1. To do so, you have to give the mount command the type of file you want the list of. For that use the option -t and the file type name after the command. The syntax is:
mount -t <file_type_name>One common file type of the device is the ext4 type. Proceed according to the below steps to check the ext4 type mounted file list.
Steps to Follow >
➊ Open the Ubuntu Terminal.
➋ Type the following command in the command prompt:
mount -t ext4➌ Now, tap the ENTER button.
Output >
You can see the list of mounted ext4-type files from the output image.
Example 5: Mount a File System Using the “mount” Command in Linux
To mount a filesystem you have to specify the mount point or directory to which the filesystem will be attached to. You can mount a filesystem by typing the mount command followed by the file_name that is situated inside a valid block device (hard drive or a partition of a hard drive) you want to mount. Then give the target mount point or directory name. The syntax is:
sudo mount <file_name> <mount_point>Steps to Follow >
➊ Open the Ubuntu Terminal.
➋ To mount the file sda3 from the dev directory to another file directory named munny, type the following command in the command prompt:
sudo mount /dev/sda3 /media/munny➌ Tap the ENTER button.
➍ Now, display the list to check if you have mounted the file successfully by using the option –show-label with the command.
sudo mount -l -t ext4➎ Finally, press the ENTER button.
Output >
From the output image, you can see I have mounted my sda3 file which is ext4 type to the mount point directory munny.
Example 6: Mount Files in Read-Only Mode
When you want to mount a file in a protected way you can mount it in the read-only mode. This will prevent any changes to the original file. To mount a file in read-only mode use the option –read-only or -r with the mount command. The syntax is:
sudo mount -r <device> <target>To view an example, follow the below steps.
Steps to Follow >
➊ Open the Ubuntu Terminal.
➋ Type the following command in the command prompt to mount the file sdr0 in read-only mode,
sudo mount -r /dev/sdr0 /run➌ Now, tap the ENTER button.
➍ Now, check the list of mounted files to see if the command has mounted the file successfully or not by typing the below command,
df➎ Finally, tap the ENTER button.
Output >
From the output display, you can see the command line to mount the /dev/sr0 file in read-only mode with the option -r. And after running the commands we found that our file has been mounted successfully on the /run mount point.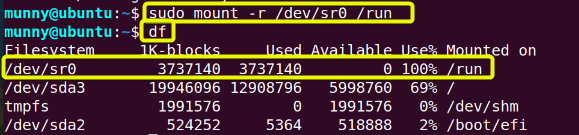
Example 7: Mount a File to Read or Write
Say you want to mount a file in a way that you can both read and write on it later. This will let you modify the mounted file later. To mount a file in read-write mode use the option -rw with the mount command. The syntax is:
sudo mount -rw <device> <target>To view an example, follow the below steps.
Steps to Follow >
➊ Open the Ubuntu Terminal.
➋ Type the following command in the command prompt to mount the file sda2 in read-write mode,
sudo mount -rw /dev/sda2 /media➌ Now, tap the ENTER button.
➍ Now check the list of mounted files to see if your file has been mounted or not by typing the below command,
df➎ Finally, tap the ENTER button.
Output >
From the output display, you can see the command line to mount the /dev/sda2 file in read-write mode with the option -rw. And after running the commands we found that our file has been mounted successfully on the /media mount point.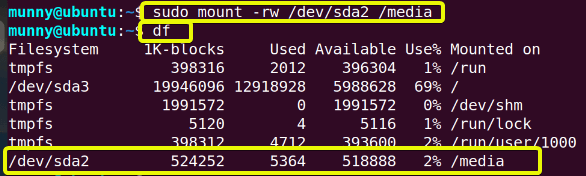
Example 8: Mount a File System With Specified Options
You can mount a file just the way you want it to be mounted by specifying mount options. To modify the mounting process, you can use several mount options separated by a comma (no space between them) after the option –test-opts or -o. It is an option that allows the command to use multiple options as a comma-separated list. The syntax is:
sudo mount -o [option1,option2,...optionN] <file_name> <mount_point>Follow the below example to check the result.
Steps to Follow >
➊ Open the Ubuntu Terminal.
➋ To mount the file sda2 from the dev directory to another file directory named run, with options noatime, nouser, and ro type the following command in the command prompt:
sudo mount -o noatime,nouser,ro /dev/sda2 /run➌ Tap the ENTER button.
➍ Now, display the list to check if you mounted the file successfully by using the df command.
df➎ Press the ENTER button.
➏ You can see the detailed list too by typing the below command.
sudo mount -l➐ Finally, hit ENTER.
Output >
From the output image, you can see I have mounted my sda2 file with multiple options separated by a comma after the option –opts to the mount point directory run. Then running the df command we can see that it has been mounted. To view the mounted file in detail I used the last command. As you can see from the output image, it is displaying all the information about the mounted file. The file type along with all the used options are in there.
![]()
Example 9: Mounting a File System Using Contents From /etc/fstab File
The lines in the /etc/fstab file describe where system devices are mounted and their corresponding options. In general, fstab is used for internal devices (CD/DVD) and network shares (NFS/SSHFS). When you provide only one parameter either device or directory, that time the mount command reads the contents of the /etc/fstab configuration to check if the specified file is listed there. If it is found then the command uses values for the missing parameter and chooses options from the configuration. Mount a filesystem from the list in the /etc/fstab file using the syntax:
sudo mount [options] [device]
OR,
sudo mount [options] [directory]Take a look at the below example to do the mounting practically.
Steps to Follow >
➊ At first, open the Ubuntu Terminal.
➋ Type the following command in the command prompt to mount a filesystem inside the block device /dev named sda2,
sudo mount /dev/sda2➌ Now, tap the ENTER button.
➍ Now, check the list of mounted ext4 type files to see if your file has been mounted or not by typing the below command.
sudo mount -l -t ext4➎ Finally, tap the ENTER button.
Output >
I used the first command to mount the file sda2, and using the second command I can see that my file is mounted on the root ( / ), which is ext4 type.
Example 10: Move a Mounted File System to Another Mount Point
You can move a mounted file to a different mount point or location. Moving the file to another mount point causes the contents of that file to appear in the new location but the physical location remains unchanged. To do so use the mount command with the long option –move or -M. Just type the mount command followed by the name of the current directory as the source and then the new destination. The syntax is:
sudo mount -M <current_location> <new_location>Read through the following steps to move a mounted file to a new location.
Steps to Follow >
➊ Open the Ubuntu Terminal.
➋ Check all the mounted files with their location by the following command.
df➌ Type the following command in the command prompt to move the mounted file.
sudo mount -M /run/lock ~/munny➍ Now, tap the ENTER button.
➎ After that, again check the list by the following command.
df➏ Finally, hit the ENTER button.
Output >
From the output image, you can see the list of mounted files with their location. After that I used the mount command with the –move option to move the mounted file from the old place /run/lock to its new place ~/munny. And then check the list of mounted files with the df command again. As you can see from the output display the file is now in a new place.
Example 11: Mount a USB Drive Using the “mount” Command in Linux
You can mount removable device storage using the mount command. Although modern Linux system automatically mounts removable drivers as soon as you insert them. You can mount them manually too when there is an error in automatic mount. To mount a USB drive manually with the command, first, check the list of all your disks and see the device name your drive is currently inserted into. After that run the mount command with that device name followed by the target destination as a mount point. The syntax is:
sudo mount device targetSteps to Follow >
➊ At first, open the Ubuntu Terminal.
➋ Type the following command in the command prompt to check the disk list in your system.
sudo fdisk -l➌ Now, tap the ENTER button and type your password.
➍ After that, you know your drive device name. Run the following command to mount it on the target destination.
sudo mount /dev/sdb1 /run/usb➎ Then, press the ENTER button.
➏ Afterward, write the below command to check the mount list.
sudo mount -l➐ ENTER
Output >
After inserting your removable driver write the first command as in the picture below. Then type your password.![]() After running the first command all your disks list and their specifications will be on the display like in the below image. As you can see my removable drive is in /dev/sdb1 device.
After running the first command all your disks list and their specifications will be on the display like in the below image. As you can see my removable drive is in /dev/sdb1 device.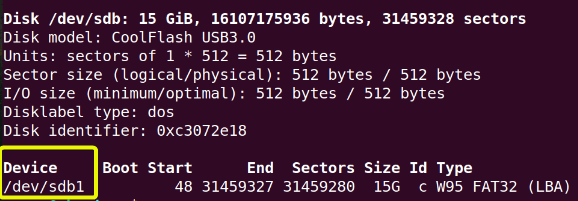 After that, type the second command to mount your driver. Give the device name and then the mount point. From the image, you can see I am using usb directory as my destination directory. If you don’t have your target mount point you can create one too before running the command. Just use the sudo mkdir command. After that type the last command to check the mount list.
 From the list, you will find your mounted driver’s name at the bottom as it was mounted last. See my mounted driver’s name in the below image.
![]()
Example 12: Mount a CD-ROM using the “mount” Command in Linux
Linux automatically mounts removable device CD-ROM too. As I have said in the upper example if there is an error you can mount manually by using the mount command. In that case, type the mount command then your CD-ROM standard file system followed by the mount point. As CD-ROM is a read-only optical disk so use the read-only option while mounting. Also to give the CD_ROM standard file system type use the type option -t. The syntax is:
sudo mount --type [options] <file_name> <mount_point>ISO9660 is a standard file system that is used on CD-ROMS. I will mount this file in the below example. Go through the following steps to mount yourself.
Steps to Follow >
➊ Start by opening the Ubuntu Terminal.
➋ Type the following command in the command prompt to mount the ISO9660 filesystem from the /dev/cdrom device point to /mnt mount point.
sudo mount -t iso9660 -o ro /dev/cdrom /mnt➌ Now, tap the ENTER button.
➍ Now, check the list of mounted files to see if the command has mounted the file or not by typing the below command.
sudo mount -l➎ Finally, tap the ENTER button.
Output >
From the output image, you can see the written command to mount the ISO9660 file.![]() After the first command is run, run the second command to check the list of the mounted files. And from the display bottom, you will see that your CD_ROM file is mounted. You can see mine in the below image.
After the first command is run, run the second command to check the list of the mounted files. And from the display bottom, you will see that your CD_ROM file is mounted. You can see mine in the below image.
Example 13: Mount ISO Files Using the “mount” Command in Linux
ISO files can be used as a virtual disc drive on the computer. They can be mounted using virtual drive software without burning them to a physical disk. That way ISO file contents will appear as if they were on an actual disk. Use the mount command to mount these ISO files and use them as a virtual disk. To mount an iso file you have to use the loop device which is a special pseudo-device that makes the iso file accessible as a block device (hard drive or usb drive). That way you can use the contents of the iso files as if they were on a physical disk. The syntax is:
sudo mount [options] <file.iso> <mount point> loopSee the below example to check how to mount ISO files practically.
Steps to Follow >
➊ Begin by opening the Ubuntu Terminal.
➋ Type the following command to make the mount point directory,
sudo mkdir /mnt/media/iso➌ Now, type the following command in the command prompt to mount the iso file memtest86+.iso from the /usr/lib/memtest86+ device point to /mnt/media/iso mount point.
sudo mount /usr/lib/memtest86+/memtest86+.iso /mnt/media/iso -o loop➍ Then, tap the ENTER button.
➎ After that, check the list of mounted files to see if the command has mounted the file successfully or not by typing the below command,
sudo mount -l➏ Finally, tap the ENTER button.
Output >
From the output display image, you can see that using the first command mkdir I made my mount point directory iso. After I ran the second command to mount my iso file to the iso mount point. Inspect the below image where you can see the command has mounted the iso file successfully in read-only mode.
Example 14: Do Fake Mounting while Using the “mount” Command in Linux
Fake mounting is a way in Linux where a directory or file appears as if it is located in a different location on a file system while it’s still in its original location. The command does everything except the actual system call, thus ‘fakes’ mounting. You can fake mounting to create multiple references to the same data without taking up additional storage space. To do the fake mounting use the –fake or -f option with the mount command. As this type of mounting is a kind of deception try to avoid it. The syntax is:
sudo mount --fake <device> <directory>Check out the following example.
Steps to Follow >
➊ Open the Ubuntu Terminal.
➋ Type the following command in the command prompt:
sudo mount --fake /dev/sda2 /run➌ Now, tap the ENTER button.
➍ Give password
➎ Type the following command to check the mounted list.
df➏ Finally, press the ENTER button.
Output >
From the output display, you can see I used the first command to do fake mounting on the /dev/sda2 block device.![]() After running the command, you can see no mounted file named sda2 in the list. Cause there was no actual system call for mounting it.
After running the command, you can see no mounted file named sda2 in the list. Cause there was no actual system call for mounting it.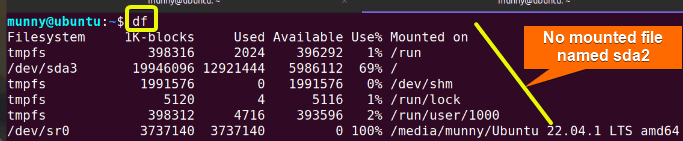
Example 15: Mount the Partition of Specified Labels
In Linux, a file system label is a user-defined name or string of characters that can be assigned to a file. The label is used to identify a file system rather than relying on device names or file system UUIDs. You can mount the partition that has specified labels. Use the option –label or -L with the mount command to mount a file with a specified label. Type the label name after the option. The syntax is:
sudo mount -L <label_name> <device> <mount-point>Follow the below example to check practically.
Steps to Follow >
➊ Open the Ubuntu Terminal.
➋ First, type the following command in the command prompt to add the label [mylabel] to the file /dev/sda3.
sudo e2label [mylabel] /dev/sda3➌ Now, tap the ENTER button.
➍ Then, write the following command to check if you added the label successfully.
sudo findmnt -o source,target,label➎ Again, Press ENTER
➏ After that, run the following command to mount the /dev/ada3 file by specifying its assigned label.
sudo mount -L [mylabel] /dev/sda3 /media/mylabel➐ Press ENTER again.
➑ Subsequently check the list of mounted files. And see if you have mounted your file or not by typing the below command,
sudo mount -l -t ext4➒ At last, tap the ENTER button.
Output >
Write the first command as in the display picture to add label [mylabel] to the ext4 type file sda3.![]() After running the first command to add the label we can run the second command to check if the label is added. And from the output image, we can see [my label] tag has been added to the file sda3.
After running the first command to add the label we can run the second command to check if the label is added. And from the output image, we can see [my label] tag has been added to the file sda3.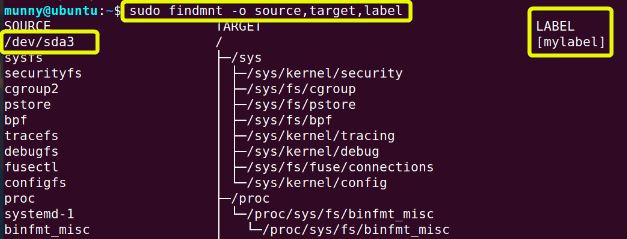 Then write the 3rd command as in display and run to mount the specified label file.
![]() After running the mount command check the list with the last command and from the output you will be able to see the mounted ext4 type file with the label name within it.
After running the mount command check the list with the last command and from the output you will be able to see the mounted ext4 type file with the label name within it.
Exit Status
After running the mount command, it returns exit statuses as completion. These exit statuses contain some codes where “0” indicates success and some other codes indicate different types of errors while running the command. Some common exit status codes of the mount command include:
- 1 → Insufficient permissions or incorrect command calling.
- 2 → System error.
- 4 → Internal bugs for the mount command.
- 8 → User interrupted the operation.
- 10 → Block device required.
- 12 → Device or resource busy.
- 16 → Problem with writing or locking the /etc/mtab file.
- 20 → Not a directory.
- 22 → Is a directory.
- 32 → Fail to mount, no such file or directory.
- 40 → wrong file system type.
- 64 → Not all but at least one mount operation succeeded.
- 72 → Unknown error.
Conclusion
Well to sum up, throughout this long article, I discussed the mount command and how to mount different files and removable devices with some practical examples. Hope you will learn most of the stuff related to the command tool and be a power user of LINUX.
Similar Readings
- The “shred” Command in Linux [9 Practical Examples]
- The “dd” Command in Linux [7+ Practical Examples]
- The “du” Command in Linux [14 Practical Examples]
- The “mke2fs” Command in Linux [10 Practical Examples]
- The “mkfs” Command in Linux [4+ Practical Examples]
FUNDAMENTALS A Complete Guide for Beginners


