The useradd is a command in Linux that is used to create a new user account on the system. It’s a lower-level command that directly adds a new user to the system but doesn’t configure the account or create the user’s home directory by default. This command is typically used by system administrators to create new user accounts for other users on the system.
In this article, I will describe all the features and uses of the useradd command in Linux with multiple examples.
Syntax of “useradd” Command
The syntax of the useradd command in Linux is:
useradd [OPTION]... user_nameIn the syntax above, [OPTIONS] are not mandatory and three dots after it means multiple options can be used after the useradd command.
Options of “useradd” Command
There are numerous options available for the useradd command. You can learn about them by the command:
man useraddHere are some useful options:
| Option | Description |
|---|---|
| -c | Specify a comment or description for the user account. |
| -d | Set the user’s home directory. |
| -D | Set the user default value. |
| -e or –expiredate | Set the date on which the user account will be disabled. |
| -f or –inactive | Set password inactivity period of the new account. |
| -g or –gid | Set the user’s primary group. |
| -G or –groups: | Set the user’s secondary groups. |
| -h or –help | Display the help message. |
| -m | Create the user’s home directory if it does not already exist. |
| -M | Do not create the user’s home directory. |
| -p or –password | Encrypted password of the new account. |
| -r or –system | Create a system account. |
| -s | Set the user’s login shell. |
Practical Examples of the “useradd” Command in Linux
In Linux, the useradd command is a helpful tool to create and manage a new user account for other users. Now, I will show you some of the most useful applications for the useradd command in Linux.
Example 1: Add a New User With the “useradd” Command in Linux
To add a new user using the useradd command, provide the username after the command as below:
sudo useradd user2In the image below, you can see that I have created anew user named “user2“.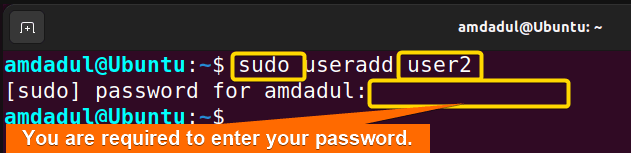
Similar Readings
- The “usermod” Command in Linux [14+ Practical Examples]
- The “users” Command in Linux [4 Practical Examples]
- The “who” Command in Linux [6 Practical Examples]
Example 2: Create a New User With Specific Home Directory Using the “useradd” Command in Linux
You can create a new user with a specific home directory by simply running the useradd -d command. For example, to add a user “user3” with a different home directory (/home/star), run the following command in the command prompt:
sudo useradd -d /home/star user3Now, type the following command into the command prompt to see if the newly added user is entered in the /etc/passewd:
grep user3 /etc/passwdIn the following image, you can see that I have created a new user named “user3” in the /home/star directory.
Example 3: Create a User With a Specific User ID With the “useradd” Command in Linux
To create a new user account specifying an individual user ID using the useradd command, use option -u. Here is an example:
sudo useradd -u 2023 user2It will create a new user called “user2” by giving it the “2023”
You can check the UID by typing the following command:
grep user2 /etc/passwdIn the image below, you can see that I have created a new user named “user2” with the UID “2023”.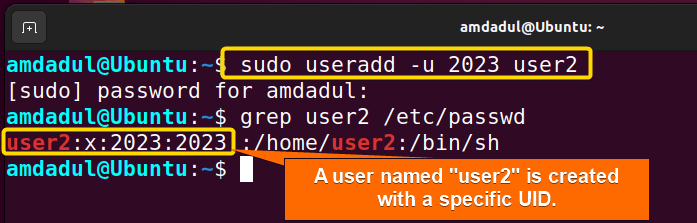
Example 4: Create a User With a Specific Group ID
To create a new user account specifying an individual group ID using the useradd command, use option -g. Here is an example:
sudo useradd -g 27 user5It will create a new user called “user5” by giving it the GID “27”
Now, run the command below to check the GID:
id user5In the following image, you can see that I have created a new user named “user5” with the GID “27”.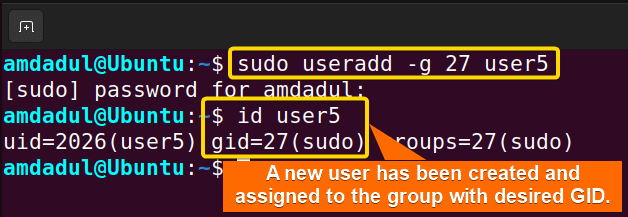
Example 5: Create a User Without a Home Directory
To create a user account without creating a home directory using the useradd command, use -M option. Here’s how:
sudo useradd -M user6It will create a new user called “user6” without a home directory with the useradd command. To check the non-existence of home directory, type the following command into the command prompt:
sudo ls -l /home/user6In the following image, you can see that I have created a user named “user6” without the home directory.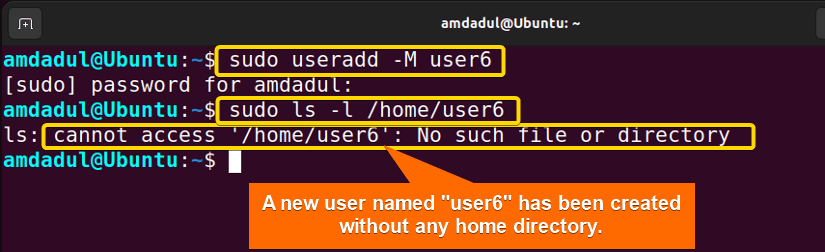
Example 6: Create a User With an Expiry Date
To create a user account without creating a home directory using the useradd command, use -e option. For example, to create a new user called “temp” with an expiry date of October 10, 2023, run the command below:
sudo useradd -e 2023-10-10 tempNow, use the following command to check the expiry of the “temp” user.
sudo chage -l tempIn the following image, you can see that there is a user “temp” with an expiry date.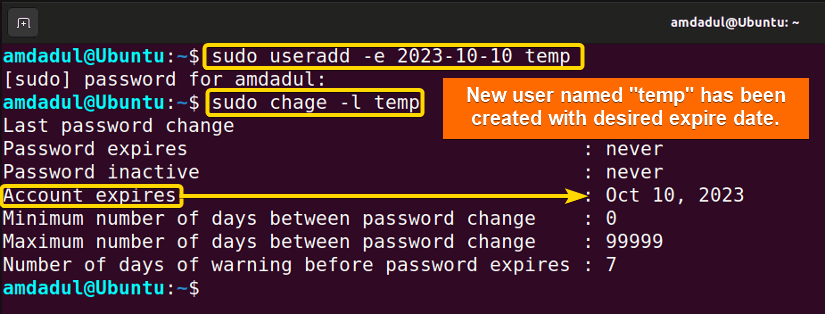
Example 7: Create a User With a Comment Using the “useradd” Command in Linux
Creating a new user with an additional comment is helpful for future reference and also to note something important. Use -c option for this purpose. Here is an example:
sudo useradd -c "For example 7, this user is created" user7It will create a new user called “user7” with a comment “For example 7, this user is created”
Now, run the following command to see comments that was used while creating “user7”:
cat /etc/passwd | grep user7In the image below, you can see that a new user named “user7” was created with the comment “For example 7, this user is created”.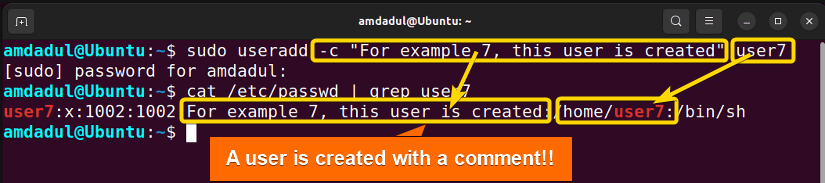
Example 8: Specify the Shell for a User With the “useradd” Command in Linux
Sometimes, creating a new user account with a different shell is necessary. The default shell is /bin/bash for new users in Ubuntu. For example, to create a new user “user8” in the /bin/sh shell, use the below command:
sudo useradd -s /bin/sh user8Now, run the following command to verify this:
cat /etc/passwd | grep user8In the following image, You can see that I have created a new user “user8” under the /bin/sh shell.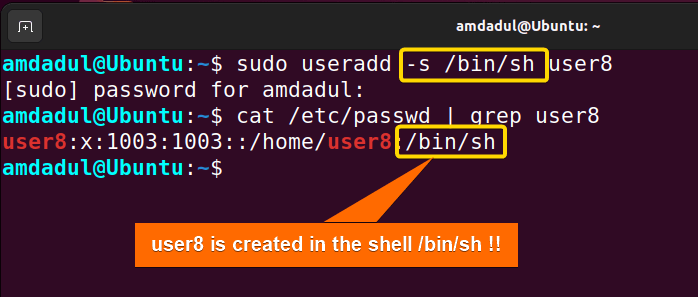
Example 9: Set an Encrypted Password for the New User
To set an encrypted password for the new user, use -p with useradd command. Here is an example:
sudo useradd -p abcdef123 user9It will set an encrypted password for a new user called “user9”.
Now, use the following command to verify this:
sudo grep user9 /cat/shadowYou can see that I have created a new user named “user9” along with setting its password.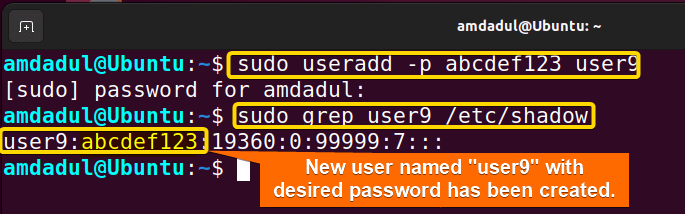
Example 10: Change the Default “useradd” Values
You can see the default value (of the useradd command) by using it followed by the option -D.
useradd -DIn the image below, you can see the default value for the useradd command.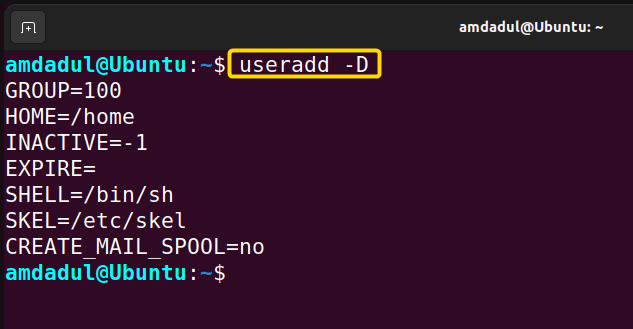 Now, to change the default value for the shell from /bin/sh to /bin/bash, run the following command into the command prompt:
sudo useradd -D -s /bin/bashNow, use the following command to see the current SHELL value:
sudo useradd -D | grep -i shellIn the following image, you can see that the shell value is changed to /bin/bash.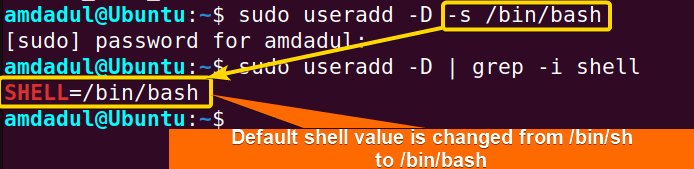
Example 11: Create a System User Using the “useradd” Command in Linux
The system user, also known as the root user, is responsible for creating normal users and is automatically created when the operating system is first installed. To create a new system user using the useradd command use the --system or -r option. Here is an example:
sudo useradd -r user11OR,
sudo useradd --system user11Now, run the following command to see user ID of “user11”.
id user11In the Image below, you can see that a system user named “user11”is created.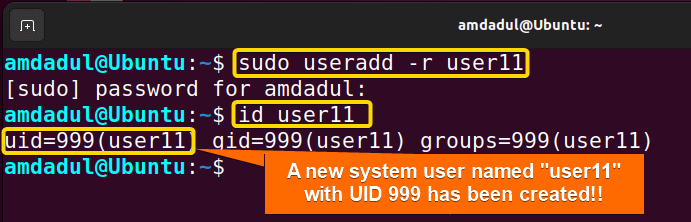
Example 12: Help Page for the “useradd” Command in Linux
For details about the useradd command in Linux, you can go to the help section using the command:
useradd --helpIn the following image, you can see the help page of the useradd command in Linux.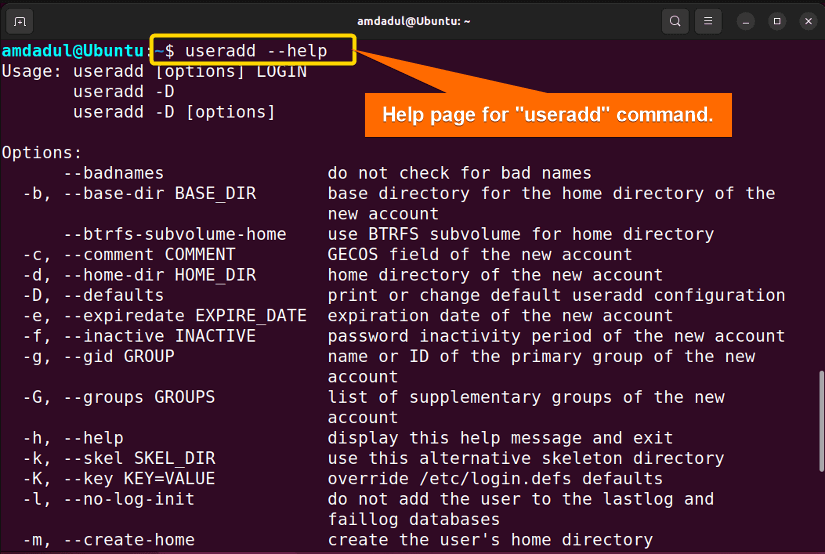
Conclusion
In this article, I’ve shown the operation of the useradd command. I’ve also provided some relevant examples. You should be able to use the useradd command effectively on your own if you properly read this article and follow the above-mentioned guidelines. I hope these examples will help you on your journey to be a power user of the Linux command line.
Similar Readings
- The “whoami” Command in Linux [5 Practical Examples]
- The “adduser” Command in Linux [12 Practical Examples]
- The “su” Command in Linux [6 Practical Examples]
- The “userdel” Command in Linux [4 Practical Examples]
FUNDAMENTALS A Complete Guide for Beginners


