The “usermod” command is a useful tool to modify the attributes of an existing user. This command allows the root user or superuser to modify the user name, user ID, groups, home directory, password, user shell, expiry date, and other user details of an existing user. Generally, the usermod command provides the opportunity to modify the file like /etc/group, /etc/shadow, /etc/gshadow, /etc/login.def & /etc/passwd.
The syntax of the usermod command in Linux is pretty simple, as shown below.
usermod [OPTION]... USEROptions of “usermod” Command
There are numerous options available for the usermod command. You can learn more about the usermod command, its options and their uses by checking the man page.
man usermod| Options | Use |
|---|---|
| -a, –append | Add the user to the one or more supplementary group. You can Use it only with the -G. |
| -b, –badnames | Permit non-compliant names. |
| -c, –comment | Add a comment field for the user account. |
| -d, –home | Modify the login directory for any existing user account. |
| -e, –expiredate | Set account expiry date. The date is specified in the format YYYY-MM-DD. |
| -f, –inactive | Permanently disable the number of days after a password expires until the account. |
| -g, –gid | Change the primary group for a User. |
| -G, –groups | Add supplementary groups. |
| -L, –lock | Lock the user’s password. |
| -m, –move-home | Move the contents of the home directory from the existing home directory to the new directory. |
| -o, –non-unique | Change the user ID to a non-unique value. |
| -l, –login | Change the login name from user_name to new_user_name. |
| -p, –password | Specify new unencrypted password. |
| -R | Apply changes in the CHROOT_DIR directory and use the configuration files from the CHROOT_DIR directory. |
| -s, –shell | Specify the user’s new login shell. |
| -u, –uid | Specify the new numerical value of the user’s ID. |
| -U, –unlock | Unlock a user’s password. |
Note: Commands and their options are case-sensitive in Linux.
Practical Examples of the “usermod” Command in Linux
In Linux, the usermod command is a helpful tool that allows superuser or root user to modify the user name, user ID, groups, home directory, password, user shell, expiry date, and other user details of an existing user. In the section below, I will show you some of the most useful applications for the usermod command in Linux.
Example 1: Rename the User With the “usermod” Command
The usermod command in Linux allows you to modify an existing user name by simply running the usermod command followed by the option -l. Follow the below example:
- At first, open the Ubuntu Terminal.
- Run the command below:
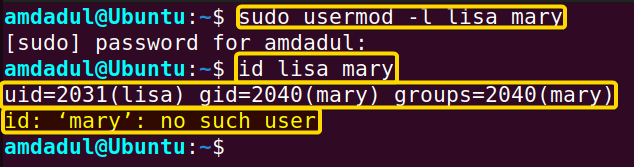
id maryYou will receive Mary’s UID, GID and a list of the groups she is a member of, as shown in the image below.

- Execute the command below to rename.
sudo usermod -l lisa maryAlternatively,
sudo usermod --login lisa mary - Type your password.
- Tap ENTER again.
- Now, run the following command into the command prompt:
id lisa maryIn the following image, you can see that user mary has been renamed to lisa with the previous UID 2031.


Similar Readings
- The “users” Command in Linux [4 Practical Examples]
- The “who” Command in Linux [6 Practical Examples]
Example 2: Modify the User UID With the “usermod” Command
To modify the UID of any user by running the usermod command with the option –uid or -u. Follow the below example:
- Open the Ubuntu Terminal first.
- Type the following command into the command prompt
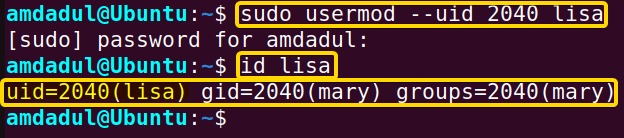
id lisaIn the following image, you can see the IDs of the user “lisa” including UID which is 2031.

- Now execute the command below to alter its UID.
sudo usermod --uid 2040 lisaAlternatively,
sudo usermod -u 2040 lisa - Tap the ENTER button.
- Type your Password.
- You can check the UID by typing the following command.
id lisaYou can see in the image below that I have modified the UID of lisa with the UID “2040“.


Example 3: Modify the User UID With a Non-Unique Value
The UID needs to be an individual, non-negative number. However, you can createusers with duplicate (non-unique) UIDs by using the-o or --non-unique option. Let’s see how:
- Launch the Ubuntu Terminal first.
- Execute the following command into the command prompt:
id lisa johnIn the following image, you can see that the users named lisa and john have UID values of 2040 and 2028, respectively.

- Now, enter the following command into the command prompt:
sudo usermod -o -u 2028 lisaAlternatively,
sudo usermod --non-unique --uid 2028 lisa - Type your Password.
- You can check the GID by typing the following command.
id lisa johnIn the image below, you can see that I have changed the UID of lisa with the same UID as john.


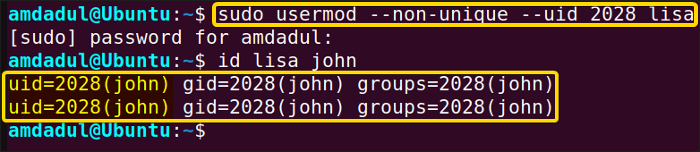
Note: As the user with UID 2028 is a member of group john with GID 2028. So, the group of lisa also turned into jhon while I changed the UID.
Example 4: Modify the User GID With the “usermod” Command
You can modify the GID of any user by running the usermod command with the option --gid or -g. Here’s how:
- Open the Ubuntu Terminal first.
- Type the following command into the command prompt
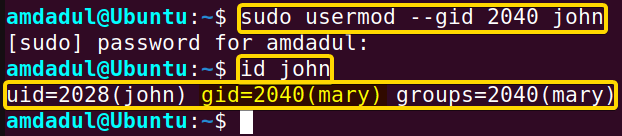
id jhonIn the following image, you can see the IDs of john including GID which is 2028.

- Now execute the command below to alter its GID.
sudo usermod --gid 2040 johnAlternatively,
sudo usermod -g 2040 john - You can check the UID by typing the following command.
id johnYou can see in the image below that I have modified the GID of john with the GID “2040“.


Example 5: Add a User to Secondary Groups Using “usermod” Command
To add a user to secondary groups you have to use option usermode -G command. Follow the steps below.
- Launch the Ubuntu Terminal.
- Run the following command into the command prompt:
sudo usermod -G 2029,2030,2031 johnAlternatively,
sudo usermod --groups 2029,2030,2031 john - Now type the following command into the command prompt:
id johnYou can see in the image below that I have added user john to group4, group5, group6.


Note: A primary group in Linux is the group to which a user belongs initially, and it is used to specify the group ownership of files and directories that the user creates. In addition to their primary group, users can also be a part of other groups, which are referred to as supplementary groups or secondary groups. These groups are used to grant additional permissions or access to resources.
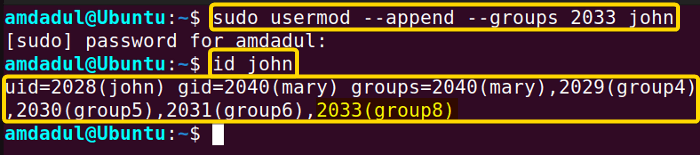
Example 6: Append a User to Secondary Groups Along With the Existing Groups
To add a user to other secondary groups without overwriting others, you have to use option -a or --append along with the option -G or --groups. Here’s how:
- Firstly, open the Ubuntu Terminal.
- Execute the following command
sudo usermod -a -G 2033 johnAlternatively,
sudo usermod --append --groups 2033 john - Now use the following command:
id johnIn the following image, you can see that the user john has become a member of group8 without losing the membership of previous secondary groups.

Example 7: Adding Information to User Account With “usermood” Command
To add information to a user account option -c or --comment after the “usermod” command. Follow the steps below.
- Launch the Ubuntu Terminal.
- Type the following command into the command prompt:
sudo usermod -c "this is john" johnAlternatively,
sudo usermod --comment "this is john" john - Now type the following command into the command prompt:
grep john /etc/passwdIn the following image, you can see that I have added information about the user john in the form of a comment.


Example 8: Change the User Home Directory With the “usermod” Command in Linux
To change the current home directory, -d or --home is used after the usermod command. In this example, I will change the home directory of the user james(/home/james) and use the home directory of user david(/home/david) as james’s home directory. Here’s how:
getent passwd david james You can also change the home directory of any user by following the steps below.
- Open the Ubuntu Terminal.
- Execute the following command
sudo usermod -d /home/david jamesAlternatively,
sudo usermod --home /home/david james - Now type the following command into the command prompt:
getent passwd jamesYou can see in the image that the home directory of user james has changed to /home/david from /home/james.


Example 9: Move the Content of the User’s Home Directory Using “usermod” Command
When you change the home directory of any user, the content of the previous home directory does not shift to the new home directory. So, if you want to shift a user’s home directory along with the content of the home directory, then you have to use the -m or --move-home option after the usermod command. Here’s how:
getent passwd LisaThen you can see the terminal as the image shown below. To move any user’s home directory along with the contents, then follow the steps listed below.
- At first, open the Ubuntu Terminal.
- Run the command below:
sudo usermod -d /home/amdadul/Public -m LisaAlternatively,
sudo usermod --home /home/amdadul/Public --move-home Lisa - Now, type the following command into the command prompt:
getent passwd LisaIn the following image, you can see that I have moved the home directory of the user Lisa from /home/Lisa to /home/amdadul/Public.


Example 10: Change User Login Shell With the “usermod” Command
To change the login shell of any user using the usermod command, you have to use the option -s or --shell. In this section, I will change the login shell of user “Lisa”, Whose current login shell is /bin/sh shown in the image below. To perform the operation, follow the steps below.
- Open the Ubuntu Terminal.
- Type the following command into the command prompt:
sudo usermod -s /bin/bash LisaAlternatively,
sudo usermod --shell /bin/bash Lisa - Now type the following command into the command prompt:
getent passwd LisaIn the image below, you can see that I have changed Lisa’s login shell from /bin/sh to /bin/bash.


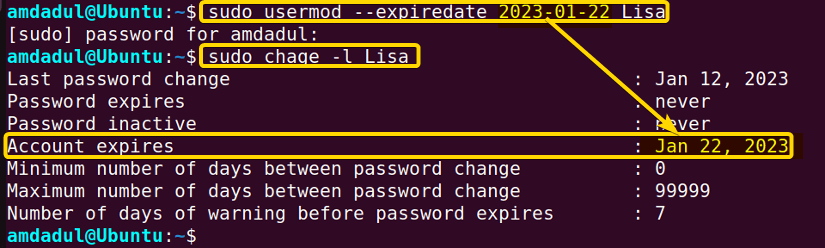
Example 11: Modify User Account Expiry Date With the “usermod” Command in Linux
The usermod command allows you to modify the expiry date of a user account.
sudo chage -l LisaThe result I got by running the command above is shown below.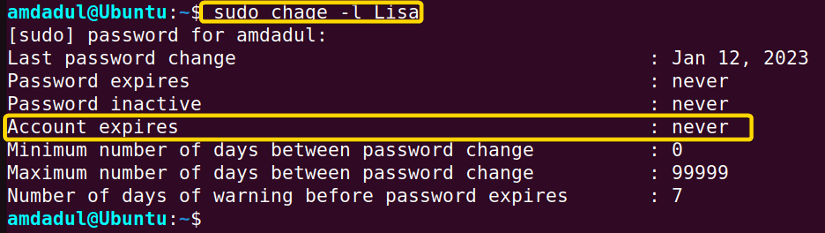 To modify the expiration date of a user account you can follow the steps below.
- Launch the Ubuntu Terminal.
- Type the following command into the command prompt:
sudo usermod -e 2023-02-22 LisaAlternatively,
sudo usermod --expiredate 2023-02-22 Lisa - Now type the following command into the command prompt:
sudo chage -l LisaIn the following image, you can see that I have modified the expiration date of the user account ‘Lisa’ from having no expiration date to Jan 22, 2023.

Example 12: Update the User Password Using the “usermod” Command
The usermod command provides modification permission for a user’s password. That means you can set a new password for a user or change the existing password of a user by using the usermod command. In the section below, I will discuss both cases.
Case A: Set Password of a User Without Having One
Let’s sees the process of setting a password for user:
- First, open the Ubuntu Terminal.
- Execute the following command
sudo usermod -p abcdefg123 LisaAlternatively,
sudo usermod --password abcdefg123 Lisa - Now type the following command into the command prompt:
sudo grep Lisa /etc/shadowYou can see in the image that I have set up a password for user Lisa.


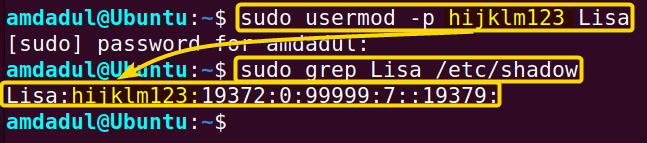
Case B: Change the Existing Password of a User
Follow the steps to change an existing password for a user in the section below:
- Open the Ubuntu Terminal, first.
- Run the following command
sudo usermod -p hijklm123 LisaAlternatively,
sudo usermod --password hijklm123 Lisa - Now type the following command into the command prompt:
sudo grep Lisa /etc/shadowYou can see in the image that I have changed the existing password abcdefg123 to hijklm123 for user Lisa.

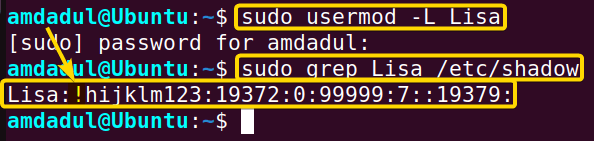
Example 13: Lock User Account Using the “usermod” Command
The usermod command allows you to lock an account by the option-L or --lock:
- Launch the Ubuntu Terminal.
- Execute the following command
sudo usermod -L LisaAlternatively,
sudo usermod --lock Lisa - Now type the following command into the command prompt:
sudo grep Lisa /etc/shadowIn the image, the “!” sign after the name of the account Lisa illustrates that this account is locked.

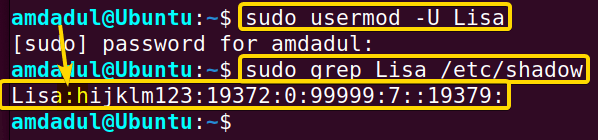
Example 14: Unlock User Account Using the “usermod” Command in Linux
To unlock a user account, use the usermod command follower by the option -U or --unlock. Here’s how:
- Open the Ubuntu Terminal.
- Run the following command
sudo usermod -U LisaAlternatively,
sudo usermod --unlock Lisa - Now type the following command into the command prompt:
sudo grep Lisa /etc/shadowIn the following image, You can see that there is no “!” sign after the name of the account Lisa which illustrates that this account is being unlocked.

Conclusion
In this article, I’ve discussed the usermod command which is useful to modify user name, user ID, groups, home directory, password, user shell, expiry date, and other user details of an existing user. At the same time, I’ve discussed its options and provided some relevant examples. Undoubtedly, this article will help you better understand the usermod command and its use. Consequently, it will make your journey easier to become a power user of the Linux command line.
Similar Readings
- The “whoami” Command in Linux [5 Practical Examples]
- The “useradd” Command in Linux [12 Practical Examples]
- The “adduser” Command in Linux [12 Practical Examples]
- The “su” Command in Linux [6 Practical Examples]
- The “userdel” Command in Linux [4 Practical Examples]
FUNDAMENTALS A Complete Guide for Beginners


