The locate command is used for searching files in the background on an existing database of Linux. This command is an alternative to the find command. However, the locate command does not search the entire file system like the find command; rather, it searches through a periodically updated file database within the system. As a result, the search is completed much more quickly. You can also use the locate command to know the location of the files. In this article, I will describe all the features and uses of the locate command in Linux with multiple examples.
Syntax of “locate” Command
The syntax for the locate command is pretty simple which is the command itself followed by some specific options and the pattern you want to locate. Here’s the syntax:
locate [OPTION]... PATTERN...Useful Options for “locate” Command
Many useful options are available for the locate command. I have listed some of the most used ones here. However, if you want to know more about options for the locate command you can always check the man page for the locate command.
man locateLet’s check some useful options:
| Options | Description |
|---|---|
| -c, –count | Does not print any matches but rather the total occurring number. |
| -e, –existing | Only prints the existing match. |
| -i, –ignore-case | Ignores the sensitivity of cases. |
| -A, –all | Only shows the entries that match all the given patterns. |
| -b, –basename | Only matches the basename against the given patterns. |
| -w, –wholename | Only matches the whole path name against the given patterns. |
| -d, –database [DBPATH] | Replaces the default database with [DBPATH] which is a list of database files separated by a colon. |
| -L, –follow | Deletes broken symbolic links. Also, checks if the files exist when the –existing option is specified. |
| -p, –nofollow | Ignores punctuation and spaces when matching patterns. |
| -l, –limit, -n [limit] | Stop searching after limit matches have been found. |
| -t, –transliterate | Makes use of iconv transliteration to ignore accents and diacritical marks while matching patterns. |
| -0, –null | Instead of printing each item in a separate line, it separates the output items using ASCII NULL characters. |
| -S, –statistics | Instead of looking for files, it prints out the statistics about each read database to standard output. |
| -q, –quiet | Hides errors encountered while reading and processing the database. |
Note: The options in Linux CLI(Command Line Interface) are all case-sensitive, So be cautious while using them.
How to Install the “locate” Command in Linux
Most of the Linux distributions have the locate package preinstalled. To check whether you have it preinstalled or not just type the below command on the command prompt:
locateIf you don’t have it preinstalled, it will show the below output:

To install the locate package, you can type the following command in the command prompt after opening the Ubuntu Terminal:
sudo apt install mlocateAfter typing the password and pressing ENTER, locate command will be installed on your machine as shown in the below picture:

Practical Examples of the “locate” Command in Linux
The locate command in Linux is an easy-to-use command that is used to find the location of files from an existing database. Some of the most useful examples of the locate command have been illustrated below:
1. Using “locate” Command to Search for a File in Linux
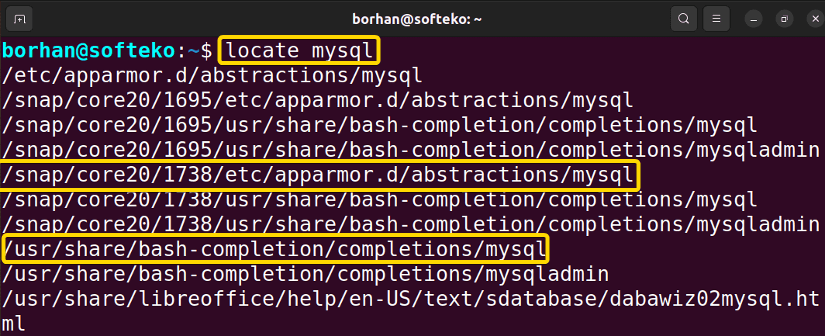
You can search for a file using the locate command. To search any file you should follow the below procedure. Here, I have searched for a file named mysql. To do this, type the following command in the command prompt of your terminal:
locate mysqlYou can see in the below picture that all the files named mysql are listed on display:
Similar Readings
- The “pwd” Command in Linux [4 Practical Examples]
- The “cd” Command in Linux [6 Practical Examples]
- The “ls” Command in Linux [7+ Practical Examples]
2. Limit the Number of Search Results
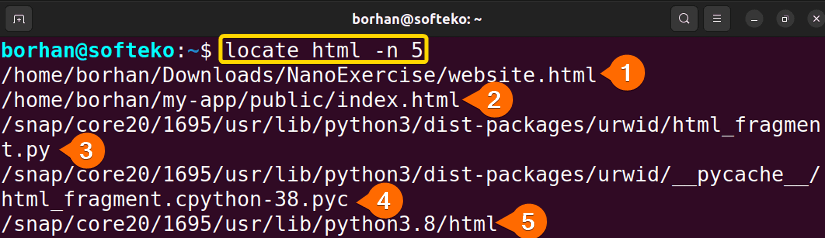
You can limit the number of search results using the locate command. To do so you should follow the below procedure. Here, I have limited the number of search results for html. To complete the task, type the following command in the command prompt:
locate html -n 5You can see in the below picture that only 5 html files are listed on display:
3. Using “locate” Command to Format Output in Linux
Sometimes there are huge amounts of search results appear for the locate command. You can format the output for your convenience using the locate command. Here, I have formatted the output of search results for the bash files.
To do so you can type the following command in the command prompt:
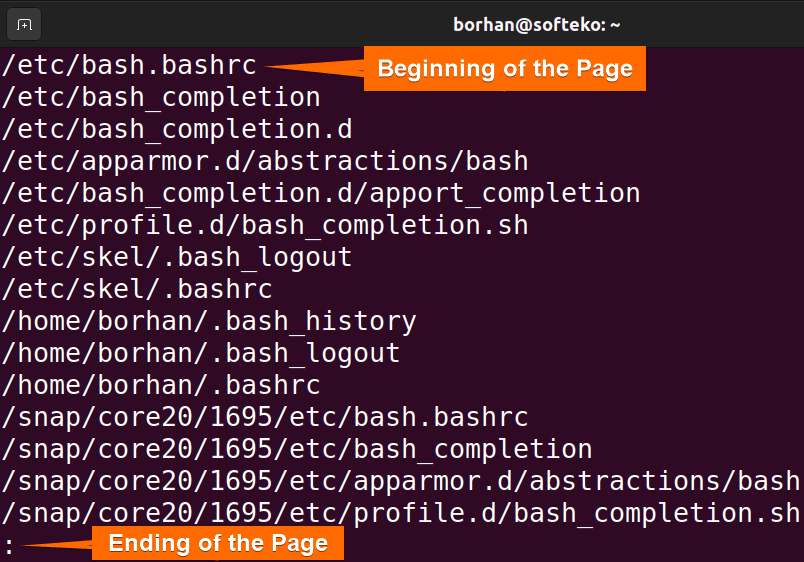
locate bash | lessYou can see in the below picture that all the bash files are listed on display in a page-by-page format. To move to the next page, you can press the SPACE BAR and go to the previous page by pressing the B button. You can exit from the list by pressing the Q button:
4. Using “locate” Command to Show Existing Files in Linux
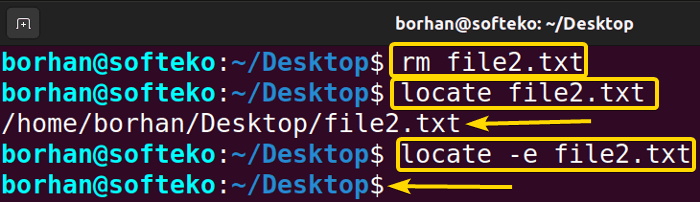
After removing some files, you will still see the non-existing files in the display using the locate command. You can skip it by adding the -e option with the locate command. Here, I have deleted my file2.txt file and shown it with the locate command. To do so you can follow the below procedure:
- Type the following command in the command prompt to delete the file from the machine:
rm file2.txt - Now, type the following command in the command prompt to locate the deleted file:
locate file2.txt - To check the deleted file location with the
-eoption, write this command:locate -e file2.txt
You can see in the below picture that the file2.txt file’s location is not shown this time:
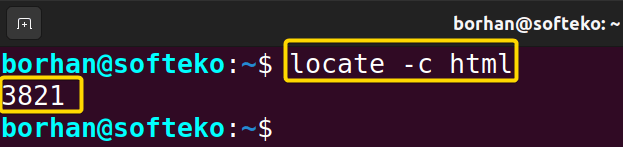
5. Using “locate” Command to Count Existing Files in Linux
You can count the number of existing files using the locate command. Here, I have counted all my html files. To do so you can type the following command in the command prompt:
locate -c htmlYou can see in the below picture the total number of html files printed here:
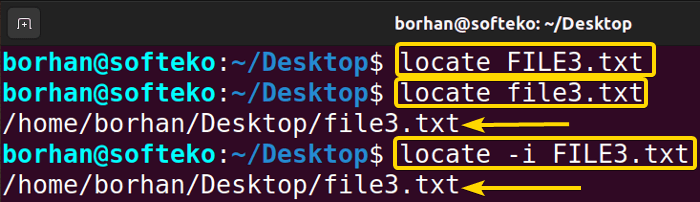
6. Ignore Case-Sensitivity
The locate command by default doesn’t show the files if the name’s cases are wrong. To ignore the case sensitivity you should follow the below procedure. Here, I have used the file3.txt file to show you the example.
- Type the following command in the command prompt. This will not show any file as the case is not correct for the filename:
locate FILE3.txt - Now, type the next command in the command prompt and you will see the locate command will show the file location:
locate file3.txt - Finally, type this command in the command prompt:
locate -i FILE3.txt
You can see in the below picture that the file3.txt file’s location is shown this time, although I did not put the correct cases for the filename:
Similar Readings
- The “mv” Command in Linux [8 Practical Examples]
- The “cp” Command in Linux [6 Practical Examples]
- The “rm” Command in Linux [7 Practical Examples]
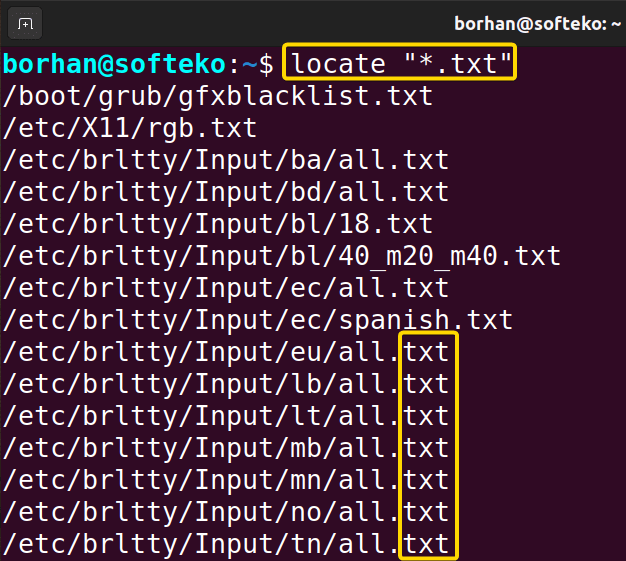
7. Using “locate” Command to Display Files by Their Extensions in Linux
You can search for a specific file type using the locate command. To do so you should follow the below procedure. I have searched for all of my files containing .txt extensions at the end of their name. Now, type the following command in the command prompt:
locate “*.txt”You can see in the below picture that all the filenames containing .txt extensions at the end of their name are listed on display:
Conclusion
After completing this article, you will acquire all the knowledge about the locate command in Linux. With the given practical examples, you will be able to execute many commands to locate the location of different files on your machine.
People Also Ask
Why use “locate” command in Linux?
You can use the locate command to quickly locate all the files and directories on your Linux computer. It uses a built-in database, so it’s faster than searching the filesystem in real time.
How does the “locate” command work?
The locate command works by looking for a file name and its path in a pre-made database. Usually, this database is updated regularly using the updatedb command.
What is the command to locate a directory in Linux?
To locate a directory in Linux, you can use the locate directory_name syntax.
What is the difference between “locate” and “find” command in Linux?
The locate command is more efficient due to its pre-built database, however, it may not deliver results in real time. But the find command searches provide real-time results and it is more versatile and suitable for complex and timely file searches.
Similar Readings
- The “touch” Command in Linux [8 Practical Examples]
- The “mkdir” Command in Linux [6+ Practical Examples]
- The “find” Command in Linux [10+ Practical Examples]
- The “chmod” Command in Linux [6 Practical Examples]
- The “chown” Command in Linux [8 Practical Examples]
FUNDAMENTALS A Complete Guide for Beginners


