The stat command in Linux is a system utility that stands for status. It is used to display the status of specified files or filesystems. The command shows thorough information about a file such as its size, permissions, creation & modification timestamps, ownership, and many more metadata. It is the most useful command tool to dig for far deeper information about filesystems. In this article, I will discuss the basics of the stat command and show some practical examples of the usage of the command.
A. Description
The stat command is used to print out detailed information about a file, filesystem, or directory. You may think that when you can use the popular ls command to view file information what is the need to use the stat command? Well, because the stat command digs deeper information about a file such as size, blocks, inodes, timestamps of modification, etc. which you can’t view with the ls command. Whenever the system administrators need detailed information about a file while troubleshooting, they use the stat command for that.
B. Syntax
The stat command is a simple & handy tool to use in Linux. The syntax of this command is also straightforward. The syntax is,
stat [OPTION]... <File_name>...Note: Whatever is enclosed by a square bracket in the above syntax is not mandatory. Moreover, OPTION and FIle_name are enclosed by square brackets and followed by 3 dots representing that multiple options and filenames can be used at a time.
C. Options
The stat command plays an essential role in viewing the filesystem status. It has some command-line options to modify its usage. Besides you can customize the output of the command by changing different formats. Here, I will give a list of the options for the command with short details. You can view all the information about the options and available formats from the man page.
man statUseful Options
- -f, –file-system, to view the file-system status, instead of file status.
- -L, –dereference, to follow links.
- -c, –format=FORMAT, to change the FORMAT (not to use the default one) and output a new line after each use of the FORMAT.
- –printf=format, works like –format, but interprets backlash escapes & doesn’t output a mandatory new line by default.
- -t, –terse, to display information in terse mode.
- –help, print help messages for the command & then exit.
- –version, to display version information.
NOTE: The options in Linux CLI (Command Line Interface) are all case-sensitive, So be cautious while using them.
Practical Examples of the “stat” Command in Linux
The stat command has many practical usages. I will discuss some of the basic uses of the command with practical examples in the following article. So keep reading!
Example 1: Display File Status Using the “stat” Command in Linux
To view detailed information on any file or directory using the stat command, just specify the file or directory name after the command. The command shows the file name, size, blocks, permissions, device name where it is situated, access & modification time, and some more information. The syntax is,
stat <file_name>Follow the below steps to check yourself. I will check the status of my file story.txt and the directory media. You choose any of the files from your system to check.
Steps to Follow >
➊ At first, open the Ubuntu Terminal.
➋ Then, type the following command in the command prompt:
stat story.txt➌ Now, press the ENTER button.
➍ After that, type the following command to view the status of the media directory,
stat /media➎ Finally, tab the ENTER key.
Output >
In the output display for the first command, you will see detailed information for the specified file story.txt. Check the below image of the output display. 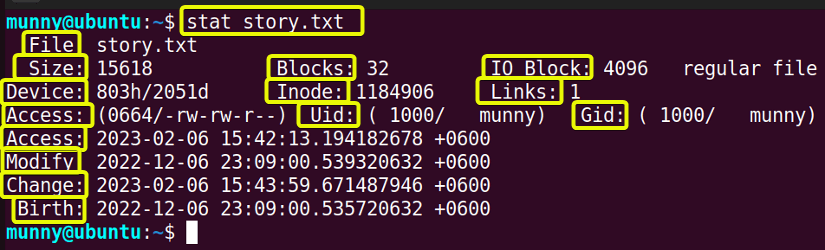 The output has many sections representing different pieces of information about the file. Read the below part to understand what each section represents.
Understanding Output
- File→ The name of the specified file. If the file is a symlink then the name will be different.
- Size→ The size of the file in bytes.
- Blocks→ It shows the total number of blocks allocated to the file to store on the hard disk.
- IO Block→ The size of each allocated block in bytes.
- File Type→ Tells the type of the file. Such as regular files, special files, directories, symbolic links,
- Device→ Gives the device number in hexadecimal
- Inode→ Display the Inode number of the file.
- Links→ Shows the number of hard links of the file.
- Access→ It shows the access permissions both in numeric & symbolic
- Uid→User ID & the name of the owner.
- Gid→ Group ID & the owner name.
- Context→The SELinux security context.
- Access→ The last time the was accessed.
- Modify→ The last modification time of the file.
- Change→ The last time file contents or attributes were changed.
- Birth→ The time when the file was created.
After that, run the second command to view detailed information about a directory. In the below image see the details information about my directory media.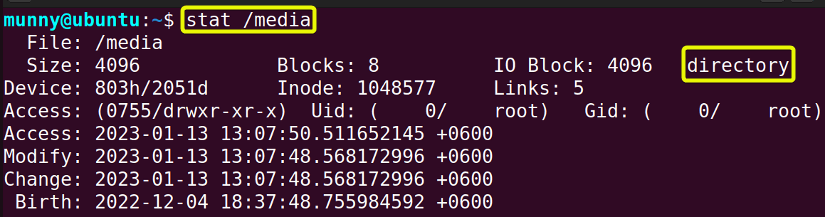
Example 2: Display the Filesystem Information Using the “stat” Command in Linux
The stat command can be used to display the status of a file system too. The status of the filesystem instead of the files means checking the system status in which the given file resides. To view the filesystem status use the option –file-system or -f with the stat command followed by the file name that resides in the filesystem. The output display shows the Type, ID, Block size, Inodes, etc. about the filesystem. The syntax is,
stat -f <file_name>Read the below steps to display the filesystem status.
Steps to Follow >
➊ First, launch the Ubuntu Terminal.
➋ Then, type the following command in the command prompt:
stat -f story.txt➌ Now, press the ENTER button.
➍ Type the following command in the command prompt to view the “/” directory filesystem status:
stat -f /➎ Again tab the ENTER key.
Output >
I ran the first command and as you can in the output image, the status of the filesystem where the file story.txt resides.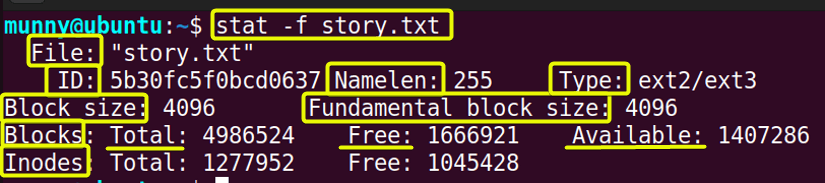 Now, the output display has many sections representing different pieces of information about the filesystem. Read the below part to understand what each section represents.
Understanding Output
- File→ The name of the file.
- ID→ The ID of the filesystem in hexadecimal
- Namelen→ The max length (no. of characters) of a filename.
- Fundamental Block Size→Total size of every block on the filesystem.
- Blocks→
- Total–Total number of blocks in the filesystem.
- Free–Total number of free blocks in the filesystem.
- Available– Total number of free available blocks for the non-root
- Inodes→
- Total– Total number of Inodes in the filesystem.
- Free– Number of free Inodes in the filesystem.
Then, I ran the second command to view the filesystem status where the root ( / ) directory resides and got the output display like the following image.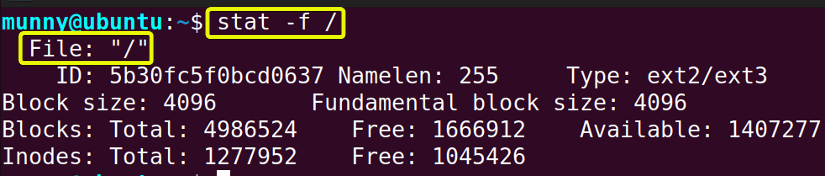
Similar Readings
- The “pwd” Command in Linux [4 Practical Examples]
- The “cd” Command in Linux [6 Practical Examples]
- The “ls” Command in Linux [7+ Practical Examples]
Example 3: Display Information of Multiple Files Using the “stat” Command in Linux
You can view information for multiple files at a time with the stat command. Just give the file names one after one with spaces between them after the command. Now, remember if you are giving a file name that is not in the current directory you are working on then must specify the location path for that file. The syntax is,
stat <file_name_1> <file_name_2>...Proceed to carry out the process by following the below steps. I will use the stat command to view the status of two of my files named story.txt and Files.pdf which are located in two different locations.
Steps to Follow >
➊ Begin by opening the Ubuntu Terminal.
➋ Type the following command in the command prompt:
stat story.txt Desktop/Files.pdf➌ Then, tab the ENTER button.
Output >
See the output image, where you can notice the stat command is showing detailed information for both files in the order they were specified in the command. First, the information about the story.txt file and then the information for the Files.pdf file.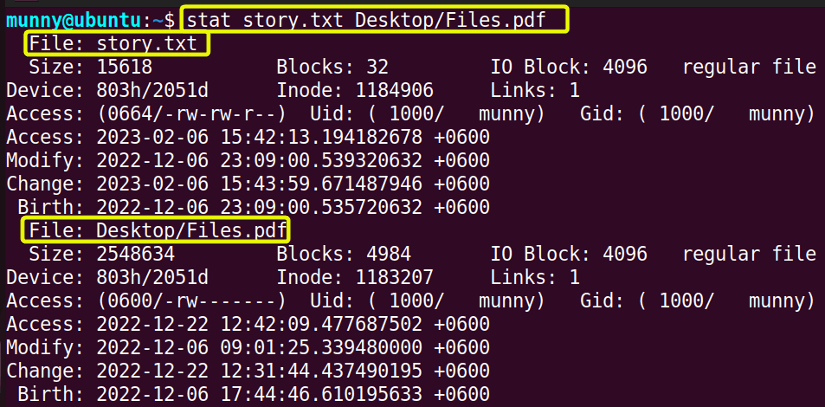
Example 4: Dereference Symlinks Using the “stat” Command in Linux
A symbolic link or symlink is a special file that serves as a reference to another file or directory. It acts as a shortcut to the target file or directory. Now, if you provide the symbolic link after the command, it will display the information about the symbolic link instead of the original file that the link points to. To view the original file information of the symlink file use the option –dereference or -L with the stat command followed by the symlink file name. The syntax is,
stat -L <symlink_file_name>Perform according to the below steps to view the original file information of one of your symlink files. I will use my special file /etc/resolv.conf.
Steps to Follow >
➊ Open the Terminal application of your Ubuntu.
➋ Type the following command in the command prompt:
stat /etc/resolv.conf➌ Hit the ENTER key.
➍ Then, type the following command in the command prompt:
stat -L /etc/resolv.conf➎ Again press the ENTER key.
Output >
Run the first command to view the symlink file information without the -L option of the stat command and in the output you will notice it is showing the symbolic link information like the following image.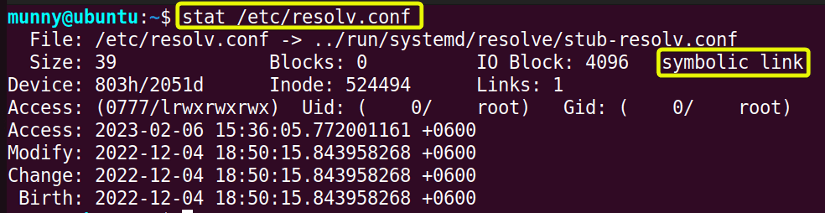 Then, run the second command with the -L option, and see the difference. It is now showing the original file information just like the following image.
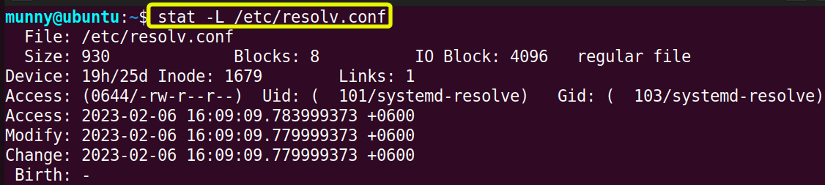
Example 5: Learn About the timestamps of the Output of the “stat” Command in Linux
The output of the stat command displays different timestamps related to the files or filesystems. The timestamps displayed by the command are access time, modification time, change time, and the birth time of the file. These timestamps are stored as part of the file’s metadata and are updated every time the file is accessed, modified or its metadata is changed. They are displayed in the ‘YYYY-MM-DD’ format. Also, timestamps show information about the timezone, for instance, the time at which the file was created from the UTC timezone. If the value is positive then the file was created ahead of the UTC timezone and vice versa.
Check out the below steps to view different timestamps status for a file.
Steps to Follow >
➊ First open the Ubuntu Terminal application.
➋ Type the following command in the command prompt:
stat story.txt➌ Now, press the ENTER button.
Output >
See in the output display, all the timestamps are listed together on the bottom left side. Access, modify, change, and birth timestamps. The timestamps are showing the year, month, and date followed by the timezone in the last part. Here the positive value +6000 is indicating the file was created ahead of the UTC timezone.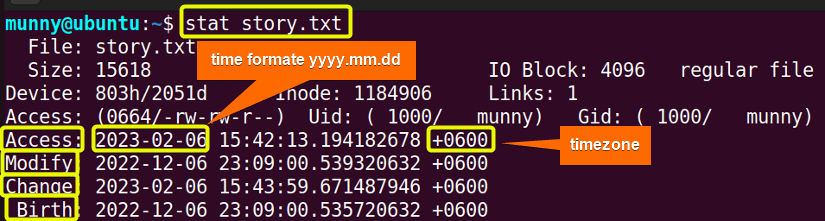
Example 6: Customize the Output Display Format of the “stat” Command in Linux
The stat command provides a lot of information by default. Sometimes you may not need them all. In that case, you can customize the output using the command options and formats. The stat command has two options to customize the output. The first one is, –format or -c. While viewing multiple files’ status this option automatically adds a new line after each operand’s output. Another option is –print which doesn’t add a new line by default. But you can add trailing characters with this option. For example, use “\n” to add a new line after each line output. To customize the output for the specified file or filesystem, use the valid format sequences after the stat command option (-c or –print) and the equal “=” sign.
Format Sequences
View the list of all valid format sequences for files & filesystems from the man page. See the below picture, which is the short list of valid format sequences for files from the man page. And, check the next picture, which is the short list of valid format sequences for filesystems from the man page.
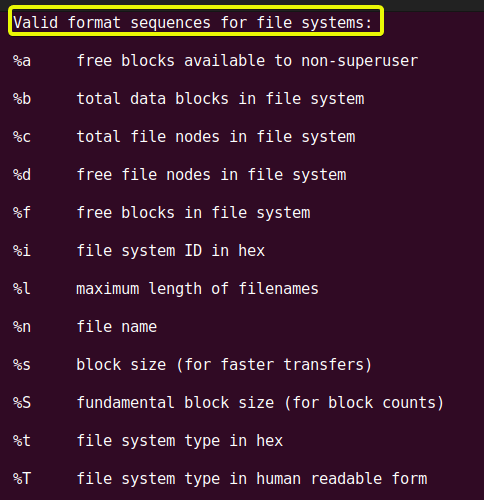
Syntax >
stat --format=<formats> <file_name> OR,stat -c=<format> <file_name> OR,stat --print=<'format\n''format\n'...>Go through the below steps to customize output formats yourself.
Steps to Follow >
➊ Begin by opening the Ubuntu Terminal.
➋ Then, type the following commands in the command prompt with the –format and -c options:
stat --format=%n /etc/passwdstat -c=%U,%A,%F story.txtstat -c=%U,%A,%F /etc/resolv.conf➌ Now, press the ENTER button after typing each command.
➍ Next, Type the following commands in the command prompt with the –print option:
stat --print='%a:%A:%n\n' story.txtstat --print='%a,\n''%A,\n''%n,\n' story.txt➎ Finally, tab the ENTER key after writing each command.
Output >
Run the first command with option –format with the format value %n to view the file name of the file passwd and see the output display like the below image.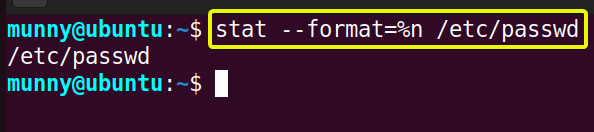 Then run the second command with option -c with the format values %U, %A, and %F to view the user name, permissions, and file type of the story.txt file and see the output display like the following image.
 After that, run the third command with option -c with the format values %U, %A, and %F to view the user name, permissions, and file type of the symlink file /etc/resolv.conf and see the output result like the below picture.
  Finally, run the 4th and 5th commands, with option –print with the format values %a, %A, and %n to view the permission bits in octal, permissions, and file name of the file story.txt in different patterns. And the output results look like the following picture.
Similar Readings
- The “mv” Command in Linux [8 Practical Examples]
- The “cp” Command in Linux [6 Practical Examples]
- The “rm” Command in Linux [7 Practical Examples]
Example 7: View the Output Information of the “stat” Command in Terse Mode
The default output of the stat command is in a human-readable format. If you want the short and simple version of the output, then print the output in terse mode. Write the option –terse or -t with the stat command followed by the file name you want the information for. The syntax is,
stat -t <file_name>Follow the below steps to display output in terse mode.
Steps to Follow >
➊ Start by opening the Ubuntu Terminal window.
➋ Then write the following command in the command prompt:
stat -t story.txt➌ Now, press the ENTER button.
Output >
You can see the output information for the file story.txt is in the terse mode now, not in a human-readable structure just like the following image.
Example 8: Check the “stat” Command Version on Your System
Check the version of the stat command tool on your system using the option –version or -v of your command. The syntax is,
stat --versionRead the below steps to see the command version on your system.
Steps to Follow >
➊ Run the Ubuntu Terminal.
➋ Then, type the following command in the command prompt:
stat --version➌ Now, push the ENTER button on your keyboard.
Output >
The output display will show the Version, Copyright, and License of the stat command.
Example 9: Print the Help messages for the “stat” Command
While working with the stat command, if you need any help with the options and usage of the command use the –help option. It will concisely display all the details about the command options and then exit. The syntax is,
stat --helpSee the below steps to learn how to print help messages.
Steps to Follow >
➊ First, open the Ubuntu Terminal.
➋ Then, type the following command in the command prompt:
stat --help➌ Finally, press the ENTER button.
Output >
Finally, the output will display the following help messages for the command.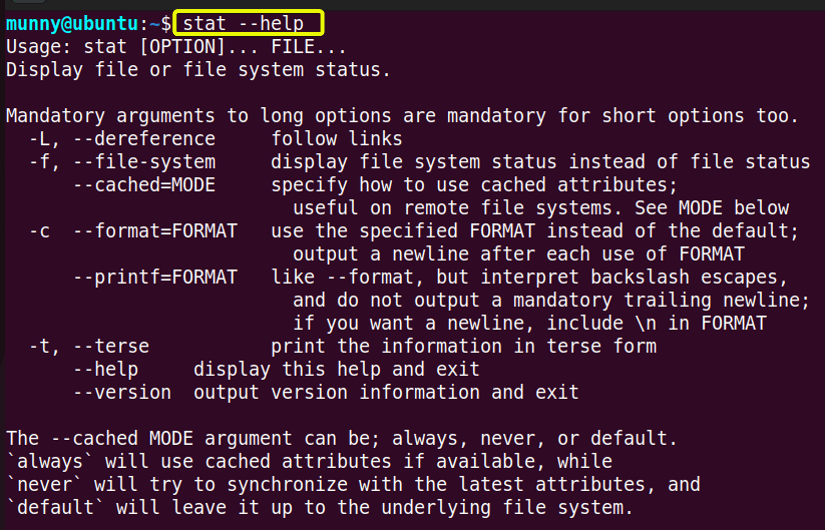
Conclusion
In this article, I discussed the basics of the stat command with some practical examples. This command tool is an essential tool to view the files and filesystems statuses. If you go through the examples one by one I explained here, hope you will learn most of the stuff related to the command. Good luck being a power user of LINUX!
Similar Readings
- The “touch” Command in Linux [8 Practical Examples]
- The “mkdir” Command in Linux [6+ Practical Examples]
- The “locate” Command in Linux [7 Practical Examples]
- The “find” Command in Linux [10+ Practical Examples]
- The “chmod” Command in Linux [6 Practical Examples]
- The “chown” Command in Linux [8 Practical Examples]
FUNDAMENTALS A Complete Guide for Beginners


