The fsck command in Linux is a file management tool that stands for file system consistency check. The command checks for file integrity and fixes detected errors interactively. It performs a thorough examination of the disk using built-in tools and presents a report of its findings. If any issues are found, it will try to fix them automatically. System administrators can run the command automatically at boot time or manually. In this article, you will learn how to use the fsck command in different aspects with some practical examples. So let’s begin.
A. Description
The fsck command checks and repairs inconsistent filesystems. It is an important tool and you don’t need any installation process or specific steps to use the command. It comes with Linux distributions by default. You can use the fsck command to repair corrupted files in cases where the system fails to boot or a partition can not be mounted. The program tries to handle filesystems on different physical disk drives in parallel to reduce time checking all of the filesystems. Also, note that the command does not work on mounted files and often prints wrong error messages with further corruption. So make sure to unmount the file before using the command on it.
B. Syntax
The fsck command is a stable tool that performs repairing cautiously and tries to avoid actions that may result in the loss of valid data. The command has a plain syntax. The syntax is,
fsck [OPTION]... [filesystem]...Here, the filesystem can be a device, a partition, or a mount point.
Note: Whatever is enclosed by a square bracket in the above syntax is not mandatory. Moreover, OPTION and FIlesystem are enclosed by square brackets and followed by 3 dots representing that multiple options and filenames can be used at a time.
C. Options
The fsck is an essential file management tool for all Linux users. It uses some command line options. I will list some of them with short details here. You can view all the information about the command from the man page.
man fsckUseful Options
- -a, to repair filesystem errors automatically without any interaction, so be careful using this option.
- -A, to check all filesystems listed in /etc/fstab.
- -C, to see the fixing progress for ext2 & ext3 type filesystems.
- -l, to lock the device so that other programs can’t use the partition during scan & repair.
- -f, to force fsck for checking a filesystem, even if it’s clean.
- -M, to not check mounted The command returns the exit code “0” if the file is mounted.
- -N, to do a dry run. The command outputs what it will do without executing any actions. It also displays errors & warnings.
- -R, to not check root filesystems while you are using the -A.
- -P, to run multiple filesystems in parallel.
- -r, to display device statistics.
- -t, to specify which filesystem types to check with the command.
- -T, to hide the title when the command starts its action.
- -y, to repair filesystem errors automatically during the specific filesystem check.
- -v, to print the verbose.
NOTE: The options in Linux CLI (Command Line Interface) are all case-sensitive, So be cautious while using them.
Cases Where you may need to use the “fsck” command:
- System Boot Issues →The fsck command can detect when the system fails to boot.
- Inconsistencies in the Filesystem→Run the command to check on a filesystem as preventive maintenance or if there there is an issue with the system.
- Filesystem Corruption→In case you get an input-output error for the corrupted filesystem.
- External Drives Check→To check the external drives’ health such as SD cards or USB flash drives.
The “fsck” command checks for:
- File system structure→It verifies the overall structure of the file system, including the superblock, inode table, and block bitmap.
- Inode information→ It checks the consistency of the inode information such as timestamps, permissions, hard links, and ownership.
- Block usage→ It examines blocks or fragment numbers allocated to multiple files and verifies blocks that are not being used multiple times and that there are no unreferenced blocks.
- Link count→ It verifies whether the link counts for each file are accurate or not.
- Directory structure→ It checks for directory structure consistency such as cross-link errors, missing or duplicate entries, and directories that are not reachable.
Practical Examples of the “fsck” Command in Linux
There are many cases of filesystem malfunction where you can use the fsck command. Also, you need to know how to use the command properly as unnecessary corrective actions may result in data loss. So always use the command on file systems only after the system malfunctions and the default action for each inconsistency should be to wait for the operand to enter yes or no. Read the following article, where I will discuss how to use the command in different cases with examples.
How to Use the “fsck” Command on File Systems
Do not run the fsck command on a filesystem that is currently in use. Attempting to check a mounted file system can lead to further errors. So, to run the command first you need to identify the device partitions you want to repair or check. Run the below command to check all the currently mounted files and their location on your system.
df -h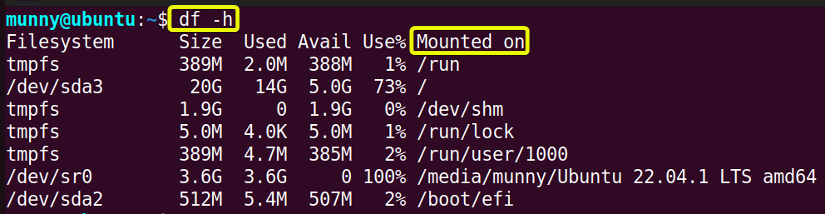 Now if you want to run the fsck command on any of these mounted files, you have to umount that file. Otherwise, the command will not perform successfully and may even produce more errors in the filesystem. Check the below image, where I tried to run the fsck command on a mounted file.
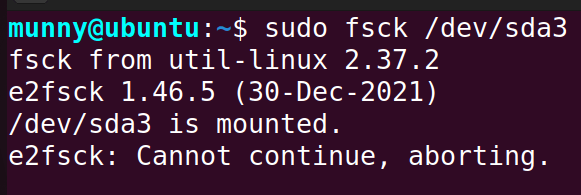
Note: Only a superuser can make changes or open mounted filesystems. So to run the command on mounted filesystems use ‘sudo’ ( Substitute User DO) before the command. Temporarily it allows you to appoint your current user to have root privileges.
To view disk partitions of any of the disks of your system run the below command. I will view the disk partition for the sda2 disk.
sudo parted /dev/sda2 ‘print’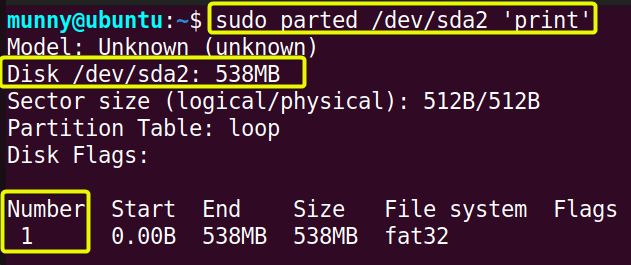 See from the output, the sda2 disk has only one partition. Now, I will check the sda2 disk for inconsistency. For that, I will first unmount it using the below command and later see if it has been unmounted successfully with the help of the df command.
sudo umount /dev/sda2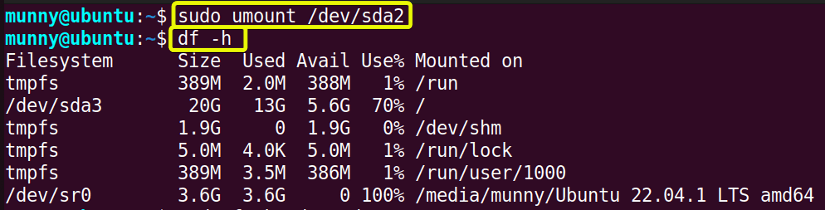 As you can see from the output list the disk is not mounted anymore.
Example 1: Run the “fsck” Command on File Systems
As I unmounted the sda2 file now I can run our command fsck on this filesystem. To do so, I will write the filesystem name after the command. You can also check multiple files at a time with the command. Just write the filesystem names with spaces between them after the command. The syntax is,
sudo fsck <filesystem>...Follow the below steps to check the sda2 file system consistency.
Steps to Follow >
➊ At first open the Ubuntu Terminal.
➋ Type the following command in the command prompt:
sudo fsck /dev/sda2➌ Now, press the ENTER button.
➍ Then run the following command to check on two filesystems at once:
sudo fsck /dev/sda2 /dev/sdb1➎ Tap the ENTER key again.
Output >
After running the first command, from the output display, you can see the file information of the sda2 file. As the disk is clean it is showing this type of message, if there were multiple problems on the disk then a confirmation prompt would have appeared.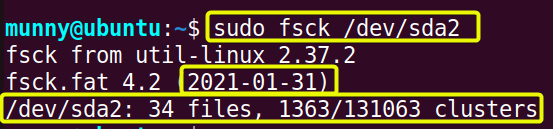
Note: Remember to remount the disk with the “mount” command after checking and repairing it, that way you will be able to use it again.
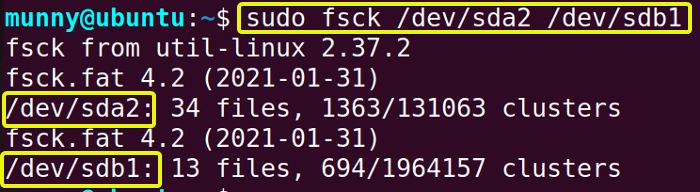 Then, run the second command to check two files sda2 and sdb1 at once. I unmounted the sdb1 filesystem just like I unmounted the sda2 file before running the command. Now from the output you can see the file information for both of them in the order, they were specified in the command.
Exit Codes
The fsck command produces different exit codes. From the meaning of these codes, you can determine what kind of error occurred while running the command. Read the below code description to learn about them.
- 0→ No errors.
- 1→ Filesystem errors corrected.
- 2→ System needs to be rebooted.
- 4→ Filesystem errors are not corrected.
- 8→ Operational error.
- 16→ Usage or syntax error.
- 32→ Checking canceled by user request.
- 128→ Shared-library error.
Similar Readings
- The “diff” Command in Linux [11 Practical Examples]
- The “cmp” Command in Linux [7 Practical Examples]
- The “comm” Command in Linux [10 Practical Examples]
Example 2: Run the “fsck” Command Excluding Mounted Files
You must not run the fsck command on mounted filesystems, which may cause serious damage to the file. But sometimes you may need to check all your filesystems for errors, in that time remember to exclude the mounted files using the option -M with the fsck command. The syntax is,
sudo fsck -M <file-system>See the below steps to check yourself.
Steps to Follow >
➊ Start by opening the Ubuntu Terminal.
➋ Then, type the following command in the command prompt to check how the option -M works on a mounted file:
sudo fsck -M /dev/sdb1➌ Press the ENTER button.
➍ After that unmount the file with the following command:
sudo umount /dev/sdb1➎ Hit the ENTER key.
➏ Now, run the same command in the unmounted file,
sudo fsck -M /dev/sdb1➐ Finally, tap the ENTER button.
Output >
After running the first command, you will notice that the command didn’t display anything about the file as it is mounted and you used the -M option to exclude the mounted files. Then unmount the file using the second command. And run the fsck command again using the 3rd command, now check the output. It is now showing the checked output for error. See the below image for a visual aid.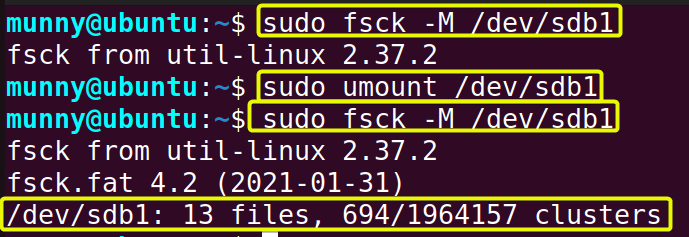
Example 3: Print the Output of the “fsck” Command Only Without Repairing
To print only the error reports without repairing them, use the option -n with the fsck command. Just type the command then the option -n followed by the file system name you want to check for errors. The syntax is,
sudo -n <file-system>Act according to the below steps to check errors of a filesystem & print only.
Steps to Follow >
➊ Launch the Terminal application on your Ubuntu.
➋ Then, type the following command in the command prompt:
sudo fsck -n /dev/sdb1➌ Finally, tap the ENTER button.
Output >
You can see from the output image, that the command is printing about the errors and saying, it won’t fix them automatically.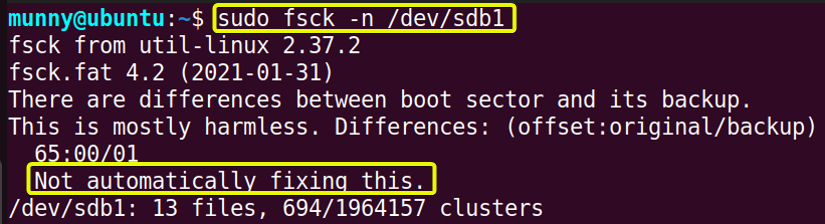
Example 4: Fix the Detected Errors Automatically Using the “fsck” Command in Linux
Normally, when the fsck command will find multiple errors on your filesystem, it will display confirmation prompts, and perform interactively. Now, if you want to fix the problems automatically without getting confirmation messages, use the option -y with the command. The syntax is,
sudo -y <file-system>Proceed to the below steps to carry out the process yourself.
Steps to Follow >
➊ First, open the Ubuntu Terminal.
➋ Then, type the following command in the command prompt:
sudo -y /dev/sda2➌ Finally, press the ENTER key.
Output >
After running the command, you will notice that the command has fixed all the errors by itself without asking for your confirmation. You can see the output display of my command from the following image, as it was clean it is not showing any fixing history.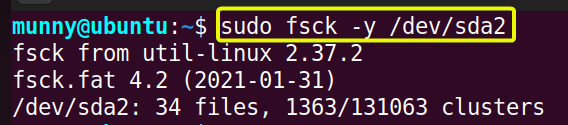
Example 5: Do Force Check Using the “fsck” Command in Linux
From the upper example’s output picture you noticed that when the fsck command performs on a clean disk, it skips the filesystem check and minor fixing tasks. Well, you can force the command to check even the clean disk. To do so, use the option –f with the command. The syntax is,
sudo -f <file-system>Follow the below steps to force the fsck command to check a filesystem.
Steps to Follow >
➊ At first open the Ubuntu Terminal.
➋ Then, type the following command in the command prompt:
sudo fsck -f /dev/sdb1➌ Now, press the ENTER button.
Output >
See the output image, the fsck command is now checking the sdb1 filesystem thoroughly and fixing even the minor errors.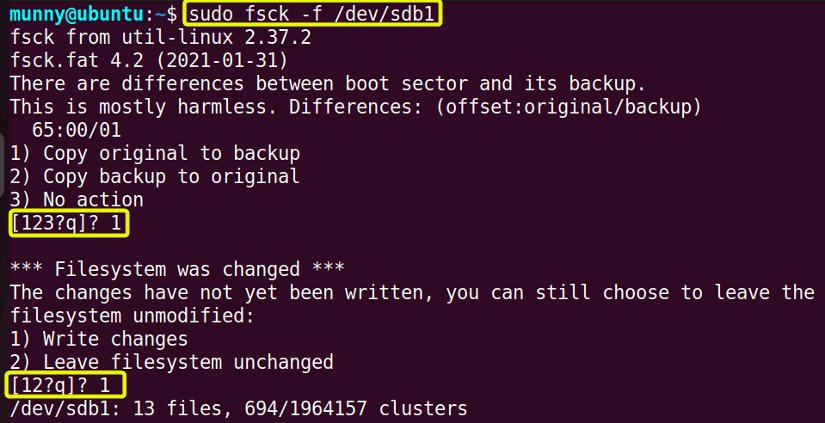
Similar Readings
- The “ln” Command in Linux [6 Practical Examples]
- The “lsof” Command in Linux [8 Practical Examples]
- The “tar” Command in Linux [12 Practical Examples]
Example 6: Display the Verbose Output for the “fsck” Command in Linux
The system administrators sometimes need a more detailed output of the fsck command while troubleshooting. For that display the verbose output for the fsck command. Just use the option -v with the command followed by the filesystem you want to check. The syntax is,
sudo -v <file-system>Go through the below steps to display the verbose output.
Steps to Follow >
➊ Launch the Ubuntu Terminal.
➋ Then, type the following command in the command prompt:
sudo fsck -v /dev/sdb1➌ Finally, press the ENTER key.
Output >
Notice the below image, you can see the verbose output for the sdb1 file. There is a lot more detailed information than I had before.
Example 7: Print the Help messages for the “fsck” Command in Linux
While working with the fsck command, if you need any help with the options and usage of the command use the –help option. It will concisely display all the details about the command options and then exit. See the below steps to print the help messages for the fsck command.
Steps to Follow >
➊ First, begin by opening the Ubuntu Terminal.
➋ Then, the following command in the command prompt:
fsck --help➌ Now, press the ENTER button.
Output >
In the output display, you will see the help messages for the fsck command just like in the following image.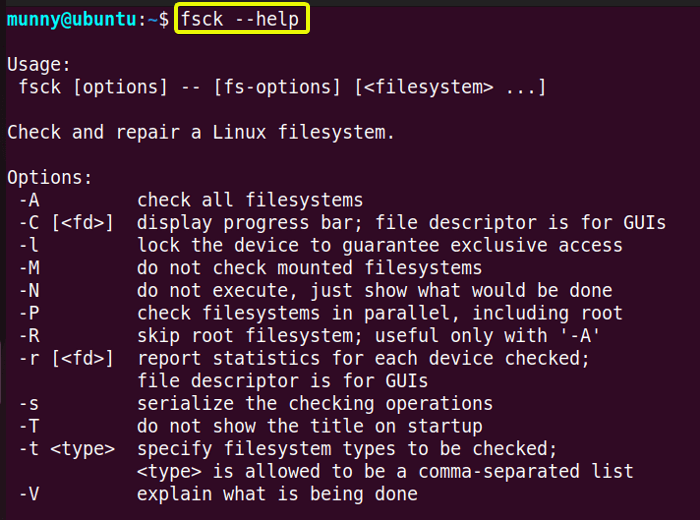
Conclusion
Well, to sum up, the fsck command in Linux is an important command tool for fixing and checking your system’s filesystems health. It is really necessary to learn to use the command properly. In this article, I tried to talk about the basics of the command and explained how to use it with different steps and examples. Hope the article helps you to learn.
Similar Readings
- The “chgrp” Command in Linux [7 Practical Examples]
- The “file” Command in Linux [9+ Practical Examples]
- The “patch” Command in Linux [4 Practical Examples]
- The “rmdir” Command in Linux [7 Practical Examples]
- The “stat” Command in Linux [9 Practical Examples]
FUNDAMENTALS A Complete Guide for Beginners


