The chgrp command is a group management tool used to manage file permissions and access control on a Linux system. Moreover, In this article, I will describe all the features and uses of the chgrp command in Linux with multiple examples.
A. Description
The chgrp command, short for “change group“, is a useful tool in Linux for managing file permissions and access control. It alters the group name that a file or directory belongs to, which in turn affects the permissions that users have to access and modify the file. Furthermore, In Linux, each file is created by a user, and each user belongs to one or more groups. By changing the group ownership of a file or directory, the permissions that users have over the file change as well.
Note: You must be logged in as the root user or you must use the “sudo” command as the prefix to execute the “chgrp” command with root privileges.
B. Syntax
The syntax of the chgrp command in Linux is pretty simple, as shown below.
chgrp [OPTION]... [GROUP_NAME] [DIRECTORY/FILE_NAME]...Note: In the syntax above, the OPTION, GROUP_NAME & DIRECTORY/FILE_NAME enclosed by the square brackets mean it is not mandatory and three dots after the square brackets mean multiple OPTIONs and DIRECTORies/FILE_NAMEs can be used after the chgrp command.
C. Options
There are numerous options available for the chgrp command. Here, I have listed a few of them. However, you can learn more about the chgrp command, its options, and their uses by checking the man page.
man chgrpUseful Options
- -c, –changes: Works like verbose but report only when a change is made.
- -f, –silent, –quiet: Can be used to suppress error messages.
- -v, –verbose: Generates a diagnostic report for each file that is processed.
- –dereference: Modifies the referent of each symbolic link (the default behavior) instead of the symbolic link itself.
- –no-preserve-root: Does not treat root directory ‘/‘ specially (the default).
- –preserve-root: Fails to operate recursively on root directory ‘/‘.
- –reference=RFILE: Employs the group of RFILE instead of specifying a GROUP value.
- -R, –recursive: Performs actions on files and directories recursively.
- –version: Shows the program’s version number.
- –help: Shows help message.
Note: Commands and their options are case-sensitive in Linux. So, be careful while using them.
Practical Examples of the “chgrp” Command in Linux
In Linux, the chgrp command is a helpful tool to change the group ownership of a file or directory, which also changes the file or directory’s accessibility according to the new group. In the section below, I will show you some of the most useful applications for the chgrp command in Linux.
Example 1: Change the Group of a Directory/File Using the “chgrp” Command in Linux
The “chgrp” command in Linux can be used to change the group ownership of a directory. For example, to change the group ownership of a directory called “mydir” to the group “mygrp” you can simply follow the steps below.
Steps to Follow >
➊ At first, open the Ubuntu Terminal.
➋ Secondly, execute the following command:
ls -l |grep mydir➌ Then, run the command to change the group ownership of the directory “mydir”:
sudo chgrp mygrp mydir➍ After that, press the ENTER key.
➎ At this point, input your Password.
➏ Tap the ENTER key again.
➐ Now, run the command to check the current group of the directory “mydir”:
ls -l |grep mydir➑ Finally, Press ENTER again.
Output >
In the following image, you can see that I have changed the group of the directory “mydir” from “amdadul” to “mygrp.”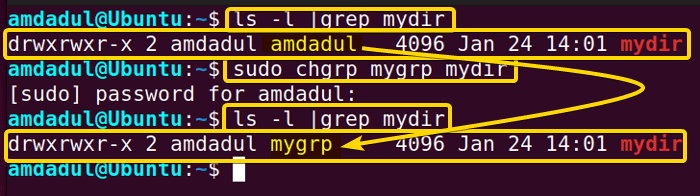
Note: You can change the group ownership of files in the same manner as the directories.
Similar Readings
- The “diff” Command in Linux [11 Practical Examples]
- The “cmp” Command in Linux [7 Practical Examples]
- The “comm” Command in Linux [10 Practical Examples]
Example 2: Recursively Change Group Ownership Using the “chgrp” Command in Linux
To recursively change the group ownership of a directory and all of its contents using the “chgrp” command in Linux, you have to use the “-R” or “–recursive” option. For example, to change the group ownership of the directory “mydir1” to the group “mygrp”. I mention some steps below that you can follow to do the same. This will change the group ownership of the directory and all of its contents to “mydir”.
Steps to Follow >
➊ First, open the Ubuntu Terminal.
➋ Next, run the command to see the owner of the group and its contents:
tree -g mydir1➌ Then, press the ENTER button.
The image below shows you the group name to which mydir1 and its contents belong.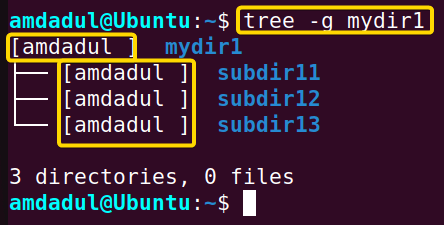 ➍ At this point, execute the command to change the group ownership of directory “mydir1” recursively:
sudo chgrp -R mygrp mydir1➎ Press the ENTER key
➏ After that, provide your Password.
➐ Then, hit the ENTER key again.
➑ To see the new group owner of the directory “mydir1” and its contents run the command below:
tree -g mydir1➒ Finally, tap the ENTER button.
Output >
In the image below, you can see that I have recursively changed the group ownership of the directory named “mydir1”.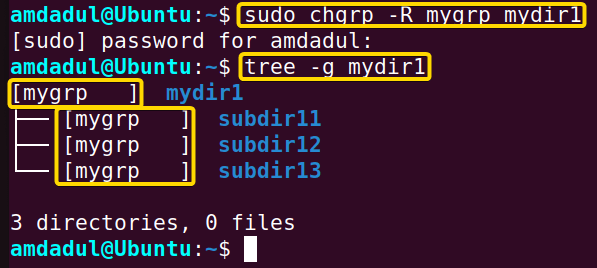
Example 3: Change the Group Ownership to the Same as a Reference File/Directory
To change the group ownership of a directory and all of its contents to the same as a reference file/directory, you can use the “chgrp” command in Linux in combination with the “-R” option for recursive and the “–reference” option. The “–reference” option allows you to set the group ownership of a file or directory to be the same as the group ownership of a reference file/directory. For example, to change the group ownership of the directory “mydir2” to the same as the group ownership of the reference directory “mydir1,” you can follow the steps mentioned below.
Steps to Follow >
➊ Open the Ubuntu Terminal.
➋ Execute the following command to see the group ownership of directories “mydir1” and “mydir2”:
tree -g mydir1 mydir2➌ Then, press the ENTER key.
The image below shows you the group name to which mydir1, mydir2, and their contents belong.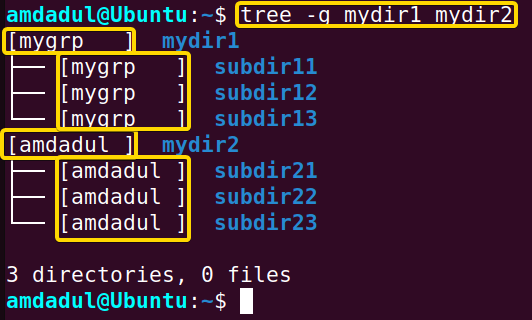 ➍ Now, run the following command to change the group ownership of directory “mydir2” to the same as directory “mydir1”:
sudo chgrp -R --reference=mydir1 mydir2➎ At this point, hit the ENTER button.
➏ Then, type your Password.
➐ Tap the ENTER key again.
➑ To see the new group owner of the directory “mydir2” and its contents, run the command below:
tree -g mydir1 mydir2➒ In the end, tap the ENTER button.
Output >
In the following image, you can see that I have changed the group ownership of the directory named “mydir2” to the same as the directory “mydir1.”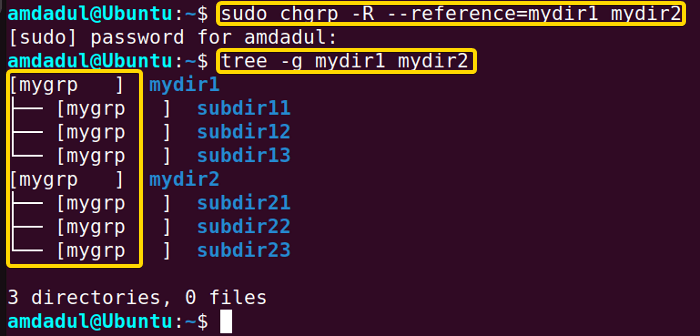
Example 4: Display Execution Details of the “chgrp” Command in Linux
To display the details of the execution of the “chgrp” command in Linux, you can use the “-v” option, which stands for “verbose.” This will display the files and directories that are being processed as the command is executed. Here, I will change the group ownership of the directory “mydir3” to the group “mygrp” and display the execution details. You can get the same result by following the steps below.
Steps to Follow >
➊ Open the Ubuntu Terminal.
➋ Secondly, execute the command:
ls -l |grep mydir3➌ Press the ENTER button.
➍ Now, Run the command below to show the execution details of the chgrp command:
sudo chgrp -v mygrp mydir3➎ At this stage, provide your Password.
➏ Hit the ENTER key again.
➐ Now, run the below command to check the current group of the directory “mydir3”:
ls -l |grep mydir3➑ Finally, Press the ENTER key.
Output >
The below image shows that I have changed the group ownership of the directory “mydir3” and displayed the execution details.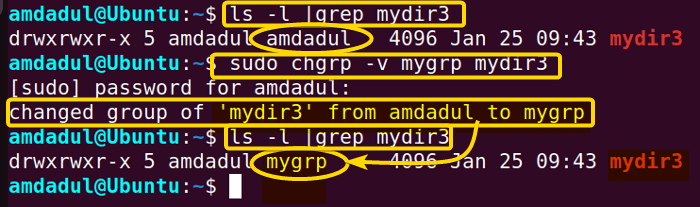
Similar Readings
- The “ln” Command in Linux [6 Practical Examples]
- The “lsof” Command in Linux [8 Practical Examples]
- The “tar” Command in Linux [12 Practical Examples]
Example 5: Hide the “chgrp” Command Errors
To hide errors generated by the “chgrp” command in Linux, you can use the “-f” option with the “chgrp” command. This will suppress potential error messages. Here, I will show this with a practical example. In this example, I will try to change the group ownership of the directory “mydir5” which doesn’t exist in my system, and at the same time suppress the error messages. You can do the same by following the steps below.
Steps to Follow >
➊ In the beginning, open the Ubuntu Terminal.
➋ Then, execute the command below:
sudo chgrp mygrp mydir5➌ Now, tap the ENTER button.
➍ Input your Password.
➎ Press the ENTER key again.
➏ Then, execute the command to suppress the error messages:
sudo chgrp -f mygrp mydir5➐ In the end, press the ENTER key.
Output >
In the following image, you can see that I have suppressed the error message that is generated for an error in the execution of the chgrp command.
Example 6: Display Messages Only When A Change Is Made
The “chgrp” command in Linux allows you to display information about the execution of the command only when a change is made. For this, you can use the “-c” or “–changes” option, which stands for “changes.” Now, I will change the group ownership of the directory “mydir4” to the group “mygrp” and display information only when a change is made. To do the same you can use the steps below.
Steps to Follow >
➊ Launch the Ubuntu Terminal.
➋ Then, type the following command:
sudo chgrp -c -R mygrp mydir4➌ Press the ENTER button.
➍ At this point, provide your Password.
➎ Hit the ENTER key again.
Output >
In the following image, you can see that every change due to the execution of the “chgrp” command is displayed.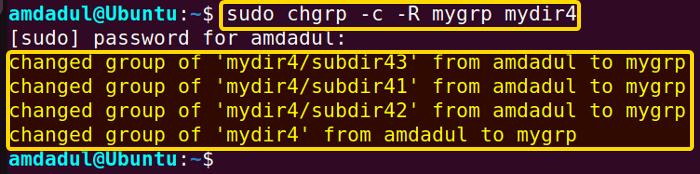
Example 7: Change the Group Name of Symbolic Linked Files
The “chgrp” command in Linux allows you to change the group name of the symbolic linked file (main file) without changing the group ownership of the symbolic linked file. You can create a symbolic link file by simply following the below syntax format:
ln -s File_name Symbolic_Link_nameIn the section below, I will create a symbolic link of the file named “file1” as a symbolic link named “symbolic_link” which is shown in the image by running the command mentioned below:
ln -s file1 symbolic_link
Now, I will change the group of file1 without changing the group of the symbolic link of file1.To do the same you can use the steps below.
Steps to Follow >
➊ Open the Ubuntu Terminal.
➋ Then, type the following command in the Ubuntu Terminal:
sudo chgrp --dereference mygrp symbolic_link➌ Press the ENTER button.
➍ At this point, provide your Password.
➎ Hit the ENTER key again.
➏ Run the following command to see the current group ownership:
ls -l | grep file1➐ Finally, tap the ENTER button.
Output >
In the following image, you can see that I have changed the group of the main file without changing the group of the symbolic link.
Conclusion
In this article, I’ve discussed the chgrp command, which is used to change the group ownership of a file or directory and the permissions that users have to access and modify. In addition, I have explained its options with some relevant examples. With this article, you should now have a better understanding of the chgrp command and how to use it. Hopefully, this article will make it easier for you to become skilled in using the Linux command line.
Similar Readings
- The “file” Command in Linux [9+ Practical Examples]
- The “fsck” Command in Linux [7 Practical Examples]
- The “patch” Command in Linux [4 Practical Examples]
- The “rmdir” Command in Linux [7 Practical Examples]
- The “stat” Command in Linux [9 Practical Examples]
FUNDAMENTALS A Complete Guide for Beginners


