The tar command in Linux is one of the most important commands to archive files. It keeps a lot of files together in an archive. This command does not compress the files’ size unless the options are used to compress. In this article, you will get to know the ins and outs of this command in Linux.
A. Description
The tar command in Linux is used to archive files into a tar archive. Using the tar command with its options, you can also compress file size with bzip2 & gzip. While creating a tar archive using the tar command, it always keeps the original files. This command is also used to extract files from the tar archive in different ways.
B. Syntax
The tar command in Linux has a very easy syntax. It includes the tar command, options & name of the tar archive. And the syntax is as follows:
tar [OPTION]... [FILE]Note: In the syntax above, OPTION is enclosed by a square bracket and followed by 3 dots representing that more than one option can be used at the same time. Besides, FILE suggests that you can specify one file at a time.
C. Options
So many options are available for the tar command in Linux. I have shown here some of the most useful options of the command. Still, you can look into the man page for the tar command to know more about its options.
man tarUseful Options
- -c, Creates uncompressed tar archive.
- -x, Extracts files from a tar archive.
- -v, Displays archived files of a tar archive.
- -f, Sets the name of a tar archive.
- -t, Displaying the list of the tar archive.
- -j, Creates tar archive with bzip2.
- -z, Creates tar archive with gzip.
- -r, Update files/directories of the existing tar archive.
- –wildcards, Specifies patterns of archived files of a tar archive.
- –delete, Deletes file/directory from the tar archive.
Practical Examples of the “tar” Command in Linux
The tar command in Linux is a pretty simple command that will archive files in a tar archive. Here you will get to know several useful examples of the tar command. In this article, I have worked with the files below.
Example 1: Create an Uncompressed Tar Archive
To create a tar archive you can use the tar command along with option -c, option -v & option -f. To do the same follow the steps below:
Steps to Follow >
➊ Start by opening the Ubuntu Terminal.
➋ To view the files, type the following command in the command prompt:
ls MyFolder/➌ Now, tap the ENTER key.
❹Type the following command in the command prompt:
tar -cvf tarFile.tar MyFolder/➎ Then, hit the ENTER button.
❻ To view the tar archive, type the following command in the command prompt:
ls❼ Finally, press the ENTER button.
Output >
In this image, you can see the tar archive is created using the tar command in Linux.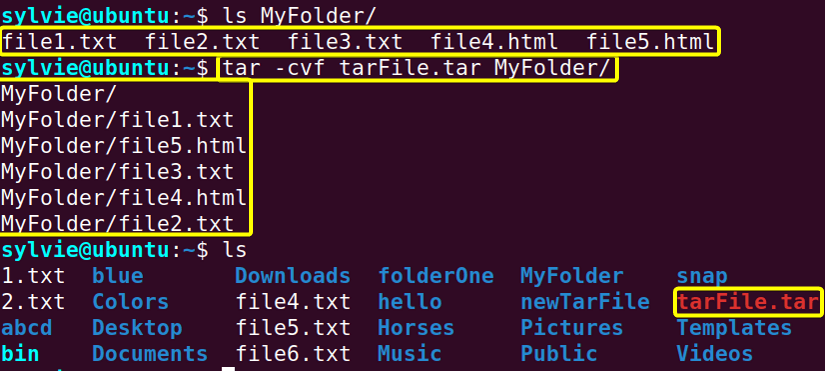
Example 2: Create an Uncompressed Tar Archive of a Specific Group of Files
To create a tar archive you can use the tar command along with option -c, option -v & option -f. Here I have created an archive of files named file1.txt, file2.txt & file3.txt. You can also do the same by following the instructions below:
Steps to Follow >
➊ At the first launch the Ubuntu Terminal.
➋ To view the files, type the following command in the command prompt:
ls➌ Now, hit the ENTER button.
❹Type the following command in the command prompt:
tar -cvf tarFile.tar *.txt➎ Now, press the ENTER key.
❻ To view the tar archive, type the following command in the command prompt:
ls❼ Finally, press the ENTER button.
Output >
In the image below, you can see the tar archive is created with a specific group of files using the tar command in Linux.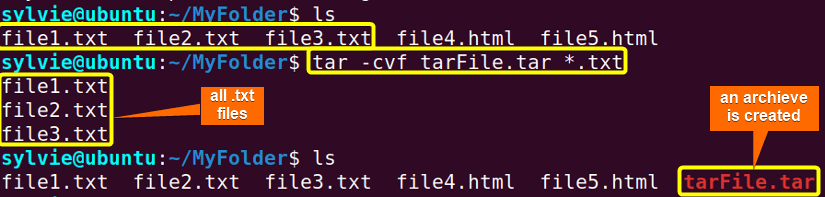
Similar Readings
- The “pwd” Command in Linux [4 Practical Examples]
- The “cd” Command in Linux [6 Practical Examples]
- The “ls” Command in Linux [7+ Practical Examples]
Example 3: Extract Files From the Tar Archive
To extract files from a tar archive I am using the tar command along with option -x, option -v & option -f. To do the same follow the instructions below:
Steps to Follow >
➊ At first open the Ubuntu Terminal.
➋ To view the tar archive, type the following command in the command prompt:
ls➌ Now, hit the ENTER key.
❹Type the following command in the command prompt:
tar -xvf tarFile.tar➎ Then, press the ENTER button.
❻ To view the files, type the following command in the command prompt:
ls❼ Finally, press the ENTER button.
Output >
In the following image, you can see the files are extracted from the tar archive using the tar command in Linux.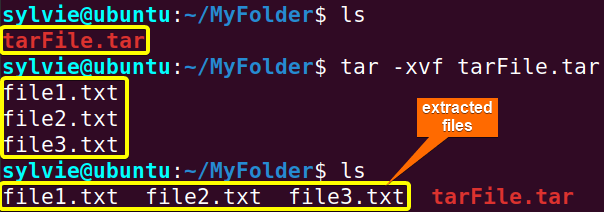
Example 4: Create a Gzip Tar Archive of a Specific Group of Files Using the “tar” Command in Linux
To create and compress a tar archive with gzip compression you can use the tar command along with option -c, option -v, option -z & option -f together. Here I have created an archive of files named file1.txt, file2.txt & file3.txt. You can also do the same by following the instructions below:
Steps to Follow >
➊ At first open the Terminal in Ubuntu.
➋ To view the files, type the following command in the command prompt:
ls➌ Now, strike the ENTER button.
❹Type the following command in the command prompt:
tar -cvzf tarFile.tar.gz *.txt➎ Then, press the ENTER key.
❻ To view the gzip tar archive, type the following command in the command prompt:
ls❼ Finally, press the ENTER button.
Output >
In the image below, you can see the gzip tar archive is created using the tar command in Linux.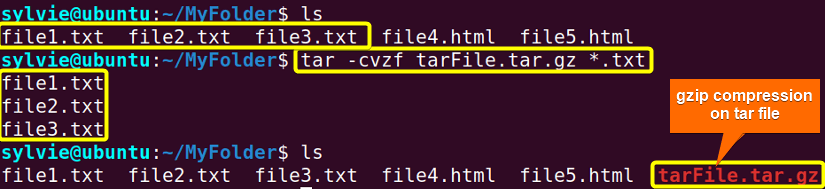
Example 5: Extract Files From a Gzip Tar Archive
To extract files from a tar archive I am using the tar command along with option -x, option -v, option -z & option -f together. To do the same follow the instructions below:
Steps to Follow >
➊ At the first launch the Terminal in Ubuntu.
➋ To view the gzip tar archive, type the following command in the command prompt:
ls➌ Now, hit the ENTER key.
❹Type the following command in the command prompt:
tar -xvzf tarFile.tar.gz➎ Then, press the ENTER button.
❻ To view the files, type the following command in the command prompt:
ls❼ Finally, press the ENTER button.
Output >
As you can see in this image, the files are extracted from a gzip tar archive using the tar command in Linux.
Example 6: Create a Bzip2 Tar Archive of a Specific Group of Files Using the “tar” Command in Linux
To create and compress a tar archive with bzip2 compression you can use the tar command along with option -c, option -v, option -j & option -f. Here I have created an archive of files named file1.txt, file2.txt & file3.txt. You can also do the same by following the steps below:
Steps to Follow >
➊ To begin, open the Terminal in Ubuntu.
➋ To view the files, type the following command in the command prompt:
ls➌ Now, hit the ENTER key.
❹Type the following command in the command prompt:
tar -cvjf tarFile.tar.bz2 *.txt➎ Then, strike the ENTER key.
❻ To view the bzip2 tar archive, type the following command in the command prompt:
ls❼ Finally, tap the ENTER button.
Output >
As you can see in the image below, the bzip2 tar archive is created using the tar command in Linux.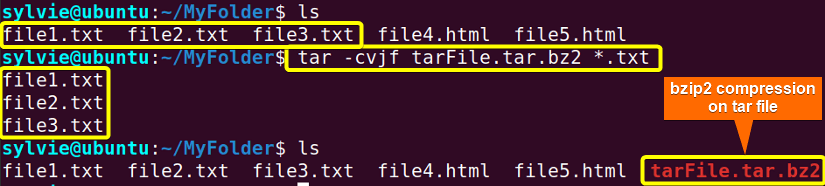
Example 7: Extract Files From a Bzip2 Tar Archive
To extract files from a tar archive I am using the tar command along with option -x, option -v, option -j & option -f together. To do the same follow the process below:
Steps to Follow >
➊ Start by opening the Terminal in Ubuntu.
➋ To view the bzip2 tar archive, type the following command in the command prompt:
ls➌ Now, tap the ENTER key.
❹Type the following command in the command prompt:
tar -xvjf tarFile.tar.bz2➎ Then, hit the ENTER button.
❻ To view the files, type the following command in the command prompt:
ls❼ Finally, press the ENTER button.
Output >
As you can see in the following image, the files are extracted from a bzip2 tar archive using the tar command in Linux.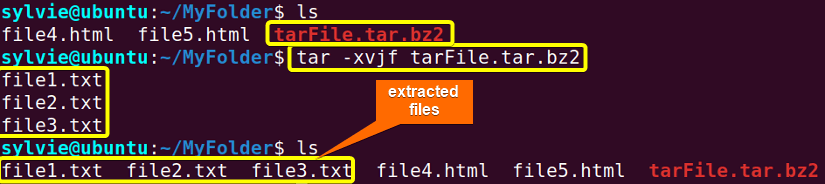
Example 8: Extract Specific Files From a Tar Archive
To extract specific files from a tar archive I am using the tar command along with option -x, option -v & option -f. I want to extract file1.txt & file2.txt from the tar archive. You can do the same by following the process below:
Steps to Follow >
➊ Initially, launch the Ubuntu Terminal.
➋ To view the tar archive, type the following command in the command prompt:
ls➌ Now, tap the ENTER button.
❹ Type the following command in the command prompt:
tar -xvf tarFile.tar file1.txt file2.txt➎ Then, press the ENTER key.
❻ To view the files, type the following command in the command prompt:
ls❼ Finally, strike the ENTER button.
Output >
In the following image, the specific files are extracted from a tar archive using the tar command in Linux.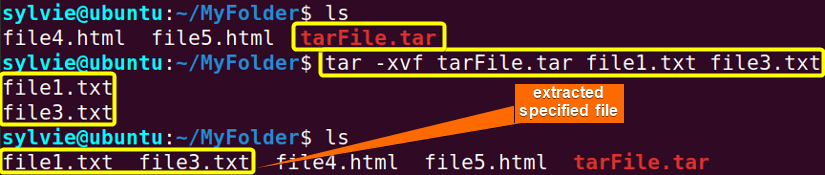
Similar Readings
- The “mv” Command in Linux [8 Practical Examples]
- The “cp” Command in Linux [6 Practical Examples]
- The “rm” Command in Linux [7 Practical Examples]
Example 9: Extract an Archive in a Specified Directory
To extract files from a tar archive in a specified directory you can use the tar command along with option -x, option -v & option -f. You also have to use option -C to specify a directory. I want to extract files in a directory named newTarFile from the tar archive. You can do the same by following the steps below:
Steps to Follow >
➊ To start off, open the Ubuntu Terminal.
➋ To view the tar archive, type the following command in the command prompt:
ls➌ Now, tap the ENTER button.
❹ Type the following command in the command prompt:
tar -xvf tarFile.tar -C newTarFile/➎ Then, press the ENTER key.
❻ To view the files, type the following command in the command prompt:
ls❼ Finally, strike the ENTER button.
Output >
As you can see in the image below, the files are extracted from a tar archive to the directory named newTarFile using the tar command in Linux.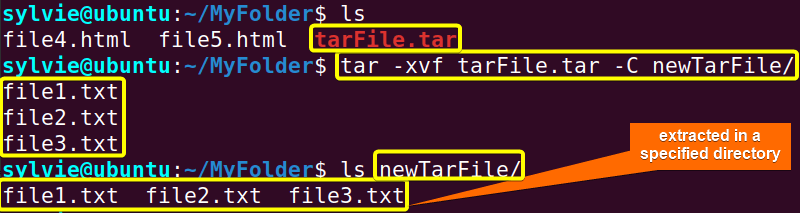
Example 10: View the List of Archived Files of an Archive
To view the list of archived files of a tar archive I am using the tar command along with option -t & option -f. To do the same, follow the procedure below:
Steps to Follow >
➊ As a first step, open the Ubuntu Terminal.
➋ Type the following command in the command prompt:
tar -tf tarFile.tar➌ Then, press the ENTER key.
Output >
As you can see in the image, the archived files of the tar archive are listed here.
Example 11: Extract a Group of Files From an Archive Using the “tar” Command in Linux
To extract a specific group of files from a tar archive in a specified directory you can use the tar command in Linux along with option -x, option -v & option -f together. Here I want to extract all HTML files from the tar archive and for this, I have to use option –wildcards. You can do the same by following the steps below:
Steps to Follow >
➊ To begin the journey, open the Ubuntu Terminal.
➋ To view the tar archive, type the following command in the command prompt:
ls➌ Now, tap the ENTER button.
❹ Type the following command in the command prompt:
tar -xvf tarFile.tar - -wildcards '*.html'➎ Then, press the ENTER key.
❻ To view the files, type the following command in the command prompt:
ls MyFolder/❼ Finally, strike the ENTER button.
Output >
In the image below, a group of files is extracted from a tar archive using the tar command in Linux.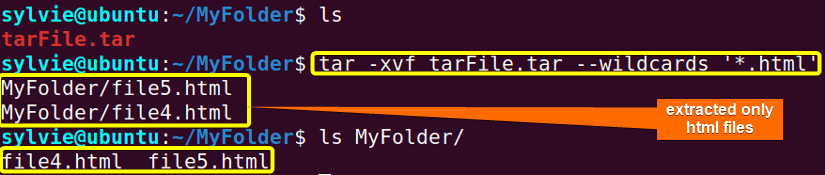
Example 12: View the Size of Tar Archive Using the “tar” Command in Linux
To view the size of the tar archive you can use the tar command in Linux along with option -c, option -z & option -f. Here you also have to use piping. The size of the archive will be shown in kilobytes.
Steps to Follow >
➊ First open the Ubuntu Terminal.
➋ Type the following command in the command prompt:
tar -czf - tarFile.tar | wc -c➌ Now, tap the ENTER button.
Output >
In this image, the size of the tar archive is shown in kilobytes using the tar command in Linux.
Example 13: Update Tar Archive Using the “tar” Command in Linux
To update a tar archive you can use the tar command in Linux along with option -r, option -v & option -f together. Here I want to add an HTML file to the tar archive. You can do the same by following the steps below:
Steps to Follow >
➊ At the first launch the Ubuntu Terminal.
➋ To view the files’ list of the tar archive, type the following command in the command prompt:
tar -tf tarFile.tar➌ Now, tap the ENTER button.
❹ Type the following command in the command prompt:
tar -rvf tarFile.tar file4.html➎ Then, press the ENTER key.
❻ To view if the HTML file is added or not, type the following command in the command prompt:
tar -tf tarFile.tar❼ Finally, hit the ENTER key.
Output >
In this image, an HTML file is added to the tar archive using the tar command in Linux.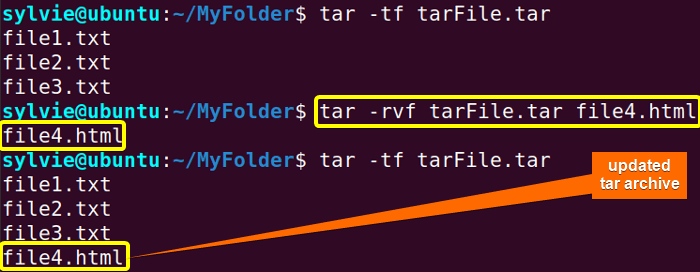
Conclusion
As you have seen in this article, the tar command is one of the most useful commands in Linux. You’ve also learned the syntax, some useful options, and the practical application of this command. So, go through all the materials and execute accordingly to become a power user.
Similar Readings
- The “touch” Command in Linux [8 Practical Examples]
- The “mkdir” Command in Linux [6+ Practical Examples]
- The “locate” Command in Linux [7 Practical Examples]
- The “find” Command in Linux [10+ Practical Examples]
- The “chmod” Command in Linux [6 Practical Examples]
- The “chown” Command in Linux [8 Practical Examples]
FUNDAMENTALS A Complete Guide for Beginners


