The chown command in Linux is very important. Because Linux is a system that enables multiple users to use a single system simultaneously, this command is very useful for changing files or directory owners. In this article, I will show you how the chown command works and give some useful examples.
A. Description
The word chown stands for Change Owner. So it is evident that this command is used for changing owners. When I say Change Owner I mean changing both file owner and group owner. The chown command is very useful when it comes to accessing the permission of a file or directory.
B. Syntax
The syntax of the chown command is very simple. But it has two syntaxes. Both syntaxes work with changing owners. The syntax is the chown command followed by one or multiple options and then the owner name and file name or directory name.
chown [OPTION]... [OWNER] [:[GROUP]] FILE…chown [OPTION]... --reference=RFILE FILE…C. Options
Many useful options are available for the chown command. I have listed some of the most used ones here. However, if you want to know more about options for the chown command you can always check the man page for the chown command.
man chownUseful Options
- -R, –recursive: Changes files and directories recursively.
- -v, –verbose: Outputs a Diagnostic when a file is processed.
- -c, –change: Reports only when a change is made.
- -f, –silent, –quiet: Suppresses most error massages.
- –version: Outputs version information and exit.
- –help: Displays this help and exit.
View Owner of a File or Directory
Knowing the existing owner of a file or directory is important before changing the owner. Now follow the steps below to view the owner of a file or directory.
Steps to Follow >
➊ At first open the Ubuntu Terminal.
➋ Type the following command in the command prompt:
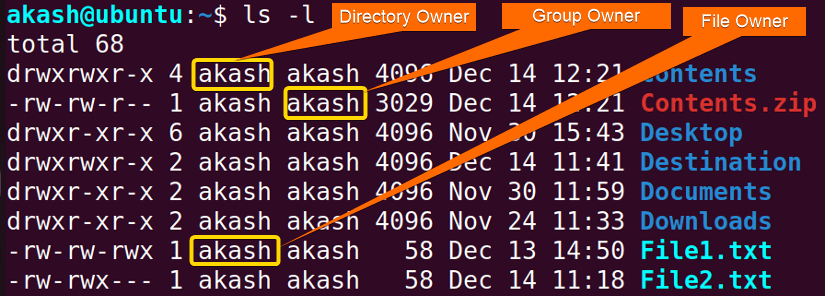
ls -l➌ Now, press the ENTER button.
Output >
Here you can see the different types of owners. The Group owner is the owner of the file or directory group that can have multiple members. These members can have permission to access the files or directories if permitted by the owner. Here I have listed out all the contents of my Home directory. That’s why the Owner is akash.
Practical Examples of the “chown” Command in Linux
The chown command is a very important command of the Linux CLI. Here I have given some basic examples of the chown command. I have used some Files and Directories that I have created on my machine. You can download these contents if you want to work with the same Files and directories.
Example 1: Changing the Owner of a File Using the “chown” Command in Linux
The basic syntax of chown is very simple. Which is given below.
chown Newownername FileNameBut there is a problem. The problem is you just can’t change the file or directory owner as a regular user. For changing owner you have to be a root user. Look at the picture below to understand.

As you can see I despite being the owner, wasn’t permitted to run the chown command. It is because I am not the root user. I have a file named File1.txt I will change the owner of that file. Now follow the steps below to see how this works.
Steps to Follow >
➊ At first open the Ubuntu Terminal.
➋ Type the following command in the command prompt:
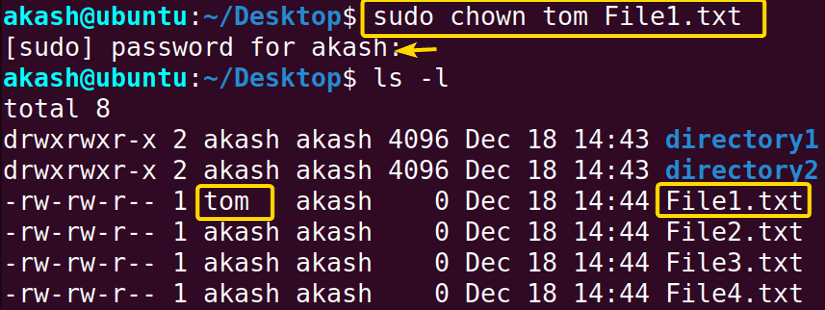
sudo chown tom File1.txt➌ Now, press the ENTER button.
➍ Provide your user password.
➎ Now, press the ENTER button.
➏ Type the following command in the command prompt:
ls -l➐ Now, press the ENTER button.
Output >
As you can see from here after using the chown command with sudo I was able to change the user name to tom from akash.
Example 2: Changing the Owner of Multiple Files Using the “chown” Command in Linux
I have shown in Example 1 that the command chown can be used to change the owner of a file. But you can also use the chown command to change the owner of multiple files with a single command. I have two files named File1.txt and File2.txt, I will change the owner of these two files. To know the previous owner of these files look at the picture below.

Now follow the steps below to change the owner of these two files.
Steps to Follow >
➊ At first open the Ubuntu Terminal.
➋ Type the following command in the command prompt:
sudo chown tom File1.txt File2.txt➌ Now, press the ENTER button.
➍ Provide your user password.
➎ Now, press the ENTER button.
➏ Type the following command in the command prompt:
ls -l➐ Now, press the ENTER button.
Output >
As you can see that the new owner is set to tom. And you should also notice that I had to use the sudo command because I am not a root user.

Similar Readings
- The “diff” Command in Linux [11 Practical Examples]
- The “cmp” Command in Linux [7 Practical Examples]
- The “comm” Command in Linux [10 Practical Examples]
Example 3: Changing the Owner of a Directory Using the “chown” Command in Linux
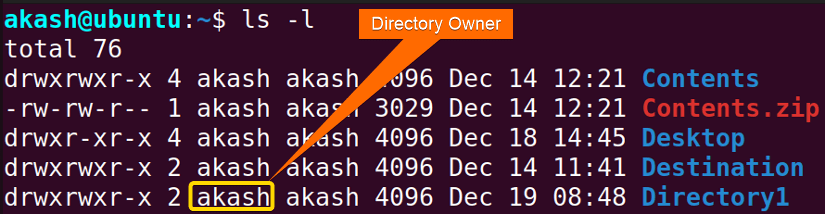
Changing the owner of a directory is actually pretty basic. It is similar to changing the owner of a file using the chown command. I have a directory named Directory1, I will change the owner of that directory. Look at the picture below which shows the previous owner of Directory1.
Now follow the steps below to change the owner of this directory.
Steps to Follow >
➊ At first open the Ubuntu Terminal.
➋ Type the following command in the command prompt:
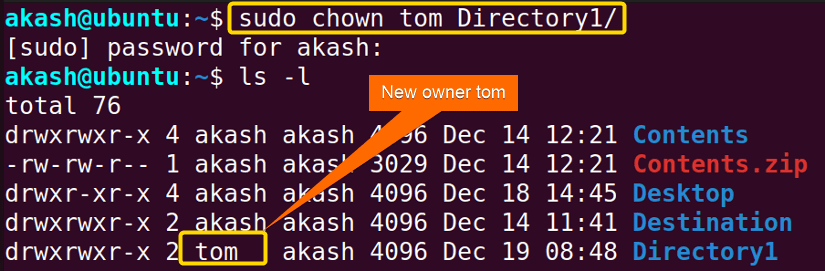
sudo chown tom Directory1/➌ Now, press the ENTER button.
➍ Provide your user password.
➎ Now, press the ENTER button.
➏ Type the following command in the command prompt:
ls -l➐ Now, press the ENTER button.
Output >
As you can see the new owner is set to tom. You should also notice that I had to use the sudo command because I am not a root user.
Example 4: Changing the Owner of Multiple Directories Using the “chown” Command in Linux
Changing the owner of multiple directories is similar to changing the owner of multiple files using the chown command. I have two directories named Directory1 and Contents, I will change the owner of that directory. Look at the picture below which shows the previous owner of Directory1 and Contents.

Now follow the steps below to change the owner of these directories.
Steps to Follow >
➊ At first open the Ubuntu Terminal.
➋ Type the following command in the command prompt:
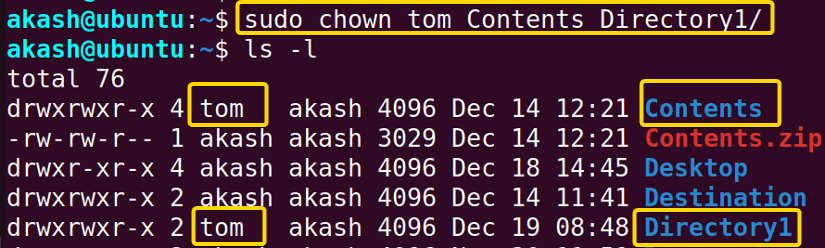
sudo chown tom Contents Directory1/➌ Now, press the ENTER button.
➍ Provide your user password.
➎ Now, press the ENTER button.
➏ Type the following command in the command prompt:
ls -l➐ Now, press the ENTER button.
Output >
As you can see the new owner is set to tom. In Addition, you should notice that I had to use the sudo command because I am not a root user.
Example 5: Changing the Group Owner of Files Using the “chown” Command in Linux
For changing the Group Owner we also use the chown command. For this example, I will demonstrate changing the Group Owner of the files that I have used previously which are File1.txt and File2.txt. But first, let’s take a look at their current groups in the picture below.

Now follow the steps below to change the group owner of these files.
Steps to Follow >
➊ At first open the Ubuntu Terminal.
➋ Type the following command in the command prompt:
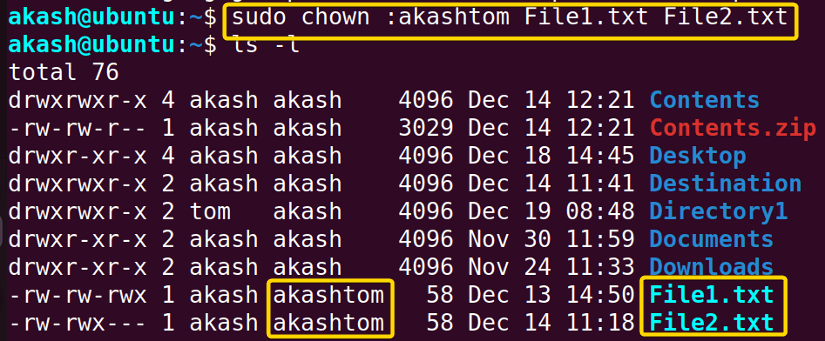
sudo chown :akashtom File1.txt File2.txt➌ Now, press the ENTER button.
➍ Type the following command in the command prompt:
ls -l➎ Now, press the ENTER button.
Output >
As you can see the new group owner is set to akashtom.
Example 6: Changing the Group Owner of a Directory Using the “chown” Command in Linux
For changing the Group Owner of a directory we also use the chown command. For this example, I will demonstrate changing the Group Owner of the directory Directory1. But first, let’s take a look at the current group of this directory from the picture below.
![]()
Now follow the steps below to change the group owner of this directory.
Steps to Follow >
➊ At first open the Ubuntu Terminal.
➋ Type the following command in the command prompt:
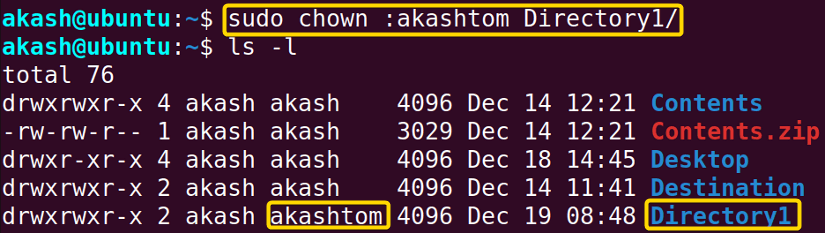
sudo chown :akashtom Directory1/➌ Now, press the ENTER button.
➍ Type the following command in the command prompt:
ls -l➎ Now, press the ENTER button.
Output >
As you can see the new group owner is set to akashtom.
Similar Readings
- The “ln” Command in Linux [6 Practical Examples]
- The “lsof” Command in Linux [8 Practical Examples]
- The “tar” Command in Linux [12 Practical Examples]
Example 7: Changing the Owner and Group Owner of a File with Single command
If I want to change both the owner and the group owner with a single command, I will have to use a combined chown command. For this example, I will change the owner and the group owner of File1.txt. I have previously set it to akash and akashtom respectively. Look at the picture below to recall that.

Now follow the steps below to see how this works.
Steps to Follow >
➊ At first open the Ubuntu Terminal.
➋ Type the following command in the command prompt:
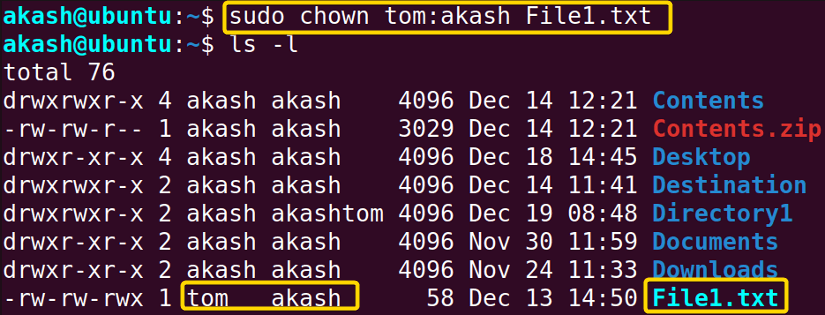
sudo chown tom:akash File1.txt➌ Now, press the ENTER button.
➍ Type the following command in the command prompt:
ls -l➎ Now, press the ENTER button.
Output >
As you can see the new group owner is set to akash. And the owner is set to tom
Example 8: Changing the Owner of Files within a Directory Using the “chown” Command Recursively
If I want to change the owner of the files that are inside a directory, I will have to use the chown command recursively on that directory. I have a directory named Destination. I will change the owners of the files that are inside this directory using the chown command. First, let’s look at the files and their owners from the picture below.
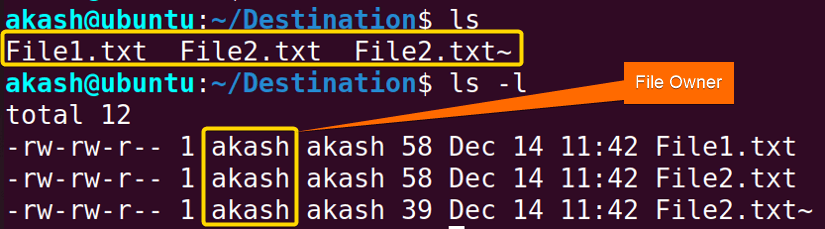
Now follow the steps below to change the owners of these files without going into the directory.
Steps to Follow >
➊ At first open the Ubuntu Terminal.
➋ Type the following command in the command prompt:
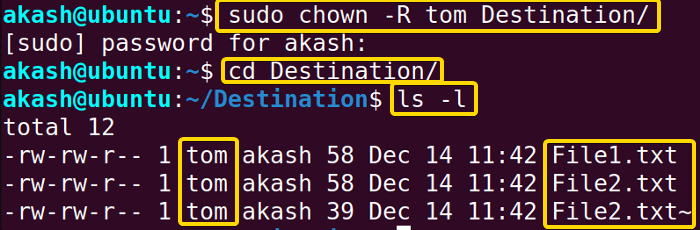
sudo chown -R tom Destination/➌ Now, press the ENTER button.
➍ Provide your user password.
➎ Press the ENTER button.
➏ Type the following command in the command prompt:
cd Destination/➐ Press the ENTER button.
➑ Type the following command in the command prompt:
ls -l➒ Now, press the ENTER button.
Output >
As you can see from the picture below all the files of the directory have a new owner that is tom.
Conclusion
In this article, I have tried to show you how the chown command in Linux works. And I have also included some useful examples. If you go through this article properly, you should be able to use the command chown properly on your own.
Similar Readings
- The “chgrp” Command in Linux [7 Practical Examples]
- The “file” Command in Linux [9+ Practical Examples]
- The “fsck” Command in Linux [7 Practical Examples]
- The “patch” Command in Linux [4 Practical Examples]
- The “rmdir” Command in Linux [7 Practical Examples]
- The “stat” Command in Linux [9 Practical Examples]
FUNDAMENTALS A Complete Guide for Beginners


