The chmod command in Linux is a very useful command. It is used for changing the permission of access. In the Linux distribution Ubuntu or in any other system there might be files that you don’t want others to access. Changing access permission is the solution to that. In this article, I will show you how to use the chmod command and I will show you some useful examples too.
A. Description
The word chmod is the short form of Change Mode. This means the chmod command can make a file Readable, Writable, and Executable for users other than you. Or it can restrict permission for everyone or a selected group of people. All these will be discussed here in detail.
B. Syntax
The syntax for the chmod command is very simple. But there are multiple syntaxes for the chmod command. All of the syntaxes do the same thing which is altering the permission of a file or directory.
- Syntax 1
chmod [OPTION]... MODE[,MODE]... FILE…- Syntax 2
chmod [OPTION]... OCTAL-MODE FILE…- Syntax 3
chmod [OPTION]... - -reference=RFILE FILE…C. Options
Many useful options are available for the chmod command. I have listed some of the most used ones here. However, if you want to know more about options for the chmod command you can always check the man page for the chmod command.
man chmodUseful Options
- -R, –recursive: Changes files and directories recursively.
- -v, –verbose: Outputs a Diagnostic when a file is processed.
- -c, –change: Reports only when a change is made.
- -f, –silent, –quiet: Suppresses most error messages.
- –version: Outputs version information and exit.
- –help: Displays this help and exit.
View Permission of a File or Directory
Knowing the existing permission of a file or directory is mandatory before changing the permissions. Now follow the steps below to view the permission of a file or directory.
Steps to Follow >
➊ At first open the Ubuntu Terminal.
➋ Type the following command in the command prompt:
ls -l➌ Now, press the ENTER button.
Output >
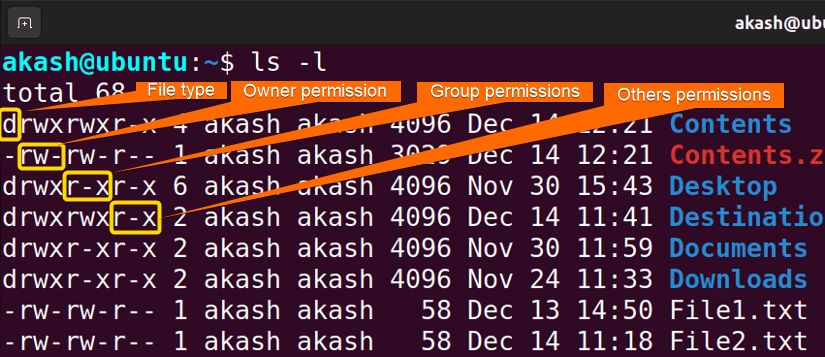
In the picture below first 10 characters define the file type and permissions.
Altering Permission of a File or Directory
There are three ways that permission can be altered. Three types of argument are given below.
- Normal Expression: u=wx, this means the owner is given writing and executing
- Logical Expression: o+r, means other users were given reading When used minus sign (-) it will revoke permission.
- Octal Notation: Octal 7 is Binary 111 which means all yes. So, the 9 characters represent different users, and each three are expressed as an octal number. 7 means reading, writing, and executing all permission granted. 0 means all permission is revoked.
NB: u = owner of a file, g = users that are members of file-group, o = other users, a = all users.
Practical Examples of the “chmod” Command in Linux
The chmod command is very easy to use. It is one of the most important commands of the Linux CLI. Here I have given some basic examples of the chmod command. I have used some Files and Directories that I have created on my machine. You can download these contents if you want to work with the same Files and directories.
Example 1: Giving Permissions Using Normal Expression of the “chmod” Command in Linux
I have a file named File1.txt which doesn’t have permission granted for other users to write or execute. Look at the picture below to understand clearly.
![]()
Now to alter these permissions follow the steps below.
Steps to Follow >
➊ At first open the Ubuntu Terminal.
➋ Type the following command in the command prompt:
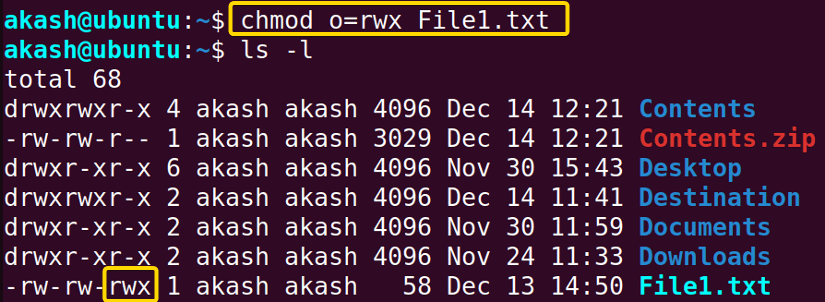
chmod o=rwx File1.txt➌ Now, press the ENTER button.
Output >
Here File1.txt didn’t have write or execute permission for others. But I used the chmod command to change that permission.
NB: u = owner of a file, g = users that are members of file-group, o = other users, a = all users.
The (-l) option is used for viewing the long list.
Similar Readings
- The “pwd” Command in Linux [4 Practical Examples]
- The “cd” Command in Linux [6 Practical Examples]
- The “ls” Command in Linux [7+ Practical Examples]
Example 2: Revoking Permissions Using Normal Expression of the “chmod” Command in Linux
I have a file named File2.txt which has permission granted for the members of the file group to read or write. Look at the picture below to understand clearly.
![]()
Now follow the steps below to revoke these permissions.
Steps to Follow >
➊ At first open the Ubuntu Terminal.
➋ Type the following command in the command prompt:
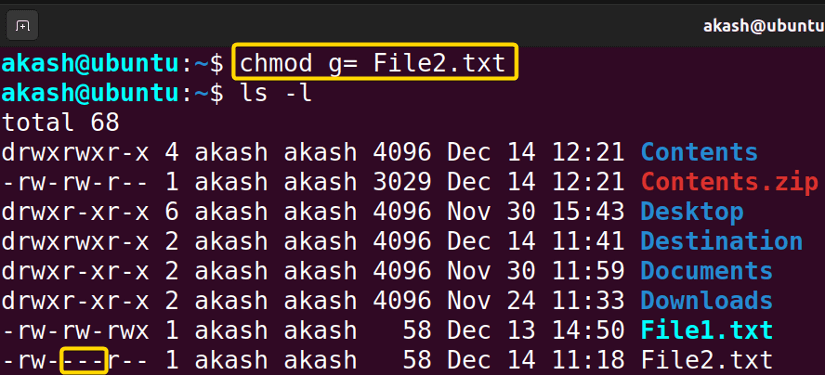
chmod g= File2.txt➌ Now, press the ENTER button.
Output >
As you can see, all the permissions for the group members were nullified.
NB: u = owner of a file, g = users that are members of file-group, o = other users, a = all users.
The (-l) option is used for viewing the long list.
Example 3: Giving Permissions Using Logical Expression of the “chmod” Command in Linux
I will give the permission back to the group users of File2.txt, which I revoked in the previous Example. But now I will use the Logical Expressions to the chmod command. Now follow the steps below to see how this works.
Steps to Follow >
➊ At first open the Ubuntu Terminal.
➋ Type the following command in the command prompt:
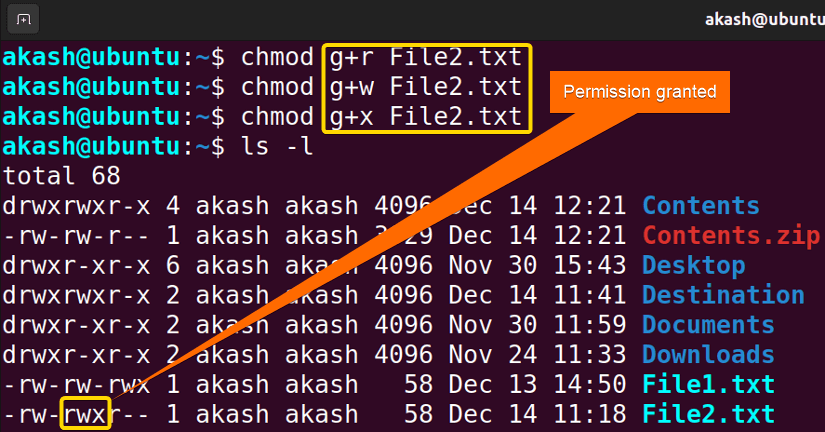
chmod g+r File2.txt➌ Now, press the ENTER button.
➍ Type the following command in the command prompt:
chmod g+w File2.txt➎ Now, press the ENTER button.
➏ Type the following command in the command prompt:
chmod g+x File2.txt➐ Now, press the ENTER button.
Output >
As you can see I used the chmod command 3 times to grant three permissions. All three characters were dash (-) but they are now changed to r, w, and x by the chmod command.
NB: u = owner of a file, g = users that are members of file-group, o = other users, a = all users.
The (-l) option is used for viewing the long list.
Example 4: Revoking Permissions Using Logical Expression of the “chmod” Command in Linux
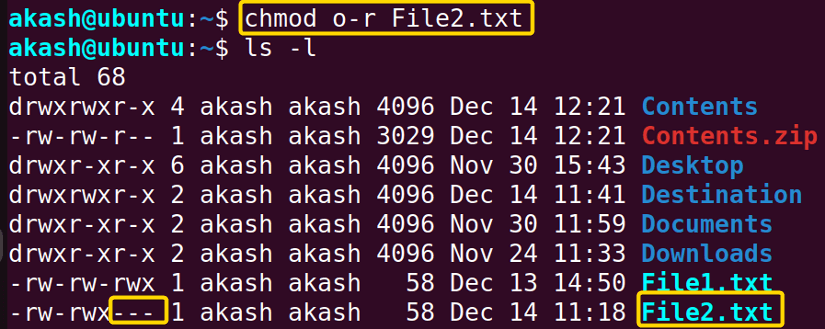
I will use the same file File2.txt to demonstrate this example. As you can see from the picture below, this file has permission to be read by other users.
![]()
But I don’t want others to read this file. So I will revoke that permission using the chmod command. Now follow the steps below to see how this works.
Steps to Follow >
➊ At first open the Ubuntu Terminal.
➋ Type the following command in the command prompt:
chmod o-r File2.txt➌ Now, press the ENTER button.
Output >
As you can see from the picture others don’t have read permission anymore. The “r” character is replaced by dash(-).
NB: u = owner of a file, g = users that are members of file-group, o = other users, a = all users.
The (-l) option is used for viewing the long list.
Similar Readings
- The “mv” Command in Linux [8 Practical Examples]
- The “cp” Command in Linux [6 Practical Examples]
- The “rm” Command in Linux [7 Practical Examples]
Example 5: Changing Permissions for All the Users
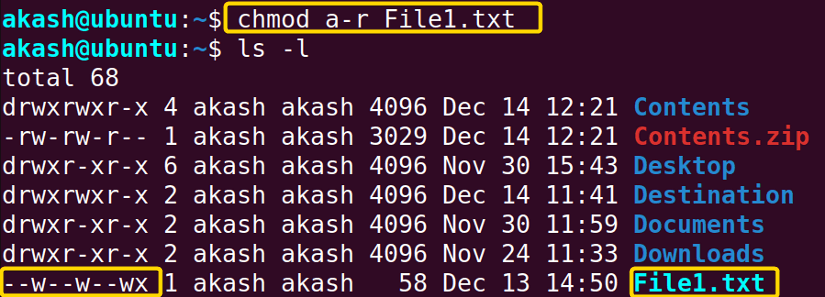
In previous examples, you must have noticed that I was only altering the permission of one group of users at a time. It was either Owner or the User of the File Group. But I didn’t alter their permission together. Because there is a different way to do that. For this example, I will use the File1.txt file. Which has read permission for all the users. You can affirm that from the picture below.
![]()
I will revoke read permission for all users with just one command. Now follow the steps below to see how you can alter permission for all the users at one go.
Steps to Follow >
➊ At first open the Ubuntu Terminal.
➋ Type the following command in the command prompt:
chmod a-r File1.txt➌ Now, press the ENTER button.
Output >
As you can see all the “r” characters are replaced with dash(-). So it’s safe to say that revoking permission was successful.
NB: u = owner of a file, g = users that are members of file-group, o = other users, a = all users.
The (-l) option is used for viewing the long list.
Example 6: Giving Permissions Using Octal Notation of the “chmod” Command in Linux
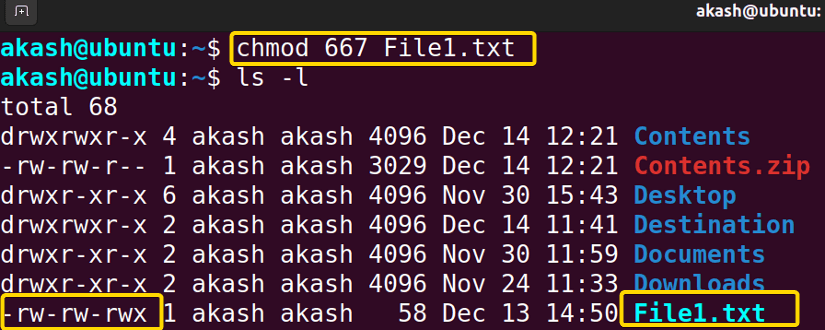
I will give back the permissions to all the users which I have revoked in the previous example. First, take a look at the picture below to understand what permission File1.txt has as of now.
![]()
So from the picture, it’s evident that none of the users have read permission. So let’s give read permission to everyone. But I will use Octal Notation rather than using other expressions. Now, I will give the octal expression for that.
- Owner group: rw- = 110 (Binary representation) = 6 (Octal representation)
- User of File Group: rw- = 110(Binary representation) = 6 (Octal representation)
- Other Users: rwx = 111(Binary representation) = 7(Octal representation)
Now follow the steps below to see how this works.
Steps to Follow >
➊ At first open the Ubuntu Terminal.
➋ Type the following command in the command prompt:
chmod 667 File1.txt➌ Now, press the ENTER button.
Output >
As you can see all the dash(-) characters are replaced with “r” characters. So it’s safe to say that giving permission back was successful.
Conclusion
In this article, I have shown you how the chmod command works. And I have also included some useful examples. If you go through this article properly, you should be able to use the command chmod properly on your own.
Similar Readings
- The “touch” Command in Linux [8 Practical Examples]
- The “mkdir” Command in Linux [6+ Practical Examples]
- The “locate” Command in Linux [7 Practical Examples]
- The “find” Command in Linux [10+ Practical Examples]
- The “chown” Command in Linux [8 Practical Examples]
FUNDAMENTALS A Complete Guide for Beginners


