The mv command in Linux is used to move files and folders from one location to another specified location within a file system. Usually, it is used to move files or folders. However, the “mv” command can also rename any given file or directory to a new name. It is a widely used file/folder management command using Terminal in a UNIX or UNIX-like system.
This article will discuss in-depth the basics, and distinct features of the mv command in Linux with 8 step-by-step examples.
Syntax of the Linux “mv” Command
The syntax for the mv command can vary. There can be one or more options, one or more source paths, and a single destination path.
mv [OPTION]... SOURCE... DESTINATIONLinux “mv” Command Options
Many useful options are available for the mv command. Below you’ll find some of the useful options available that will come in handy while moving or renaming files using the mv command in Linux:
|
Option |
Description |
| -n, – -no-cobber | Do not overwrite an existing file |
| -i, – -interactive | Prompt before overwriting |
| -f, – -force | Do not prompt before overwriting |
| -v, – -verbose | Explain what is being done |
| -u, – -update | Move only when the source file is newer than the Destination file |
| – -version | Outputs the version information |
8 Practical Examples of the “mv” Command in Linux
The mv command is used all the time while managing files. Here, you will find some 8 practical examples of the “mv” command you will need most of the time.
Example 1: Moving a File to Another Directory
This is the main purpose of the mv command in Linux which is to move files. You need to type the source and destination directories to be able to do that. But you need to keep the file name the same for both the source and the destination. Otherwise, the file name will be changed after moving. The general syntax to move a file is as follows:
mv SOURCE DESTINATIONYou can imitate the following steps to move a file using the mv command:
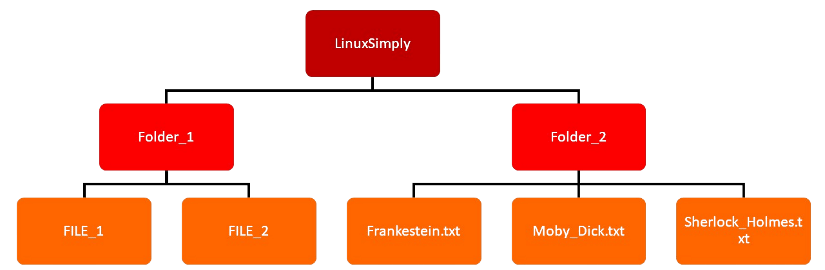
- Open Terminal in the Home directory. Let, you have a file structure like the following on your Desktop:

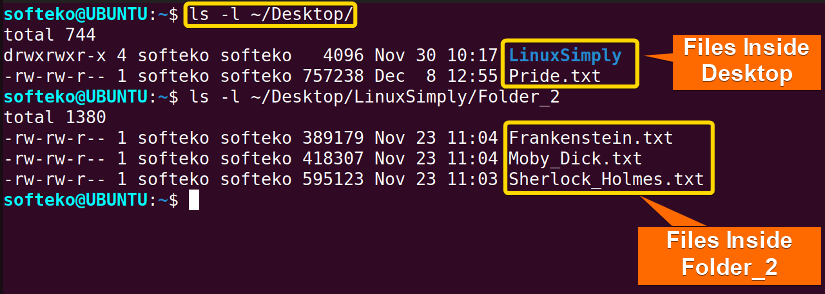
- To move a file from the Desktop named Pride.txt into Folder_2, run the following commands to check the Desktop and the Folder_2:
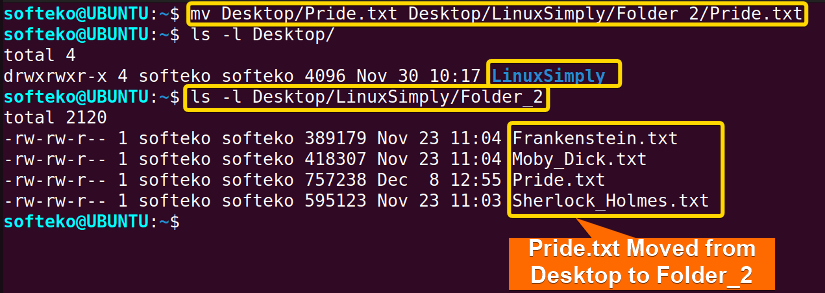
ls -l ~/Desktop/ls -l ~/Desktop/LinuxSimply/Folder_2 - Now, run the following command to move Pride.txt from Desktop to Folder_2:
mv Desktop/Pride.txt Desktop/LinuxSimply/Folder_2/Pride.txtNote: Keep the file names the same, otherwise in the destination, the file will have a different name.
As you can see in the following pictures, Pride.txt moved from Desktop to Folder_2.
Before moving:

After moving:

Example 2: Moving Multiple Files to Another Directory
To move multiple files at once, you can use the mv command. In this case, you can move the files to just one destination folder. The general syntax is as follows:
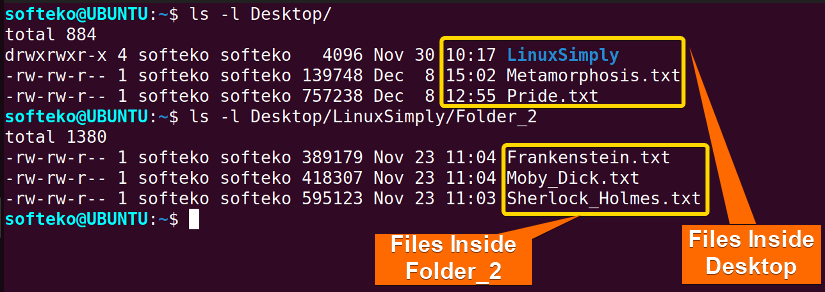
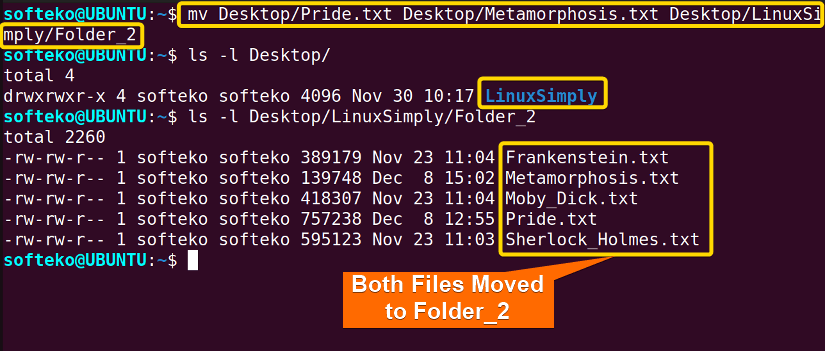
mv SOURCE1 SOURCE2 SOURCE3 DESTINATIONIn this case, let’s say you want to move 2 files named Pride.txt and Metamorphosis.txt to Folder_2. You can take the following steps:
- Open Terminal in Home Directory.
- Check the Desktop and the Folder_2 folders using the following command:
ls -l Desktop/ls -l Desktop/LinuxSimply/Folder_2 - Now type the following command and hit ENTER to move these 2 files:
mv Desktop/Pride.txt Desktop/Metamorphosis.txt Desktop/LinuxSimply/Folder_2Note: There should be only one destination as the ending argument. There can be multiple source files that will be moved to the same destination.
As you can see from the images below, the 2 files are now in Folder_2.
Before moving:

After moving:

Similar Readings
- The “diff” Command in Linux [11 Practical Examples]
- The “cmp” Command in Linux [7 Practical Examples]
- The “comm” Command in Linux [10 Practical Examples]
Example 3: Moving Multiple Files with Similar Names
Sometimes there are similar files that we want to move. Here is a method to do that easily using a placeholder symbol (*). The general syntax to use this command is as follows:
mv FILE_NAME* DESTINATIONHere are the steps you need to follow to move multiple files with the same name from the terminal:
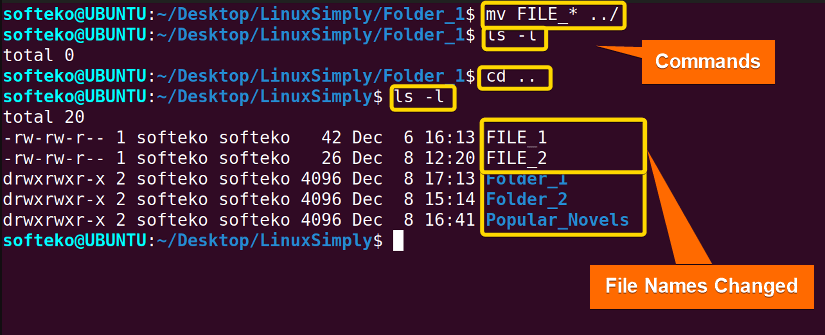
- Navigate inside the directory where the files reside. Here, let’s say you want to rename the files inside the Folder_1. Navigate using the command below:
cd Desktop/LinuxSimply/Folder_1 - You can view the files inside using the following command:
ls -l - Let’s say you want to move the FILE_1 and FILE_2 into the LinuxSimply parent directory. Run the following command:
mv FILE_* ../Note: The (*) is the placeholder that will have any multiple numbers or characters. You can also use the (?) symbol which will only take a single number or character. - Now, you can come back to the LinuxSimply folder by running the following commands and check the file names:
lscd ..ls -lHere as you can see, the file names starting with the FILE_ have been moved from the Folder_1 to the LinuxSimply folder.
Before moving:

After moving:


Example 4: Moving a Folder to Another Directory
You can also move a folder using the mv command. The syntax is quite similar to that of moving files.
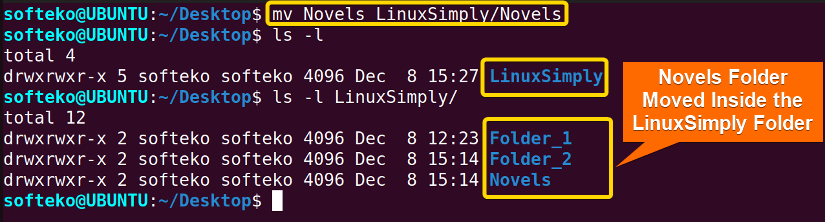
mv SOURCE_FOLDER DESTINATIONLet’s say, you have created a folder named Novels on your Desktop. Now you want to move the folder inside the LinuxSimply folder. Using the following steps, you can quickly move the whole folder with files inside:
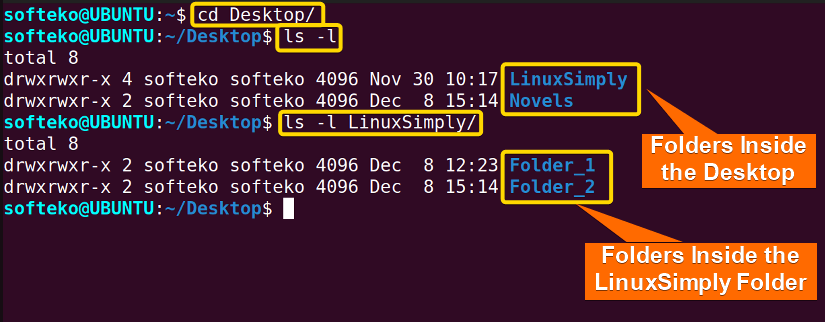
- Open the terminal in the home directory and move to the Desktop folder using the cd command like the following:
cd Desktop/ - Now, view the files inside the Desktop and the LinuxSimply folder by running the commands below:
ls -lls -l LinuxSimply/ - To move the Novels folder inside the LinuxSimply folder, type the following command and press ENTER:
mv Novels LinuxSimply/NovelsNote: Use the same folder name, otherwise, at the destination, there will be a folder with a different name.
In the command prompt, you will see the following output. You have just moved the Novels folder.
Before moving:

After moving:

Example 5: Moving and Overwriting Files with an Interactive Prompt
Sometimes you have the same files inside a folder and you want to overwrite that file. But you also want to make sure which file you want to overwrite and which file you want to keep as it is. To do that you can use the -i or –interactive option. The general syntax of the command is as follows:
mv -i SOURCE1 SOURCE2 SOURCE3 DESTINATIONYou can follow the steps below to try this command from the terminal:
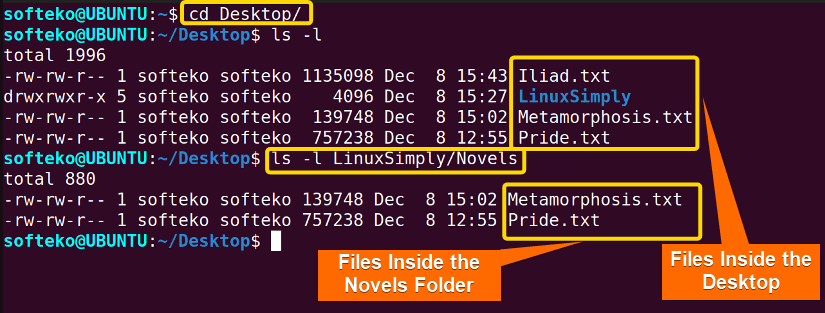
- Change the directory into the Desktop using the cd command:
cd Desktop/ - View the contents of the Desktop and Novels folder using the following command:
ls -lls -l LinuxSimply/Novels - Type the following command to move the 3 files named Pride.txt, Metamorphosis.txt, and Iliad.txt. As you can see, Pride.txt and Metamorphosis.txt are already inside the Novels folder and you want to overwrite those 2 files. Use the following command to overwrite with a prompt:
mv -i Pride.txt Metamorphosis.txt Iliad.txt LinuxSimply/NovelsNote: Use y or Y to Overwrite and n or N to Ignore.
- You will receive a prompt where you need to press y as Yes or n as No each time you want to overwrite.
- Press the ENTER key.After you press the ENTER key, you will receive the prompt where if you want to overwrite, you have to press y or n to overwrite or not overwrite.Before moving:
 After moving:
 After moving:
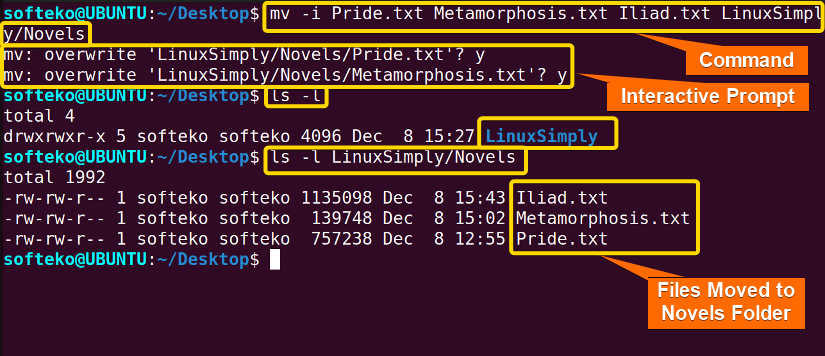
Similar Readings
- The “ln” Command in Linux [6 Practical Examples]
- The “lsof” Command in Linux [8 Practical Examples]
- The “tar” Command in Linux [12 Practical Examples]
Example 6: Move and Overwrite Files without any Prompt
Now if you want to move the same set of files, but don’t want to see the prompt and just overwrite them, use the -f or –force option. The general syntax is as follows:
mv -f SOURCE1 SOURCE2 SOURCE3 DESTINATIONAgain, try these steps to understand the command:
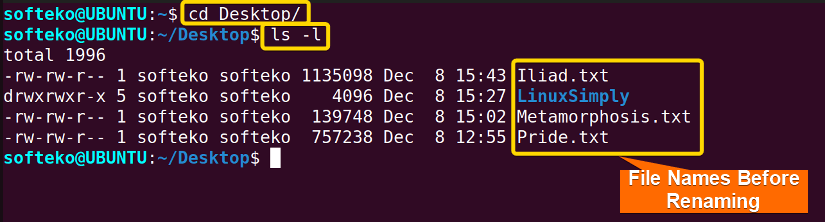
- Get inside the Desktop directory by using the cd command:
cd Desktop/ - You can check the contents inside the Desktop and Novels folder using the following command:
ls -lls -l LinuxSimply/Novels - Now type the following command to directly overwrite the contents without any prompt:
mv -f Pride.txt Metamorphosis.txt Iliad.txt LinuxSimply/Novels - Press the ENTER key.As you can see, the files inside the Desktop have been moved to the Novels folder. But there was no prompt in this case files actually changed location.Before moving:After moving:

 After moving:
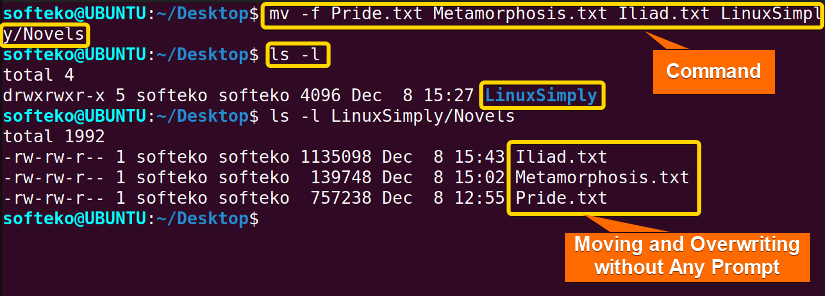
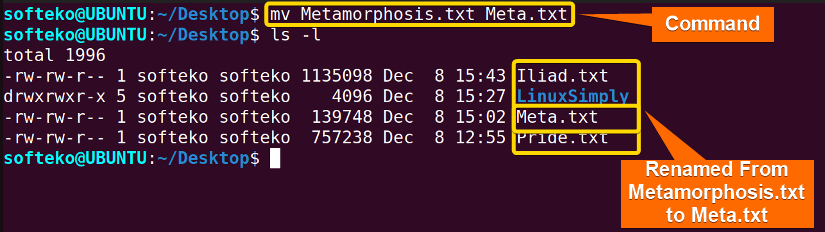
Example 7: Renaming a File
You can also rename a file at your wish using the mv command. The mv command works as a location-changing command which also allows renaming. In this case, you just need to keep the same destination and change the file name like the following:
mv file.txt FILE.txtYou can go through the following method to use this command:
- Open the terminal and navigate inside the folder where the files are located. Here, you will get inside the Desktop folder with the cd command.
cd Desktop/ - Use the following command to view files on the Desktop:
ls -l - Let’s say you want to rename the Metamorphosis.txt into Meta.txt. Run the following command to do that:
mv Metamorphosis.txt Meta.txtNote: Use a relative path in the same directory for renaming while keeping the file in the same folder.
As you can see the file name has been changed from Metamorphosis.txt to Meta.txt
Before renaming:
After renaming:

Example 8: Renaming Folders
Renaming any folder is also quite easy using the mv command. It is almost the same as renaming a file. The general syntax is as follows:
mv folder FOLDERYou can follow the steps below to try this out:
- Navigate to the directory where the folder is. In this case, let’s say you want to navigate inside the LinuxSimply folder and rename the Novels Folder. Type the following command.
cd Desktop/LinuxSimply - You can view the folders and files inside this directory using the ls command:
ls -l - Now, you need to type the following command and hit the ENTER button:
mv Novels Popular_NovelsNote: Use a relative path in the same directory for renaming while keeping the folder in the same parent folder.Here you’ll find that the Novels folder is renamed the Popular_Novels folder.
Before renaming:

After renaming:


Conclusion
In this article, you’ve learned about many different features and uses of the mv command with 8 practical examples. There are many options available for this command and you may find them difficult. Don’t worry, you’re not the only one. Just come back here to review or bookmark this page. Practice all these examples and I’m sure you’ll be using them like a professional in no time.
People Also Ask
What is the mv command in Linux?
The mv command in Linux moves files or even directories to another destination directory. In addition, it renames a specified file or directory. It is a basic and necessary tool that every Linux user should know about. When moving the file or folder to a new location, the base name is retained. On the other hand, if you are moving a file or folder with the same directory, the mv command smartly renames the file or folder.
Can I move multiple files at once using the Linux mv command?
Yes, you can. To move multiple files at once using the mv command, open the terminal and use the mv command with the syntactical format mv SOURCE1 SOURCE2 SOURCE3 DESTINATION. This will move the 3 sources to the DESTINATION.
What happens if I move a file to a directory where a file already exists with the same name?
If you move a file to a directory where a file already exists with the same name, the previous file will be overwritten without warning. Thus, it’s essential to check the destination to avoid accidental file loss. To do so, you can use the -i flag with the mv command to get a prompt for confirmation before the moving operation takes place in such situations.
How to rename a file using the mv command in Linux?
To rename a file using the mv command in Linux, open the terminal and use the syntax mv old_file_name new_file_name. This will rename the “old_file_name” to “new_file_name”. For instance, if you have a file named “hello.txt” and you want to rename it as “bye.txt”, then run the command mv hello.txt bye.txt.
Can I move an entire directory using the Linux mv command?
Absolutely. Just run the mv command in the terminal followed by the source directory and the destination directory afterward. The syntax is mv source_dir /path/to/destination_dir.
Is it possible to view the mv command output on the screen?
Yes. Use the mv command with the -v option which stands for “verbose”. The “-v” option displays detailed information about the action the “mv” command performs. This is useful to verify if the “mv” command has executed as expected. For instance, if you run the command mv -v file1.txt to file2.txt then, the file1.txt will be renamed to file2.txt and the screen will also display the details of the operation in the format: renamed ‘file1.txt’ -> ‘file2.txt
Similar Readings
- The “chgrp” Command in Linux [7 Practical Examples]
- The “file” Command in Linux [9+ Practical Examples]
- The “fsck” Command in Linux [7 Practical Examples]
- The “patch” Command in Linux [4 Practical Examples]
- The “rmdir” Command in Linux [7 Practical Examples]
- The “stat” Command in Linux [9 Practical Examples]
FUNDAMENTALS A Complete Guide for Beginners


