As a multi-user system, there can be lots of users in Linux. And a group is a collection of users in Linux that helps to manage those multiple users with the same security and privileges. Moreover, One user can be part of multiple groups. The groups command in Linux allows users to see which groups they and other users belong to. In this article, I will describe all the features and uses of the groups command in Linux with multiple examples.
A. Description
The groups command in Linux is not a frequently used command. But it is helpful to know the groups to which a user belongs. Users with similar security and access rights can be easily managed through groups. Using the groups command, you can print information about running user groups as well as information about other users.
B. Syntax
The syntax of the groups command in Linux is very simple and is as below:
groups [OPTION]... [USERNAME]...C. Options
There are a few options available for the groups command. I have listed a few of them below. However, You can learn more about the groups command, its options and their uses by checking the man page.
man groupsUseful Options
- –help: Offers a brief description of the groupscommand and links to resources that are related.
- –version: provides the version details of the groups.
Practical Examples of the “groups” Command in Linux
In Linux, the groups command is a helpful tool. In the section below, I will show you some of the most useful applications for the groups command in Linux.
Example 1: Check the Current User’s Belonging Group With the “groups” Command In Linux
The groups to which the current user belongs can be checked with the groups command. Here, I will provide an example of the groups command, which displays the groups that the current user belongs to. To do so, you can follow the steps below:
Steps to Follow >
➊ At first, open the Ubuntu Terminal.
➋ Type the following command into the command prompt:
groups➌ Now, press the ENTER button.
Output >
When you use the command groups, you will get the list of groups that the current user belongs to. The result is as below.
Similar Readings
- The “time” Command in Linux [4 Practical Examples]
- The “tty” Command in Linux [4 Practical Examples]
- The “uptime” Command in Linux [5 Practical Examples]
- The “vmstat” Command in Linux [6 Practical Examples]
- The “uname” Command in Linux [11 Practical Examples]
- The “apt-get” Command in Linux [10 Practical Examples]
Example 2: Check Other User’s Belonging Group With the “groups” Command In Linux
The groups to which another user belongs can be checked with the groups command. Here, I will displays the groups that the user named “kakon” belongs to using the groups command in Linux.. To do so, you can follow the steps below.
Steps to Follow >
➊ At first, open the Ubuntu Terminal.
➋ Type the following command into the command prompt:
groups kakon➌ Now, press the ENTER button.
Output >
In the following image, you can see the list of groups that the user kakon belongs to.
Example 3: Check the Belonging Groups of Multiple Users at a Time
The groups command allows you to check which groups users belong to. Here, I will use the groups command to show the groups of multiple users. To do so, you can follow the steps below:
Steps to Follow >
➊ At first open the Ubuntu Terminal.
➋ Type the following command into the command prompt:
groups kakon amdadul➌ Now, press the ENTER button.
Output >
In the picture below, you can see the groups of users kakon and amdadul. The groups that a user belongs to are shown followed by the user_name_: in the terminal.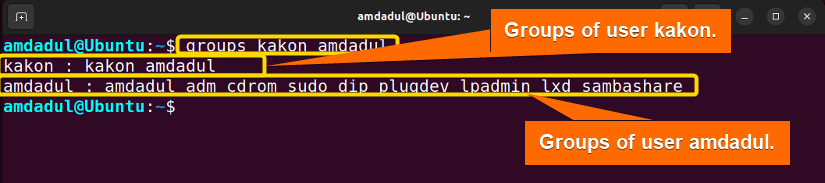
Similar Readings
- The “free” Command in Linux [8 Practical Examples]
- The “getent” Command in Linux [11 Practical Examples]
- The “groupadd” Command in Linux [7 Practical Examples]
- The “addgroup” Command in Linux [7 Practical Examples]
- The “passwd” Command in Linux [7 Practical Examples]
- The “firewall-cmd” Command in Linux [7 Practical Examples]
Example 4: List the Existing Groups in Your System
Here, I will show you an example of the groups command to show the groups that exist in your system. You can see the existing group list of your system by following the steps below.
Steps to Follow >
➊ At first open the Ubuntu Terminal.
➋ Type the following command into the command prompt:
cat /etc/groupOR,
getent group➌ Now, press the ENTER button.
Output >
After executing the commands above, you will get a list of groups as below.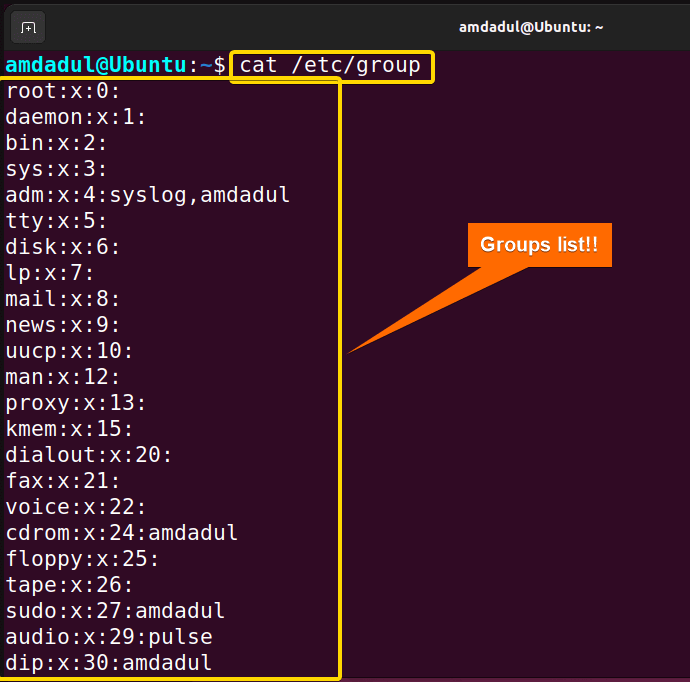 The result for the command getent group is exactly the same.
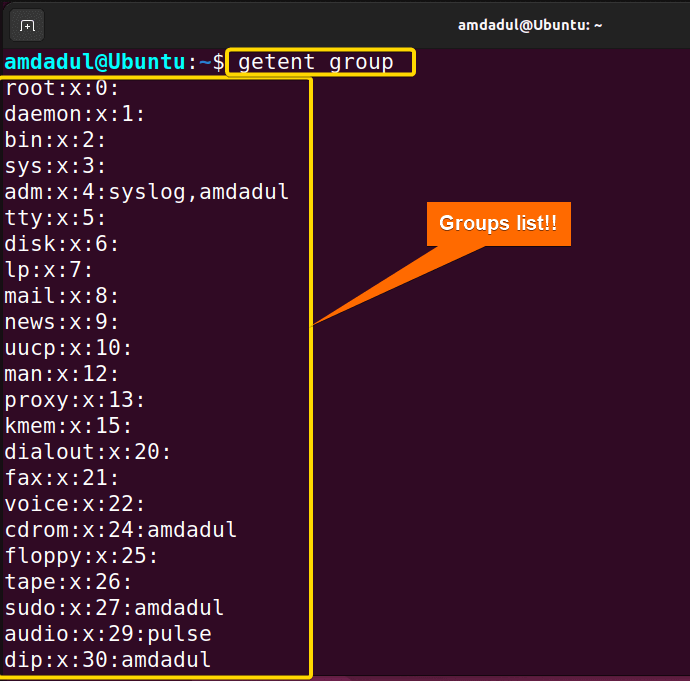 You can look for a specific group by typing the command getent group followed by its name. Then, you will get the result as below.
getent group kakon
Similar Readings
- The “groupmod” Command in Linux [5+ Practical Examples]
- The “id” Command in Linux [7+ Practical Examples]
- The “service” Command in Linux [6 Practical Examples]
- The “sestatus” Command in Linux [4 Practical Examples]
- The “shutdown” Command in Linux [7 Practical Examples]
- The “finger” Command in Linux [6 Practical Examples]
Example 5: Getting Help Information About the “groups” Command in Linux
In this example, I will show you the helping instruction for the groups command. Follow the steps below to get a brief description and helpful link for the groups command.
Steps to Follow >
➊ At first open the Ubuntu Terminal.
➋ Type the following command into the command prompt:
groups --help➌ Now, press the ENTER button.
Output >
After executing the command, you will get the help instruction in the terminal.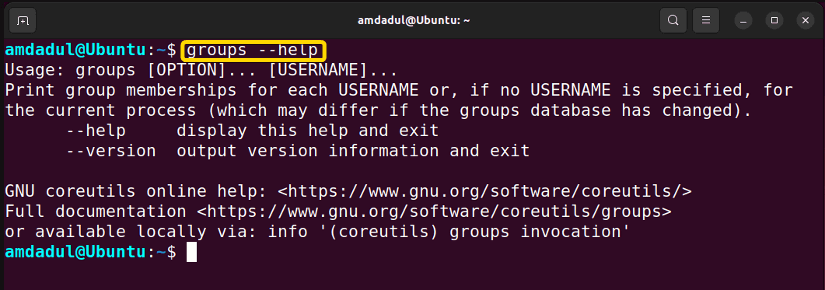
Similar Readings
- The “dmesg” Command in Linux [7+ Practical Examples]
- The “install” Command in Linux [6+ Practical Examples]
- The “reboot” Command in Linux [3 Practical Examples]
- The “sync” Command in Linux [8 Practical Examples]
- The “chage” Command in Linux [7 Practical Examples]
- The “env ” Command in Linux [9 Practical Examples]
Example 6: Checking the Version of the “groups” Command in Linux
You will be able to check the version of the groups command using the groups –version command. In this section, I will show you the version of the groups command. You can get the same result by following the steps below.
Steps to Follow >
➊ At first open the Ubuntu Terminal.
➋ Type the following command into the command prompt:
groups --version➌ Now, press the ENTER button.
Output >
After running the command above, you will receive the version of the groups command as well as a relative description of the groups command.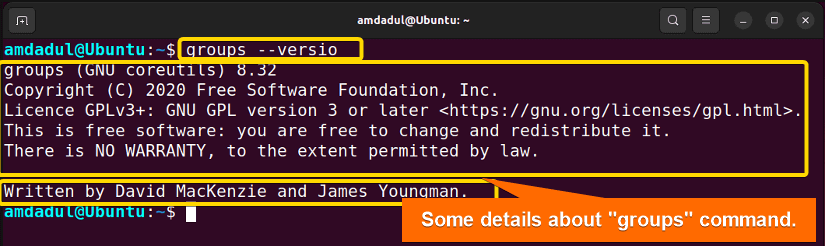
Conclusion
In this article, I’ve shown the operation of the groups command. I’ve also provided some relevant examples. You should be able to use the groups command effectively on your own if you properly read this article and follow the above-mentioned guidelines.
Similar Readings
- The “sudo” Command in Linux [8 Practical Examples]
- The “df” Command in Linux [11 Practical Examples]
- The “apt” Command in Linux [13+ Practical Examples]
- The “top” Command in Linux [8 Practical Examples]
- The “htop” Command in Linux [7 Practical Examples]
- The “enable” Command in Linux [6 Practical Examples]
FUNDAMENTALS A Complete Guide for Beginners


