The finger command is a pretty straightforward command in Linux. It is used to display users’ information on a system in Linux. In this section, you will learn the syntax, options, and practical applications of the command in Linux.
A. Description
The major objective of the finger command is to display the users’ login information on a system in Linux. This command helps to display the idle status of the user. It can also be used to display the user’s plan and project in Linux. The information provided by the finger command may vary depending on the system configuration in Linux.
B. Syntax
The syntax of the finger command in Linux is simple. It includes the finger command, options & username. And the syntax is as shown:
finger [OPTION]... [USERNAME]...C. Options
A few options are available for the finger command. I have mentioned the most used options of the command here. Yet, you can look into the man page for the finger command to know more about its options.
man fingerUseful Options
- -p, Shows information except for the user’s plan or project.
- -s, Displays idle status with login information.
- -m, Prevents matching of user names.
How to Install the “finger” command in Linux
It is really easy to install the finger command in Linux. To install the finger command follow the steps below:
Steps to Follow >
➊ Just like the image below, open up the Ubuntu Terminal.
➋ Copy the following command in the command prompt:
sudo apt-get install finger➌ Then, press the ENTER key.
❹ As you can see in the image, you need to type the password of your user account in the command prompt.
➎ After, tap the ENTER button.
After processing a little bit, your finger command will be ready to use in Linux.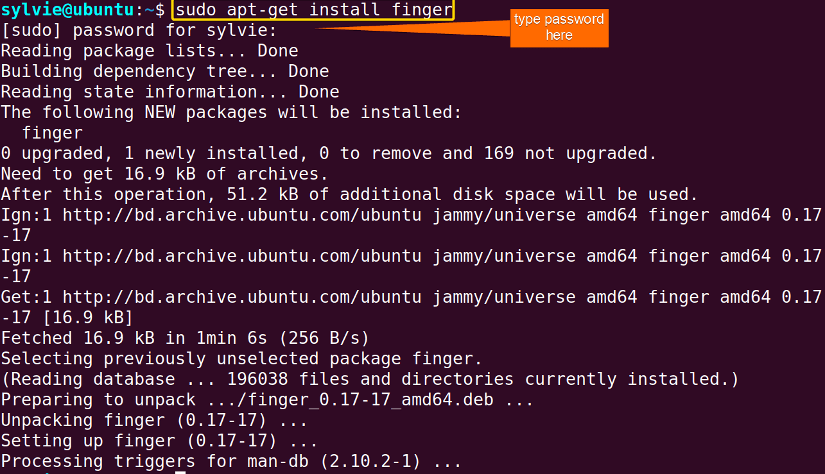
Practical Examples of the “finger” Command in Linux
The finger command in Linux is a user-friendly command which displays users’ login information in the terminal. Here you will get to know some useful examples of the finger command.
Example 1: Display Information About Currently Logged-in User
The finger command displays information about the currently logged-in user in Linux. The device is currently logged in as the user sylvie. To do the same you can follow the procedure below:
Steps to Follow >
➊ Initially open the Ubuntu Terminal.
➋ Now, execute the command below in the command prompt:
finger➌ Then, tap the ENTER button.
Output >
As you can see, the output is displaying the information about the currently logged-in user which is sylvie.
Similar Readings
- The “time” Command in Linux [4 Practical Examples]
- The “tty” Command in Linux [4 Practical Examples]
- The “uptime” Command in Linux [5 Practical Examples]
- The “vmstat” Command in Linux [6 Practical Examples]
- The “uname” Command in Linux [11 Practical Examples]
- The “apt-get” Command in Linux [10 Practical Examples]
Example 2: Display Information About Specific User
The finger command can be used to display information about the specific user in Linux. Here I am specifying the user sylvie. You can also do this by following the process below:
Steps to Follow >
➊ To start launch the Ubuntu Terminal.
➋ Now, run the command below in the command prompt:
finger sylvie➌ Then, hit the ENTER key.
Output >
As you can see in the image below, the output is displaying the information about the user sylvie.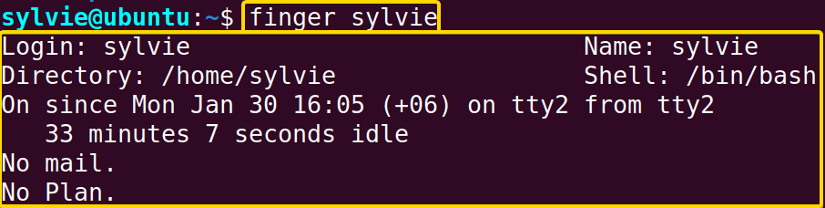
Example 3: Get Idle Status Along With the Login Details of Specific User
To get the idle status along with the login details of the specific user, the finger command can be used in Linux. Here I am specifying the user sylvie. But You can specify any username here. To do the same you can follow the instructions below:
Steps to Follow >
➊ Firstly open the Terminal in Ubuntu.
➋ Type the command below in the command prompt:
finger -s sylvie➌ Finally, strike the ENTER button.
Output >
As you can see in the following image, the output is showing the idle status along with the login details of the user sylvie.
Similar Readings
- The “free” Command in Linux [8 Practical Examples]
- The “getent” Command in Linux [11 Practical Examples]
- The “groupadd” Command in Linux [7 Practical Examples]
- The “addgroup” Command in Linux [7 Practical Examples]
- The “passwd” Command in Linux [7 Practical Examples]
- The “firewall-cmd” Command in Linux [7 Practical Examples]
Example 4: View the User’s Plan With Other Information Using the “finger” command in Linux
You can view the user’s plan with the other information of the specific user using the finger command in Linux. Here I am mentioning the user sylvie to view its plan. To do the same you can follow the procedure below:
Steps to Follow >
➊ At first launch the Terminal in Ubuntu.
➋ For creating a plan, write the command below in the command prompt:
echo "New Plan" > ~/.plan➌ Now, press the ENTER key.
❹ After that, type the command below in the command prompt:
finger sylvie❺ Finally, tap the ENTER button.
Output >
In the following image, you can view the user’s plan along with other information about the user sylvie.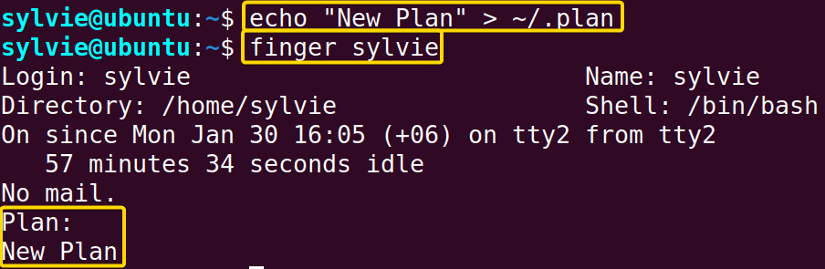
Similar Readings
- The “groupmod” Command in Linux [5+ Practical Examples]
- The “id” Command in Linux [7+ Practical Examples]
- The “service” Command in Linux [6 Practical Examples]
- The “sestatus” Command in Linux [4 Practical Examples]
- The “shutdown” Command in Linux [7 Practical Examples]
- The “groups” Command in Linux [6 Practical Examples]
Example 5: Show User’s Project With Other Information
Using the finger command in Linux the user’s project can be shown with the other information of the specific user. Here I am specifying the user sylvie to view its project. You can specify any username here. To do the same you can follow the steps below:
Steps to Follow >
➊ Launch the Ubuntu Terminal.
➋ For creating a project, copy the command below in the command prompt:
echo "New Project" > ~/.plan➌ Now, tap the ENTER button.
❹ After that, run the command below in the command prompt:
finger sylvie❺ Finally, hit the ENTER key.
Output >
Finally, in the image below, you can view the user’s project along with other information about the user sylvie.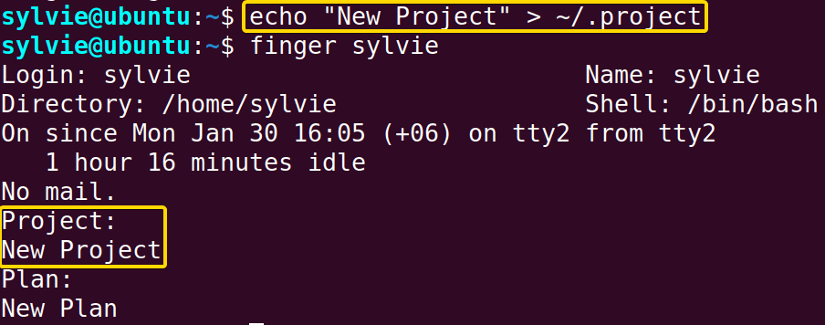
Similar Readings
- The “dmesg” Command in Linux [7+ Practical Examples]
- The “install” Command in Linux [6+ Practical Examples]
- The “reboot” Command in Linux [3 Practical Examples]
- The “sync” Command in Linux [8 Practical Examples]
- The “chage” Command in Linux [7 Practical Examples]
- The “env ” Command in Linux [9 Practical Examples]
Example 6: Display Information Except for Plan & Project Using the “finger” command in Linux
For displaying the information of the specific user except for plan & project, the finger command can be used in Linux. Here I am specifying the user sylvie. You can also do this by following the process below:
Steps to Follow >
➊ Open the Terminal in Ubuntu.
➋ Copy the following command in the command prompt:
finger -p sylvie➌ After that, press the ENTER button.
Output >
Finally, in the image, the output does not show the plan & project of the user sylvie.
Conclusion
As you’ve seen in this section, the finger command holds important functions in Linux. You’ve also got to know the syntax, some functional options, and the practical applications of this command. To excel in Linux, regularly exercise command usage and its applications.
Similar Readings
- The “sudo” Command in Linux [8 Practical Examples]
- The “df” Command in Linux [11 Practical Examples]
- The “apt” Command in Linux [13+ Practical Examples]
- The “top” Command in Linux [8 Practical Examples]
- The “htop” Command in Linux [7 Practical Examples]
- The “enable” Command in Linux [6 Practical Examples]
FUNDAMENTALS A Complete Guide for Beginners


