Groups in Linux are used to assign common privileges and permissions to multiple users rather than managing them at the individual user level. The groupadd command in Linux allows administrators to create new user groups in order to manage privileges and permissions for multiple users more easily. In this article, I will describe all the features and uses of the groupadd command in Linux with multiple examples.
A. Description
The groupadd command in Linux is a useful tool that helps to create several groups with one or more users to maintain their permissions and privileges in a more efficient way. This command helps to avoid the time-consuming task of setting permissions and privileges for each user individually, which can also be prone to errors.
B. Syntax
The syntax of the groupadd command in Linux is pretty simple, as shown below.
groupadd [OPTION]... GROUP_NAMENote: In the syntax above, the OPTION enclosed by the square bracket means it is not mandatory and three dots after the square bracket mean multiple OPTIONS can be used after the groupadd command.
C. Options
There are numerous options available for the groupadd command. I have listed a few of them. You can learn more about the groupadd command, its options and their uses by checking the man page.
man groupadd
Useful Options
- -f, –force: Exits with success status if the specified group already exists, and turns off -g if specified GIDalready exists.
- -g, –gid GID: Specifies the numerical value of the group’s ID, which must be unique unless -o is used and must be non-negative.
- -h, –help: Displays help message.
- -K, –key KEY=VALUE: Overrides /etc/login.defs defaults with specified KEY and VALUE, multiple -K options can be used.
- -o, –non-unique: Allows adding a group with a non-unique GID.
- -p, –password PASSWORD: Sets an encrypted password for the group, default is to disable the password.
- -r, –system: creates a system group.
- -R, –root CHROOT_DIR: This option is used to specify a different root directory than the default root directory.
- -P, –prefix PREFIX_DIR: This option specifies a different prefix than the default prefix to use when creating a new group.
Practical Examples of the “groupadd” Command in Linux
In Linux, the groupadd command is a helpful tool to create new groups that are useful for maintaining a large number of users with the same privileges and permissions. In the section below, I will show you some of the most useful applications for the groupadd command in Linux.
Example 1: Adding a New Group With the “groupadd” Command in Linux
The groupadd command in Linux allows you to add a new group to your system by simply running the groupadd command. Here, I will create a new group named “group1” with the groupadd command. You can do the same by following the steps below.
Steps to Follow >
➊ At first, open the Ubuntu Terminal.
➋ Run the command below:
sudo groupadd group1➌ Now, press the ENTER button.
➍ Type your Password.
➎ Press ENTER again.
➏ Now, type the following command into the command prompt:
getent group group1➐ Tap the ENTER button.
Output >
In the following image, you can see that I have created a new group named group1 with the groupadd command.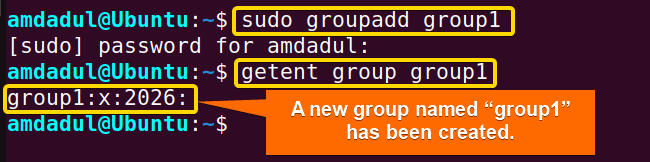
Similar Readings
- The “time” Command in Linux [4 Practical Examples]
- The “tty” Command in Linux [4 Practical Examples]
- The “uptime” Command in Linux [5 Practical Examples]
- The “vmstat” Command in Linux [6 Practical Examples]
- The “uname” Command in Linux [11 Practical Examples]
- The “apt-get” Command in Linux [10 Practical Examples]
Example 2: Create a Group With a Specific GID With the “groupadd” Command in Linux
You can create a new group with a specific GID by running the groupadd command with the option -g or –gid. Here, I will create a new group called “group2“ by giving it the GID “2023” with the groupadd command. You can do the same by following the steps below.
Steps to Follow >
➊ Open the Ubuntu Terminal first.
➋ Type the following command into the command prompt:
sudo groupadd -g 2023 group2OR,
sudo groupadd --gid 2023 group2➌ Tap the ENTER button.
➍ Type your Password.
➎ Press ENTER again.
➏ You can check the GID by typing the following command.
getent group group2➐ Now, Hit the ENTER key.
Output >
In the image below, you can see that I have created group2 with the GID “2023”.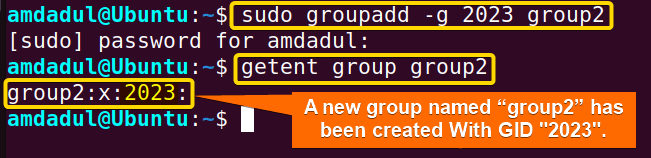
Example 3: Specify a Custom GID Range for New Groups Instead of Using the Default Values
The groupadd command in Linux allows you to add a new group to your system within a specified range of GID values by running the groupadd command followed by the option -K or –key. The -K or –key option followed by KEY=VAL (here, the KEY may be GID_MIN, GID_MAX and others) allows you to override the default values specified in the /etc/login.defs file. Here, I will create a new group named “group3” within a specified range of GID 5000–7000 with the groupadd command. You can do the same by following the steps below.
Steps to Follow >
➊ At first, open the Ubuntu Terminal.
➋ Type the following command into the command prompt:
sudo groupadd -K GID_MIN=5000 -K GID_MAX=7000 group3OR,
sudo groupadd --key GID_MIN=5000 --key GID_MAX=7000 group3➌ Hit the ENTER key.
➍ Type your Password.
➎ Press ENTER again.
➏Type the following command into the command prompt:
getent group group3➐ Tap ENTER key.
Output >
In the following image, you can see that I have created a new group named group3 with the groupadd command within the range of GID (5000-7000).
Similar Readings
- The “free” Command in Linux [8 Practical Examples]
- The “getent” Command in Linux [11 Practical Examples]
- The “passwd” Command in Linux [7 Practical Examples]
- The “addgroup” Command in Linux [7 Practical Examples]
- The “groups” Command in Linux [6 Practical Examples]
- The “firewall-cmd” Command in Linux [7 Practical Examples]
Example 4: Create a New Group With a Non-Unique GID With the “groupadd” Command
The group ID needs to be an individual, non-negative number. However, you can create groups with duplicate (non-unique) group IDs by using the -o or –non-unique option. Here, I will create a new group called “group4“ with the same GID of “group2” using the groupadd command. You can do the same by following the steps below.
Steps to Follow >
➊ Open the Ubuntu Terminal first.
➋ Type the following command into the command prompt:
getent group group2➌ Press the ENTER button.
In the following image, you can see that the group named group2 has a GID 2023. ➍ Now, enter the following command into the command prompt:
sudo groupadd -o -g 2023 group4OR,
sudo groupadd --non-unique -g 2023 group4➎ Type your Password.
➏ Press ENTER again.
➐ You can check the GID by typing the following command.
getent group group2 group4➑ Hit the ENTER button.
Output >
In the image below, you can see that I have created group4 with the same GID as group2.
Example 5: Create a New Group With a Name That is Already in Use by an Existing Group
The group name needs to be Unique. However, you can create groups with duplicate (non-unique) group names by using the option -f or –force. Here, I will create a new group called “group4“, which already exists and has GID 2023. You can do the same by following the steps below.
Steps to Follow >
➊ Open the Ubuntu Terminal first.
➋ Type the following command into the command prompt:
sudo groupadd group4➌ Press the ENTER button.
➍ Type your Password.
➎ Hit ENTER key again.
As shown in the image below, you will be informed that group4 already exists.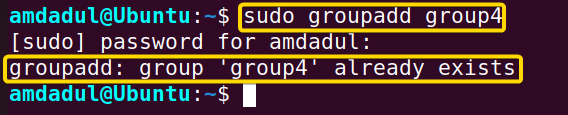 ➏ You can check the groups existence group4 by typing the following command.
getent group group4➐ Tap the ENTER button.
➑ Now, enter the following command into the command prompt to create group4 forcefully.
sudo groupadd -f group4OR,
sudo groupadd --force group4➒ Press ENTER again.
Output >
You can see in the image below that I have created a group with the name “group4” which already exists as an existing group name.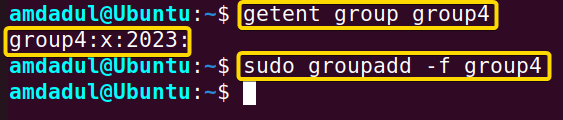
Similar Readings
- The “groupmod” Command in Linux [5+ Practical Examples]
- The “id” Command in Linux [7+ Practical Examples]
- The “service” Command in Linux [6 Practical Examples]
- The “sestatus” Command in Linux [4 Practical Examples]
- The “shutdown” Command in Linux [7 Practical Examples]
- The “finger” Command in Linux [6 Practical Examples]
Example 6: Create a System Group With the “groupadd” Command
You can create a system group using the groupadd command with the option -r or –system. Here, I will create a new system group called “sgroup“ with the groupadd command. You can do the same by following the steps below.
Steps to Follow >
➊ At first,open the Ubuntu Terminal.
➋ Run the following command:
sudo groupadd -r sgroupOR,
sudo groupadd --system sgroup➌ Now, press the ENTER button.
➍ Type your Password.
➎ Hit ENTER.
➏ You can check the GID by typing the following command.
getent group sgroup➐ Press ENTER button.
Output >
In the image below, you can see that I have created a system group named “sgroup”.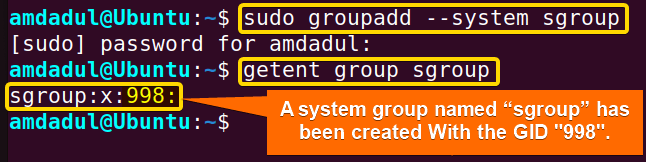
Similar Readings
- The “dmesg” Command in Linux [7+ Practical Examples]
- The “install” Command in Linux [6+ Practical Examples]
- The “reboot” Command in Linux [3 Practical Examples]
- The “sync” Command in Linux [8 Practical Examples]
- The “chage” Command in Linux [7 Practical Examples]
- The “env ” Command in Linux [9 Practical Examples]
Example 7: Use an Encrypted Password for The New Group
At the time of creating a group, you may set a password by using the groupadd command followed by the option -p or –password. Here, I will set a password for a new group called “group7“. You can do the same by following the steps below.
Steps to Follow >
➊ First, open the Ubuntu Terminal.
➋ Type the following command into the command prompt:
sudo groupadd -p abcdef123 group7OR,
sudo groupadd --password abcdef123 group7➌ Now, press the ENTER button.
➍ Type your Password.
➎ Tap ENTER again.
Now type the following command into the command prompt:
sudo grep group7 /etc/gshadow➐ Press ENTER key.
Output >
You can see that I have created a new group named “group7” along with setting its password.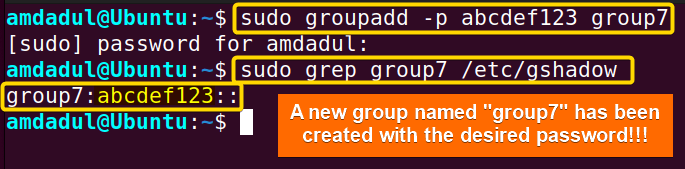
Conclusion
In this article, I’ve provided some relevant examples of the groupadd command in Linux, which will help you on your journey to becoming a power user at the Linux command line. By properly reading through the article and following the guidelines, you should be able to use the groupadd command to manage groups on your Linux system.
Similar Readings
- The “sudo” Command in Linux [8 Practical Examples]
- The “df” Command in Linux [11 Practical Examples]
- The “apt” Command in Linux [13+ Practical Examples]
- The “top” Command in Linux [8 Practical Examples]
- The “htop” Command in Linux [7 Practical Examples]
- The “enable” Command in Linux [6 Practical Examples]
FUNDAMENTALS A Complete Guide for Beginners


