The firewall-cmd command in Linux is a useful tool to manage the firewall in an easy and effective way. In this article, I will describe all the features of the firewall-cmd command and how to use it to configure firewall rules and zones on a Linux system.
A. Description
The firewall-cmd is a powerful firewall management tool that provides a command-line interface for configuring and managing the firewall on a Linux system. It is part of the firewall software package, which is a built-in firewall solution for Linux systems. firewall-cmd is capable of managing the firewall in a simple and effective way and allows users to configure firewall rules and zones in an easy-to-use interface.
B. Syntax
The syntax of the firewall-cmd command in Linux is simple, as shown below.
firewall-cmd [OPTION]...C. Options
The firewall-cmd command has multiple options available. Here, I have listed a few of them. However, you can learn more about the firewall-cmd command, its options and their uses by checking the man page.
man firewall-cmdUseful Options
- –permanent: Makes the change permanent.
- –zone=zone: Specifies the firewall zone to which the command applies.
- –add-port=port/protocol: Adds a port or port range to the firewall.
- –remove-port=port/protocol: Removes a port or port range from the firewall.
- –list-all: Shows the current firewall configuration, including all zones and their associated rules.
- –reload: Reloads the firewall.
- –state: Shows the state of the firewall (running or not running).
- -h, –help: Displays the help page.
- -V, –version: Displays version information.
Installing the “firewall-cmd” Command in Linux
The firewall-cmd command is typically pre-installed on most Linux distributions. If it is not already installed on your system, you can easily install it using the package manager for your distribution. You can find out whether you have it on your machine or not by typing anyone of the following commands.
firewall-cmd --versionOR,
firewall-cmd versionYour system will print out the version of the firewall-cmd command if it is already installed. Otherwise, you will see the message as in the image below. Don’t worry! You can install the firewall-cmd command on your machine within a minute by following the instructions given below.
Steps to Follow >
➊ At first, open the Ubuntu Terminal.
➋ Type the following in your command prompt:
sudo apt-get install firewalldOR,
sudo apt install firewalld➌ Tap the ENTER key.
➍ Input your password.
➎ Finally, press ENTER.
Output >
Upon completion of these steps, the firewall-cmd command will be installed on your machine.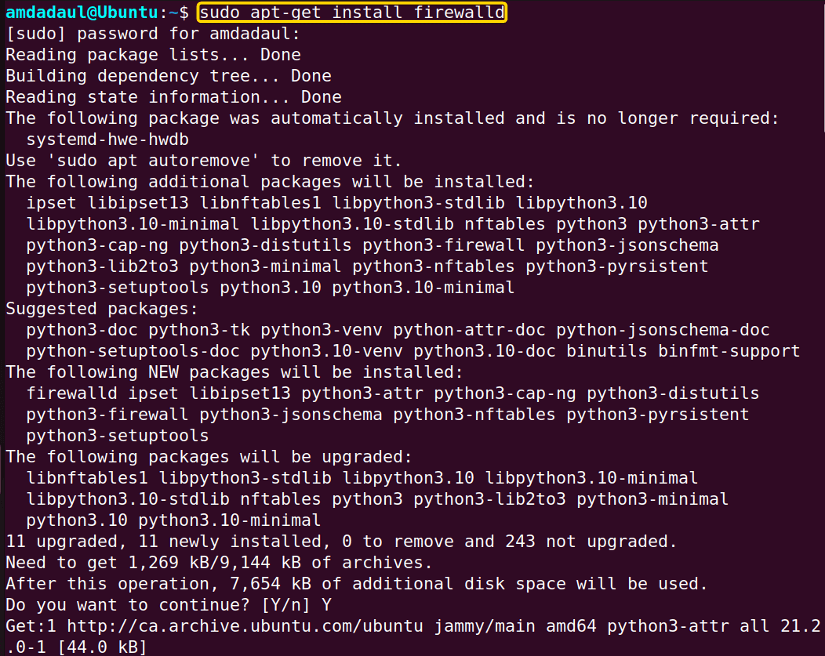
Practical Examples of the “firewall-cmd” Command in Linux
In Linux, the firewall-cmd command is a helpful tool to manage the firewall configuration. In the section below, I will show you some of the most useful applications for the firewall-cmd command in Linux.
Example 1: Add Port With the “firewall-cmd” Command in Linux
You can add a port to the firewall by using the firewall-cmd command followed by the –add-port option. Here, I will add a new port “460” to the firewall. You can do the same by following the steps below.
Steps to Follow >
➊ At first, open the Ubuntu Terminal.
➋ Next, execute the command to add port “460” to the firewall.
sudo firewall-cmd --add-port=460/tcp➌ Tap the ENTER key.
➍ Input your Password.
➎ Press ENTER key again.
Output >
In the following image, you can see that I have successfully added a new port to the firewall.
Similar Readings
- The “time” Command in Linux [4 Practical Examples]
- The “tty” Command in Linux [4 Practical Examples]
- The “uptime” Command in Linux [5 Practical Examples]
- The “vmstat” Command in Linux [6 Practical Examples]
- The “uname” Command in Linux [11 Practical Examples]
- The “apt-get” Command in Linux [10 Practical Examples]
Example 2: List Available Ports With the “firewall-cmd” Command in Linux
The firewall-cmd command allows you to see the list of ports in your Linux system. You can follow the below process to see the ports list.
Steps to Follow >
➊ First, open the Ubuntu Terminal.
➋ Then, run the below command to see the list of ports in your Linux system.
sudo firewall-cmd --list-ports➌ Next, press the ENTER key.
➍ Provide your Password.
➎ Lastly, press the ENTER button.
Output >
In the image below, you can see that I have displayed the lists of ports in my system.
Example 3: Remove a Port With the “firewall-cmd” Command in Linux
You can remove any existing port using the firewall-cmd command. In this example, I will remove the port “3400”. You can do the same by following the steps below.
Steps to Follow >
➊ Launch the Ubuntu Terminal first.
➋ Then, type the following command into the command prompt:
sudo firewall-cmd --list-ports➌ Press the ENTER button.
➍ Type your Password.
➎ Press ENTER again.
➏ Now, run the following command to remove port “3400”.
sudo firewall-cmd --remove-port=3400/tcp➐ Then, press the ENTER key.
➑ Run the following to ensure the removal of the port.
sudo firewall-cmd --list-ports➒ Finally, tap the ENTER key.
Output >
In the image below, you can see that I have removed port “3400”.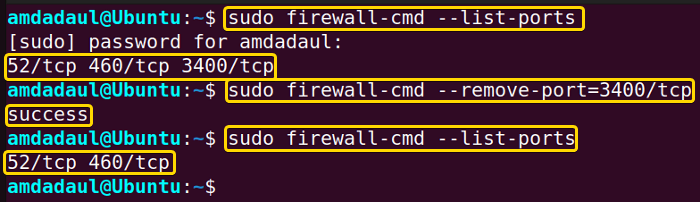
Similar Readings
- The “free” Command in Linux [8 Practical Examples]
- The “getent” Command in Linux [11 Practical Examples]
- The “groupadd” Command in Linux [7 Practical Examples]
- The “addgroup” Command in Linux [7 Practical Examples]
- The “groups” Command in Linux [6 Practical Examples]
- The “passwd” Command in Linux [7 Practical Examples]
Example 4: Forwarding a Port Using The “firewall-cmd” Command in Linux
Port forwarding with firewall-cmd allows you to redirect network traffic from one network port to another network port on a local or remote machine. To redirect traffic of any network port the following syntax can be used.
sudo firewall-cmd --zone=public --add-forward-port=port=INCOMING_PORT:proto=tcp:toport=DESTINATION_PORT --permanentHere, I will redirect the traffic from port 52 to port 460. To configure port forwarding with firewall-cmd, you can follow the steps given below.
Steps to follow >
➊ Open the Ubuntu Terminal first.
➋ Type the following command into the command prompt.
sudo firewall-cmd --zone=public --add-forward-port=port=52:proto=tcp:toport=460 --permanent➌ Tap the ENTER button.
➍ Type your Password.
➎ Hit ENTER again.
➏ To reloads the firewall configuration run the below command.
sudo firewall-cmd --reload➐ Now, press ENTER key.
Output >
You can see in the image below that I have forwarded the traffic of port 52 to port 460.
Example 5: List All Rules With the “firewall-cmd” Command in Linux
You can get the list of rules by running the firewall-cmd commands with the option –list-all. In this example, I will show you the list of rules in my machine’s firewall. You can get the same result on your machine by following the steps mentioned below.
Steps to Follow >
➊ First, open the Ubuntu Terminal.
➋ Next, run the command to see the list of rules in the firewall.
sudo firewall-cmd --list-all➌ Finally, tap the ENTER button.
➍ Input your Password.
➎ Tap ENTER again.
Output >
As you can see in the image below, I have displayed the list of rules in the firewall.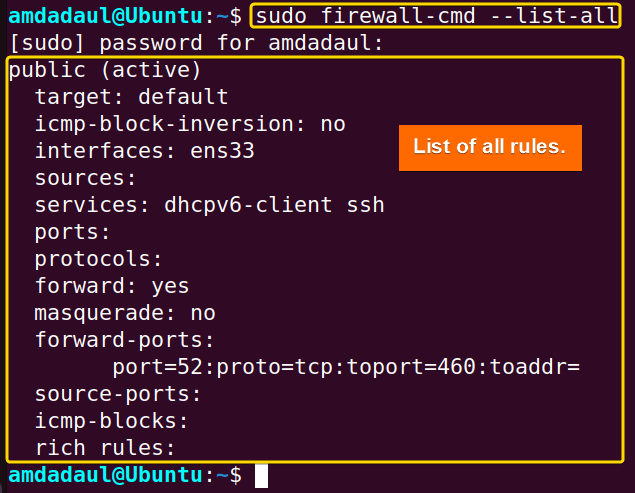
Similar Readings
- The “groupmod” Command in Linux [5+ Practical Examples]
- The “id” Command in Linux [7+ Practical Examples]
- The “service” Command in Linux [6 Practical Examples]
- The “sestatus” Command in Linux [4 Practical Examples]
- The “shutdown” Command in Linux [7 Practical Examples]
- The “finger” Command in Linux [6 Practical Examples]
Example 6: List All the Available Zones in Firewalld
You can get the list of all zones by running the firewall-cmd commands with the option –list-all-zones. In this example, I will show you the list of all zones in my machine. You can do the same by following the steps below.
Steps to Follow >
➊ At first, open the Ubuntu Terminal.
➋ Then, type the following command into the command prompt:
sudo firewall-cmd --list-all-zones➌ Now, press the ENTER button.
➍ Type your Password.
➎ Then, press ENTER again.
Output >
In the image below, you can see the list of all available zones in the firewall.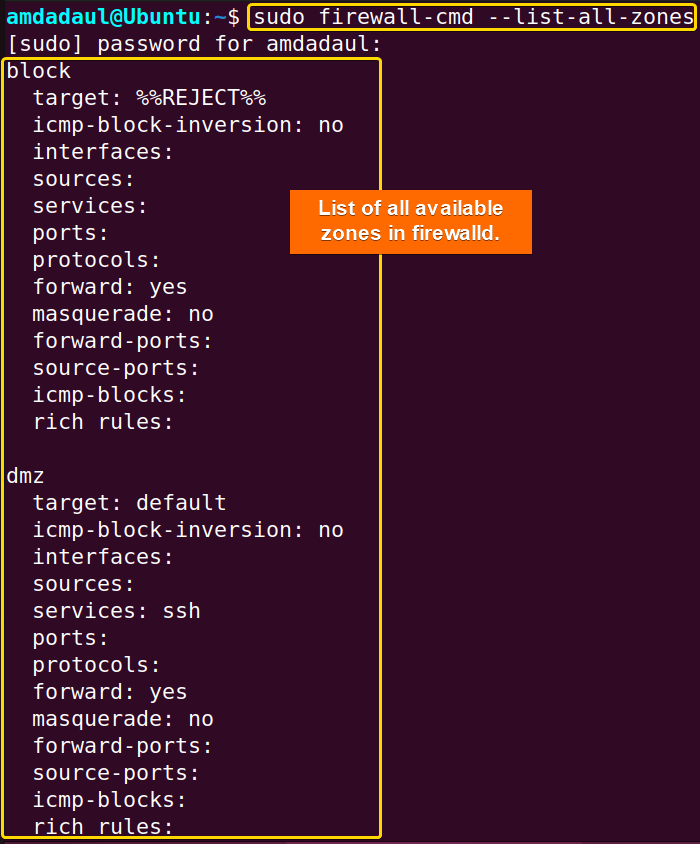
Similar Readings
- The “dmesg” Command in Linux [7+ Practical Examples]
- The “install” Command in Linux [6+ Practical Examples]
- The “reboot” Command in Linux [3 Practical Examples]
- The “sync” Command in Linux [8 Practical Examples]
- The “chage” Command in Linux [7 Practical Examples]
- The “env ” Command in Linux [9 Practical Examples]
Example 7: Allow a Specific IP Address to Access a Port
The firewall-cmd command allows you to give access to a port for a specific IP address. The following syntax is used for this purpose
sudo firewall-cmd --permanent --zone=FIREWALL_ZONE --add-rich-rule 'rule family="ipv4/ipv6" source address="IP_ADDRESS" port port=PORT_NUMBER protocol=tcp accept'Here, I will allow the “192.168.0.100” IP address to use port 450. You can do the same for any IP address by following the steps below.
Steps to follow >
➊ Open the Ubuntu Terminal first.
➋ Type the following command into the command prompt.
sudo firewall-cmd --permanent --zone=public --add-rich-rule 'rule family="ipv4" source address="192.168.0.100" port port=3306 protocol=tcp accept'➌ Tap the ENTER button.
➍ Type your Password.
➎ Hit ENTER again.
➏ To reloads the firewall configuration run the following command.
sudo firewall-cmd --reload➐ Now, press ENTER key.
Output >
You can see in the image below that I have given permission to the IP address 100.125.0.112 to use port 450.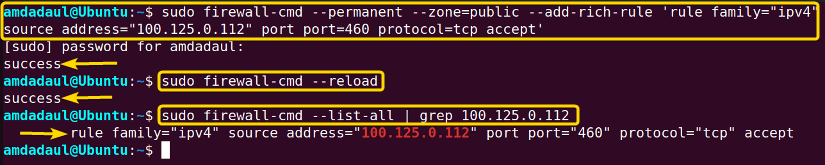
Conclusion
The firewall-cmd is a versatile and effective firewall management tool that can be used to easily configure and manage firewall rules and zones on a Linux system. Whether you are a beginner or an experienced user, firewall-cmd will provide a user-friendly interface that will make it easy for you to manage your firewall. In addition, if you are looking to secure your system against unwanted access or to restrict network access to specific applications, firewall-cmd is a great choice. By understanding the basics of firewall-cmd, you can take full advantage of the power and flexibility of this tool to secure your Linux system against potential threats.
Similar Readings
- The “sudo” Command in Linux [8 Practical Examples]
- The “df” Command in Linux [11 Practical Examples]
- The “apt” Command in Linux [13+ Practical Examples]
- The “top” Command in Linux [8 Practical Examples]
- The “htop” Command in Linux [7 Practical Examples]
- The “enable” Command in Linux [6 Practical Examples]
FUNDAMENTALS A Complete Guide for Beginners


