In Linux, groups are used to distribute common permissions and privileges to a number of users and manage them at the user level. In order to more easily manage privileges and permissions for numerous users, administrators can create new user groups in Linux by using the addgroup command.In this article, I will describe all the features and uses of the addgroup command in Linux with multiple examples.
A. Description
The addgroup command is a tool used in Linux to create a new group on the current machine. It allows you to customize the group’s settings and manage privileges and permissions. It is similar to the groupadd command but more interactive than that.
B. Syntax
The syntax of the addgroup command in Linux is pretty simple, as shown below.
addgroup [OPTION]... GROUP_NAMEC. Options
There are numerous options available for the addgroup command. Here, I have listed some of them. However, You can learn more about the addgroup command, its options and their uses by checking the man page.
man addgroupUseful Options
- –debug: Enable debugging mode.
- –force-badname: Allows you to create a group with a name that does not match the system’s naming conventions.
- –gid GID:Specifies the numerical value of the group’s ID, which must be unique and non-negative
- -h, –help: Displays help message
- –system: Create a system group.
- –version: Show the version and copyright information.
Practical Examples of the “addgroup” Command in Linux
In Linux, the addgroup command is a helpful tool to create new groups and manage multiple users with the same permissions and privileges. In the section below, I will show you some of the most useful applications for the addgroup command in Linux.
Example 1: Add a New Group With the “addgroup” Command in Linux
The addgroup command in Linux allows you to add a new group to your system by simply running the addgroup command. Here, I will create a new group named “group1” with the addgroup command. You can do the same by following the steps below.
Steps to Follow >
➊ At first, open the Ubuntu Terminal.
➋ Run the command below:
sudo addgroup group1➌ Now, press the ENTER button.
➍ Type your Password.
➎ Press ENTER again.
➏ Now, type the following command into the command prompt:
getent group group1➐ Tap the ENTER button.
Output >
In the following image, you can see that I have created a new group named group1 with GID 1000.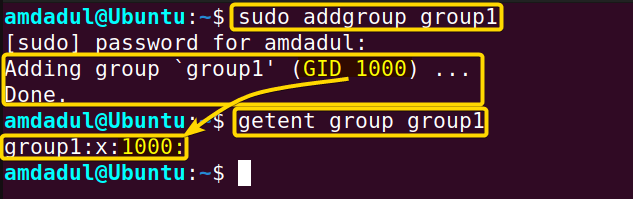
Similar Readings
- The “time” Command in Linux [4 Practical Examples]
- The “tty” Command in Linux [4 Practical Examples]
- The “uptime” Command in Linux [5 Practical Examples]
- The “vmstat” Command in Linux [6 Practical Examples]
- The “uname” Command in Linux [11 Practical Examples]
- The “apt-get” Command in Linux [10 Practical Examples]
Example 2: Create a Group With a Specific GID With the “addgroup” Command in Linux
You can create a new group with a specific GID by running the addgroup command with the option –gid. Here, I’ll use the addgroup command to create a new group called “group2” and assign it the GID “202301.” By using the steps listed below, you can achieve the same results.
Steps to Follow >
➊ Open the Ubuntu Terminal first.
➋ Type the following command into the command prompt
sudo addgroup --gid 202301 group2➌ Tap the ENTER button.
➍ Type your Password.
➎ Press ENTER again.
➏ You can check the GID by typing the following command.
getent group group2➐ Now, Hit the ENTER key
Output >
You can see that I created group2 with the GID “202301” in the image below.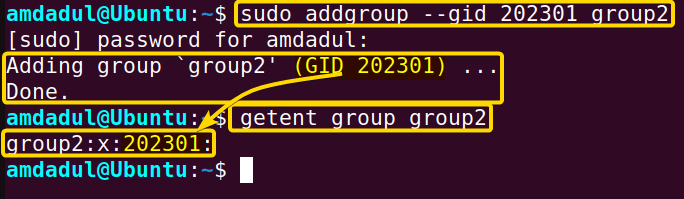
Example 3: Create a Group With a Specific Shell
The addgroup command allows you to specify a login shell for a new group. To do this, you have to add the shell path after the addgroup command, followed by the –shell option. Now, I will create a new group named “group3” under the shell /bin/sh. The procedures listed below can help you achieve this
Steps to Follow >
➊ At first, open the Ubuntu Terminal.
➋ Run the following command:
sudo addgroup group3 --shell /bin/sh➌ At this point, press ENTER.
➍ Enter your password.
➎ Press ENTER again.
Output >
In the following image, you can see that I have created a new group named group3 under the /bin/sh shell.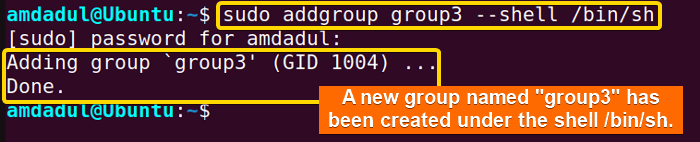
Similar Readings
- The “free” Command in Linux [8 Practical Examples]
- The “getent” Command in Linux [11 Practical Examples]
- The “groupadd” Command in Linux [7 Practical Examples]
- The “passwd” Command in Linux [7 Practical Examples]
- The “groups” Command in Linux [6 Practical Examples]
- The “firewall-cmd” Command in Linux [7 Practical Examples]
Example 4: Create a System Group
You can create a system group using the addgroup command with the option –system. Here, I will create a new system group called “employee“ with the addgroup command. You can do the same by following the steps below.
Steps to Follow >
➊ First, launch the Ubuntu Terminal.
➋ Execute the following command:
sudo addgroup --system employee➌ Now, press the ENTER button.
➍ Type your Password.
➎ Hit ENTER.
➏ You can check the GID by typing the following command.
getent group employee➐ Press ENTER button.
Output >
You can see that I have created a system group called “employee” in the image below.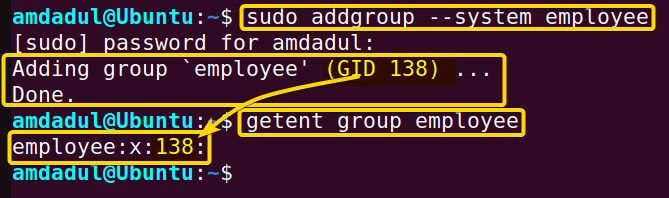
Example 5: Switch to Verbose Mode
The verbose mode signifies that you want to display a lot of processing information on your screen. You can switch to the verbose mode by adding the –debug option after the addgroup command. Now, I will create a group named “group5” in verbose mode and show you the detailed processing information in the terminal. You can do the same by following the steps below.
Steps to Follow >
➊ Launch the Ubuntu Terminal first.
➋ Put the following command into action:
sudo addgroup group5 --debug➌ Now, press the ENTER button.
➍ Type your Password.
➎ Click ENTER.
➏ Run the following command.
getent group group5➐ Press ENTER button.
Output >
The image below shows that I have created a group called “group5” in the verbose mood.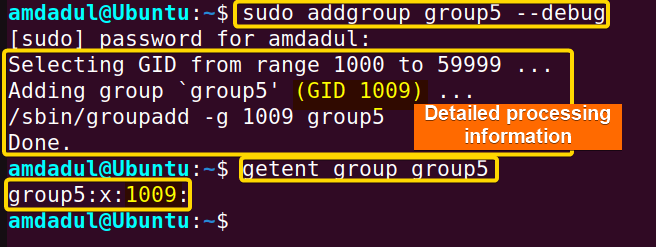
Similar Readings
- The “groupmod” Command in Linux [5+ Practical Examples]
- The “id” Command in Linux [7+ Practical Examples]
- The “service” Command in Linux [6 Practical Examples]
- The “sestatus” Command in Linux [4 Practical Examples]
- The “shutdown” Command in Linux [7 Practical Examples]
- The “finger” Command in Linux [6 Practical Examples]
Example 6: Get Help About the “addgroup” Command in Linux
In Linux, the help page for the addgroup command contains a brief description of the command. You can see the help page by following the steps that I mentioned below.
Steps to Follow >
➊ At first, open the Ubuntu Terminal.
➋ Type the following command into the command prompt:
sudo addgroup --help➌ Now, press the ENTER button.
➍ Enter your password.
➎ Tap the ENTER key again.
Output >
In the image below, you can see the help page for the addgroup command in Linux.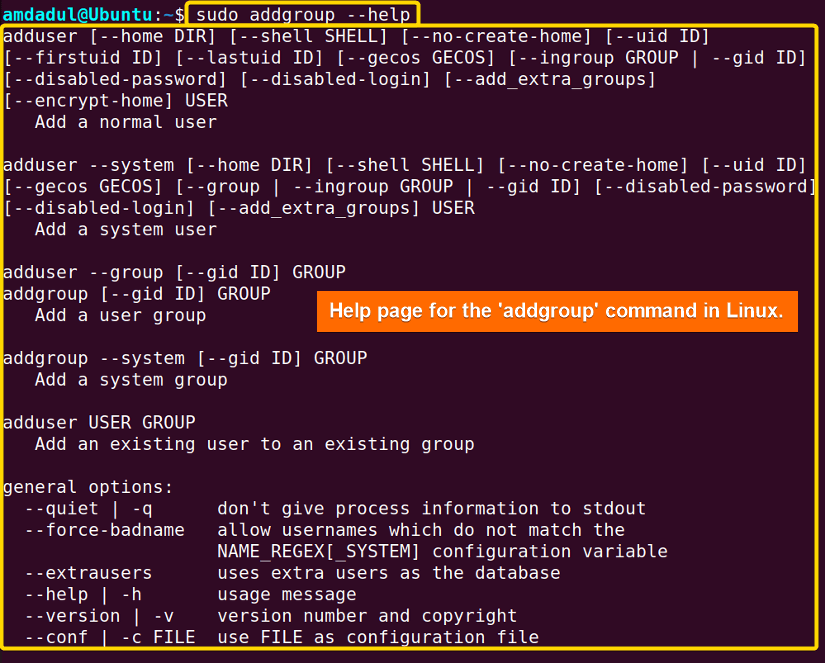
Similar Readings
- The “dmesg” Command in Linux [7+ Practical Examples]
- The “install” Command in Linux [6+ Practical Examples]
- The “reboot” Command in Linux [3 Practical Examples]
- The “sync” Command in Linux [8 Practical Examples]
- The “chage” Command in Linux [7 Practical Examples]
- The “env ” Command in Linux [9 Practical Examples]
Example 7: Get the Version of the “addgroup” Command in Linux
You can see the current version of the addgroup command on your Linux machine. Here, I will show you the version of the addgroup command of my machine on the terminal. You can do the same by following the steps below.
Steps to Follow >
➊ Open the Ubuntu Terminal.
➋ Run the following command:
sudo addgroup --version➌ Now, press the ENTER button.
➍ Type your password.
➎ Press the ENTER key.
Output >
In the following image, you can see that I have displayed the version of the addgroup command in Linux.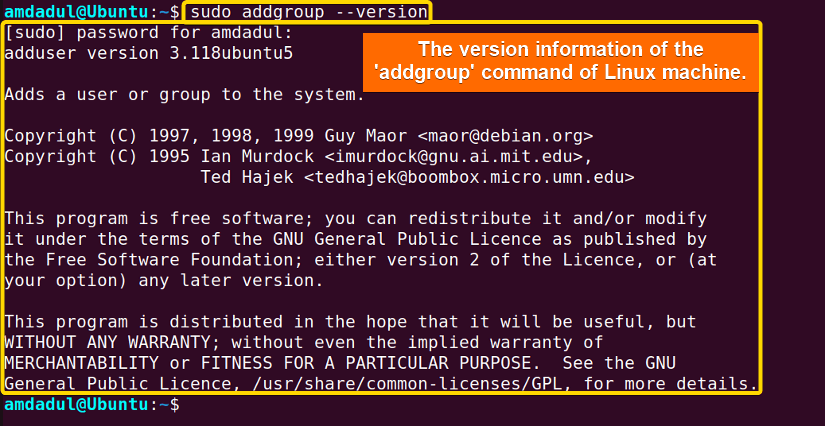
Conclusion
The addgroup command in Linux enables users to create and manage groups in the system. And this article includes some helpful examples of this useful addgroup command that will help you learn how to use the command effectively and become a power user. Keep learning!!
Similar Readings
- The “sudo” Command in Linux [8 Practical Examples]
- The “df” Command in Linux [11 Practical Examples]
- The “apt” Command in Linux [13+ Practical Examples]
- The “top” Command in Linux [8 Practical Examples]
- The “htop” Command in Linux [7 Practical Examples]
- The “enable” Command in Linux [6 Practical Examples]
FUNDAMENTALS A Complete Guide for Beginners


