The Advanced Package Utility (APT) library may be accessed via the command line tool apt-get (a package management system for Linux distributions). You may use the apt-get command in Linux to find, install, manage, update, and uninstall applications. Software is not created using the tool from the source code. Instead of using precompiled files or the source code, it builds software packages.
A. Description
The command-line tool for managing packages is apt-get, and it serves as the user’s “back end” for other programs that utilize the APT library.
B. Syntax
The apt-get command in Linux is a built-in command that takes options and commands as its argument. The main syntax for using apt-get commands is:
apt-get [OPTION] [COMMAND]C. Options
One or more options are added to the syntax of the apt-get command to modify the command. I have listed some useful options below. If you do not find your desired option here, you will find it on the man (manual) page. To go man page, type the following command and press ENTER.
man apt-getUseful Options
- –auto-remove or –autoremove : (When using apt-get with the install or remove command, this option acts like running the autoremove command.)
- -d or –download-only: (with this option the user specifies that apt-get should only retrieve the packages, and not unpack or install them.)
- -f or –fix-broken: (with this option, the user specifies that apt-get should attempt to correct the system with broken dependencies in place.)
- -h or –help (displays a short usage summary.)
- –no-install-recommends: (with this option, the user lets apt-get know not to consider recommended packages as a dependency to install.)
Practical Examples of the “apt-get” Command in Linux
The apt-get command in Linux is helpful for finding, installing, managing, updating, and uninstalling applications. A few real-life examples of the apt-get command are given below.
Example 1: Update The Package Repository Using the “apt-get” Command in Linux
While we use Linux, it is essential to resynchronize the package index files and update the package repository before installing a package. By doing this, you can be confident the packages you install are the latest. Here, I will perform an update operation. To do so, follow the below procedures.
Steps to Follow >
➊ At first, open the Ubuntu Terminal.
➋ Type the following command in the command prompt:
apt-get update➌ Now, press the ENTER button.
Output >
In the following image, we can see this command has resynchronized the package index files and updated the package repository.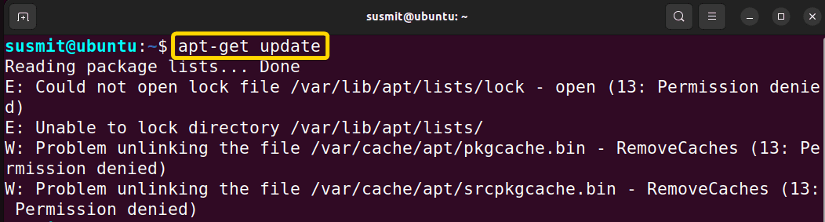
Similar Readings
- The “df” Command in Linux [11 Practical Examples]
- The “firewall-cmd” Command in Linux [7 Practical Examples]
- The “finger” Command in Linux [6 Practical Examples]
- The “env ” Command in Linux [9 Practical Examples]
- The “enable” Command in Linux [6 Practical Examples]
Example 2: Install Packages Using the “apt-get” Command in Linux
While working in Linux, various packages are needed to be installed. Here, I will install the nano package. To do so, you can follow the below procedure.
Steps to Follow >
➊ At first, open the Ubuntu Terminal.
➋ Type the following command in the command prompt.
sudo apt-get install nano➌ Now, press the ENTER button.
Output >
In the following image, we can see this command has installed the nano package.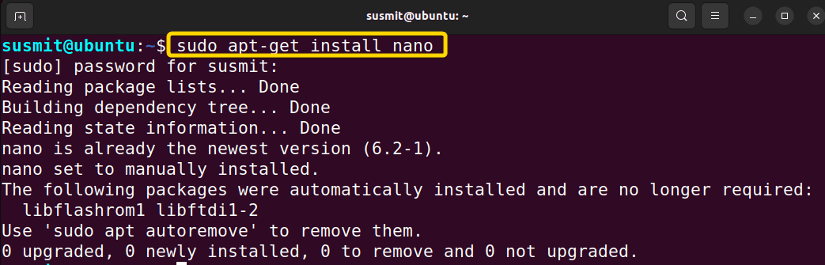
Example 3: Remove Packages Using the “apt-get” Command in Linux
While working, various packages are needed to be removed. Here, I will remove the nano package. To do so, you can follow the below procedure.
Steps to Follow >
➊ At first, open the Ubuntu Terminal.
➋ Type the following command in the command prompt.
sudo apt-get remove nano➌ Now, press the ENTER button.
Output >
In the following image, we can see this command has removed the nano package.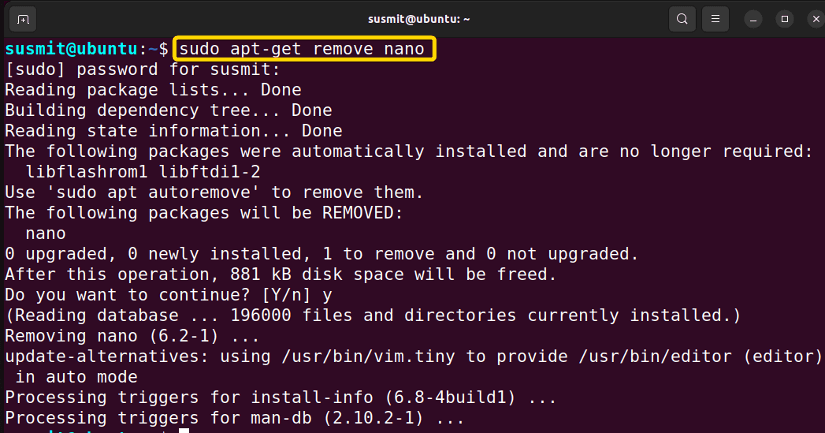
Similar Readings
- The “time” Command in Linux [4 Practical Examples]
- The “tty” Command in Linux [4 Practical Examples]
- The “uptime” Command in Linux [5 Practical Examples]
- The “vmstat” Command in Linux [6 Practical Examples]
- The “uname” Command in Linux [11 Practical Examples]
Example 4: Remove The Configuration Files of a Packages Using the “apt-get” Command in Linux
However, the apt-get remove command of the previous example only removes the package, leaving its configuration files on the system. Here I will remove the package and its configuration files both using the apt-get command followed by purge. To do so, follow the procedure below.
Steps to Follow >
➊ At first, open the Ubuntu Terminal.
➋ Type the following command in the command prompt.
sudo apt-get purge nano➌ Now, press the ENTER button.
Output >
In the following image, we can see this command has removed configuration files of the nano package.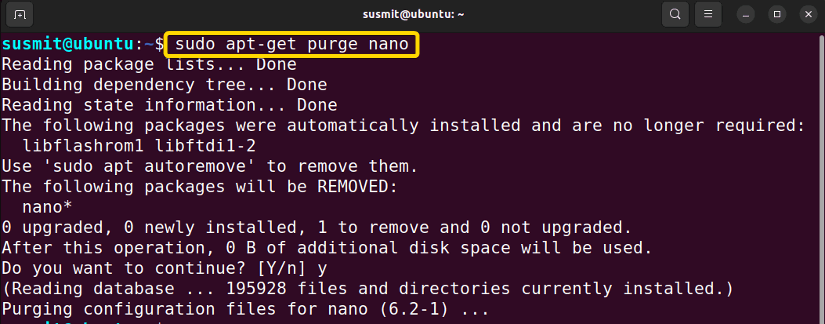
Example 5: Upgrade All Installed Packages Using the “apt-get” Command in Linux
The apt-get command followed by upgrade is a very handy command in Linux to upgrade packages. Here I will upgrade all the installed packages. To do so, follow the procedure below.
Steps to Follow >
➊ At first, open the Ubuntu Terminal.
➋ Type the following command in the command prompt.
sudo apt-get upgrade➌ Now, press the ENTER button.
Output >
In the following image, we can see this command has upgraded all the packages installed. 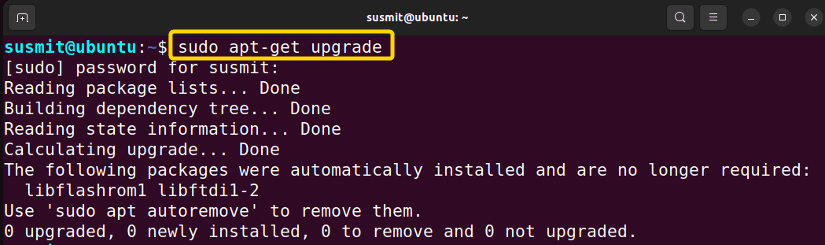
Similar Readings
- The “free” Command in Linux [8 Practical Examples]
- The “getent” Command in Linux [11 Practical Examples]
- The “groupadd” Command in Linux [7 Practical Examples]
- The “addgroup” Command in Linux [7 Practical Examples]
- The “groups” Command in Linux [6 Practical Examples]
Example 6: Full Upgrading Using the “apt-get” Command in Linux
The apt-get upgrade command of the previous example can not remove installed programs to upgrade the entire system. The apt-get command followed by full-upgrade can remove installed programs to upgrade the entire system. Here I will upgrade the entire system. To do so, follow the procedure below.
Steps to Follow >
➊ At first, open the Ubuntu Terminal.
➋ Type the following command in the command prompt.
sudo apt-get full-upgrade➌ Now, press the ENTER button.
Output >
In the following image, we can see this command has upgraded all the packages installed, removing the installed packages if needed to upgrade the whole system. 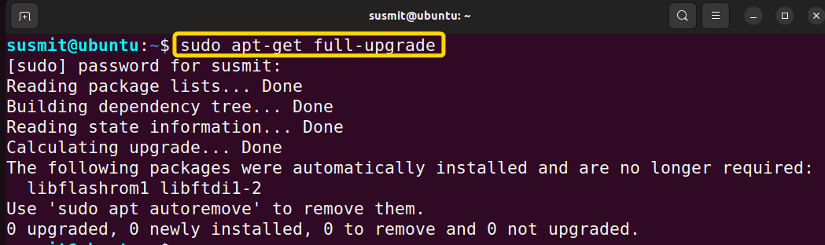
Example 7: Remove Unused Packages Using the “apt-get” Command in Linux
The system will also install the package dependencies if a new package that depends on another item is installed. The dependencies will remain on the system even after the package is removed. These unused packages can be deleted since they are no longer required by anything else. Here, I will remove the unneeded dependencies. To do so, follow the below procedures.
Steps to Follow >
➊ At first, open the Ubuntu Terminal.
➋ Type the following command in the command prompt.
sudo apt-get autoremove➌ Now, press the ENTER button.
Output >
In the following image, we can see this command has removed all the unneeded dependencies.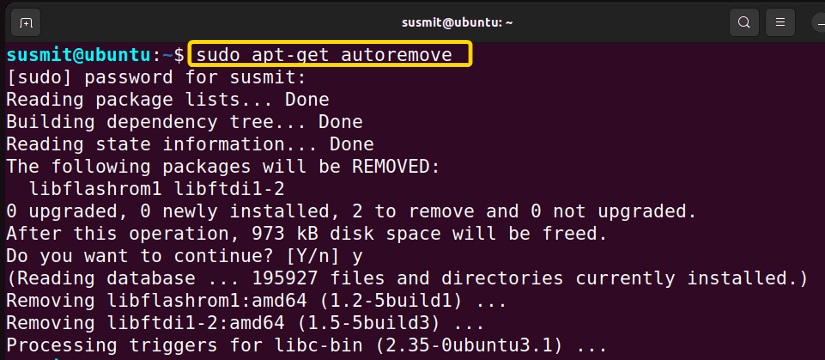
Similar Readings
- The “groupmod” Command in Linux [5+ Practical Examples]
- The “id” Command in Linux [7+ Practical Examples]
- The “service” Command in Linux [6 Practical Examples]
- The “sestatus” Command in Linux [4 Practical Examples]
- The “shutdown” Command in Linux [7 Practical Examples]
Example 8: Display Short Usage Summary Using the “apt-get” Command in Linux
Whenever it is necessary to display short usage summary, you can do it easily by using the apt-get command accompanied by the -h option. To display short usage summary, follow the below procedures.
Steps to Follow >
➊ At first, open the Ubuntu Terminal.
➋ Type the following command in the command prompt:
sudo apt-get -h➌ Now, press the ENTER button.
Output >
In the following image, we can see this command has displayed short usage summary.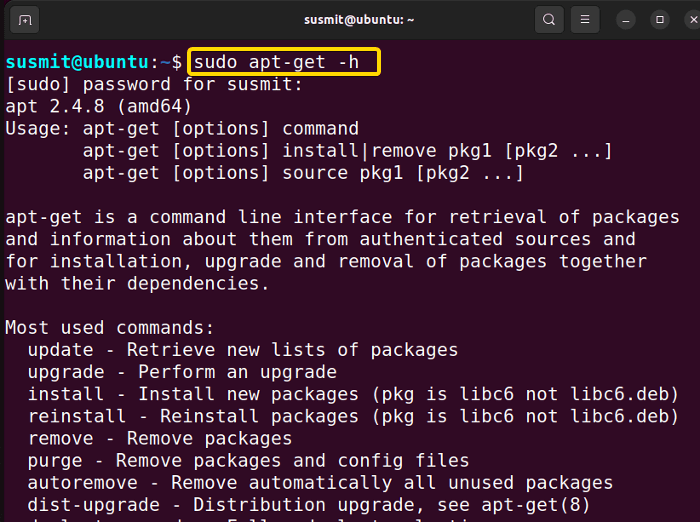
Example 9: Download A Package Using the “apt-get” Command in Linux
When downloading a package, you can do it easily by using the apt-get command. Here I will download the nano package. To do so, follow the below procedures.
Steps to Follow >
➊ At first, open the Ubuntu Terminal.
➋ Type the following command in the command prompt.
apt-get download nano➌ Now, press the ENTER button.
Output >
In the following image, we can see that It has downloaded the nano package.
Similar Readings
- The “dmesg” Command in Linux [7+ Practical Examples]
- The “install” Command in Linux [6+ Practical Examples]
- The “reboot” Command in Linux [3 Practical Examples]
- The “sync” Command in Linux [8 Practical Examples]
- The “chage” Command in Linux [7 Practical Examples]
Example 10: Clear Out the Local Repository of Retrieved Package Files Using the “apt-get” Command in Linux
The apt-get command also clears out the local repository of retrieved package files. It removes everything but not the lock file from /var/cache/apt/archives/partial/ and /var/cache/apt/archives/. Here I will use the apt-get command to clear out the local repository of retrieved package files. To do so, follow the below procedures.
Steps to Follow >
➊ At first, open the Ubuntu Terminal.
➋ Type the following command in the command prompt.
sudo apt-get clean➌ Now, press the ENTER button.
Output >
In the following image, we can see that It has cleared out the local repository of retrieved package files.

Conclusion:
In this article, I have tried to demonstrate the applications and effectiveness of the apt-get command in Linux. I hope you’ll be competent enough to explore more things with the help of these practical examples and find, install, manage, update, and uninstall the applications you need.
Similar Readings
- The “passwd” Command in Linux [7 Practical Examples]
- The “sudo” Command in Linux [8 Practical Examples]
- The “apt” Command in Linux [13+ Practical Examples]
- The “top” Command in Linux [8 Practical Examples]
- The “htop” Command in Linux [7 Practical Examples]
FUNDAMENTALS A Complete Guide for Beginners


