The sestatus command in Linux shows the information on SELinux (Security-Enhanced Linux). SELinux is a Linux kernel security module that allows an administrator to have more control over processes, applications, and files on a system. Thus an administrator can easily control who can access the system. SELinux enforces a security policy that defines access to different system objects. The information, provided by the sestatus command in Linux, contains SELinux status, mode, process context, file context etc. In this article, I will show how to install and use the sestatus command in Linux with some practical examples.
A. Description
SELinux was first developed by NSA (U.S. National Security Agency). Now it is integrated with the kernel of some popular distributions (RHEL for instance). SELinux enforces security policies which are nothing but a set of rules. Those rules define which can or can’t be accessed. And by the sestatus command in Linux, anyone can view information regarding SELinux which can help him to solve any issue and check whether SELinux is working correctly.
B. Syntax
The sestatus command in Linux doesn’t take any argument. Its syntax goes like following:
sestatus [OPTION]...C. Options
The sestatus command in Linux doesn’t have a lot options. You can check the options by using the command below:
man sestatusHere I will list the options available in the sestatus command in Linux below:
Useful Options
- -v, enables verbose mode.
- -b, shows policy booleans.
Install and Enable SELinux in Ubuntu
SELinux doesn’t come in Ubuntu by default. Ubuntu uses its own mandatory access control system (MAC) which is called AppArmor. However, you can install and enable SELinux manually.
Now to install and enable SELinux in your Ubuntu, do the following:
❶ At first, launch an Ubuntu Terminal.
❷ Paste the following command in the Terminal to install SELinux and hit ENTER:
sudo apt-get install selinux-basicssudo apt-get update❸ Provide a password if necessary and press ENTER again.
You will get an output like this. If you see the “Do you want to continue” message, type “Y” from the keyboard. The installation time may vary depending on your internet speed.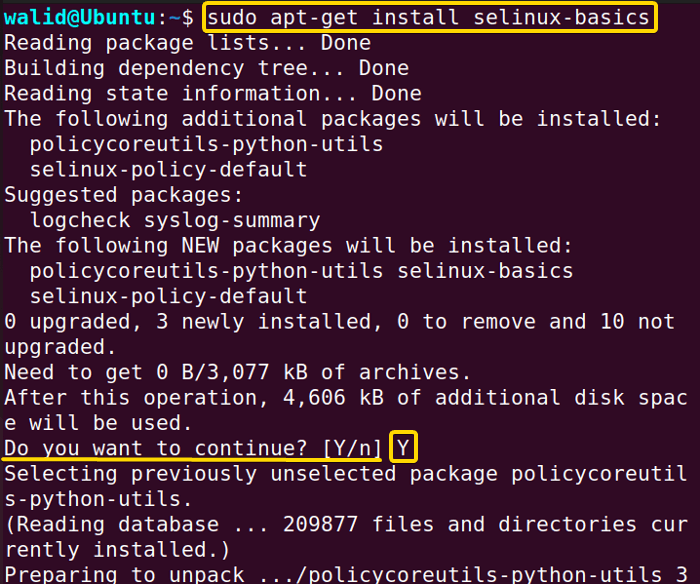 ❹ Now to activate SELinux, insert the command below and press ENTER:
sudo selinux-activateAt first, you will see “Activating SE Linux”. Give it some time. Finally, you will see “SE Linux is activated. You may need to reboot now.”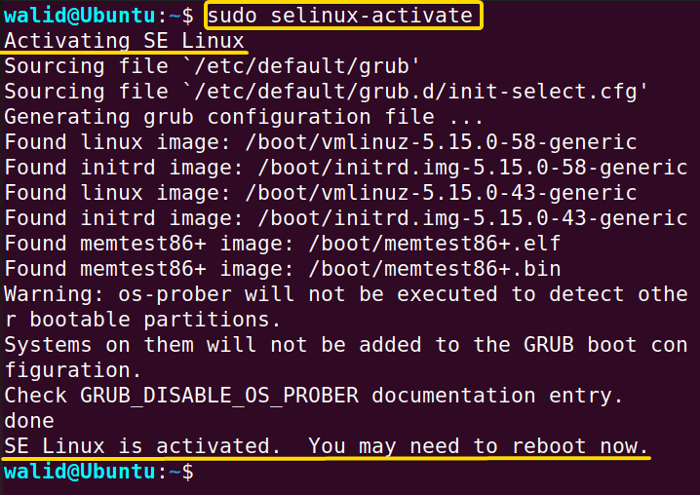 ❺ Reboot your system by executing the following command:
sudo rebootAfter pressing ENTER, your system will be restarted and SELinux policies will start to take effect. However, you won’t be able to check its status. You will need the sestatus command for that, which you will install in the next part.
Install the “sestatus” Command in Linux
Now I will install the sestatus command in Linux. It is a simple three-step process. To install the sestatus command, follow the steps below:
❶ Open a Terminal in Ubuntu at first.
❷ Write the following command in the command prompt:
sudo apt-get install policycoreutils❸ Now go press the ENTER key from your keyboard.
You should get an output like this. The installation process will be completed within a short time.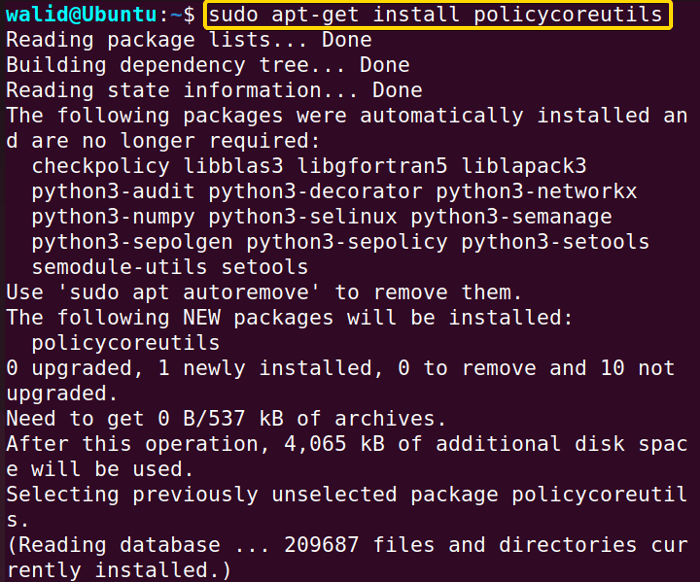
Practical Examples of the “sestatus” Command in Linux
In this section, I will provide some practical examples of the sestatus command in Linux. Also, you will learn how to use options in the sestatus command.
Example 1: Check SELinux Status Using the “sestatus” Command in Linux
At the beginning, I will check the SELinux status. This way you can see whether SELinux is enabled or not and its current mode. To check SELinux status, follow the steps below:
Steps to Follow >
➊ First, press CTRL + ALT + T, to open an Ubuntu Terminal.
➋ Then, type the following command in the command prompt:
sestatus➌ Now, press the ENTER button.
Output >
As you can see, SELinux is enabled in my system and the current mode is permissive. It is also showing information on the SELinux mount, root directory, policy name, policy version etc.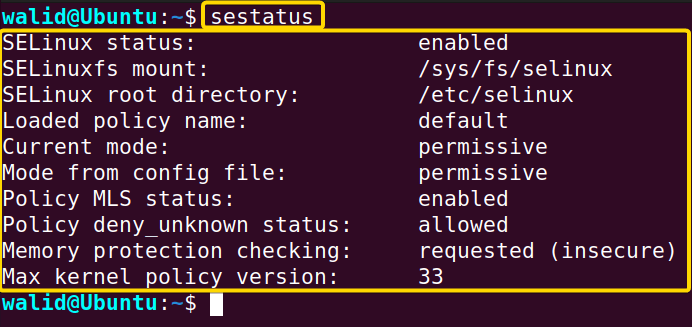
Similar Readings
- The “apt” Command in Linux [13+ Practical Examples]
- The “top” Command in Linux [8 Practical Examples]
- The “htop” Command in Linux [7 Practical Examples]
- The “enable” Command in Linux [6 Practical Examples]
Example 2: Enable Verbose Mode
If you want to get more detailed information, then you need to enable verbose mode in the sestatus command in Linux. The sestatus command provides an option “-v” for that purpose. To enable verbose mode, do the following:
Steps to Follow >
➊ Atfirst, launch a Terminal in Ubuntu first.
➋ Then, copy the following command to enable verbose mode:
sestatus -v➌ Now, hit the ENTER key on your keyboard.
Output >
The beginning of the output is similar to Example 1. However, there is additional information here. Process context defines the security and permissions of a process. It has four components- User Identity, Role, Type and Level. Moreover, file context denotes the security and permissions of a file. It has four components as well- User Identity, Role, Type and Level.
A. Process context
- User Identity: Users and groups associated with a process.
- Role: Denotes whether a process is an application or a system process.
- Type: Defines security attributes like it has access to what kind of files, directories, network connection etc.
- Level: Denotes the level of sensitivity of a process.
B. File context
- User Identity: Users and groups associated with a file.
- Role: Denotes whether a file is a user–lever or system object.
- Type: Defines attributes and permissions associated with a file
- Level: Denotes the level of sensitivity of a process.
For instance, in the output, there is a process context named “Init context” and it goes like following:
system_u:system_r:init_t:s0Here, “system_u” is User Identity, “system_r” is the Role, “init_r” is Type, and “s0” is the Level.
Moreover, there is a file context named “/etc/passwd” file context and it goes like the following:
system_u:object_r:etc_t:s0Here, “system_u” is User Identity, “object_r” is Role, “etc_t” is Type, and “s0” denotes Level.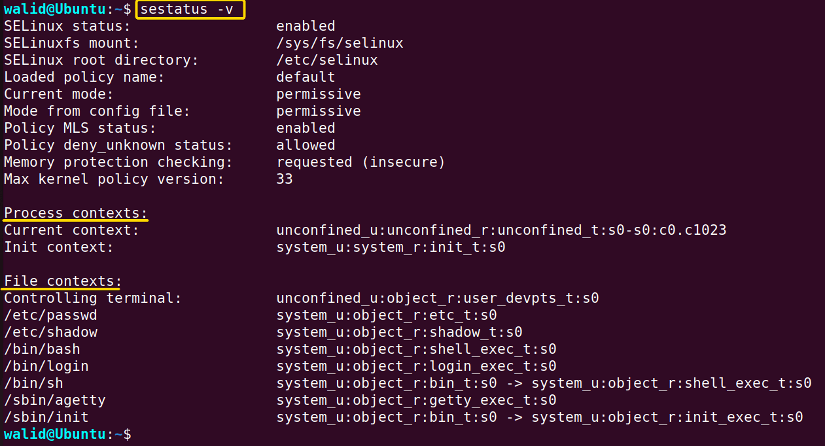
Example 3: Check Current Status in Booleans Using the “sestatus” Command in Linux
The sestatus command in Linux has an option “-b” and it shows “Policy booleans”. Policy booleans are some variables in simple on or off form which is used to change the SELinux policies. There are quite manageable and a system administrator can customize the SELinux policies very easily. Now to check the status in booleans, do the following:
Steps to Follow >
➊ First, open a Terminal in Ubuntu.
➋ Then, insert the following command in the Terminal:
sestatus -b➌ Finally, find the ENTER button on your keyboard and hit it.
Output >
The first part of the output is similar to Example 1. However, in the next part, there is a long list of all the policy booleans. You need to scroll down to see them all. I only posted the first image here.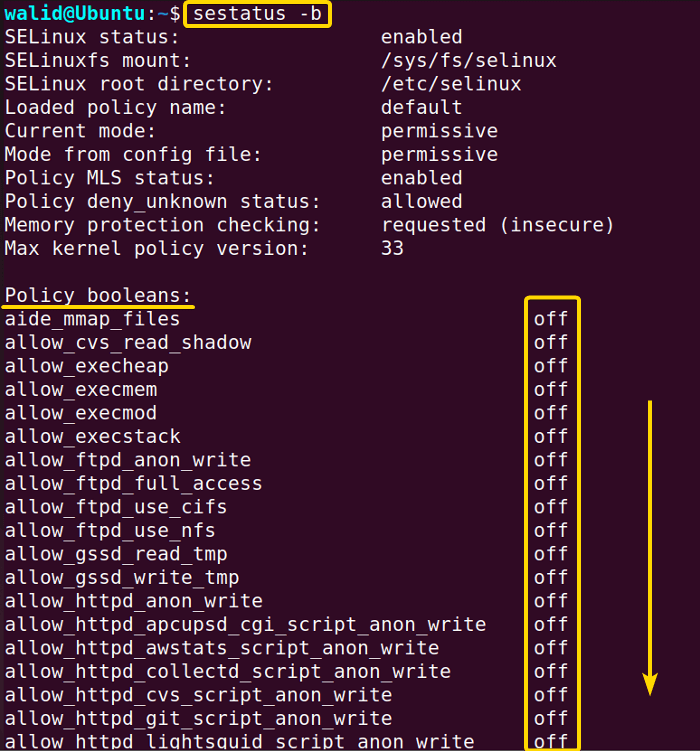
Example 4: Disable SELinux in Ubuntu
SELinux has is three modes– enforcing, permissive, and disabled. Enforcing mode enforces all the security policies of SELinux and every application and process are required to follow int. However, if your system has another access control system, you can’t enable enforcing mode. For instance, Ubuntu has AppArmor installed by default. If you try to enforce SELinux policies it will harm your system. The permissive mode doesn’t enforce SELinux policies but it keeps track of all the policy violations. It is useful for troubleshooting and testing. And the disabled mode completely disables SELinux in a system. In this example, I will disable SELinux in Ubuntu.
To disable SELinux, follow the steps below:
Steps to Follow >
➊ First, go to your Ubuntu and open a Terminal.
➋ Copy the following command in the command prompt to open SELinux config file and hit ENTER:
sudo nano /etc/selinux/config➌ Then, Edit the file like the below:
SELINUX=disabled❹ Now, press CTRL + O and ENTER to save and CTRL + X to exit.
❺ Finally, insert the following command to reboot and press ENTER:
sudo rebootOutput >
I provided two images to help you with the process. The first image shows opening the config file and rebooting the system. This image shows the editing of the config file.
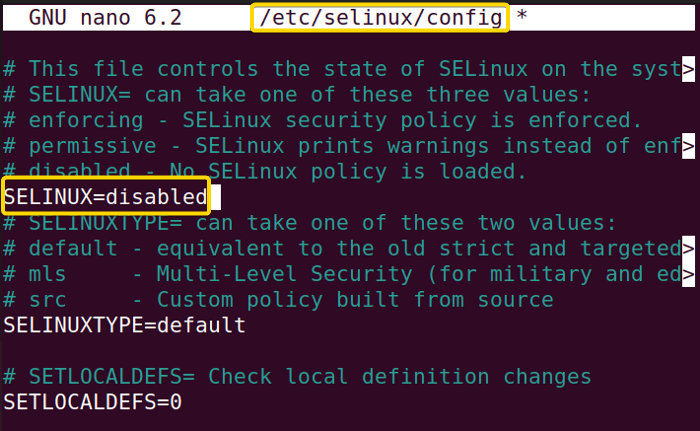 Finally, I executed the following command to check whether SELinux is disabled or not:
sestatusSee, “SELinux status” is showing “disabled”. If you want to go to the permissive mode. Follow all the steps from here. But you need to put “permissive” in place of “disabled”.
Conclusion
The sestatus command in Linux is pretty hard to grasp if you don’t have any prior knowledge of SELinux. In this article, I have tried to build a basic foundation on the sestatus and SELinux. Hopefully, it has helped you.
Similar Readings
- The “service” Command in Linux [6 Practical Examples]
- The “shutdown” Command in Linux [7 Practical Examples]
- The “sync” Command in Linux [8 Practical Examples]
- The “sudo” Command in Linux [8 Practical Examples]
- The “finger” Command in Linux [6 Practical Examples]
- The “time” Command in Linux [4 Practical Examples]
- The “tty” Command in Linux [4 Practical Examples]
FUNDAMENTALS A Complete Guide for Beginners


