The chage command has one of the most important uses in Linux. It is a very easy-to-use command that is used to change the user account’s password expiry information. In this article, you will get to know the syntax, options, and practical applications of the chage command in Linux.
A. Description
The chage command in Linux displays the user account’s aging information, changes the last password change date, and specifies the account expiration date, and minimum & maximum number of days between password change. It is also used to change the user account’s aging information.
B. Syntax
The chage command in Linux has a simple syntax. In the syntax, you need to mention the user whose accounts’s aging information you want to view or modify. And the syntax is as follows:
chage [-OPTION] [USER]Note: In the syntax above, OPTION is enclosed by a square bracket denoting one option that can be used at the same time
C. Options
A large number of options are available for the chage command in Linux. You can see the most useful options of the command are listed here. However, you can look for the chage command on the man page to know more about its options.
man chageUseful Options
- -l, Displays account aging information.
- -d, Changes last password change date.
- -E, Specifies the account expiration date.
- -I, Specifies the number of days of the account inactivity.
- -m, Specifies the minimum number of days between password change.
- -M, Specifies the maximum number of days between password change.
- -W, Specifies the number of days of warning.
Practical Examples of the “chage” Command in Linux
The chage command in Linux is used to view & modify the user account’s aging information. You will learn some useful practical examples of the chage command in Linux here.
Example 1: Display Account Aging Information Using the “chage” Command in Linux
To display the aging information of the account I am using chage command in Linux along with option -l. I am also using the sudo command as I want to view the information of the root. To do the same you can follow the procedure below:
Steps to Follow >
➊ At first open the Ubuntu Terminal.
➋ To display the account aging information, type the following command in the command prompt:
sudo chage -l root➌ Now, press the ENTER button.
❹ As it will ask for the password, type the password of the account in the command prompt.
➎ Finally, press the ENTER button.
Output >
In the image below, the output shows the aging information of the account.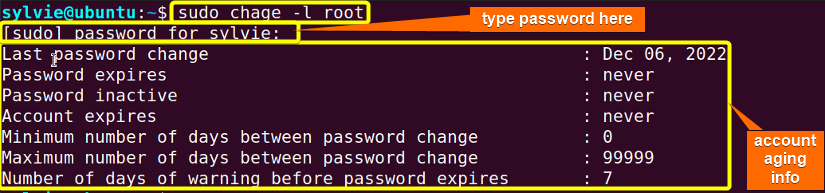
Similar Readings
- The “time” Command in Linux [4 Practical Examples]
- The “tty” Command in Linux [4 Practical Examples]
- The “uptime” Command in Linux [5 Practical Examples]
- The “vmstat” Command in Linux [6 Practical Examples]
- The “uname” Command in Linux [11 Practical Examples]
- The “apt-get” Command in Linux [10 Practical Examples]
Example 2: Change Last Password Change Date to the Specified Date
To change the last password change date of the account you can use chage command in Linux along with option -d. You have to use the sudo command to have access in the root.
Steps to Follow >
➊ At first open the Ubuntu Terminal.
➋ To change the last password change date, type the following command in the command prompt:
sudo chage -d 2022-12-01 root➌ Now, press the ENTER button.
❹ As it will ask for the password, type the password of the account in the command prompt.
➎ Then, press the ENTER button.
❻ To check the last password change date, type the following command in the command prompt:
sudo chage -l root❼ Finally, press the ENTER button.
Output >
In the following images, you can see the last password change date of the account is changed.
Before changing the last password change date 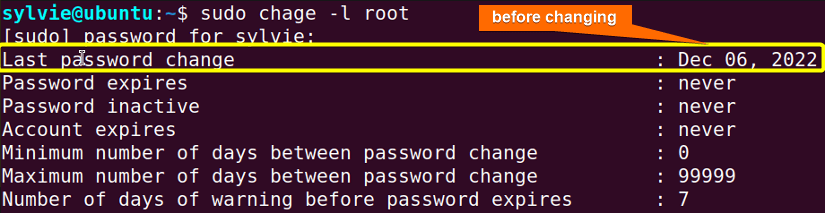 After changing the last password change date
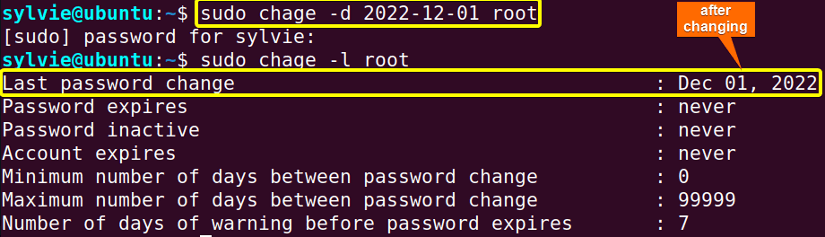
Example 3: Specify the Account Expire Date Using “chage” Command in Linux
To specify the account expiration date you can use chage command in Linux along with option -E. You have to use the sudo command to have access in the root.
Steps to Follow >
➊ At first open the Ubuntu Terminal.
➋ To specify the account expiration date, type the following command in the command prompt:
sudo chage -E 2080-10-05 root➌ Now, press the ENTER button.
❹ As it will ask for the password, type the password of the account in the command prompt.
➎ Then, press the ENTER button.
❻ To check the account expiration date, type the following command in the command prompt:
sudo chage -l root❼ Finally, press the ENTER button.
Output >
In the following images, you can see the account expiration date of the account is changed.
Before specifying the account expiration date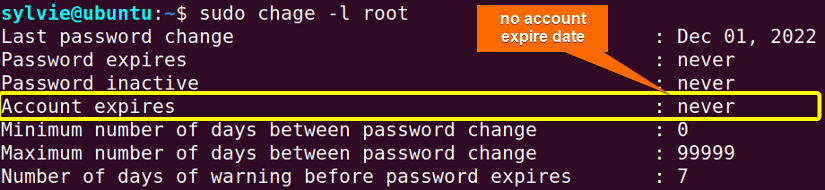 After specifying the account expiration date
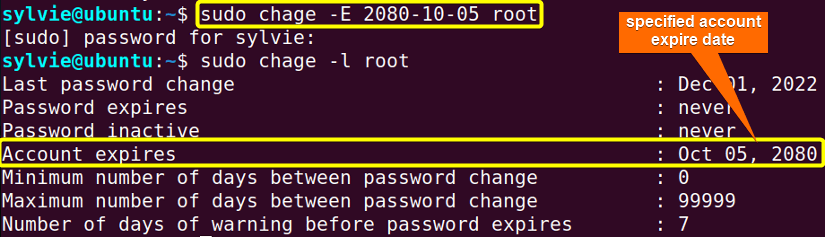
Similar Readings
- The “free” Command in Linux [8 Practical Examples]
- The “getent” Command in Linux [11 Practical Examples]
- The “groupadd” Command in Linux [7 Practical Examples]
- The “addgroup” Command in Linux [7 Practical Examples]
- The “groups” Command in Linux [6 Practical Examples]
- The “firewall-cmd” Command in Linux [7 Practical Examples]
Example 4: Specify the Minimum Number of Days Between Password Change
To specify the minimum number of days between password change of the account I am using chage command in Linux with option -m. I also have to use the sudo command to have access in the root. To do the same you can follow the procedure below:
Steps to Follow >
➊ At first open the Ubuntu Terminal.
➋ To specify the minimum number of days to expire the password of the account, type the following command in the command prompt:
sudo chage -m 1 root➌ Now, press the ENTER button.
❹ As it will ask for the password, type the password of the account in the command prompt.
➎ Then, press the ENTER button.
❻ To check the account expiration date, type the following command in the command prompt:
sudo chage -l root❼ Finally, press the ENTER button.
Output >
In the images below, you can see the minimum number of days between the password change of the account is changed.
Before specifying the minimum number of days between password change After specifying the minimum number of days between password change
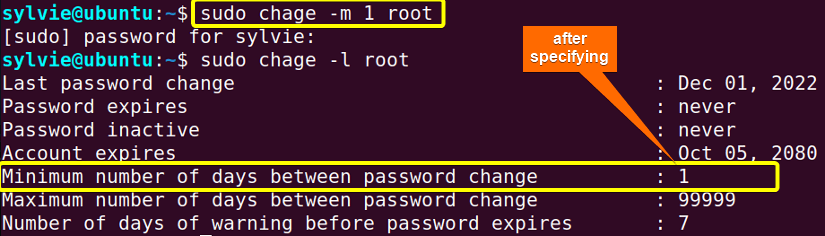
Example 5: Specify the Maximum Number of Days Between Password Change
To specify the maximum number of days between password change of the account I am using chage command in Linux with option -m. I am also using the sudo command to have access in the root. To do the same you can follow the procedure below:
Steps to Follow >
➊ At first open the Ubuntu Terminal.
➋ To specify the maximum number of days to expire the password of the account, type the following command in the command prompt:
sudo chage -M 90000 root➌ Now, press the ENTER button.
❹ As it will ask for the password, type the password of the account in the command prompt.
➎ Then, press the ENTER button.
❻ To check the account expiration date, type the following command in the command prompt:
sudo chage -l root❼ Finally, press the ENTER button.
Output >
In the following images, you can see the maximum number of days between the password change of the account is changed.
Before specifying the maximum number of days between password change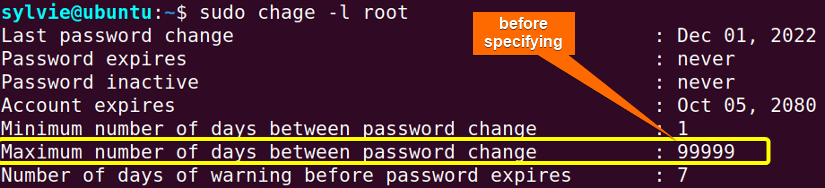 After specifying the maximum number of days between password change
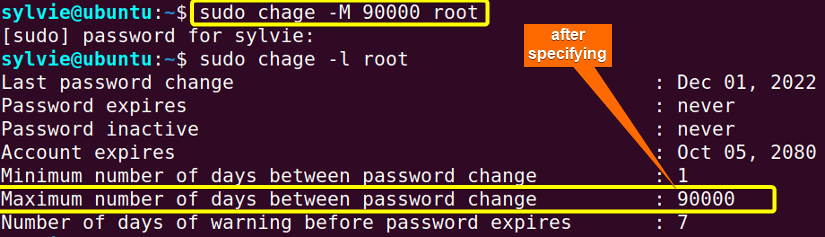
Similar Readings
- The “groupmod” Command in Linux [5+ Practical Examples]
- The “id” Command in Linux [7+ Practical Examples]
- The “service” Command in Linux [6 Practical Examples]
- The “sestatus” Command in Linux [4 Practical Examples]
- The “shutdown” Command in Linux [7 Practical Examples]
- The “finger” Command in Linux [6 Practical Examples]
Example 6: Specify the Number of Days of Warning Using “chage” Command in Linux
To specify the number of days of warning before password change of the account I am using chage command in Linux along with option -W. I am also using the sudo command to have access in the root. To do the same you can follow the procedure below:
Steps to Follow >
➊ At first open the Ubuntu Terminal.
➋ To specify the number of days of warning before password change of the account, type the following command in the command prompt:
sudo chage -W 3 root➌ Now, press the ENTER button.
❹ As it will ask for the password, type the password of the account in the command prompt.
➎ Then, press the ENTER button.
❻ To check the account expiration date, type the following command in the command prompt:
sudo chage -l root❼ Finally, press the ENTER button.
Output >
In the images below, you can see the number of days of warning before the password expiration of the account is changed.
Before specifying the number of days before password expiration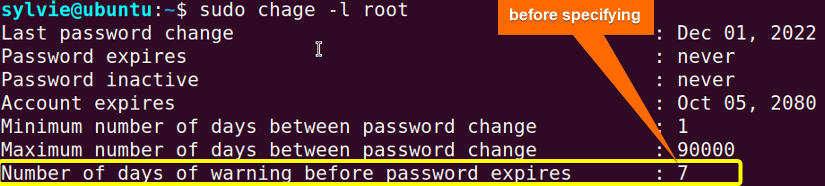 After specifying the number of days before password expiration
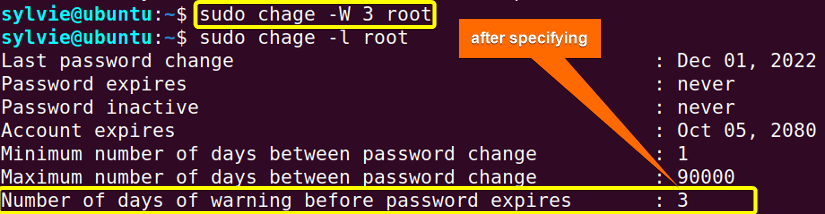
Similar Readings
- The “dmesg” Command in Linux [7+ Practical Examples]
- The “install” Command in Linux [6+ Practical Examples]
- The “reboot” Command in Linux [3 Practical Examples]
- The “sync” Command in Linux [8 Practical Examples]
- The “passwd” Command in Linux [7 Practical Examples]
- The “env ” Command in Linux [9 Practical Examples]
Example 7: Change the Account Aging Information For the User Using “chage” Command in Linux
To change the account aging information for the user you can use chage command in Linux. You have to use the sudo command to have access in the root.
Steps to Follow >
➊ At first open the Ubuntu Terminal.
➋ To specify the account aging information for the user, type the following command in the command prompt:
sudo chage sylvieNote: Here sylvie is the user. You can use any user.
➌ Now, press the ENTER button.
❹ Type the new value in the command prompt.
➎ Then, press the ENTER button after typing each value.
❻ To check the changed information, type the following command in the command prompt:
sudo chage -l sylvie❼ Finally, press the ENTER button.
Output >
As you can see, All the account aging information are changed.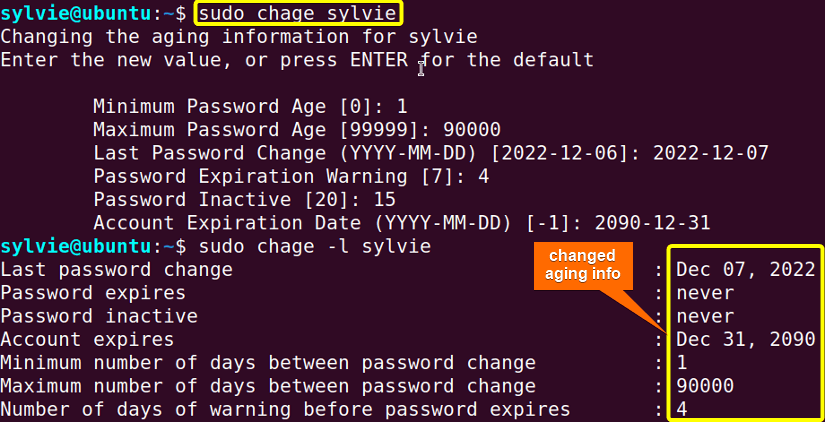
Conclusion
As you have seen in this article, the chage command has so many uses in user account in Linux. You’ve also learned the syntax, some functional options, and the practical application of this command. To become a master in Linux, try practical applications of this command by yourself.
Similar Readings
- The “sudo” Command in Linux [8 Practical Examples]
- The “df” Command in Linux [11 Practical Examples]
- The “apt” Command in Linux [13+ Practical Examples]
- The “top” Command in Linux [8 Practical Examples]
- The “htop” Command in Linux [7 Practical Examples]
- The “enable” Command in Linux [6 Practical Examples]
FUNDAMENTALS A Complete Guide for Beginners


