The install command in Linux copies files, creates directories and sets file attributes. You can also install packages with this command but then you will need to use package managers like yum or apt-get. In this article, I will explain the basic use of the install command in Linux with practical examples.
A. Description
The install command in Linux copies files from the source to a given destination. If the destination directory does not exist it can also be used to create it. The command also allows users to change permissions as well as the owner/group of the copied file.
NOTE: The install command in Linux along with its options offers functionalities similar to other available commands in Linux. These similar features are listed below.
- Copying files – same as the cp command.
- Creates directory – same as the mkdir command.
- Sets user permissions for a file – same as the chmod command.
- Sets ownership of file – same as the chown command.
B. Syntax
There are multiple syntaxes of the install command in Linux. Here, I have shown the two most basic syntaxes of the command. The first syntax is used to copy files from source to destination. Whereas the second one with option -d treats all files as directories. For more details, you can take a look at the man page.
man installinstall [OPTION]... SOURCE DESTinstall [OPTION]... -d DIRECTORY...C. Options
A number of useful options are available for the install command. I have listed some of the most used ones here. However, to learn more about the install command you can always check the man page.
man installUseful Options
- -C: Compares a pair of source and destination files.
- -d: Takes given files as directories and creates necessary files inside directories similar to the mkdir.
- -D: Creates leading directories of the destination except for the target directory.
- -g: Sets group ownership.
- -m: Sets user permission mods, same as chmod.
- -o: Sets user’s ownership.
- -t: Copies source files into a directory.
- -T: Treats destination as a file.
Practical Examples of the “install” Command in Linux
The install command in Linux is one of the useful commands to copy files and change their attributes at the same time. In this section, I will present you with some of the frequent applications of this command.
Example 1: Copying Files into Directories Using the “install” Command in Linux
You can use the install command in Linux to copy files into directories. The command creates a new file with the same name in the destination folder. In this example, I will copy the file “jobs.txt” from my current directory to the Downloads folder. You can do the same by following the steps below.
Steps to Follow >
➊ At first, open the Ubuntu Terminal.
➋ Type the following command in the command prompt:
install jobs.txt Downloads➌ Now, press the ENTER button.
Output >
In the following image, you can see that I have copied the “jobs.txt” to the Downloads folder. You can see the newly created file using the ls command.
Similar Readings
- The “time” Command in Linux [4 Practical Examples]
- The “tty” Command in Linux [4 Practical Examples]
- The “uptime” Command in Linux [5 Practical Examples]
- The “vmstat” Command in Linux [6 Practical Examples]
- The “uname” Command in Linux [11 Practical Examples]
- The “apt-get” Command in Linux [10 Practical Examples]
Example 2: Compare and Copy Files Using the “install” Command in Linux
You can copy the contents of one file to another using the install command in Linux. To do so you will need to mention both source and destination files. If the destination file already has some content, it will be overwritten in this case. Using the -C option along with the command compares the file contents while copying them. In this example, I will compare and copy texts from the “file1.txt” to the file “file2.txt”. You can do the same by following the given process.
Steps to Follow >
➊ At first, go to the Ubuntu Terminal.
➋ Type the following command in the command prompt:
install -C file1.txt file2.txt➌ Now, hit the ENTER button.
Output >
In the image below, you can see that I have copied the contents of “file1.txt” to the file “file2.txt”. Using the cat command you will be able to view the previous and updated contents of each file.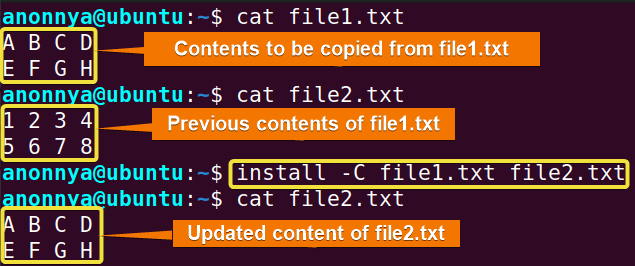
Example 3: Creating Directories Using the “install” Command in Linux
You can create new directories using the install command in Linux with the option -d. This option treats every argument as a directory. In this example, I will create a directory named “JobsDirectory”. To do so you can follow the steps below.
Steps to Follow >
➊ Launch the Ubuntu Terminal.
➋ Type the following command in the command prompt:
install -d JobsDirectory➌ Press ENTER.
Output >
In the given image, you can see that I have created a new directory named “JobsDirectory”. Here, I used the ls to show you the newly created directory.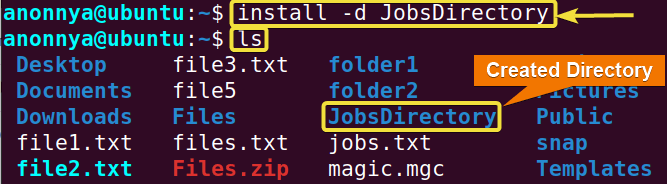
Similar Readings
- The “free” Command in Linux [8 Practical Examples]
- The “getent” Command in Linux [11 Practical Examples]
- The “groupadd” Command in Linux [7 Practical Examples]
- The “addgroup” Command in Linux [7 Practical Examples]
- The “groups” Command in Linux [6 Practical Examples]
- The “firewall-cmd” Command in Linux [7 Practical Examples]
Example 4: Setting User Permissions Using the “install” Command in Linux
You can set the user permissions while copying files using the install command in Linux with the option -m. This option takes an octal number as an argument to set the permissions for the owner, group, and others. In this example, I will copy the “file1.txt” contents to the “permission.txt” file and update its permissions to 754 (-rwxr-xr–). You can do this by following the process below.
Steps to Follow >
➊ At first, open the Ubuntu Terminal.
➋ Type the following command in the command prompt:
install -m 754 file1.txt permission.txt➌ Now, hit the ENTER button.
Output >
In the image given below, you can see that I have updated the destination file permissions while copying the file. You can use the ls command along with the -l option to view the previous and updated permissions of the files. 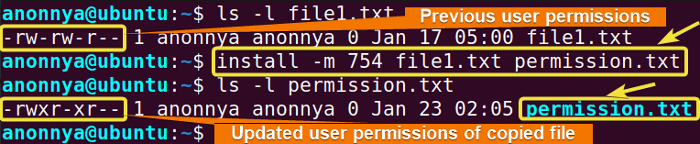
Similar Readings
- The “groupmod” Command in Linux [5+ Practical Examples]
- The “id” Command in Linux [7+ Practical Examples]
- The “service” Command in Linux [6 Practical Examples]
- The “sestatus” Command in Linux [4 Practical Examples]
- The “shutdown” Command in Linux [7 Practical Examples]
- The “finger” Command in Linux [6 Practical Examples]
Example 5: Setting Ownership Using the “install” Command in Linux
You can change ownership of a file using the install command in Linux. In this case, you must run the command as superuser using the sudo command because it works the same way as the chown command. The command allows you to change the owner using the -o option and the group using the -g option individually. Follow the below examples to learn about these separate applications.
Case A: Specifying Owner of a File Using “install” Command in Linux
To change the owner of the copied file follow the given steps.
Steps to Follow >
➊ Go to the Ubuntu Terminal.
➋ Type the following command in the command prompt:
sudo install -o demouser file1.txt userfile1.txt➌ Type your password.
❹ Hit ENTER.
Output >
In the following image, you can see that I have changed the ownership of the copied file from “anonnya” to “demouser”. You can use the ls command along with the -l option to view the ownership of the files.
Case B: Specifying Group of a File Using “install” Command in Linux
To change the group of the copied file follow the steps below.
Steps to Follow >
➊ At first, launch the Ubuntu Terminal.
➋ Type the following command in the command prompt:
sudo install -g demouser file1.txt userfile2.txt➌ Type your password.
❹ Press ENTER.
Output >
In the following image, you can see that I have changed the group ownership of the copied file from “anonnya” to “demouser”. I have also used the ls command along with the -l option to show you the ownership of the files.
Similar Readings
- The “dmesg” Command in Linux [7+ Practical Examples]
- The “passwd” Command in Linux [7 Practical Examples]
- The “reboot” Command in Linux [3 Practical Examples]
- The “sync” Command in Linux [8 Practical Examples]
- The “chage” Command in Linux [7 Practical Examples]
- The “env ” Command in Linux [9 Practical Examples]
Example 6: Displaying Verbose Output Using the “install” Command in Linux
You can display a verbose output while copying files using the install command in Linux. To get this output you will need to use the option -v along with the command. In this example, I will show you the detailed output of copying the “file1.txt” contents to the file “file2.txt”. You can do the same by following the given process.
Steps to Follow >
➊ Open the Ubuntu Terminal.
➋ Type the following command in the command prompt:
install -v file1.txt file2.txt➌ Press the ENTER button.
Output >
In the image below, you can see that I have displayed the verbose output of the copying task.
Conclusion
In this article, I have demonstrated the frequent uses of the install command in Linux. This command will allow copy file contents as well as set owners and their permissions for a file. I hope the command’s detailed usage along with practical examples will help you with your journey in Linux distribution.
Similar Readings
- The “sudo” Command in Linux [8 Practical Examples]
- The “df” Command in Linux [11 Practical Examples]
- The “apt” Command in Linux [13+ Practical Examples]
- The “top” Command in Linux [8 Practical Examples]
- The “htop” Command in Linux [7 Practical Examples]
- The “enable” Command in Linux [6 Practical Examples]
FUNDAMENTALS A Complete Guide for Beginners


