The env command in Linux is a shell command that stands for ENVironment. It is used to display the list of all the current environment variables or to run a program in an adjusted environment without modifying the current one. Also, sometimes the shell scripts use the env command to commence the correct interpreter. In this article, I will talk about the usage of the env command by showing some practical examples with several options. So stick to the end!
A. Description
The environment variables are a list of dynamic named values stored in the system to define the behavior of the environment. They can affect the executed programs of the environment too. By using the env command, these variables can be added or removed. The env command can also change or modify the existing variables by assigning new values to them.
B. Syntax
The env command is a very useful command to view and modify the shell environment variables. The syntax of the command is quite simple. Type the env command and then the variable name with the newly assigned value followed by any command and its arguments you want to provide. If no command is added, then it prints the resulting environment.
env [options]... [NAME=value]... [command[arg]...]C. Options
The env command without any options shows the list of all environmental variables. Also, there are several options to modify the usage of this command. I will list some of the most useful ones with their purposes here. You can check the man page to read more about them.
man envUseful Options
- -i or –, –ignore (to start with an empty environment)
- -0, –null (to end each output line with NUL (No New Line))
- -u, –unset=NAME ( to remove the named variable from the environment)
- -C, –chdir=DIR (to change the working directory to DIR)
- -S, –split-string=S (to pass multiple arguments on shebang lines)
- –version (to output version information and exit)
Practical Examples of the “env” Command in Linux
The env command is a very useful command in Linux. You can easily check all your environment variables. Moreover, to modify or change, this command is an efficient tool. Below I will talk about the usage of this command with some practical examples.
Example 1: Use the “env” Command in Linux to View All the Current Shell Variables
When you will use the env command only, without any options or arguments, it will print out all the environment variables. The syntax is:
envFollow the below steps to check yourself.
Steps to Follow >
➊ At first open the Ubuntu Terminal.
➋ Type the following command in the command prompt:
env➌ Now, press the ENTER button.
Output >
From the output image, you can see a list of all the environment variables. As it is a long list, all of them did not fit on one page. So you have to scroll down to check them all.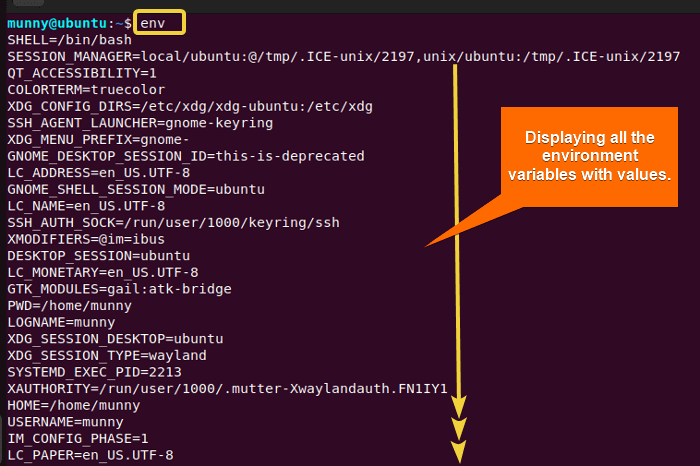
- The “time” Command in Linux [4 Practical Examples]
- The “tty” Command in Linux [4 Practical Examples]
- The “uptime” Command in Linux [5 Practical Examples]
- The “vmstat” Command in Linux [6 Practical Examples]
- The “uname” Command in Linux [11 Practical Examples]
- The “apt-get” Command in Linux [10 Practical Examples]
Example 2: Empty the Environment to Start a New Shell Environment
You can clear out an environment and then start a command in that empty environment. No existing variables of the environment will be there in the new shell. To clear an environment use the long option –ignore or short option -i or – (only) with the env command. The syntax is:
env -i /bin/shClear your current environment by following the below steps.
Steps to Follow >
➊ At first open the Ubuntu Terminal.
➋ Type the following command in the command prompt:
env -i /bin/sh➌ Now, press the ENTER button.
➍ Now to check all the current environment variables, type the following command.
env➎ After that, tap the ENTER key.
Output >
From the output image, you can see it clears out all the environment variables and then sets the new shell variable PWD. Then we run the command env to check the list of environment variables, where we will only see the PWD variable as the output.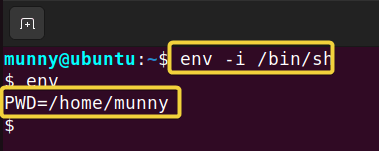
Example 3: Set an Environment Variable Using the “env” Command in Linux
Environment variables are specific to a certain environment. You can set an environment variable for the current shell using the env command temporarily. By convention, these variables should have upper-case names as they are case-sensitive. You can assign multiple values to a variable, just separate them using the colon (:) sign. To set an environment variable type the env command followed by the variable name and then its assigned value using an equal sign (=) before that. The syntax is:
env VARIABLE=ValueFollow the below steps to create an environment variable.
Steps to Follow >
➊ Start by opening the Ubuntu Terminal.
➋ Type the following command in the command prompt to set a value to a variable called HOME:
env HOME=safe place➌ Now, press the ENTER button.
Output >
From the output display, you will a list of your current shell variables. And you can find your newly created environment variable HOME and its assigned value ‘safe place’ in there.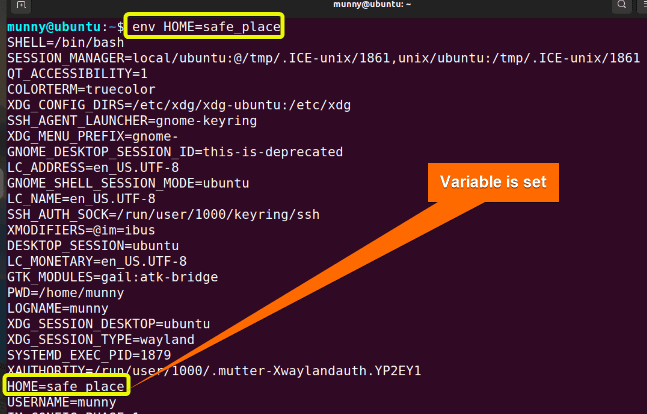
- The “free” Command in Linux [8 Practical Examples]
- The “getent” Command in Linux [11 Practical Examples]
- The “groupadd” Command in Linux [7 Practical Examples]
- The “addgroup” Command in Linux [7 Practical Examples]
- The “groups” Command in Linux [6 Practical Examples]
- The “firewall-cmd” Command in Linux [7 Practical Examples]
Example 4: Remove a Variable From the Environment
Now after you learn to set a variable from the previous example, you ought to know how to unset one too. As I already mentioned these are variables that are only valid for the running shell, they will disappear as soon as you empty your environment or you close your terminal. But if you want to unset one while you are still in the same shell environment then use the env command with the long option –unset, followed by the variable name you want to unset. The syntax is:
env -u VARIABLE_NAMEFollow the below steps to unset the variable HOME we set in the previous example.
Steps to Follow >
➊ Begin by opening the Ubuntu Terminal.
➋ Type the following command in the command prompt:
env -u HOME➌ Now, hit the ENTER button.
Output >
Check the output display, the variable HOME is absent from the list of current environment variable list.
Example 5: Change an Environment Variable
You can change the assigned value of a variable for any command. For that, use the env command then the variable name with the new value for it, and then the command name, whose variable value you are changing. The syntax is:
env VARIABLE=value command_nameCheck the below example. Where I will change the TZ variable of the date command.
Steps to Follow >
➊ At first open the Ubuntu Terminal.
➋ Type the date command just to check its default output.
date➋ Now, type the following command in the command prompt:
env TZ=MST7MDT date➌ Then press the ENTER button.
Output >
From the output of the date command, you can see the time format is set to the time format of the operating system. I changed the variable to set the time format to standard time MST. Now compare the change in the format from the output after running the command again.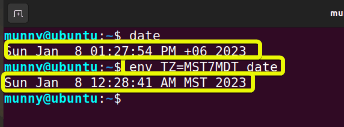
- The “groupmod” Command in Linux [5+ Practical Examples]
- The “id” Command in Linux [7+ Practical Examples]
- The “service” Command in Linux [6 Practical Examples]
- The “sestatus” Command in Linux [4 Practical Examples]
- The “shutdown” Command in Linux [7 Practical Examples]
- The “finger” Command in Linux [6 Practical Examples]
Example 6: Start Each Output Line with NUL (No New Line)
You can display the output of the env command in a way where all the output lines will be displayed without any line break. There will be no new line. You have to use the long option –null or -0 with the env command. The syntax is:
env -0To check practically, follow the below steps.
Steps to Follow >
➊ First, begin the Ubuntu Terminal.
➋ Type the following command in the command prompt:
env -0➌ Now, press the ENTER button.
Output >
From the output display, you can see all the environment variables. But they are all in one line. No new lines were added.
Example 7: Check the Version of the “env” Command
You can check the version of the env command installed in your ubuntu. To check use the –version option with the env command. The syntax is:
env --versionFollow the below steps.
Steps to Follow >
➊ At first open the Ubuntu Terminal.
➋ Type the following command in the command prompt:
env --version➌ Now, press the ENTER button.
Output >
From the output image, you will see the version of your env command. Check mine from the below image.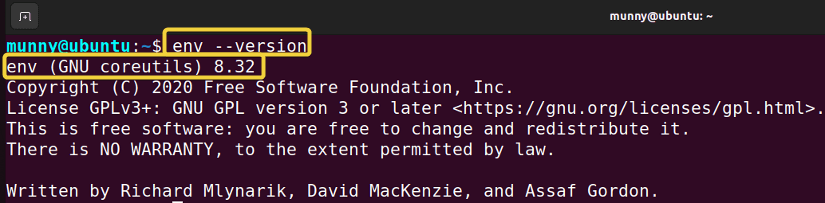
- The “dmesg” Command in Linux [7+ Practical Examples]
- The “install” Command in Linux [6+ Practical Examples]
- The “reboot” Command in Linux [3 Practical Examples]
- The “sync” Command in Linux [8 Practical Examples]
- The “chage” Command in Linux [7 Practical Examples]
- The “top” Command in Linux [8 Practical Examples]
Example 8: Display the Help Message for the “env” Command
Learn more about the env command with the help of the option –help. Just like the man page, it will display all the important information about the command. Just type the env command then the long option — help. The syntax is:
env --helpFollow the below steps.
Steps to Follow >
➊ At first open the Ubuntu Terminal.
➋ Type the following command in the command prompt:
env --help➌ Now, press the ENTER button.
Output >
From the output image, you will see all the information such as the options list with a short description, syntax, and more online help links about the env command.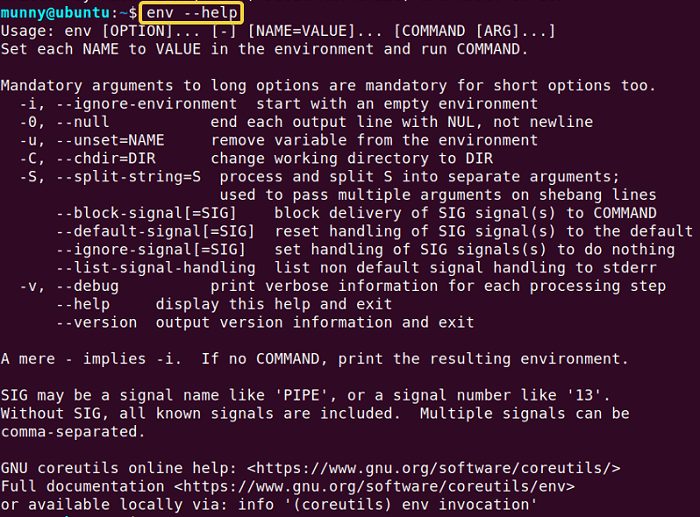
Example 9: Specify an Interpreter to Use for the Shell Scripts
You can specify the name of an interpreter to be used for your shell scripts. For that, you have to use the env command with the shebang in the first line of the script followed by the path of the specific interpreter. This way the interpreter is searched for and located along with the execution of the script. This makes the script more portable. But it also has some risks of selecting the wrong interpreter as it searches for a match in every directory on the executable path. So be careful while you are using it.
Check the below example to learn how to do it practically.
Steps to Follow >
➊ At first open the Ubuntu Terminal.
➋ Type the following nano command in the command prompt to write into the script_name:
nano script_name➌ Now, press the ENTER button.
➍ After that nano editor will pop up. Write the following line to tell the script_name to select the bash as an interpreter. And then write a message inside the echo command.
#!/usr/bin/env/bashecho ”Hi there”➎ After that save the script by pressing (CTRL+S) and then quit by (CTRL+X).
➏ Now run the following command to execute your script using the bash interpreter.
bash script_nameOutput >
At first, after using the nano command, the editor will pop up where the shebang path of the correct interpreter will be written as you can see in the below picture. After that, I wrote the message to be delivered using the echo command.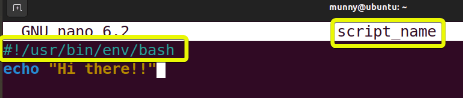 After the execution of the script_name, you will see the message that I wrote inside it as the output.
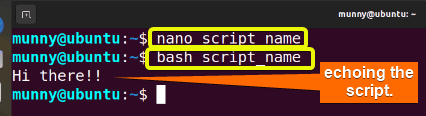
Learn to Read the Error Status Based On the “env” Command in Linux
The env command produces different exit codes. From those codes, you can determine what kind of error occurred while running the command. Read the below code description to learn about them.
- 0 → When no command is specified & the output is the environment.
- 1-125→ When the command ‘env’ itself fails.
- 126 → The command is found but can not be invoked.
- 127 → If command can not be found.
Conclusion
In this article, I discussed the env command and its usage with practical examples. If you go through the examples one by one, hope you will learn most of the stuff related to the command tool. Hope this article helps you on your way to becoming a power user of LINUX.
- The “passwd” Command in Linux [7 Practical Examples]
- The “df” Command in Linux [11 Practical Examples]
- The “sudo” Command in Linux [8 Practical Examples]
- The “apt” Command in Linux [13+ Practical Examples]
- The “htop” Command in Linux [7 Practical Examples]
- The “enable” Command in Linux [6 Practical Examples]
FUNDAMENTALS A Complete Guide for Beginners


