The grep command is very useful for searching files and directories containing matching words or characters lines. You will also be able to know the pathname of the files, and line numbers with it. In this article, I will describe all the features and uses of the grep command in Linux with multiple examples.
A. Description
The grep command can be used to search patterns in specific files or each file. Then prints the entire line containing the match. It is the shortcut for “Global Regular Expression Print”
B. Syntax
The syntax for the grep command is pretty simple which is the command itself followed by some specific options and the pattern you want to grep.
grep [OPTION]... PATTERNS [FILE…]C. Options
Many useful options are available for the grep command. I have listed some of the most used ones here. However, if you want to know more about options for the grep command you can always check the man page for the grep command.
man grepUseful Options
- -c, –count (Does not print any matches but rather the total occurring number)
- -i, –ignore-case(Ignores the sensitivity of cases)
- -v, –invert-match (Invert the sense of matching, to select non-matching lines.)
- -V, –version (Output the version number of grep and exit.)
- -w, –word-regexp (search for a whole word)
Practical Examples of the “grep” Command in Linux
The grep command in Linux is an easy-to-use command that is used to search for words or characters matching lines in files. Some of the most useful applications of the grep command have been illustrated below.
Example 1: Search Inside a File Using the “grep” Command in Linux
You can search for a specific word or character inside a file using the grep command. To search for any word inside a file you should follow the below procedure. Here, I have searched for the word “Linux” in a file named file1.txt.
Steps to Follow >
➊ At first open the Ubuntu Terminal.
➋ Type the following command in the command prompt:
grep Linux file1.txt➌ Press the ENTER button.
Output >
You can see in the below picture that all the lines are printed containing the matching word Linux.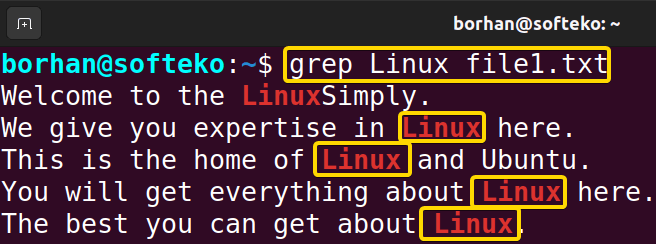
Similar Readings
- The “wc” Command in Linux [15 Practical Examples]
- The “sort” Command in Linux [16 Practical Examples]
Example 2: Search Inside Multiple Files Using the “grep” Command in Linux
You can search for a specific word or character inside multiple files using the grep command. To search for any word inside multiple files you should follow the below procedure. Here, I have searched for the word “Linux” inside 2 files named file1.txt & file2.txt.
Steps to Follow >
➊ At first open the Ubuntu Terminal.
➋ Type the following command in the command prompt:
grep Linux file1.txt file2.txt➌ Press the ENTER button.
Output >
You can see in the below picture that all the lines are printed containing the matching word “Linux” inside both files.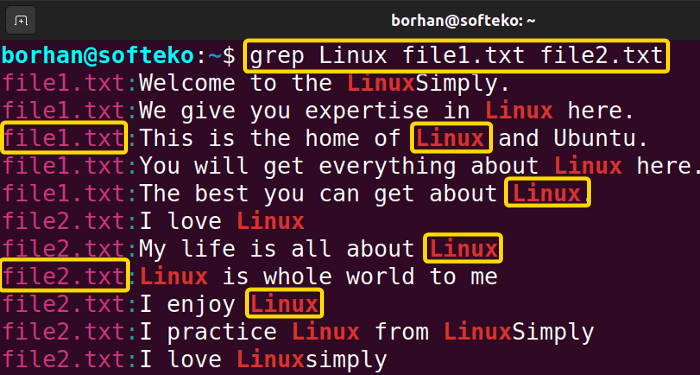
Example 3: Search Multiple Words Inside a File Using the “grep” Command in Linux
You can search for multiple words or characters inside a file using the grep command. To search for multiple words inside a file you should follow the below procedure. Here, I have searched for the words “Linux” & “love” inside a file named file2.txt.
Steps to Follow >
➊ At first open the Ubuntu Terminal.
➋ Type the following command in the command prompt:
grep -e Linux -e love file2.txt➌ Press the ENTER button.
Output >
You can see in the below picture that all the lines are printed containing both the matching words “Linux” & “love” inside the file.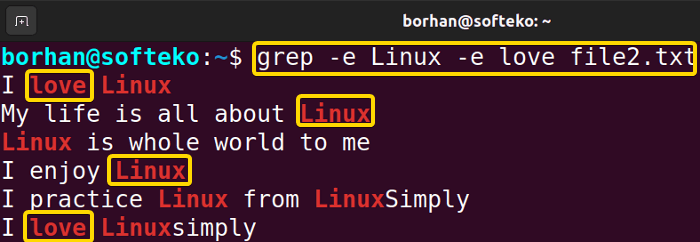
Example 4: Search All Files Inside a Directory
You can search for a specific word or character inside all the files in a directory using the grep command. To search for any specific word inside all files in a directory you should follow the below procedure. Here, I have searched for the word “Linux” in all the files in the Desktop directory using the asterisk (*) sign.
Steps to Follow >
➊ At first open the Ubuntu Terminal.
➋ Type the following command in the command prompt:
grep Linux *➌ Press the ENTER button.
Output >
You can see in the below picture that all the lines are printed containing the matching word Linux inside to files of the Desktop directory.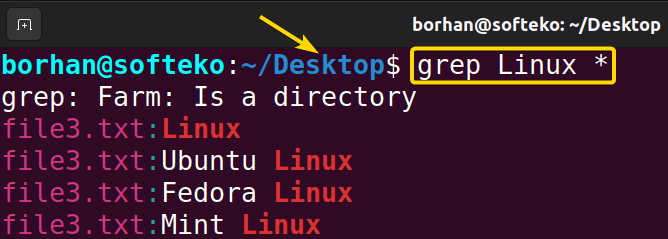
Similar Readings
- The “nano” Command in Linux [13 Practical Examples]
- The “cut” Command in Linux [8 Practical Examples]
- The “jed” Command in Linux [8 Practical Examples]
Example 5: Finding Whole Words Only Using the “grep” Command in Linux
Normally grep gives you the matching words as well as the substring of the matching words. You can search for only the whole word or character inside a file using the grep command. To search for the whole word only inside a file you should follow the below procedure. Here, I have searched for the whole word “Linux” only inside my home directory.
Steps to Follow >
➊ At first open the Ubuntu Terminal.
➋ Type the following command in the command prompt:
grep -w Linux *➌ Press the ENTER button.
Output >
You can see in the below picture that all the lines are printed containing the matching of the whole word Linux only. It has not highlighted the word LinuxSimply as here Linux is a substring of the word.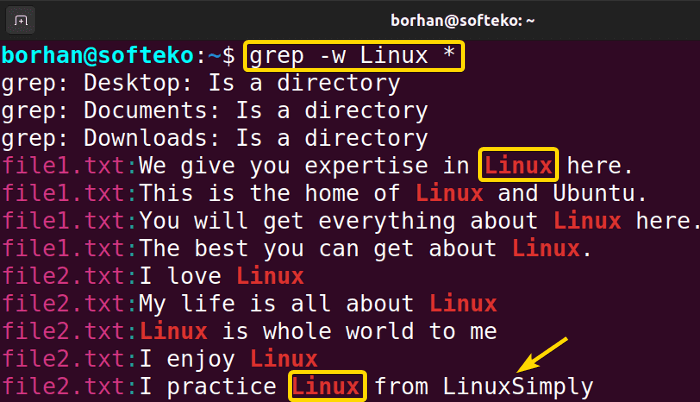
Example 6: Searching Inside Sub-directories Using the “grep” Command in Linux
You can search for a specific word or character inside sub-directories using the grep command. To search for any word inside a subdirectory you should follow the below procedure. Here, I have searched for the word “Linux” in my home directory.
Steps to Follow >
➊ At first open the Ubuntu Terminal.
➋ Type the following command in the command prompt:
grep -r Linux *➌ Press the ENTER button.
Output >
You can see in the below picture that all the lines are printed containing the matching word Linux. All the files in the sub-directory and their pathname is also printed here.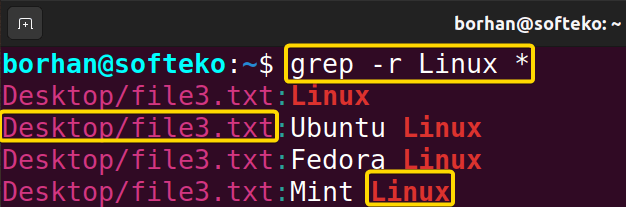
Example 7: Display Line Numbers Using the “grep” Command in Linux
You can search for a specific word or character inside a file and also show the line numbers using the grep command. To search for any word inside a file and show the line numbers you should follow the below procedure. Here, I have searched for the word “Linux” in a file named file1.txt.
Steps to Follow >
➊ At first open the Ubuntu Terminal.
➋ Type the following command in the command prompt:
grep -n Linux file1.txt➌ Press the ENTER button.
Output >
You can see in the below picture that all the lines are printed containing the matching word Linux. And their line numbers are also printed here.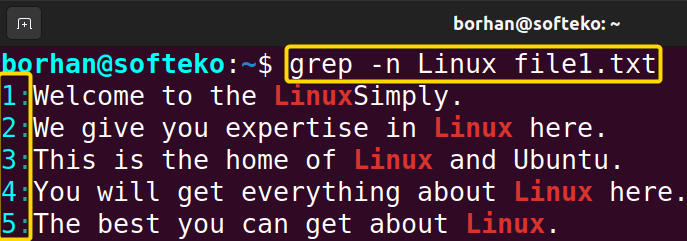
Example 8: Display the Number of Lines Before and After
You can search for a specific word or character inside a file and also show the number of lines before, after and both using the grep command. To search for any word inside a file and show the number of lines, you should follow the below procedure. Here, I have searched for the word “Linux” in a file named file1.txt.
Steps to Follow >
➊ At first open the Ubuntu Terminal.
➋ Type the following command in the command prompt:
grep -B2 Linux file1.txt➌ Press the ENTER button.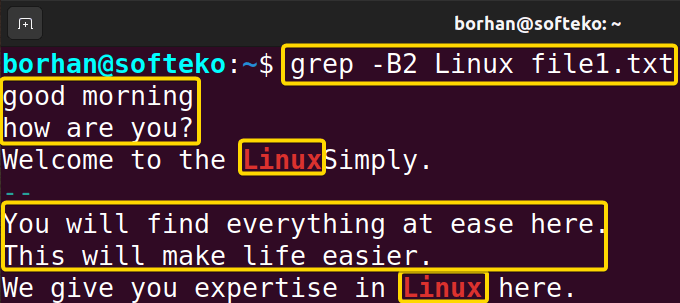 ➍ Type the following command in the command prompt:
grep -A2 Linux file1.txt➎ Press the ENTER button.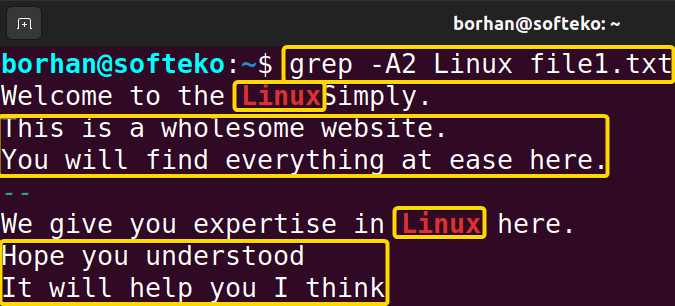 ➏ Type the following command in the command prompt:
grep -C2 Linux file1.txt➐ Press the ENTER button.
Output >
You can see in the first picture 2 lines are printed before the matching word line for the first command.
For the second command, 2 lines after the matching word line are printed in the second image.
And for the last command, 2 lines after and before both are printed in the third picture.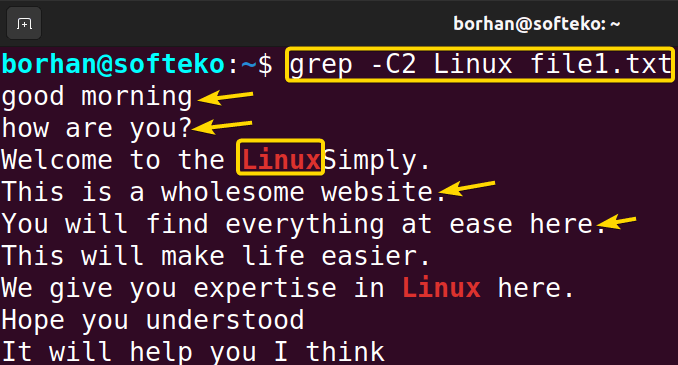
Similar Readings
- The “vi” Command in Linux [6 Practical Examples]
- The “vim” Command in Linux [8 Practical Examples]
- The “egrep” Command in Linux [10+ Practical Examples]
Example 9: Ignore Case-Sensitivity
The grep command by default doesn’t show the matching words if the name’s cases are wrong. To ignore the case sensitivity you should follow the below procedure. Here, I have used the file2.txt file to show you the example.
Steps to Follow >
➊ At first open the Ubuntu Terminal.
➋ Type the following command in the command prompt:
grep -i Linux file2.txt➌ Press the ENTER button.
Output >
You can see in the below picture that all the lines are printed containing the matching word Linux although the case in the command line is not correct.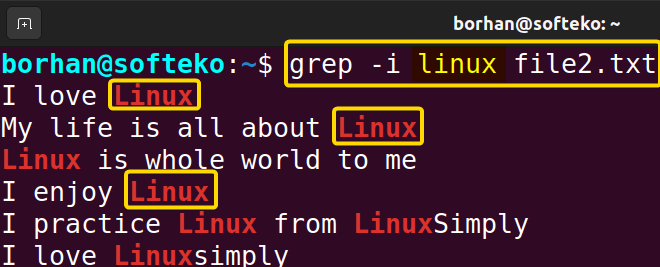
Example 10: Inverse grep Search
You can search inside a file where the line containing the given word or character will not be printed. To do so you should follow the below procedure. Here, I have given the word “Linux” in a file named file1.txt, where I do not want to see the lines containing the given word.
Steps to Follow >
➊ At first open the Ubuntu Terminal.
➋ Type the following command in the command prompt:
grep -v Linux file1.txt➌ Press the ENTER button.
Output >
You can see in the below picture that all the lines are printed except the lines containing the matching word Linux.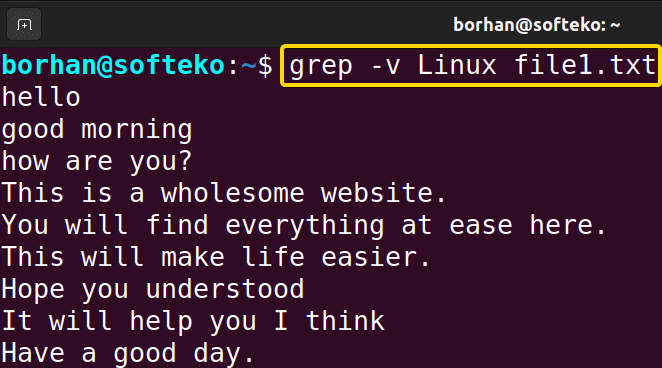
Conclusion
After completing this article, you will acquire all the knowledge about the grep command in Linux. With the given practical examples, you will be able to execute many commands to grep the location of different matches on your machine.
Similar Readings
- The “paste” Command in Linux [6 Practical Examples]
- The “split” Command in Linux [6 Practical Examples]
- The “sed” Command in Linux [7 Practical Examples]
- The “tr” Command in Linux [6 Practical Examples]
- The “uniq” Command in Linux [6 Practical Examples]
- The “printf” Command in Linux [8 Practical Examples]
FUNDAMENTALS A Complete Guide for Beginners


