Ubuntu is an open-source multiuser Operating System that allows multiple users to use the same computer system simultaneously. To ensure security and data privacy, Ubuntu allows password–protected accounts. Besides, it sets different types of permissions to access or modify files. Anyway, in some cases, you may need to create a user that can have access to some particular drive of other users. In this article, I will discuss how to create a user with access to a drive in Ubuntu using both Terminal and GUI.
Key Takeaways
- Creating a user using both Terminal & GUI.
- Adding drive access permission to the user.
- Familiarizing with the sudo, adduser, chown, chmod, mount & some other commands in Linux.
Requirements
- To create, remove, or modify a user in Ubuntu, you must either be the root user or have root/sudo privileges.
- When selecting a username, make sure to use only lowercase letters & avoid spaces with some special characters such as asterisks (*), question marks (?), or brackets ([ ]). Well, you can add numbers and some special characters including underscore (_), period (.), or hyphen (-).
Process Flow Chart
Distro Used Throughout the Tutorial: Ubuntu 22.04.1 LTS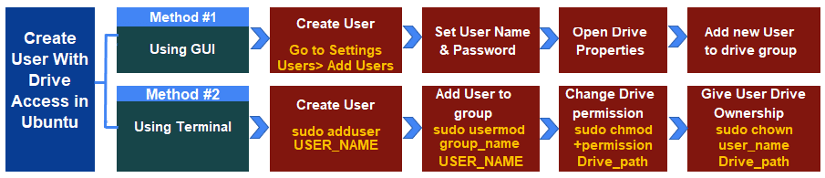
Watch 2 Methods to Create a Drive Accessible User in Ubuntu
2 Methods to Create a User with Access to a Drive in Ubuntu
Creating a user with special drive access can be vital in some cases whenever the user needs to access some specific applications or perform certain administrative tasks. Moreover, it is important to learn about sharing specific files while restricting others. Here, I will show you two ways to create a user with drive access.
Method 1: Using GUI to Create a User with Access to a Drive in Ubuntu
You can easily create a user using GUI in Ubuntu and give it access permission to any drive. GUI is simple in addition to a clear-cut solution when you can’t remember specifically which command to use in the command prompt to execute the task. Now, I will give step-by-step instructions to create a user & grant it drive access via GUI.
Steps to Follow >
➊ At first, go to your Ubuntu settings menu.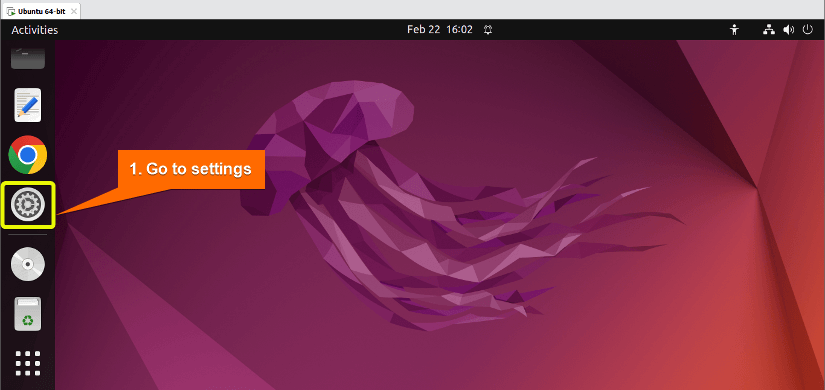 ➋ Next, search “Users” from the search option and select the ‘Add or remove users and change your password’ option.
 ➌ After that, select Unlock option to perform any action as administrator.
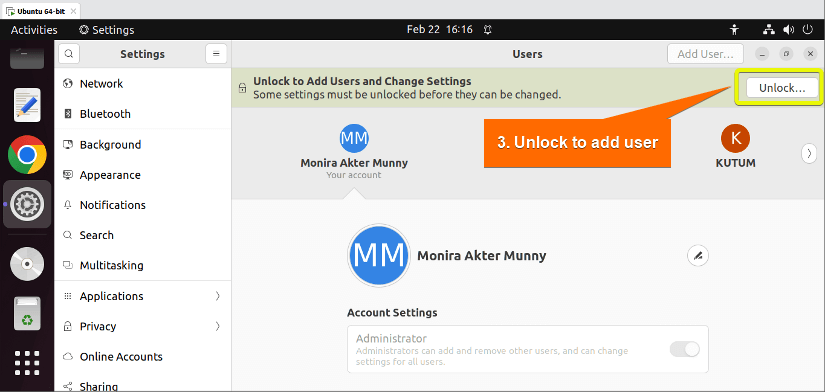 ➍ Afterward, authenticate your user account by entering the password for the currently logged-in user.
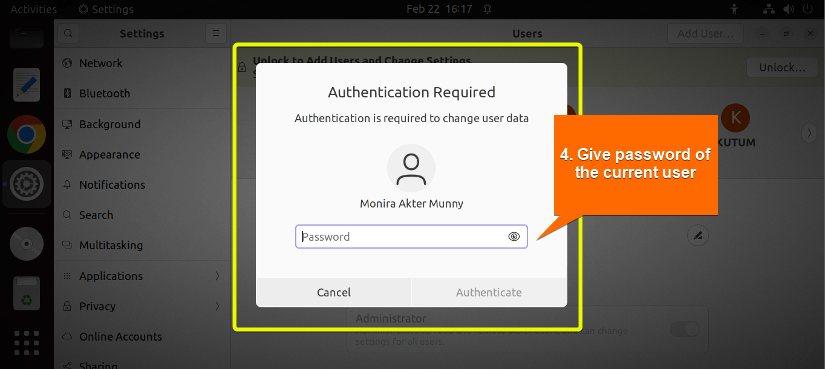 ➎ Then, Click the Add User option at the top right corner.
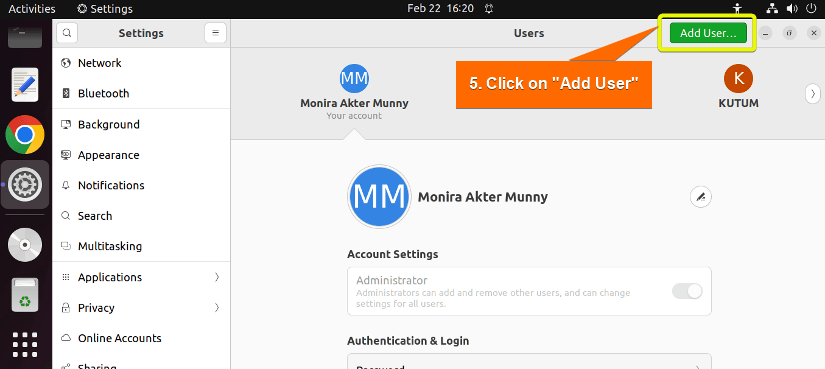 ➏ Select the account type Administrator to give administrative privileges to the new user. Set the username, and password. Then, click on the Add option.
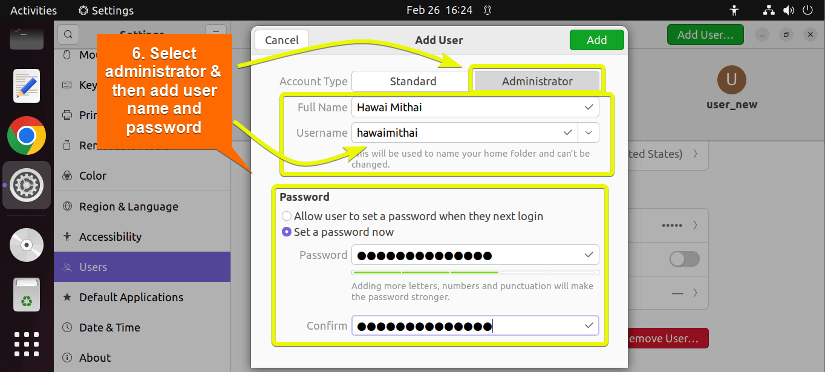 ➐ Finally, Authenticate your current account by typing the password & your new user will be created.
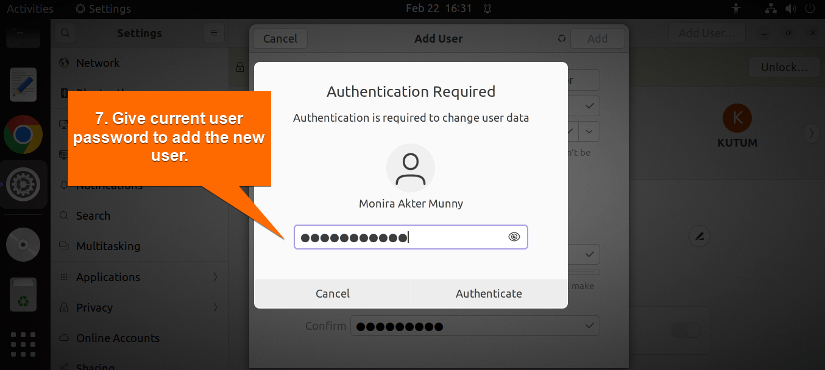 ➑ For the next phase, go to your files & right-click on any drive you want to give the new user access to. Select the “Properties” option from the list.
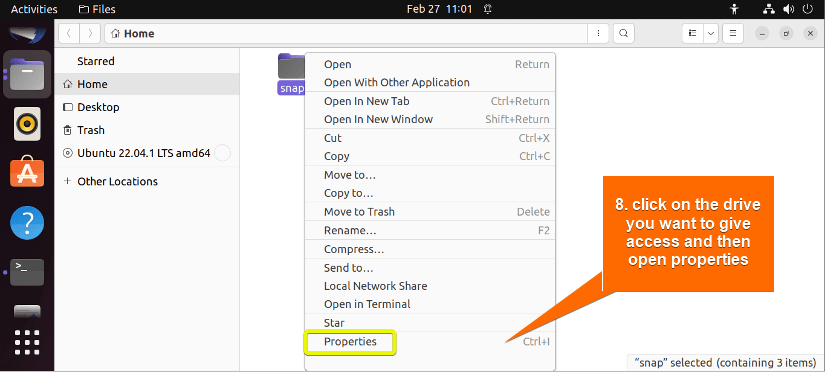 ➒ After that, go to permissions & click on “groups”.
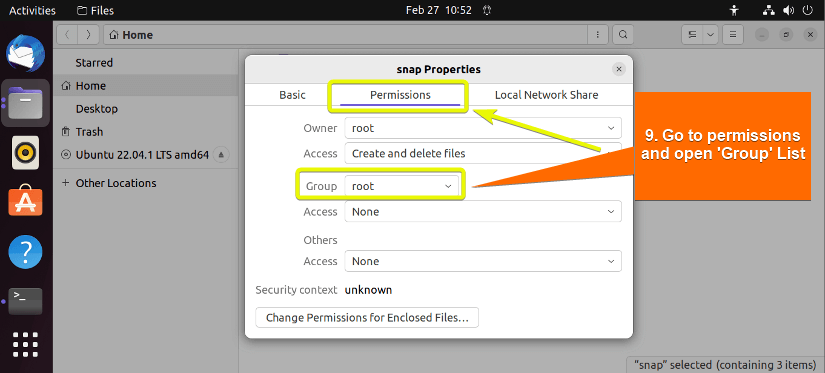 ➓ Afterward, from the group list, select the new_user group name. This way, the user will have access to this drive.
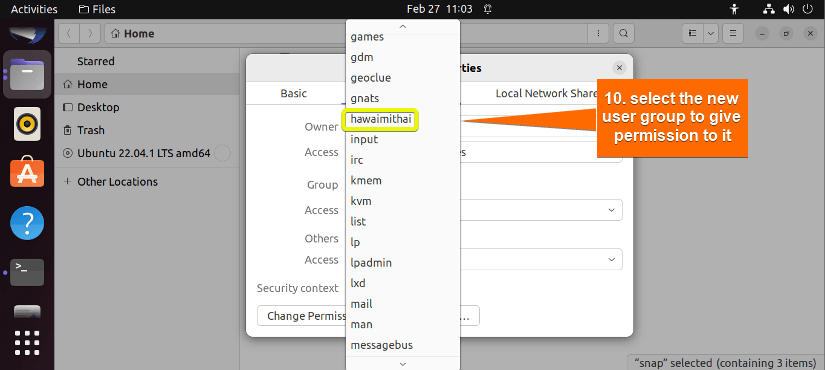 With the successful completion of the outlined steps above, you will be able to create a new user and give any drive access to it. After that, you can switch to the new user using the terminal or GUI, to check if you can access the drive.
Method 2: Using Terminal to Create a User with Access to a Drive in Ubuntu
The fastest way to create a user with access to a drive is by command line interface (CLI) via the terminal. You can easily create a user using the adduser command from the command prompt and then permit to access the drive using the chown command. Go through the below steps to perform the process practically.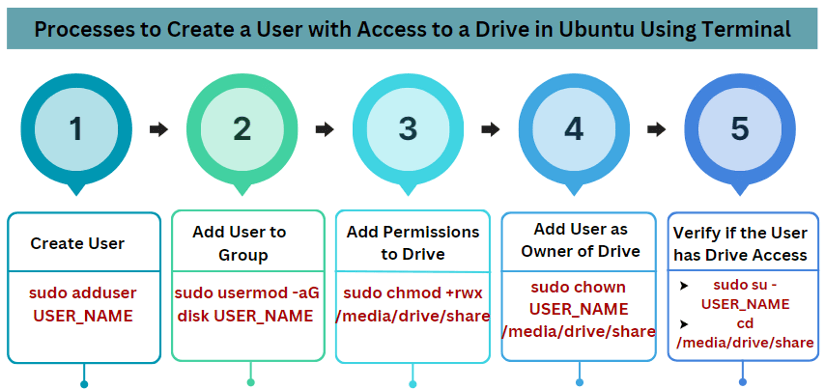
Step 1: Create a User
The distribution provides two different commands to create a new user. First, create a user using the adduser or useradd command. Here, I will create a user using the adduser command.
Command Syntax
sudo adduser USER_NAMESteps to Follow >
➊ Open your Ubuntu terminal application.
➋ Type the following command in your command prompt to create a user:
sudo adduser new_user- sudo: permits administrative privileges.
- adduser: creates a new user.
- new_user: name of the newly created user.
➍ Give the currently logged-in user password.
➎ Then, hit the ENTER button again.
After entering the password, the command will add the new user to a new group, with the same name as the username. Moreover, it will create a home directory for storing the new user’s data.
After that, the command copies the contents of the “/etc/skel” directory to the new user’s home directory. The “/etc/skel” directory contains a set of default files and directories which provide a basic set of files and settings for the user.
➏ After that, type & retype the new user password with other information. However, you can skip setting other information by pressing ENTER each time.
➐ Finally, press ‘Y’ to confirm the new user creation.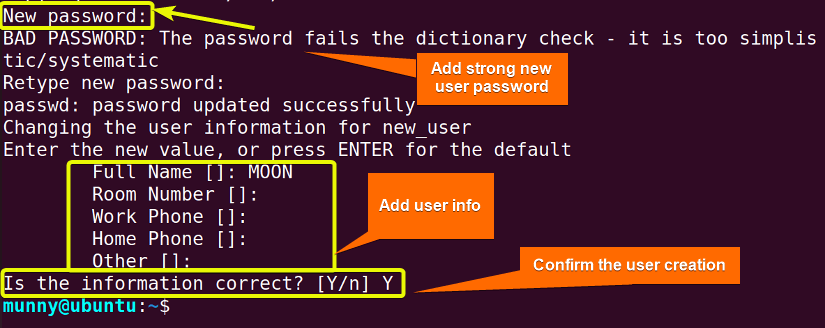
- How to Create a Jenkins User on Ubuntu? [2 Methods]
- How to Create MySQL User in Ubuntu? [2 Cases]
- Create User Without Home Directory in Ubuntu in Just 3 Steps
- How to Create a User in Docker Container Without Docker File?
Step 2: Add User to Group
By default, a new user is only a member of their own group. Now, to give the new user access to the drive, you have to add it to the appropriate group. For example, add the user to the “disk” group, which provides read/write access to block devices, such as hard drives and flash drives.
Command Syntax
sudo usermod [Options] GROUP_NAME USER_NAMESteps to Follow >
➊ Write the following command in the command prompt to add the new user to the “disk” group:
sudo usermod -aG disk new_user- usermod: Modifies assigned attributes to the user.
- -aG: This option of the usermod command adds the user to an additional group.
- new_user: Username of the newly created user.
➋ Press the ENTER key.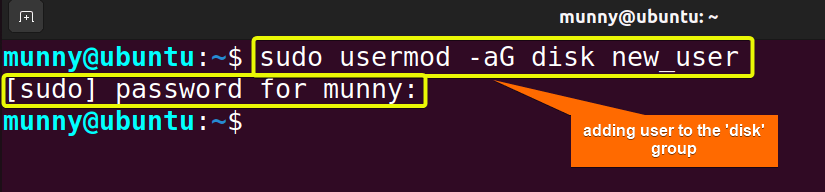 The usermod command is modifying the new_user by adding it to the additional “disk” group.
Step 3: Add Permissions to Modify the Drive
After you have created a new user and added it to the “disk” group, now you have to work on the drive, to which you want the user to have access. Check the mount point of the drive (location of the drive) and then add appropriate permissions to the directory, so that the new user can read, write or execute after accessing.
Command Syntax
sudo chmod +Permissions /path/to/the/driveSteps to Follow >
➊ Type the following command in the command prompt to set permissions to the drive:
sudo chmod +rwx /media/drive/share- chmod: changes access permission of files & directories.
- +rwx: read-write-execute permissions.
- /media/drive/share: Drive location path.
➋ Hit the ENTER button.
➌ Give the password and ENTER again.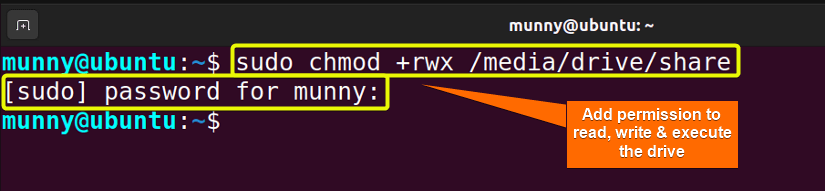 The chmod command is adding read-write-execute permissions to the drive.
Step 4: Give User Drive Ownership
Next, add the newly created user as an owner of the drive. To do so use the chown command & as an argument give the new username along with the drive location path.
Command Syntax
sudo chown USER_NAME /path/to/the/driveSteps to Follow >
➊ Write the following command to add the ownership of the drive to the new user:
sudo chown new_user /media/drive/share- chown: Changes ownership of files & directories.
- /media/drive/share: Location path of the drive.
➋ Press the ENTER key. The chown command is adding the new_user as an owner of the drive /media/drive/share.
Comparative Analysis of Methods
In this article, I showed you how to create a user and give it access to a drive both using GUI & terminal. Anyway, check the following table where I have comparatively analyzed the pros & cons of both methods.
| Methods |
Pros |
Cons |
|---|---|---|
| Method 1 |
|
|
| Method 2 |
|
|
In summary, both methods have their own pros and cons. Now, if you have good CLI knowledge and feel more comfortable using it over GUI, then use method 2. On the other hand, if you are not sure about some commands or facing unknown errors then use method 1.
- How to Create an FTP User in Ubuntu? [Step-by-Step]
- Create a New SFTP User in Ubuntu with a New SSH Key
- How to Create Group and Add User in Ubuntu? [2 Cases]
- Create FTP User for Specific Directory in Ubuntu [4 Steps]
Complementary Information
Besides, knowing about creating new users with drive accesses, you will find the below information helpful.
Check If the Newly Created User Exists in Ubuntu
After you have completed the new user account creation, verify if it has been created successfully. For that, try to find the new user name from the users’ list by using the following command syntax.
Command Syntax
getent passwd | grep USER_NAMENow, I will check if my newly created user named “new_user” exist on the system. You can do so by following the given steps.
Steps to Follow >
➊ Open the Ubuntu terminal.
➋ Then, type the following command into the command prompt:
getent passwd | grep new_user➌ Finally, Press the ENTER button.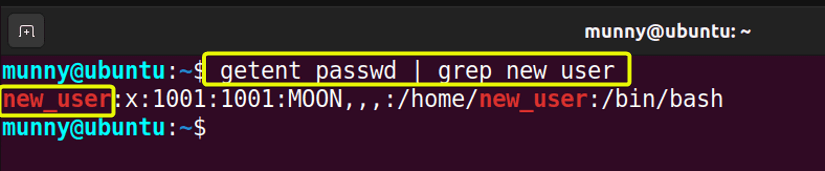
From the above image, you can see that the newly created user account “new_user” is present on the system. Each command output part represents the following info:
new_user: Name of the user account.
x: Password field in a non-readable format ‘x’. which means that the password is stored in the /etc/shadow file.
1001: The user ID (UID) for this user.
1001: The group ID (GID) for this user.
MOON: Full name of this user.
,,,: Comment field. These three consecutive commas mean that for this user it is empty.
/home/new_user: Home directory of this user.
/bin/sh: Default log-in shell of this user.
Examine If the Newly Created User has Access to the Drive
After that you have created a new user and granted access to a drive, next, let’s verify if the user really has permission to access the drive. For that, at first, switch to the new user using the following command syntax.
Command Syntax
su - USER_NAMEFollow the below steps to complete the process.
Steps to Follow >
➊ Start by opening the terminal
➋ Then, write the below command in the command prompt to log in to the newly created user:
su - new_user➌ Tab the ENTER button.
➍ Give the new_user password & hit the ENTER key again.
➎ After that, you will be logged in to the new_user. Now, let’s see if you can access & view the drive. For that, change the current working directory to the drive directory by the following command:
cd /media/drive/share- su: switches between users.
- cd: change the current working directory.
- ls: List all the file or directory contents.
➏ Tab ENTER & then, view the list of all files using the ls command.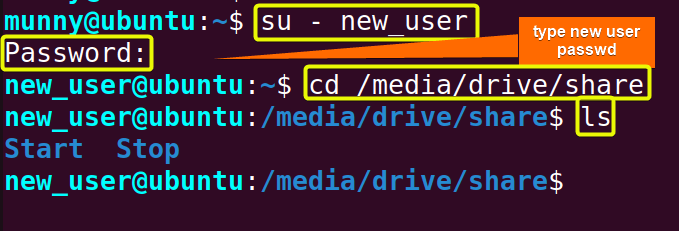
List All Users on Ubuntu
In method 1, while using GUI, you can see all users list from the Users section of applications. Now, what if you want to check all users list with their UID, GID, and home directory location using the terminal, then follow the below command syntax:
Command Syntax
getent passwd {User ID range}Steps to Follow >
➊ Open the Ubuntu terminal.
➋ Type the following command in the command prompt:
getent passwd {1000..60000}- getent: retrieves entries from a specified database.
- passwd: password database.
- {1000..60000}: User IDs ranging from 1000 to 60000.
➌ Press ENTER key.
- How to Create Multiple Users in Linux? [2 Methods]
- Create a User in Ubuntu as Read-Only Access to Log Folder
- How to Create User Account in Ubuntu with Public Key
- Create A User in Ubuntu that Runs a Script and Logs Out [4 Steps]
Give the New User Access to an External Drive in Ubuntu
Throughout the article, you learned how to give access to an internal drive to a newly created user. Now, what if you want to give the user access to an external drive? Well, the process is almost the same but you need some extra work. Follow the below steps to perform the process.
Steps to Follow >
➊ At first, plug in any external drive such as a USB drive.
➋ Next, open the Ubuntu terminal.
➌ Now, check all your system disks list using to view USB disk info by the following command:
sudo fdisk -l- fdisk: manipulate disk partition table.
- -l: used to show the list.
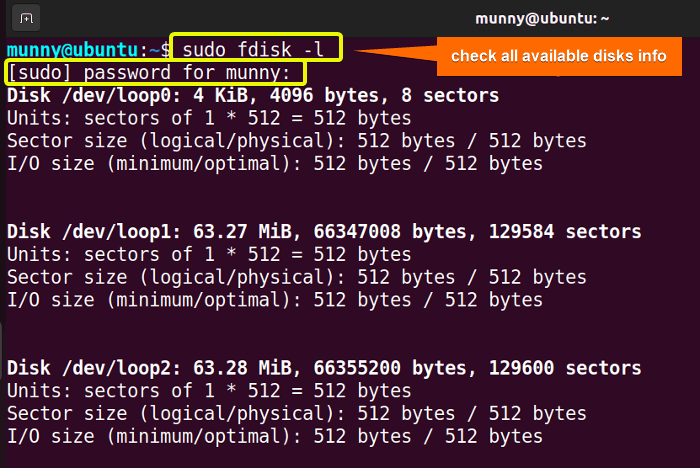 From the command output, you will see all your system disks information. If you scroll through the list, tt the bottom of the list, you will find your USB disk info like device name, size, label, identifier, etc.
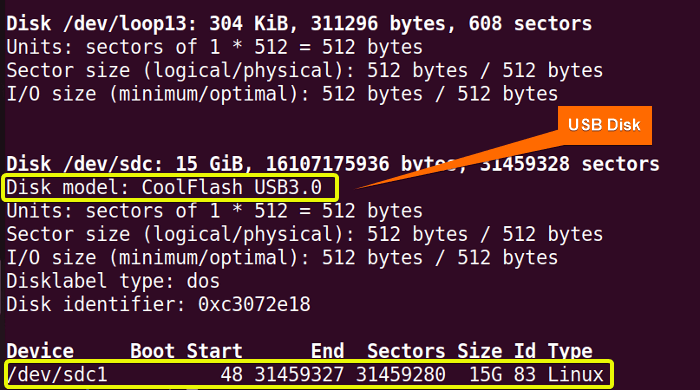 ➍ Next, mount the USB drive with the read-write option using the following command:
sudo mount -o rw /dev/sdc1 /media/munny/USB1➎ Afterward, check the mounted file list to see if the drive was mounted successfully by the below command:
df -h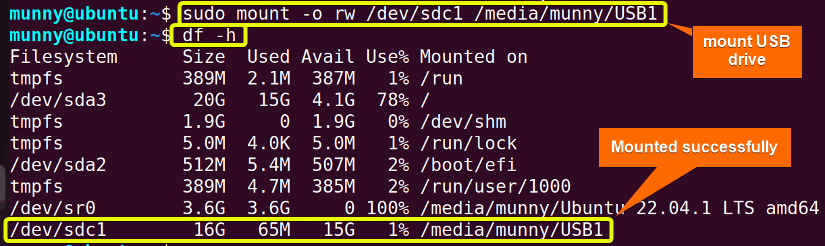 When you run the command to mount the drive, it will be mounted if no error message is shown and a new command prompt pops up as the output. Next, check the list of mounted files and you will notice the drive USB1 is listed at the bottom as it was mounted at last.
➎ Finally, add the new user as the owner of the drive by the following command:
sudo chown new_user:new_user /media/munny/USB1➏ Press the ENTER button. After these steps, your new user will have access to the external drive. You can follow these simple steps to give any user any external drive access.
Conclusion
To sum up, while using multiuser LINUX OS, it is very important to learn how to create users and distribute different types of permissions among them. Since this enhances security, control, and accountability between them. In this article, I tried to explain how to create a user with access to drive in Ubuntu and verified it with examples. Besides, I added some complementary info that will be helpful to gather some extra knowledge. Happy learning!
People Also Ask
- How to Create User and Add to Sudo in Ubuntu? [2 Methods]
- How to Create a Root User in Ubuntu [Step-by-Step]
- How to Create a New User in Ubuntu by GUI? [Step-by-Step]
- 2 Ways to Create User Account in Ubuntu Using Terminal
- How to Create Home Directory for Existing User in Ubuntu
- Create User with UID and GID in Ubuntu? [3 Scenarios]
- How to Create a Sudo User in Ubuntu? [Step-by-Step]
FUNDAMENTALS A Complete Guide for Beginners


