In the Linux-based operating system, Ubuntu, all users do not have the same privileges. By default, there is only one root user which has all the administrative power. It has the freedom that can customize, modify as well as crash the system. This is why running the system as the root user is not recommended and the substitute sudo program is introduced. When we add a regular user to the sudo program, it gains all the administrative privileges. In this article, I will show you 2 ways of “How to Create User and Add to sudo in Ubuntu”.
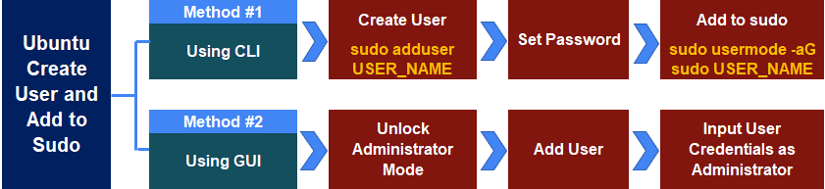
Process Flow Chart to Create User and Add to Sudo in Ubuntu
 Distro Used Throughout the Tutorial: Ubuntu 22.04.1 LTS
2 Methods to Create a User in Ubuntu and Add to Sudo
In Ubuntu, you can easily create new users from both the CLI(Command Line Interface) and GUI(Graphical User Interface). The distribution provides two different commands: the adduser & the useradd, to achieve this task from the CLI. In this section, you will learn both approaches to create a new user in Ubuntu using the CLI and the GUI.
Moreover, you can read our Comparative Analysis of Methods to distinguish between the two methods and best pick one for your needs.
Method 01: Create a User Account in Ubuntu and Add It to Sudo Group Using CLI
One of the convenient ways to create a new user in Ubuntu is by using the adduser command. This command by default adds the newly created user to a corresponding group, home directory and then prompts to set the new user password. However, you can use the useradd command to create a new user as well. But It will not be as interactive as the adduser command.
After creating a new user, by default, it will be added to the group under the username itself. If you want to give this user sudo privileges, you will need to add it to the system’s sudo group. Adding a new user to the sudo requires running the usermod command as a root user in your terminal.
In this example, I will create a new user named “new_user1” using the adduser command and then add it to the sudo group. You can follow the instructions given below to do the same:
- Open the Ubuntu Terminal.
- Type the following command in the command line and press ENTER to execute:
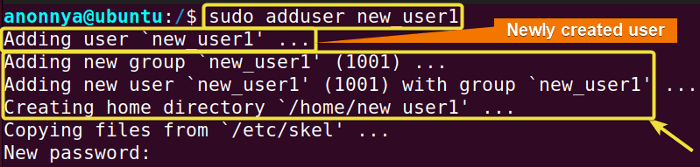
sudo adduser new_user1EXPLANATION- sudo: Grants administrative privileges.
- adduser: Adds a new user.
- new_user1: Name of the user to be created.
- Then, give the password of your currently logged-in user and hit ENTER.
 EXPLANATIONThe command adds the desired “new_user1” user and its corresponding group to the system. While adding the new user with its group to the system, its User ID is also displayed inside the parentheses ().
A home directory at the path “/home/new_user1” is also created with this command. All the default files and directories from the “/etc/skel” are copied into the home directory to establish the new user’s environment.
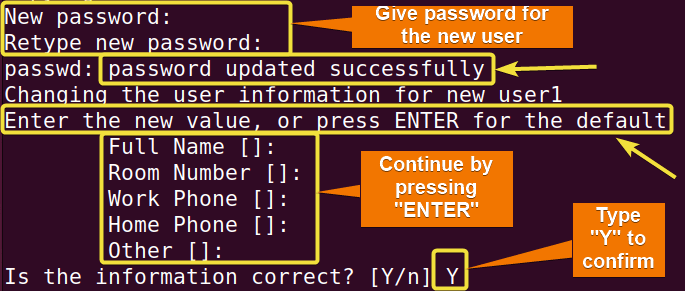
- Now, type the new password for your new user and press ENTER.
- Retype the password for confirmation and hit ENTER again.
- Continue pressing ENTER to skip the steps in the middle.However, you can give your desired information according to your need.
- Finally, type Y to confirm your given information.
 After hitting Y the new user will be created in your system. Now, to add this user to sudo you will need to follow the next steps.
 - Execute the following command to add the user to sudo:
sudo usermod -aG sudo new_user1EXPLANATION- usermod: Modifies an existing user account.
- -aG: Adds a user to the specific group.
- new_user1: Username of the user to be given root privileges.
- Give the password for the currently logged-in user and hit ENTER.
- Now, check the updated groups of the user by running the command below.
groups new_user1 EXPLANATIONIn the image above, you can see that I have added the newly created use “new_user1” to the sudo group using the usermod command. As the output of the command does not show any visible differences for the user “new_user1”, I applied the additional groups command for verification. It displays all the corresponding groups of the “new_user1” where the sudo is also enlisted now.Furthermore, you can follow this guide to verify whether the newly created user has sudo access.
 After hitting Y the new user will be created in your system. Now, to add this user to sudo you will need to follow the next steps.
Method 02: Create a User Account in Ubuntu and Add It to Sudo Group Using GUI
Apart from using the terminal, you can create a user from the graphical user interface (GUI) as well. You do not need any command to create a new user and give it sudo privileges from the GUI. In this example, I will add a new user named “new_user2” using the GUI. Following the steps below you can do the same:
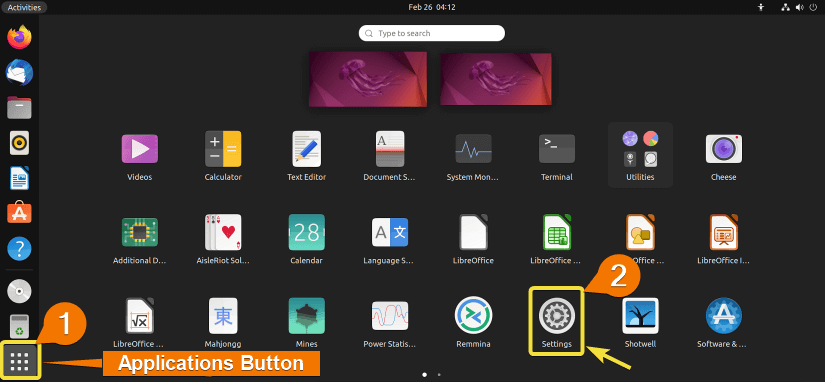
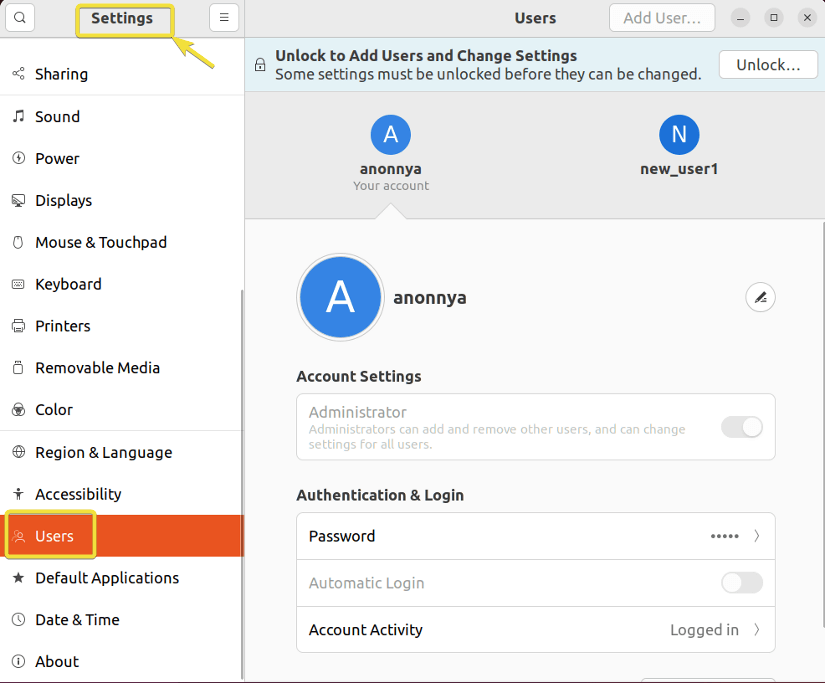
- At first, click the Applications menu and then select “Settings” from the available applications.

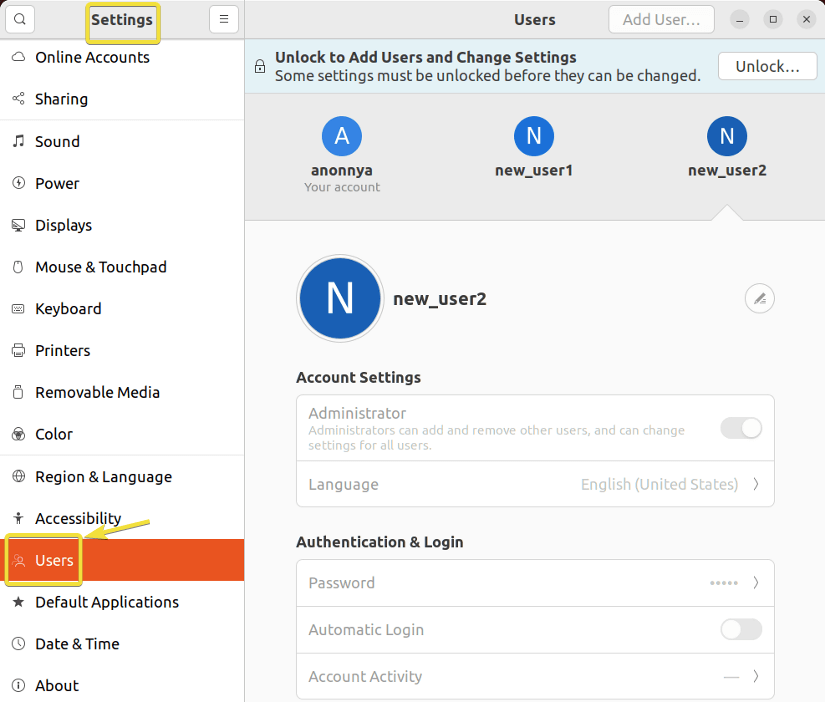
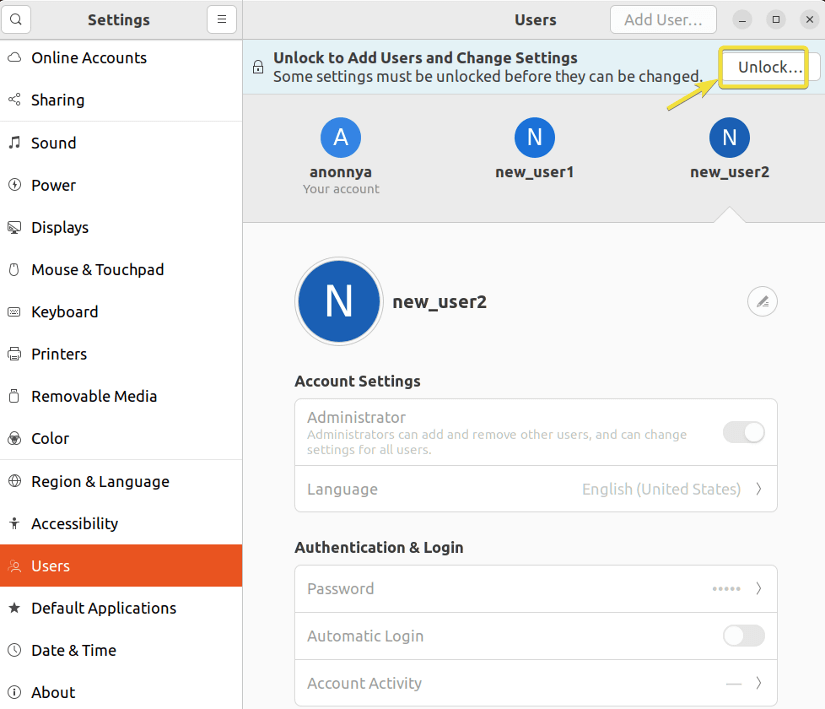
- Go to the “Users” settings as shown in the image below.

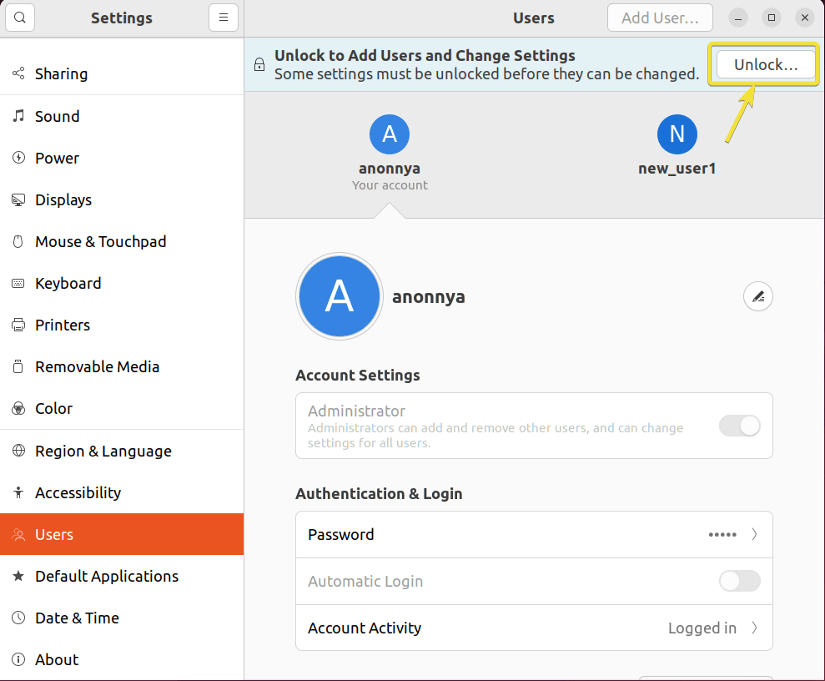
- In addition, to perform actions as administrator press the Unlock button

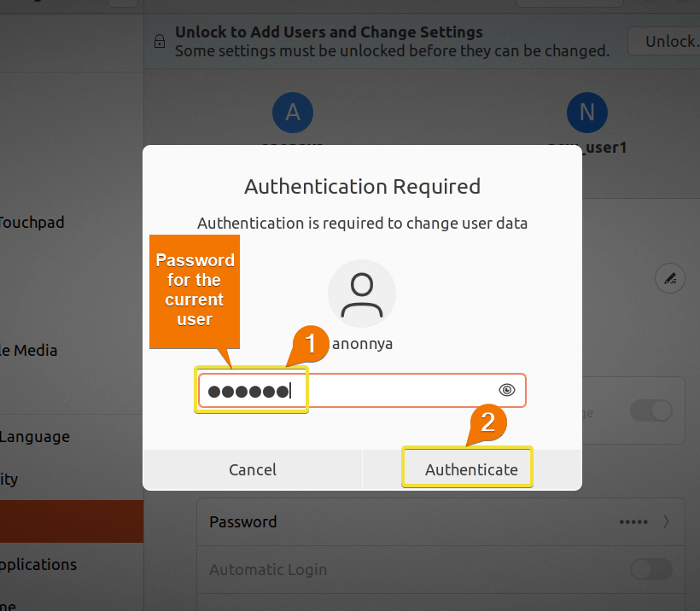
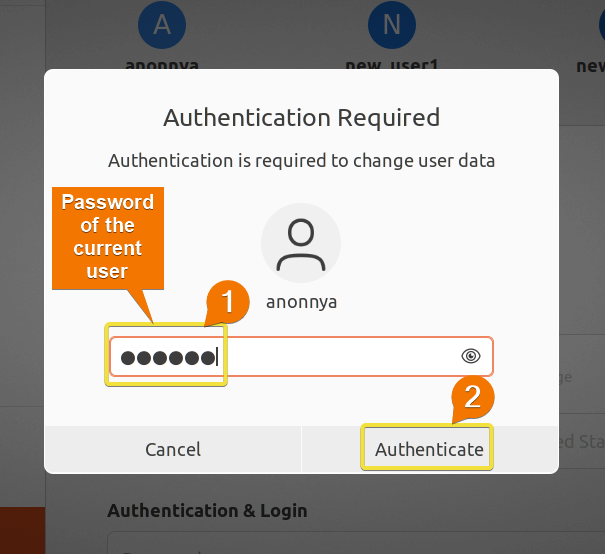
- Further, Authenticate your user account by entering the password for the currently logged-in user.

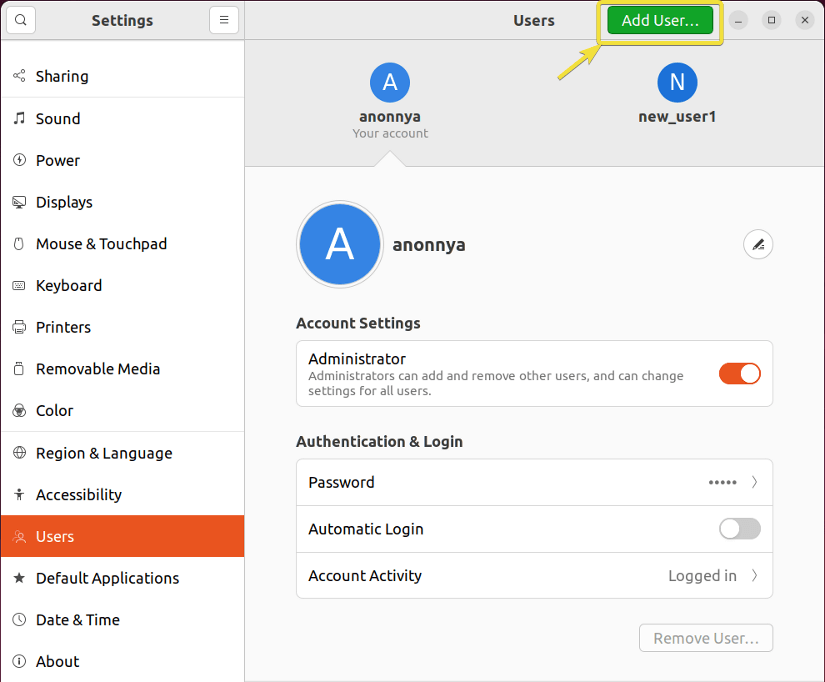
- Now, Click the Add User button at the top right corner.

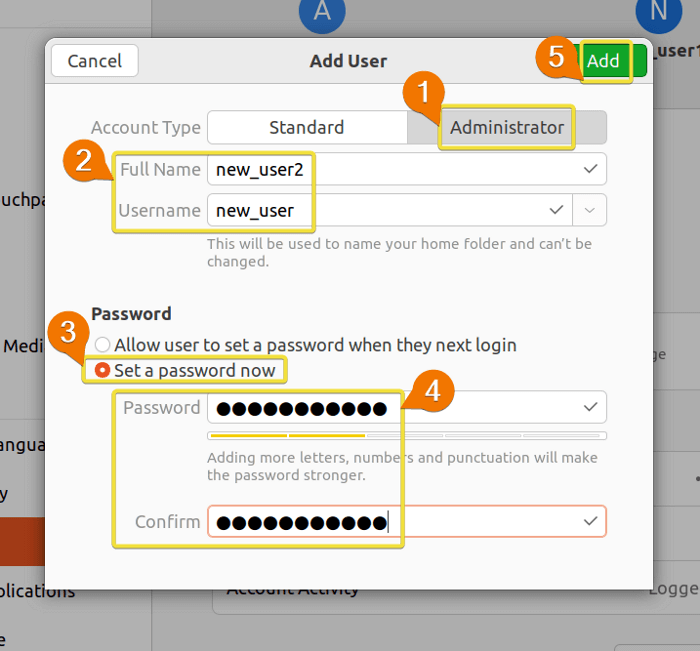
- Additionally, Select the account type Administrator to give sudo permissions to the new user. Set the user name, and password. Finally, click on the Add button.
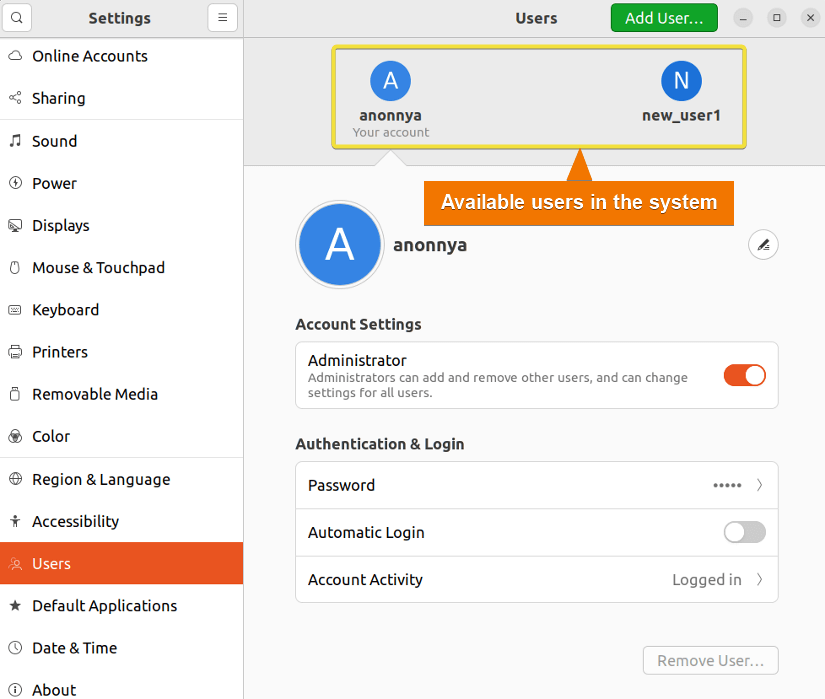
 As a result of completing the aforementioned steps, you can see that I have successfully created a new user in Ubuntu. The user is automatically added to sudo as I created the account of Administrator type.
 In the above image, you can see that the account has administrative privileges.
However, you can also run commands from your terminal and verify whether the account is added to sudo or not.
 As a result of completing the aforementioned steps, you can see that I have successfully created a new user in Ubuntu. The user is automatically added to sudo as I created the account of Administrator type.
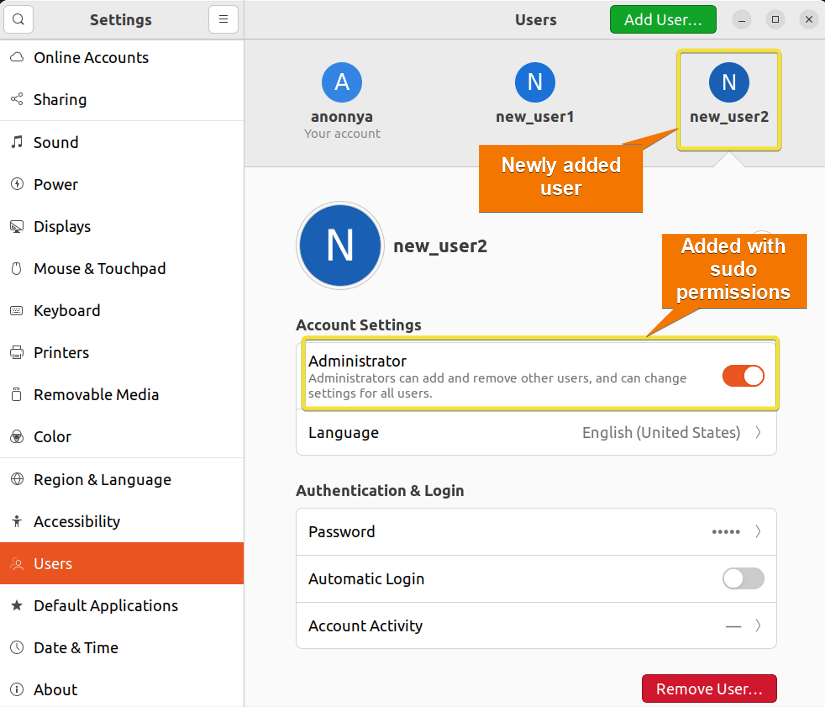 In the above image, you can see that the account has administrative privileges.
- How to Create a Jenkins User on Ubuntu? [2 Methods]
- How to Create MySQL User in Ubuntu? [2 Cases]
- Create User Without Home Directory in Ubuntu in Just 3 Steps
- How to Create a User in Docker Container Without Docker File?
Comparison of Methods to Create User and Add to Sudo
Since this article introduces multiple methods for a single task, you might get confused about which one to pick. Therefore, in this section, I am presenting a comparative analysis of the two different approaches for your convenience. You can learn the advantages and disadvantages of the available methods and choose what is the best for you.
| Methods | Pros | Cons |
|---|---|---|
| Method 1 |
|
|
| Method 2 |
|
|
Summing up it can be said that both methods come with their own pros and cons. The suitable method varies from user to user. However, if you are comfortable with the CLI you can go for Method 1. On the other hand, If you do not have any idea about the Linux commands, you can use the approach through GUI.
Check if a User has Sudo Access in Ubuntu
In Ububtu you can check if the current user has sudo privileges or not with the whoami command as well. In this example, I will verify if the newly created user “new_user1” has sudo access. For this, I will first need to switch from the current user to the “new_user1” user. Follow the steps below to do the same:
- Open the Ubuntu terminal.
- Then, type the following command in the command prompt and press the ENTER button:
su - new_user1EXPLANATION- su: Switches user to run commands as another user.
- new_user1: Username of the user to be given root privileges.
- Then, give the password of the new user and hit ENTER.
- Now, check the sudo access by typing the command below:
sudo whoamiEXPLANATION- whoami: Returns the username of the current user.
- Again, type the password for the currently logged-in user, and hit ENTER.
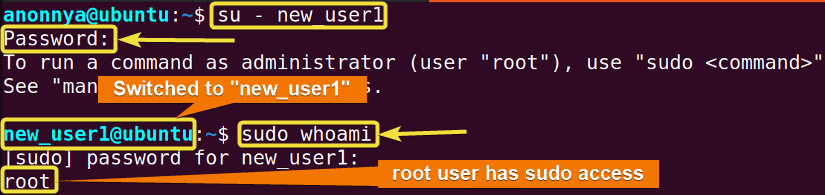
 In the above image, you can see that the su command switched from the current user to the desired “new_user1” user. Moreover, typing the whoami command with sudo keyword returns the current user. Since the “new_user1” was added to sudo and has root privileges, this user is listed and shown as root user.
 In the above image, you can see that the su command switched from the current user to the desired “new_user1” user. Moreover, typing the whoami command with sudo keyword returns the current user. Since the “new_user1” was added to sudo and has root privileges, this user is listed and shown as root user.
- How to Create an FTP User in Ubuntu? [Step-by-Step]
- Create a New SFTP User in Ubuntu with a New SSH Key
- How to Create Group and Add User in Ubuntu? [2 Cases]
- Create FTP User for Specific Directory in Ubuntu [4 Steps]
Check If the Newly Created User Exists in Ubuntu
In addition, to check whether a new user account is created, you can apply the given approach. Here, I will check if the newly created user “new_user1” exists on my system. You can do so by following the given steps:
- Open the Ubuntu terminal.
- Then, type the following command into the command prompt and hit ENTER:
getent passwd | grep new_user1EXPLANATION In the above image, you can see that the new user “new_user1” exists on my system.OUTPUT ANALYSISThe output of the above image represents the following:
- new_user1: Name of the user account.
- x: Password field in a non-readable format ‘x’. which means that the password is stored in the /etc/shadow file.
- 1001: The user ID (UID) for this user.
- 1001: The group ID (GID) for this user.
- ,,,: Comment field. These three consecutive commas mean that for this user it is empty.
- /home/tom: Home directory of this user.
- /bin/sh: Default log-in shell of this user.
 In the above image, you can see that the new user “new_user1” exists on my system.
Delete User and Home Directory in Ubuntu
Conversely, you can easily remove a user from the CLI using the userdel command in Ubuntu. In this example, I will delete the user account “new_user1” along with its home directory from my system. To do the same follow the below procedures:
- At first, open the Ubuntu terminal.
- Type the following command in the command line and press the ENTER button:
sudo userdel -r new_user1EXPLANATION- userdel: Deletes a user account.
- -r: Removes home directory and its contents.
- tom: Username of the user to be deleted.
- Accordingly, give the password of the currently logged-in user and hit ENTER.
- Now, to check if the user deletion was successful by typing the command below, and press ENTER:
getent passwd | grep new_user1EXPLANATION- getent: Looks into the administrative database that is given as its argument.
- passwd: Contains user information.
- Pipe (|): Redirects the standard output.
- grep: Looks for a specific pattern given to it as an argument.
- new_user1: Username of the newly created user to be checked.
 In this image, you can see that I have removed the user “new_user1” along with its home directory. Further, the ls command here shows all the available user home directories except for the “new_user1”.
 In this image, you can see that I have removed the user “new_user1” along with its home directory. Further, the
 Remove a User in Ubuntu from the GUI
If you do not have any knowledge of the commands in Linux, you can remove a user from the GUI also. To perform this task you must log in as a root user or, you must have the same administrative privileges as a root user. If you have such permissions, then you can follow the given steps to delete a user from your system using GUI:
- At first, click the Applications menu and then select “Settings” from the available applications.
- Go to the “Users” settings as shown in the image below.

- Since, you need administrative privileges, press the Unlock button to perform actions as administrator.

- Furthermore, Authenticate your user account by entering the password for the currently logged-in user.

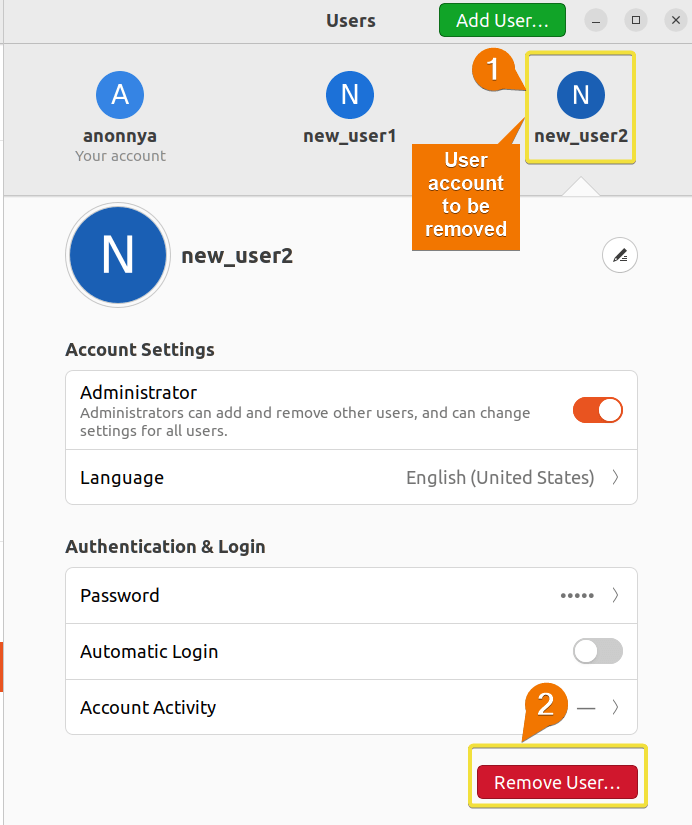
- SELECT the desired user account for deletion and then CLICK the Remove user button. In this example, I will delete the user “new_user2” by clicking the Remove user button under this user.

- Now, a dialog box will appear on your screen giving multiple options regarding the deletion. You can either keep or delete the user’s home directory along with the user account. To completely remove the user SELECT the “Delete Files” option.

 Upon completion of the given steps, the desired user account will disappear from your system. You can modify the deletion or cancel the task from the last step.

 Upon completion of the given steps, the desired user account will disappear from your system. You can modify the deletion or cancel the task from the last step.
- How to Create Multiple Users in Linux? [2 Methods]
- Create a User in Ubuntu as Read-Only Access to Log Folder
- How to Create User Account in Ubuntu with Public Key
- Create A User in Ubuntu that Runs a Script and Logs Out [4 Steps]
Conclusion
This article here presents a comprehensive guide to creating a new user in Ubuntu and adding it to the sudo group. Users of beginner to advanced levels can use the explained methods for achieving their goals. You will also be able to learn about some subsidiary tasks related to the addition of a new user. I hope these elaborative approaches will aid your journey with Ubuntu and enhance your experience in Linux.
People Also Ask
How do I create a new sudo-enabled user in Ubuntu?
To create a sudo-enabled user in Ubuntu: log into the server as the root user, then add a new user to the system, add the user to the sudo group, and finally test the sudo access of the user.
What are the basic requirements to create an Ubuntu user and add to sudo?
The basic requirements to create user and add to sudo in Ubuntu are:
- Need to be a root user or have root/sudo privileges to add, remove or modify a user in Ubuntu.
- The USER_NAME must begin with a lowercase alphabetic character and not contain any spaces or ‘@’. Furthermore, it can only include some valid letters, numbers, and symbols like ‘-’, ’_’, ‘.’ etc.
How do I create an admin in Ubuntu?
From the command line, you can create a regular user using the adduser or useradd commands and then add it to the sudo group to make it an admin user. However, while creating a user through the GUI you can choose the option of Administrator Account Type to create an admin.
What is the difference between useradd and adduser?
The useradd is a faster and lower level command that lacks entirely setting up a user account. On the other hand, the adduser is an interactive command that prompts all the required information such as user password, home directory & group by default.
How do I list all users in sudo?
You can list the available names under the sudo group by typing the getent group sudo command. Additionally, this command will return other information along with sudo usernames.
Is root user the same as sudo?
No. The root user is a special user account that has unrestricted access to the system. Whereas, sudo stands for “substitute user do” or “super user do” which temporarily allows a regular user to exercise root privileges.
How to set sudo password?
To set the sudo password you will need to log in as the root and run the passwd command from the terminal. Then, you can change/set a new password for the user.
What is the difference between su and sudo?
To run commands as root using su you will need to enter the root password. On the other hand, to run commands as root using sudo, you will need to enter the password of the current user.
Related Articles
- How to Create a Root User in Ubuntu [Step-by-Step]
- 2 Ways to Create a User With Access to a Drive in Ubuntu
- How to Create a New User in Ubuntu by GUI? [Step-by-Step]
- 2 Ways to Create User Account in Ubuntu Using Terminal
- How to Create Home Directory for Existing User in Ubuntu
- Create User with UID and GID in Ubuntu? [3 Scenarios]
- How to Create a Sudo User in Ubuntu? [Step-by-Step]
FUNDAMENTALS A Complete Guide for Beginners


