In Linux, you have the privilege to manage different users on the same machine. Sometimes you want to give some specified access to some users in Linux. You might want to create a user without a home directory in Ubuntu to restrict the user’s access or limit their privileges. This article will help you to do it very smoothly.
Process flowchart to create a user without a home directory in Ubuntu:

Distro Used Throughout the Tutorial: Ubuntu 22.04.1 LTS
3 Steps to Create a User without Home Directory in Ubuntu
In Ubuntu, you can easily create new users from both the CLI(Command Line Interface) and GUI(Graphical User Interface). The distribution provides two different commands to create a new user. Here, I will use the useradd command only as the adduser command creates a home directory by default with the new user.
Read More: How to Create a New SFTP User in Ubuntu with a New SSH Key
Step 1: Create a New User in Ubuntu
You can create a new user from the terminal using the useradd command. Here, I have used the first command. Go through the below steps to see how it works:
- Open the Ubuntu Terminal by pressing CTRL+ALT+T.
- Insert the following command to create a user:
sudo useradd -M abirOR,
It will ask for the current user’s password.sudo useradd --no-create-home abir -
Press the ENTER key after providing the password.

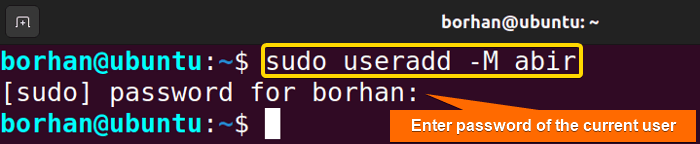
In the above image, you can see that nothing happens after giving the password. You need to set the password of the new user to create it successfully.
Step 2: Set the Password for the New User in Ubuntu
Follow the steps given below to set the password for the new user ID:
- First, open your terminal.
- Then type the following command in your command prompt:
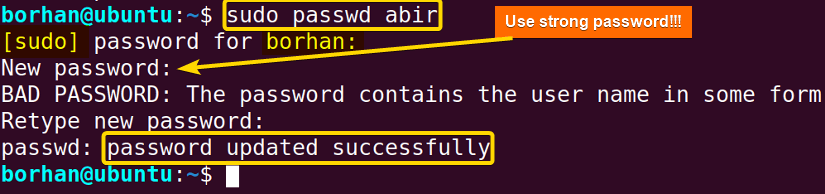
sudo passwd abirHere, the passwd command sets/changes the password.
- Finally, press the ENTER button. Now, give your current user password. Then, type the password for the new user ID and retype the password again.
 As you can see in the above image, my password is updated successfully.
 As you can see in the above image, my password is updated successfully.
Step 3: Check for New User’s Home Directory in Ubuntu
To check whether the new user account has a home directory or not you need to switch to the new user. Here’s how:
- First, launch your terminal.
- Then type the following command in your command prompt:
su - abirEXPLANATION- su: Substitutes User ID.
- abir: Newly created user name to switch to.
- After pressing the ENTER button, you will see that your command prompt and terminal will change as shown in the below picture.
 You can see that a warning message is displayed on the screen. It says no home directory is created for the new account.
 You can see that a warning message is displayed on the screen. It says no home directory is created for the new account.
Check If the Newly Created User Exists in Ubuntu
To check whether a new user account is created, you can apply the given approach:
- Open the Ubuntu terminal.
- Then, type the following command:
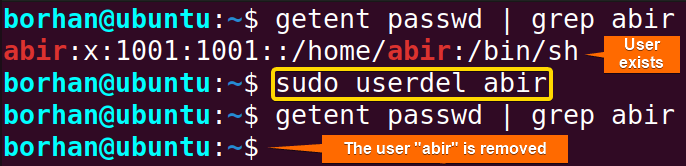
getent passwd | grep abir - Press ENTER.
 You can see in the above picture that a new user named abir has been created.
 You can see in the above picture that a new user named abir has been created.
The output of the above image represents the following:
- abir: Name of the user account.
- x: Password field in a non-readable format ‘x’. which means that the password is stored in the /etc/shadow file.
- 1001: The user ID (UID) for this user.
- 1001: The group ID (GID) for this user.
- ,,,: Comment field. These three consecutive commas mean that for this user it is empty.
- /home/tom: Home directory of this user.
- /bin/sh: Default log-in shell of this user.
Give Root Privileges to an Existing User in Ubuntu
Root privileges refer to the administrative rights granted to the superuser, often referred to as “root.” Root is the highest level of access and has unrestricted control over the system. With root privileges, a user can perform tasks that are critical to system operation, such as installing and removing software, modifying system configurations, and accessing sensitive files.
If you’re a root user or you’ve root privileges in Ubuntu, you can give root privileges to another existing user by adding it to the sudo group. For this, you have to use the usermod command in Linux. To do this:
- Open the terminal.
- Then, type the following command:
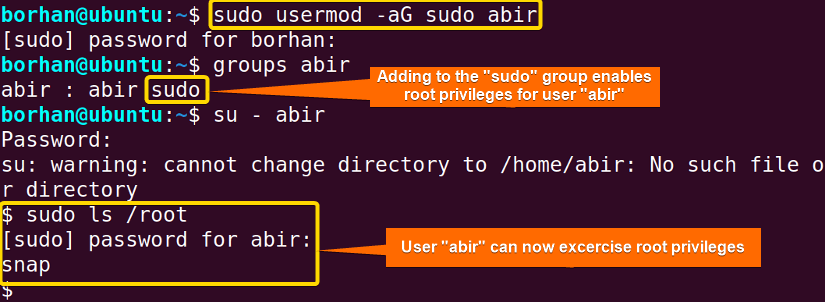
sudo usermod -aG sudo abirEXPLANATION- usermod: Modifies an existing user account.
- -aG: Adds a user to the specific group.
- After that, provide the password of the currently logged-in user.
- To check whether the user is added to the sudo group run the
groups abircommand.
 In the above image, you can see that I have given the user “abir” root privileges by adding it to the sudo group. Furthermore, I checked its group by using the
 groupscommand and tested its elevated powers by using thelscommand.
 In the above image, you can see that I have given the user “abir” root privileges by adding it to the sudo group. Furthermore, I checked its group by using the
 Delete User in Linux
You can easily remove any user from the system using the terminal with the userdel command in Ubuntu. Here, I will delete the user account named “abir”. To do the same follow the below procedures:
- Open the terminal.
- Then, type the following command into the command prompt.
sudo userdel abir - Press ENTER.
- Finally, provide the password of the currently logged-in user.
 In the above image, you can see that I removed the user “abir” using the Ubuntu terminal.
 In the above image, you can see that I removed the user “abir” using the Ubuntu terminal.
Conclusion
After completing this article, you will be able to create a user without a home directory very easily in Ubuntu. This will help you to organize your work making you a power user of Linux.
People Also Ask
What is the home directory of a user in Linux?
The home directory in Linux is the designated space where a user’s files, settings, and personal data are stored. It acts as the base directory for the user when they login to the system. The home directory acts as a one-of-a-kind workspace for the user.
How does the home directory work?
The home directory in a Unix-based system, like Linux, acts as a personal desktop for each user. The home directory contains the user’s files, configurations and settings, providing a secure and customized environment. When you log in, you’ll be directed to your home directory, which acts as a central hub for your computing experience.
Why home directory is used in Linux?
The home directory is used to create a unique environment for each user in Linux. The home directory contains the files, configuration, and settings of the user. The home directory provides the user with a secure and customized environment. The home directory is used as the user’s workspace when the user logs in.
What is the purpose of a home directory in Linux?
The home directory of Linux acts as the personal workspace of each user, containing files, settings, and configurations. This directory is the user’s initial point of entry upon logging in, allowing for personalization and security for each user’s computing experience.
Which character represents the user’s home directory?
The tilde (~) character represents the user’s home directory in Linux.
What permission should the home directory have?
The home directory should typically have 700 (dwrxr-xr-x.) permissions, ensuring maximum security by granting read, write, and execute permissions exclusively to the owner, while restricting access for others.
Where are user home directories stored in Linux?
The user home directories are stored in /home/username/os location in Linux. Here, os means the operating system the user is working with.
What is the difference between the home directory and the root directory?
The primary difference between the home and root directories is that the home directory contains user-specific files and configurations; the root directory, on the other hand, is the system’s primary directory, containing necessary system files and configurations. In other words, the home directory is user-centered, while the root directory is system-centered.
Related Articles
-
- How to Create a Jenkins User on Ubuntu? [2 Methods]
- Create MySQL User in Ubuntu? [2 Cases]
- How to Create FTP User for Specific Directory in Ubuntu [4 Steps]
- 2 Ways to Create a User With Access to a Drive in Ubuntu
- How to Create User with UID and GID in Ubuntu? [3 Scenarios]
- Create A User in Ubuntu that Runs a Script and Logs Out [4 Steps]
FUNDAMENTALS A Complete Guide for Beginners


