The open-source automation server Jenkins can easily be deployed and run on Linux distributions. The first step to using Jenkins would be creating a new user. In this article, I will show you how to create a Jenkins user on Ubuntu along with installing and setting up the very first admin user in Jenkins.
Key Takeaways
- Creating a new Jenkins user on Ubuntu using both GUI & CLI.
- Installing Java on Ubuntu.
- Installing Jenkins on Ubuntu.
- Adding Jenkins Admin.
Requirements
- Have Java installed on Ubuntu.
- Have Jenkins installed on Ubuntu.
- Need to be a root user or have root/sudo privileges to install Jenkins.
- Be a Jenkins admin user to create new users.
Downloads
Process Flow Chart
Distro Used Throughout the Tutorial: Ubuntu 22.04.1 LTS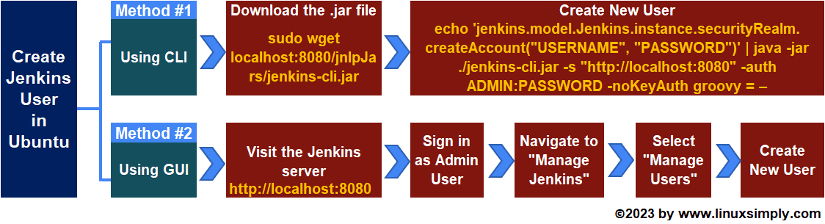
Watch 2 Methods to Create a Jenkins User on Ubuntu
2 Methods to Create a Jenkins User on Ubuntu
There are several ways of creating a new Jenkins user. However, the task can be divided into two main methods: creating a new Jenkins user using CLI(Command Line Interface) and creating a new Jenkins user using GUI(Graphical User Interface). In this section, I will illustrate both methods of creating a Jenkins user in Ubuntu.
You can read our Comparative Analysis of Methods to distinguish between these two methods and best pick one for your needs.
Method 01: Using CLI to Create a Jenkins User on Ubuntu
You can create a Jenkins user from your Ubuntu CLI. To use this method first you will need to download the ‘jenkins-cli.jar’ in your Ubuntu system which will enable you to remotely run Jenkins commands. Additionally, with this approach, you can set the user password at the same time.
In this section, I will create a new Jenkins user named “jenkins_user1” from CLI. I will set the account’s password to “user123”. You can do the same by following the steps below.
Steps to Follow >
- At first, open the Ubuntu terminal.
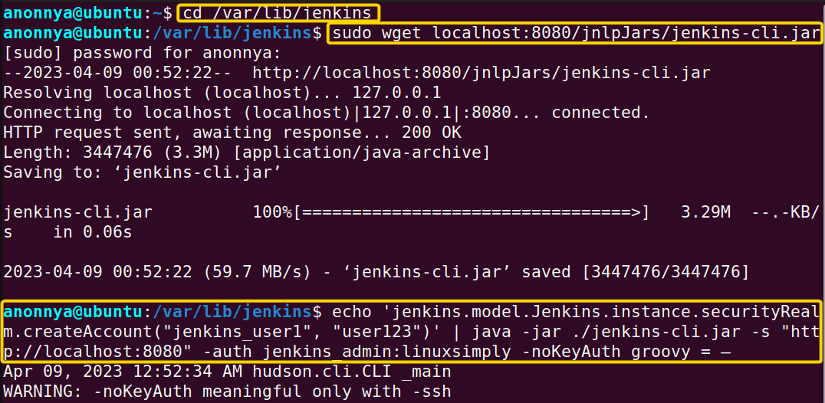
- Then, move to your Jenkins folder using the command below.
cd /var/lib/jenkinsEXPLANATION- cd: Changes directory location.
- /var/lib/jenkins: Path to the Jenkins.
- Now, download the jar file by running the following command or you can download it from this article.
sudo wget localhost:8080/jnlpJars/jenkins-cli.jar - Finally, create new user with the given command.
echo 'jenkins.model.Jenkins.instance.securityRealm.createAccount("jenkins_user1", "user123")' | java -jar ./jenkins-cli.jar -s "http://localhost:8080" -auth jenkins_admin:linuxsimply -noKeyAuth groovy = –EXPLANATION- echo: Displays a given text.
- ‘jenkins.model.Jenkins.instance.securityRealm.createAccount(“jenkins_user1”, “user123”)’: Creates a new user account in Jenkins with the username “jenkins_user1” and the password “user123”.
- | (Pipe symbol): Used to redirect the output of the first command to the input of the second command.
- java -jar ./jenkins-cli.jar: Launches the CLI tool.
- -s “http://localhost:8080“: Specifies the URL of the Jenkins server that the CLI tool should connect to.
- -auth: Specifies the Jenkins admin username and password.
- jenkins_admin:linuxsimply: The username and the password of the admin account.
- -noKeyAuth: Disables the use of SSH key authentication.
- groovy = –: Specifies that the Groovy script should be read from standard input.

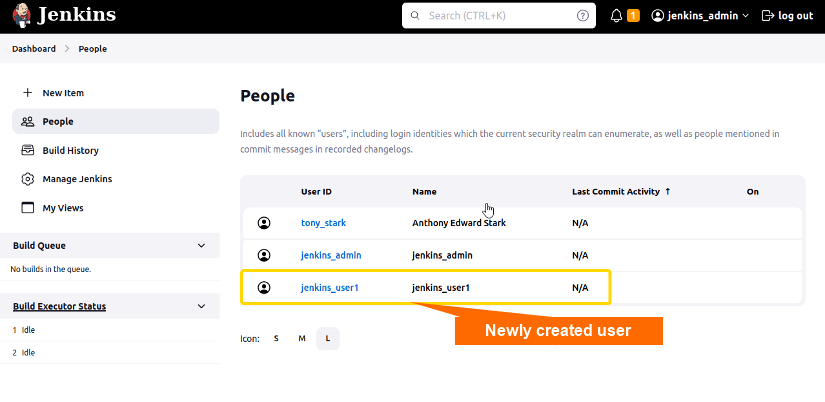
- Moreover, view the newly created user from your Jenkins server.
 Upon completion of the aforementioned steps, a new Jenkins user will be created on your server. As you can see in the above image, you can view the newly created user by logging into your Jenkins account from any web browser.
 Upon completion of the aforementioned steps, a new Jenkins user will be created on your server. As you can see in the above image, you can view the newly created user by logging into your Jenkins account from any web browser.
Method 02: Using GUI to Create a Jenkins User on Ubuntu
The second method of creating a new Jenkins user would be by using the GUI. To use the Jenkins GUI, you will have to log in to the Jenkins server from a web browser. In this example, I will create a new Jenkins user named “Tony_stark” from GUI. To do the same you can follow the steps below.
Steps to Follow >
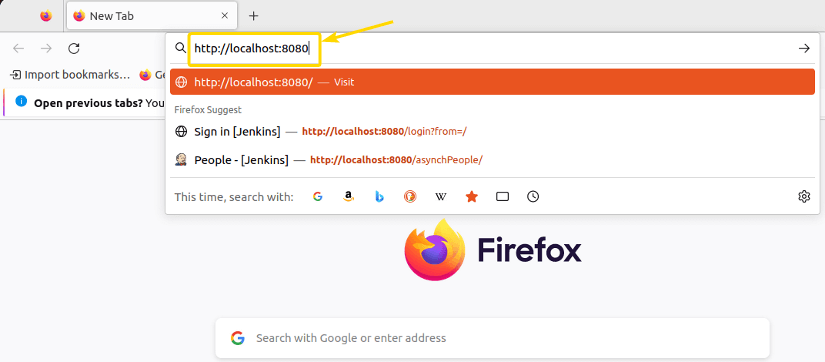
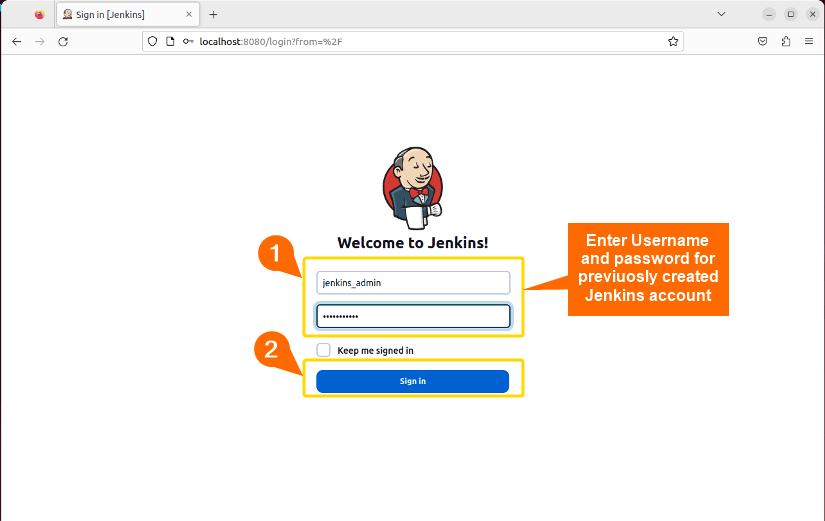
- At first, from any web browser visit the Jenkins server connected to your localhost using the following link “http://localhost:8080“.

- Then, sign in to your Jenkins admin account by entering the username and password.

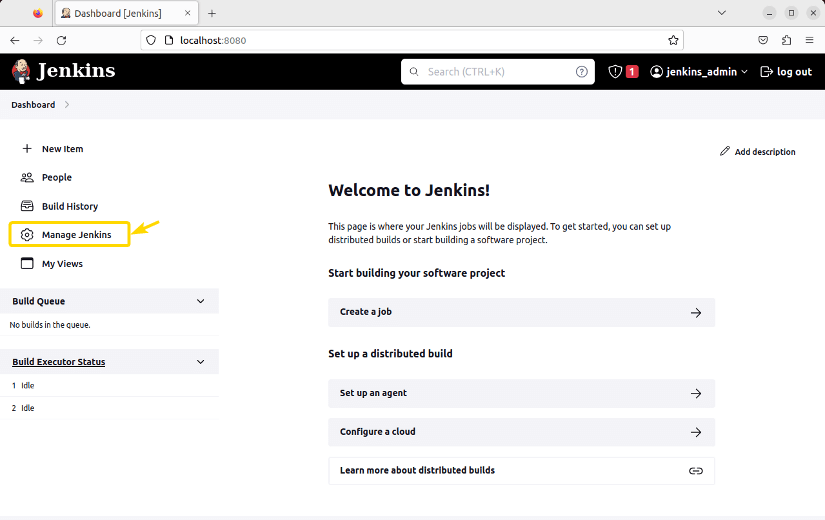
- Once logged in as the Admin User, navigate and CLICK on the “Manage Jenkins” menu.

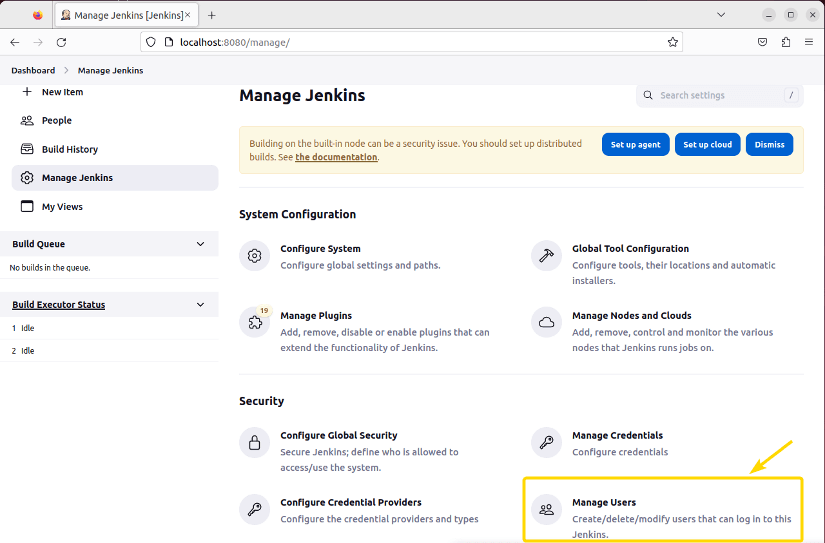
- Scroll down to find the “Manage Users” option and then CLICK on it.

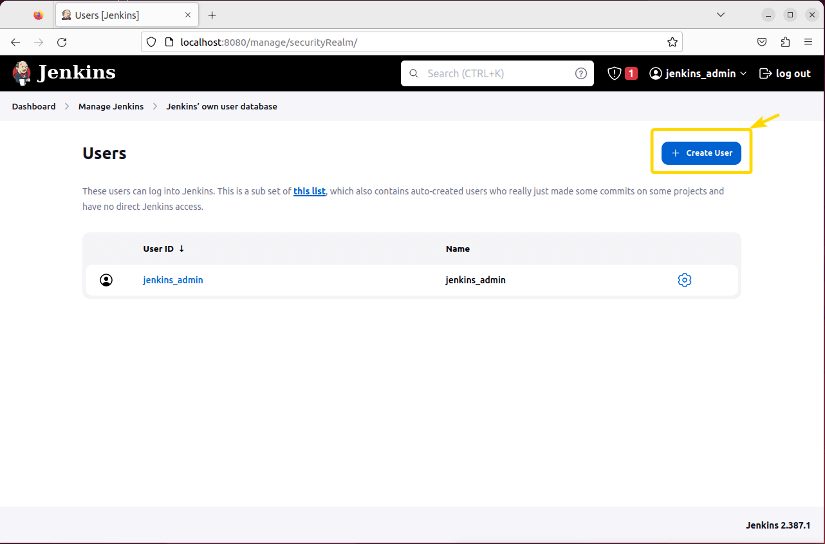
- Now, PRESS the “Create User” button located in the top right corner.

- Finally, fill up the new user credentials and then PRESS the “Create User” button.

- You can find the newly created user listed with the Jenkins server’s other available users.In the image above, you can see that I have successfully created a new Jenkins user from the Jenkins GUI.
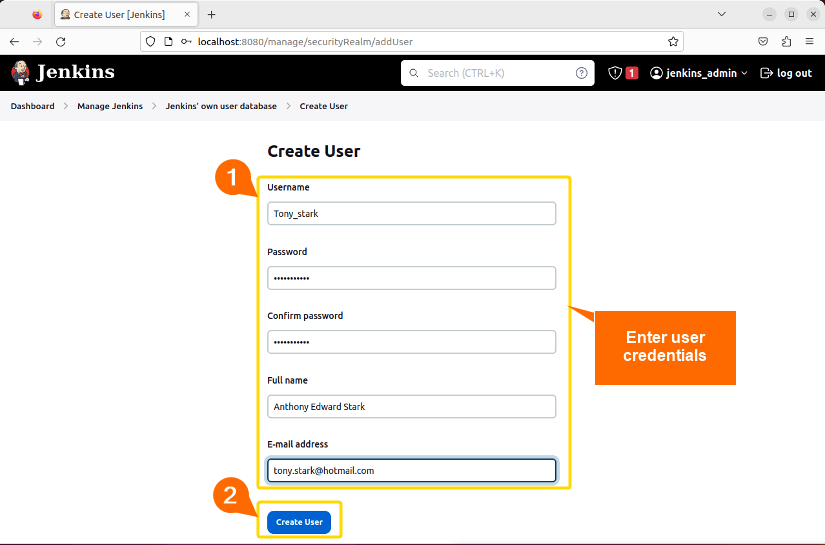
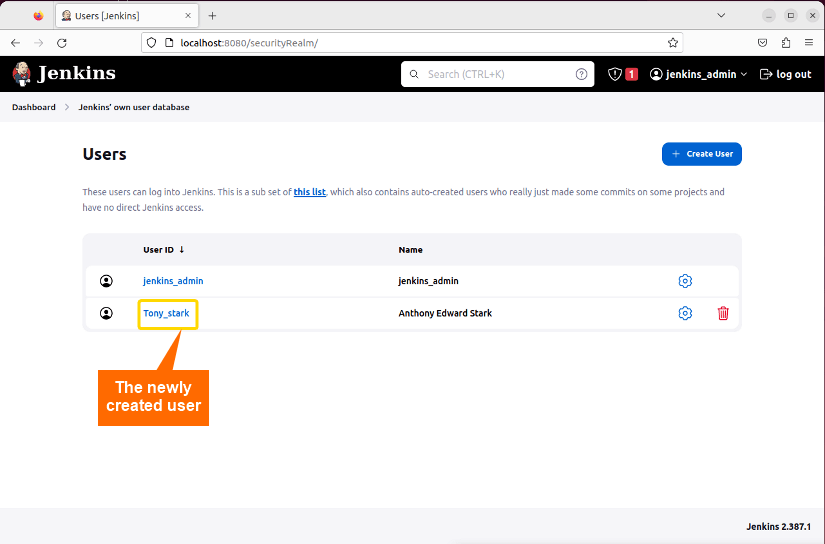 In the image above, you can see that I have successfully created a new Jenkins user from the Jenkins GUI.
- How to Create a Root User in Ubuntu [Step-by-Step]
- How to Create MySQL User in Ubuntu? [2 Cases]
- Create User Without Home Directory in Ubuntu in Just 3 Steps
- How to Create a User in Docker Container Without Docker File?
Comparative Analysis of Methods
Since this article introduces multiple cases for a single task, you might get confused about which one to pick. Therefore, in this section, I am presenting a comparative analysis of the two different approaches for your convenience. You can learn the advantages and disadvantages of both scenarios and choose what is the best for you.
| Methods | Pros | Cons |
|---|---|---|
| Method 1 |
|
|
| Method 2 |
|
|
Summing up it can be said that all three methods come with their own pros and cons. The suitable method varies from user to user. If you are comfortable with the CLI you can go for Method 1. On the other hand, If you do not have any idea about the Linux commands, you can use the approach through GUI.
Complementary Information
Besides, knowing about creating a new Jenkins user on Linux, you will find the below information helpful.
Install Java on Ubuntu
Although your Ubuntu can contain a Java package, but it may not be up to date. Therefore, to get the latest version of the Java package and install it on your system you can follow the instructions below.
Steps to Follow >
- Open the Ubuntu terminal.
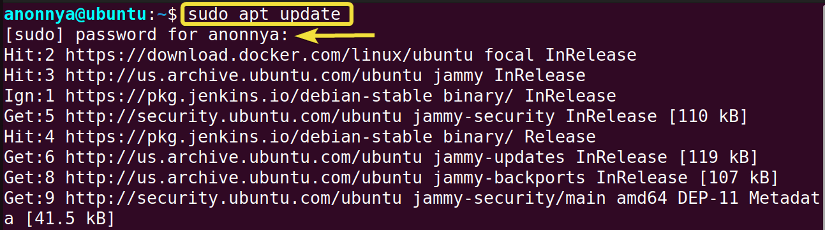
- Update the packages on your machine with the command below.
sudo apt updateEXPLANATION- sudo: Grants administrative privileges.
- apt: Manages available packages on the system.
- update: Updates available packages.
- Give the password for your current logged-in user and press ENTER.

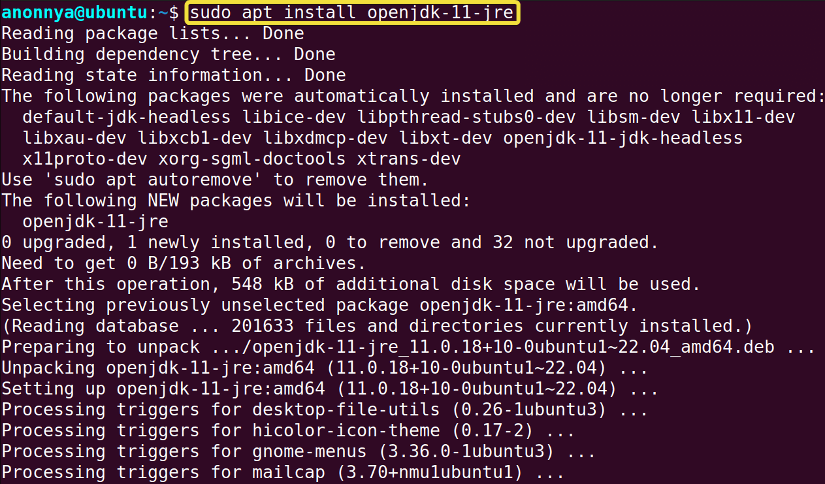
- Then, install the Java package using the following command.
sudo apt install openjdk-11-jreEXPLANATION- sudo: Grants administrative privileges.
- apt: Manages available packages on the system.
- install: Installs packages on the system.
- openjdk-11-jre: Package name of the open-source JDK.

- Finally, check the installed Java version with the command below.
java -versionEXPLANATION- java -version: Displays installed Java version.
 In the above image, I have installed the Java package on my machine by following the above-mentioned steps.
 In the above image, I have installed the Java package on my machine by following the above-mentioned steps.
- How to Create an FTP User in Ubuntu? [Step-by-Step]
- Create a New SFTP User in Ubuntu with a New SSH Key
- How to Create Group and Add User in Ubuntu? [2 Cases]
- Create FTP User for Specific Directory in Ubuntu [4 Steps]
Install Jenkins on Ubuntu
By default, Ubuntu does not offer any Jenkins package. Therefore, to get the latest version I will download the Jenkins package and install it on my system. Follow the instructions below to do the same.
Steps to Follow >
- At first, launch the Ubuntu terminal.
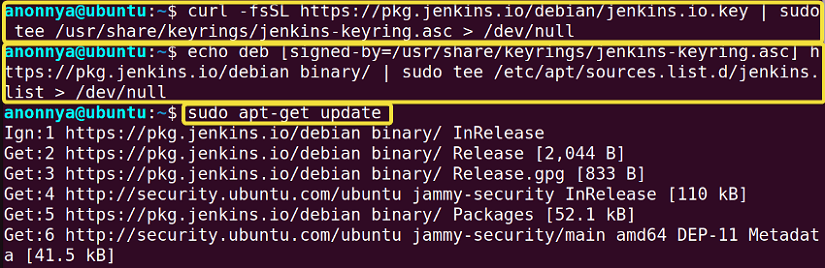
- Then, run the given command to add the GPG key to your system
curl -fsSL https://pkg.jenkins.io/debian/jenkins.io.key | sudo tee /usr/share/keyrings/jenkins-keyring.asc > /dev/nullEXPLANATION- curl -fsSL: Silently downloads files from a URL and shows errors if they occur.
- https://pkg.jenkins.io/debian/jenkins.io.key: URL to download Jenkins GPG key.
- | (Pipe symbol): Used to redirect the output of the first command to the input of the second command.
- sudo: Grants administrative privileges.
- tee: Redirects the output of the previous command to a file.
- /usr/share/keyrings/jenkins-keyring.asc: The filename where the output is redirected to.
- > /dev/null: Redirects the output of the tee command to the null device, which discards it.
- Now, add the Jenkins binary packages to your sources using the given command.
echo deb [signed-by=/usr/share/keyrings/jenkins-keyring.asc] https://pkg.jenkins.io/debian binary/ | sudo tee /etc/apt/sources.list.d/jenkins.list > /dev/nullEXPLANATION- echo: Displays a given text.
- deb: Specifies the package repository type.
- [signed-by=/usr/share/keyrings/jenkins-keyring.asc]: Specifies the location of the GPG public key file needed to authenticate packages.
- https://pkg.jenkins.io/debian binary/: URL of the package repository that contains the binary Jenkins packages.
- | (Pipe symbol): Used to redirect the output of the first command to the input of the second command.
- sudo: Grants administrative privileges.
- tee: Redirects the output of the previous command to a file.
- /etc/apt/sources.list.d/jenkins.list: The filename where the output is redirected to.
- > /dev/null: Redirects the output of the tee command to the null device, which discards it.
- To update the newly downloaded packages use the command below.
sudo apt-get updateEXPLANATION- sudo: Grants administrative privileges.
- apt-get: Manages the latest versions of available packages on the system.
- update: Updates available packages.

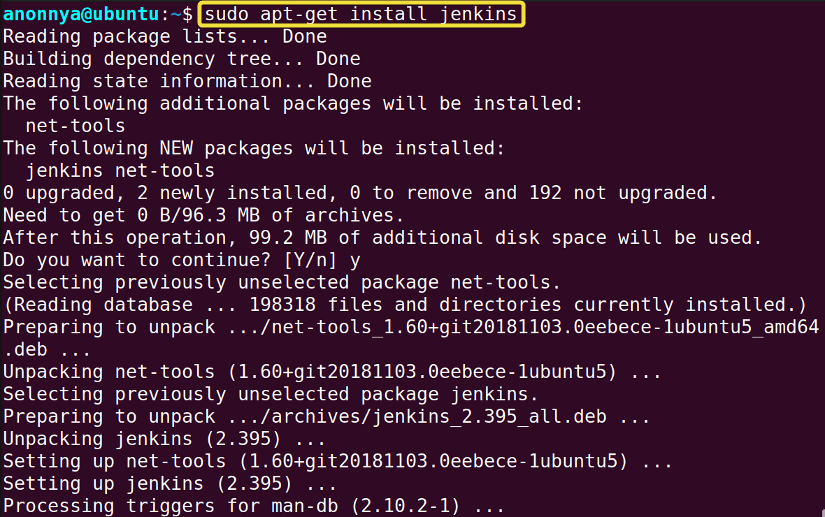
- Finally, install the Jenkins server with the following command.
sudo apt-get install jenkinsEXPLANATION- sudo: Grants administrative privileges.
- apt-get: Manages available packages on the system.
- install: Installs packages on the system.
 In the above image, you can see that I have installed the Jenkins service on my machine by following the above-mentioned steps. To set up the server follow the procedure explained next.
 In the above image, you can see that I have installed the Jenkins service on my machine by following the above-mentioned steps. To set up the server follow the procedure explained next.
Create a Jenkins Admin User on Ubuntu
After the successful installation of the Jenkins package, you will need the start the server on your system and set up an Admin User. Follow the below process to complete these tasks.
Step1: Starting Jenkins Server on Ubuntu
To start the Jenkins server in Ubuntu go through the given instructions.
Steps to Follow >
- At first, go to your Ubuntu terminal.
- Then, enable the Jenkins service with the following command.
sudo systemctl enable jenkinsEXPLANATION- sudo: Grants administrative privileges.
- systemctl: Manages system services.
- enable jenkins: Enables the Jenkins.
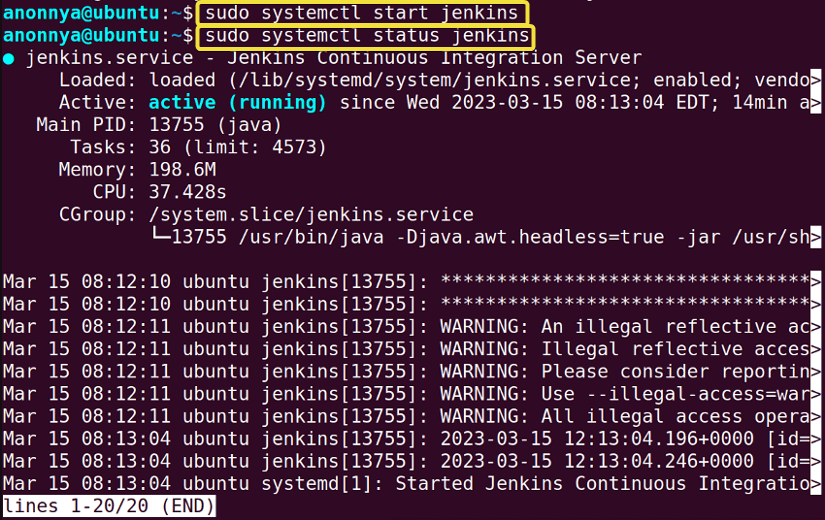
- Now, start the Jenkins server using the given command.
sudo systemctl start jenkinsEXPLANATION- sudo: Grants administrative privileges.
- systemctl: Manages system services.
- start jenkins: Starts the Jenkins.
- Additionally, check the status of the Jenkins service using the command:
sudo systemctl status jenkinsEXPLANATION- sudo: Grants administrative privileges.
- systemctl: Manages system services.
- status jenkins: Checks the status of the Jenkins.
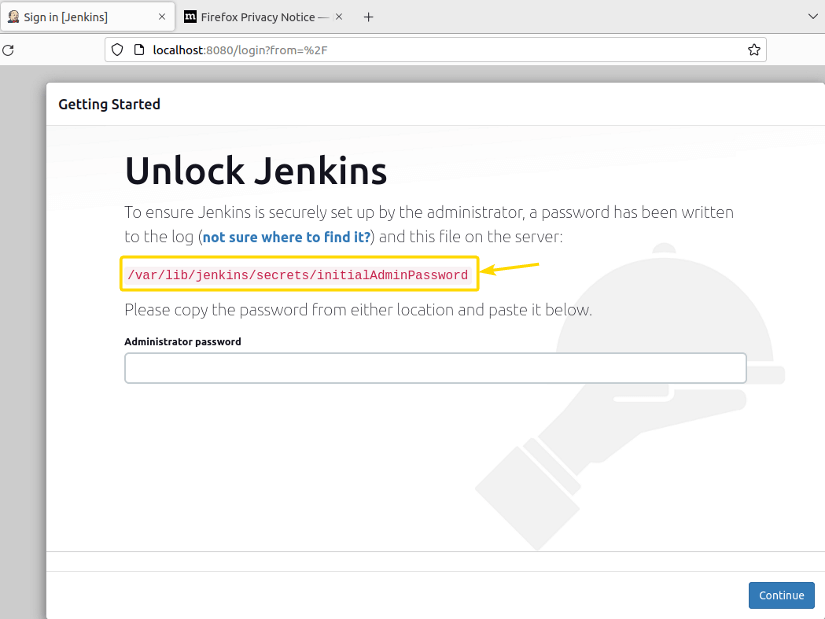
- From any web browser visit the Jenkins server connected to your localhost.

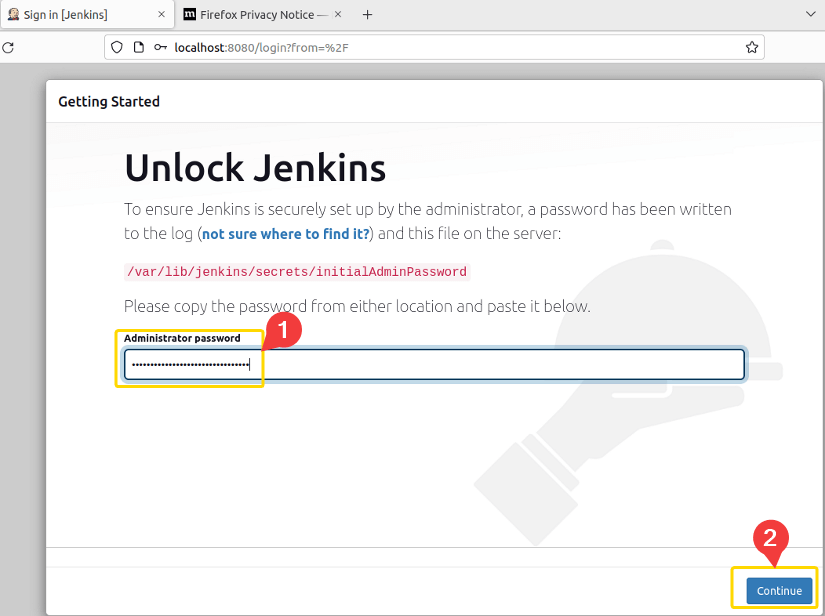
- The browser will give you a path location of a file to retrieve the Initial Admin Password from your Ubuntu system.

- Now, go to your Ubuntu terminal and open the “initialAdminPassword” file with sudo privileges using the command below. Copy the password which is displayed on your terminal.
sudo cat /var/lib/jenkins/secrets/initialAdminPasswordEXPLANATION- sudo: Grants administrative privileges.
- cat: Displays file contents.
- /var/lib/jenkins/secrets/initialAdminPassword: Path to the Jenkins
default admin user’s password file.

- Then, paste the password that you copied in step 7 to the Administrator password field and PRESS the “Continue” BUTTON.

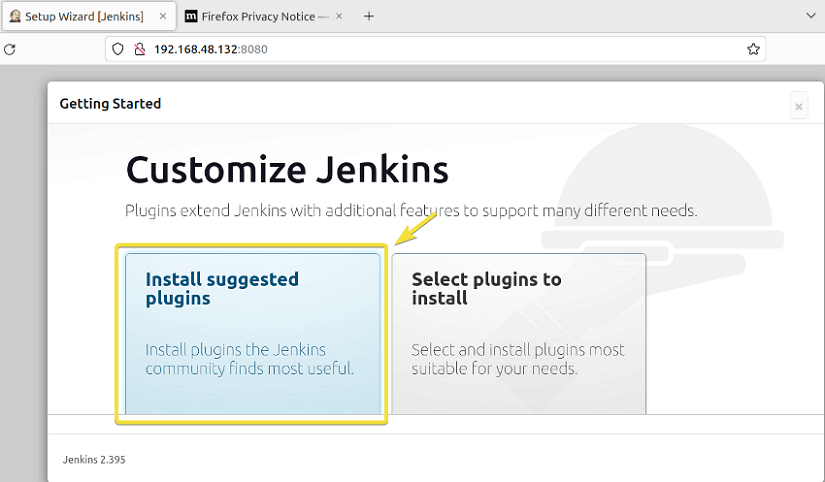
- CLICK on the “Install suggested plugins” to install the useful Jenkins plugins.

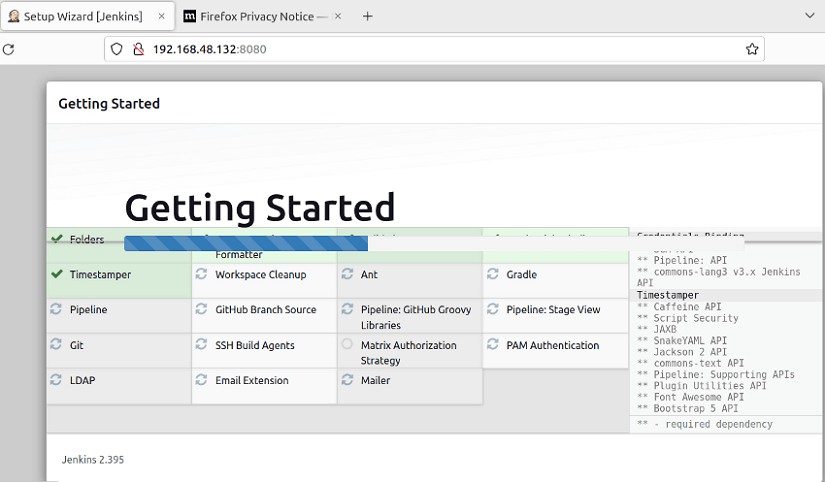
- Wait till the installation is complete.


- How to Create Multiple Users in Linux? [2 Methods]
- Create a User in Ubuntu as Read-Only Access to Log Folder
- How to Create User Account in Ubuntu with Public Key
- Create A User in Ubuntu that Runs a Script and Logs Out [4 Steps]
Step2: Setting Up Jenkins Admin User on Ubuntu
After plugin installation, you can set up the Admin User in Jenkins. Follow the process below to do so.
Steps to Follow >
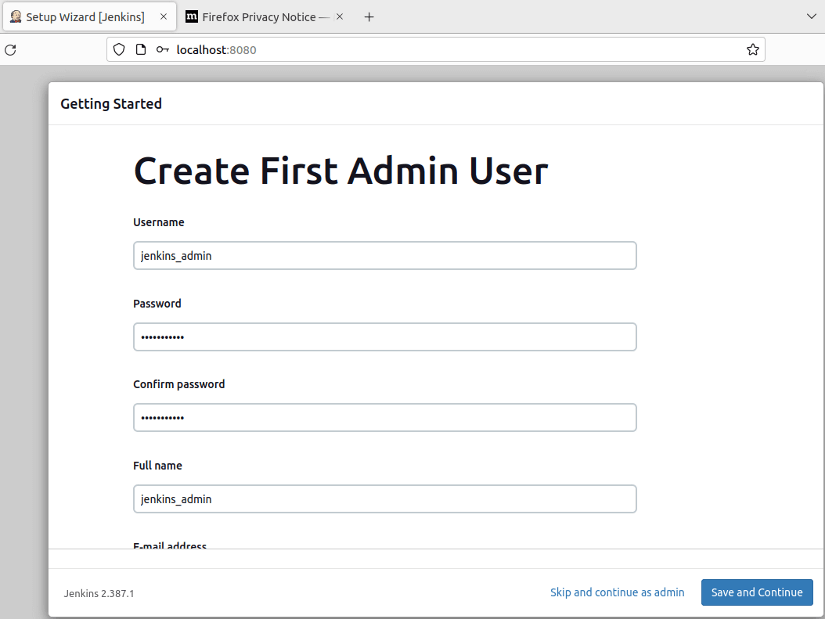
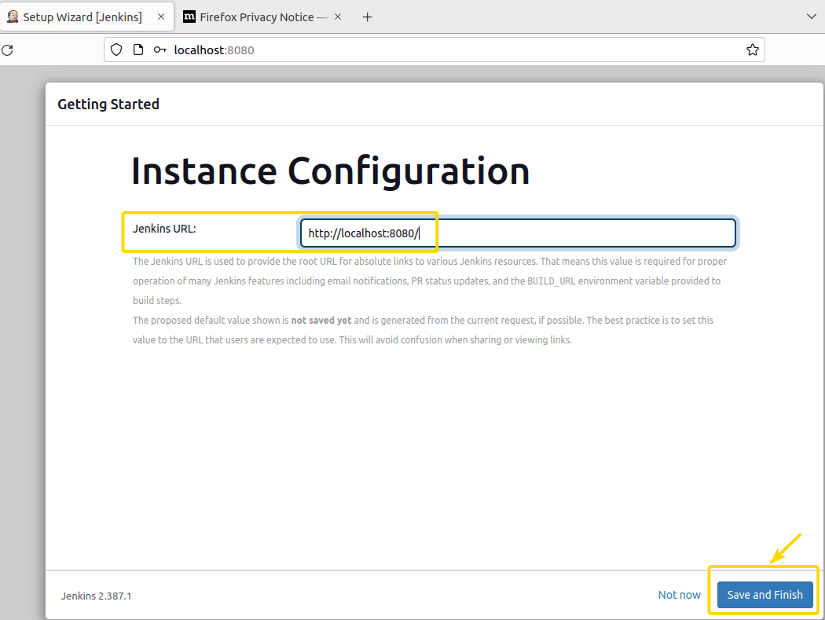
- Firstly, fill up the user credentials and then PRESS the “Save and continue” button.
- Then, PRESS the “Save and Finish” button to save the user credentials.

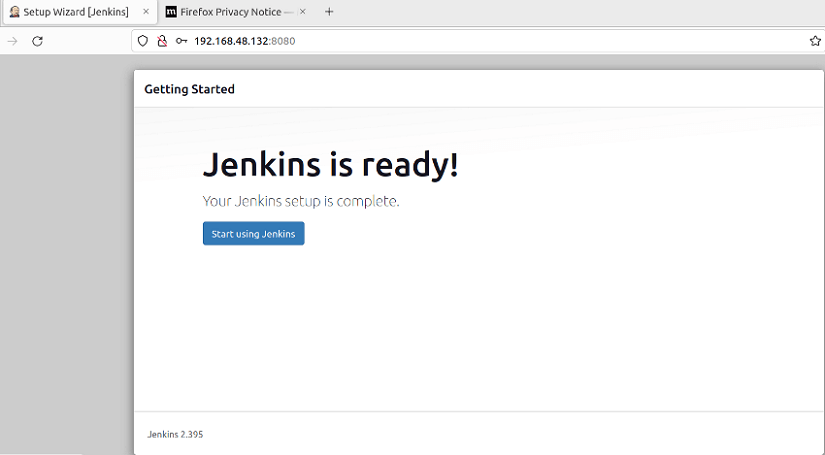
- Finally, CLICK the “Start using Jenkins” button to launch the server.

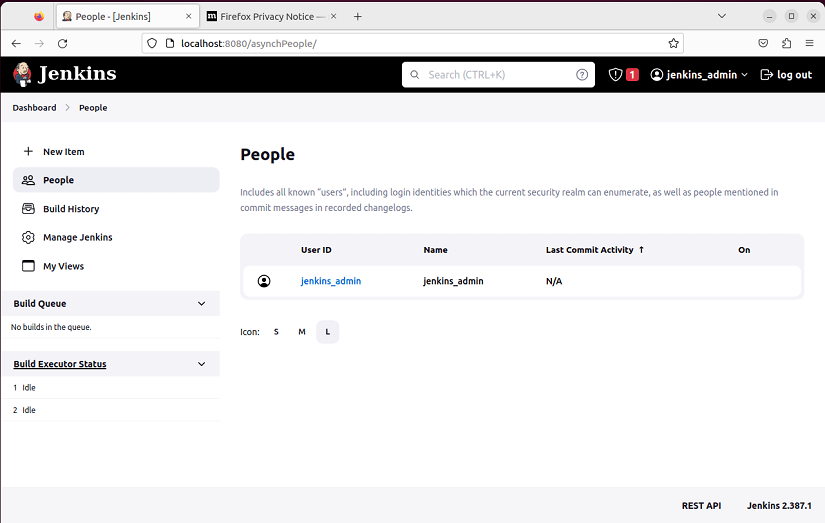
- Furthermore, navigate to the “People” menu to view the newly created Admin User.
 Upon completion of this section, the Jenkins Admin User will be created and the Jenkins server will require the given username and password for accessing the server.
 Upon completion of this section, the Jenkins Admin User will be created and the Jenkins server will require the given username and password for accessing the server.
Conclusion
This article here presents a comprehensive guide to creating a new Jenkins user in Ubuntu. Users of beginner to advanced levels can use the explained methods for achieving their goals. I hope this article will help you get familiar with the Jenkins service in Linux and improve your overall experience.
People Also Ask
- How to Create User and Add to Sudo in Ubuntu? [2 Methods]
- 2 Ways to Create a User With Access to a Drive in Ubuntu
- How to Create a New User in Ubuntu by GUI? [Step-by-Step]
- 2 Ways to Create User Account in Ubuntu Using Terminal
- How to Create Home Directory for Existing User in Ubuntu
- Create User with UID and GID in Ubuntu? [3 Scenarios]
- How to Create a Sudo User in Ubuntu? [Step-by-Step]
FUNDAMENTALS A Complete Guide for Beginners


