Ubuntu is one of the most used distributions among all Linux-based operating systems. It is a multi-user system. Moreover, the terminal or the command line interface (CLI) is one of the most powerful tools for managing administrative tasks of this system. Therefore, it is a must for the users to know how to create a user account in Ubuntu using the terminal. In this article, I will provide 2 ways to create a user account in Ubuntu using a terminal.
Process flow chart to create a user account in Ubuntu using the terminal: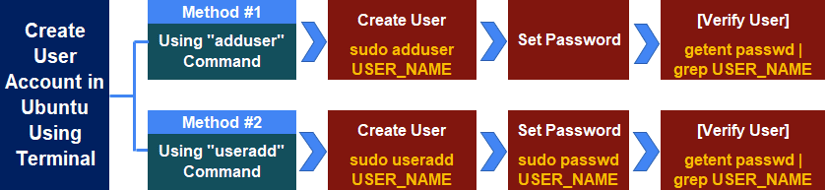 [Distro Used Throughout the Tutorial: Ubuntu 22.04.1 LTS]
2 Methods to Create a User Account in Ubuntu Using the Terminal
You can easily create a new user in Ubuntu from the terminal using two different commands i.e. the adduser & the useradd commands. In this article, I will show you two approaches using these two commands.
1. Create User Account by the “adduser” Command in Ubuntu
You can easily create a new user account in Ubuntu using the adduser command. This command prompts all the required information such as user password, home directory & group by default.
To create a new user account, let’s say “harry”, follow the steps given below:
- At first, press CTRL+ALT+T to open the Ubuntu Terminal.
- After that, copy the following command:
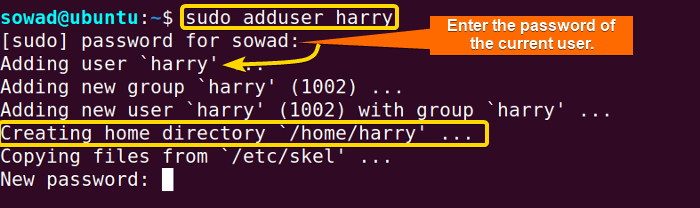
sudo adduser harry - Then, press the ENTER button.
- Finally, input the password of the currently logged-in user.
 EXPLANATION
After entering the password, the command creates a new user account named “harry”. In addition to that, it will then create a new group with the same name as the user and assigns it to the “harry” group.
Next, the command creates a home directory for the new user at “/home/harry”. Moreover, this directory will be used to store the user’s personal files and settings.
Finally, the command copies the contents of the “/etc/skel” directory to the new user’s home directory. The “/etc/skel” directory contains a set of default files and directories that are copied to new user accounts, providing a basic set of files and settings for the user.
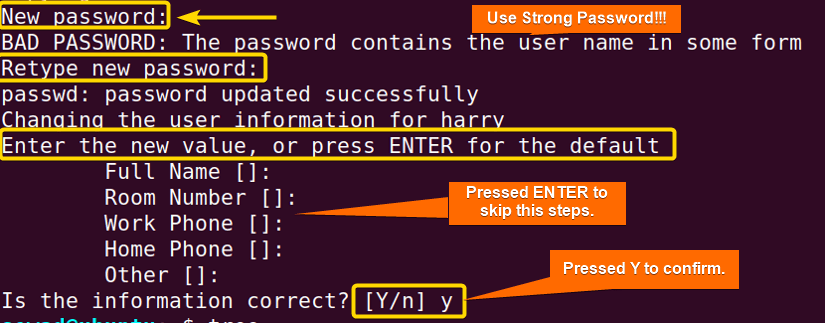
- Now, set a password for the newly created user and set other required information.However, you can skip setting other information by pressing ENTER each time.Warning: Try to set a unique and strong password. Otherwise, you will get a warning message such as “BAD PASSWORD” as in the following image.
- Finally, press Y to confirm your given information.
 After confirming all the given information by pressing Y, the new user will be created.
 After confirming all the given information by pressing Y, the new user will be created.
Now, you can follow this guide to verify the newly created user.
- Create a Jenkins User on Ubuntu? [2 Methods]
- How to Create MySQL User in Ubuntu? [2 Cases]
- Create User Without Home Directory in Ubuntu in Just 3 Steps
- How to Create a User in Docker Container Without Docker File?
- Create User Account in Ubuntu with Public Key
2. Create a User Account Using the “useradd” Command
Though the useradd command is not interactive like the adduser command, you can quickly create a new user account with this command.
To create a new user named “tom” from the terminal using the useradd command, follow the below instructions:
- First, open the Ubuntu Terminal.
- Then, type the following command:
sudo useradd tom - After that, press the ENTER button.
- Finally, input the password of the currently logged-in user.
 In the above image, you can see that after providing the current user password, I have been able to create the desired user.
 -
Now, to access the newly created user “tom”, set a password for the user by executing the following command:
sudo passwd tomHere the passwd command sets/changes the password.
 In the above image, you can see that I have successfully set a password for the newly created user.
 In the above image, you can see that after providing the current user password, I have been able to create the desired user.
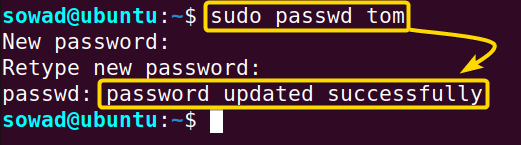 In the above image, you can see that I have successfully set a password for the newly created user.
Now you can follow this guide to verify the newly created user.
Comparative Analysis of Methods to Create a User Account in Ubuntu
After going through the above two methods you might get confused about which one to choose between the two. However, don’t worry I’ll make it easier for you with the following full-on comparison between the methods of creating users in Ubuntu using the Terminal.
| Methods | Pros | Cons |
|---|---|---|
| Method 1 |
|
|
| Method 2 |
|
|
In summary, both methods have their own pros and cons. Furthermore, the choice between the two depends on the user’s skills, the particular requirements of the user to be created and the intention of the administrator.
Check If a Newly Created User Exists in Ubuntu
In this section, I will check whether the newly created user named “tom” exists on my system. You can do so by following the given steps:
- At first, open the terminal.
- Then, type the following command:
getent passwd | grep tom - Finally, press ENTER.
 In the above image, you can see that the newly created user account “tom” actually exists on the system.
 In the above image, you can see that the newly created user account “tom” actually exists on the system.
In the above image, each field in the output represents:
- tom: Name of the user account.
- x: Password field in a non-readable format ‘x’. which means that the password is stored in the /etc/shadow file.
- 1002: The user ID (UID) for this user.
- 1002: The group ID (GID) for this user.
- ,,,: Comment field. These three consecutive commas mean that for this user it is empty.
- /home/tom: Home directory of this user.
- /bin/sh: Default log-in shell of this user.
- How to Create an FTP User in Ubuntu? [Step-by-Step]
- Create a New SFTP User in Ubuntu with a New SSH Key
- How to Create Group and Add User in Ubuntu? [2 Cases]
- Create FTP User for Specific Directory in Ubuntu [4 Steps]
- How to Create Multiple Users in Linux? [2 Methods]
Delete User and Home Directory in Ubuntu
You can easily remove any user from the system using the terminal with the userdel command in Ubuntu. Here, I will delete the user account named “tom”. To do the same follow the below procedures:
- At first, open the terminal.
- Then, type the following command into the command prompt.
sudo userdel tomHere the userdel command deletes a user account.
- After that press ENTER.
-
Finally, provide the password of the currently logged-in user.
 In the above image, you can see that I removed the user “tom” using the Ubuntu terminal. However, in this method, the home directory will still exist after deleting the user. Moreover, you can check whether the home directory is still on the machine or not by running the
 ls /homecommand.
After pressing the ENTER button, you will see the home directory of the deleted user like the image given below.
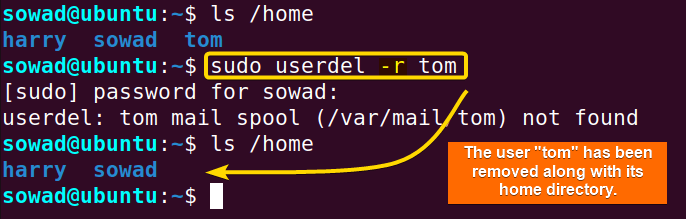
- To delete the user along with its home directory, you can type the command below.
sudo userdel -r tomHere the option
-rremoves the home directory and its contents. - After pressing the ENTER button, you will need to provide the password of the currently logged-in user.
 In the above image, you can see that the home directory is deleted along with the user.
 In the above image, you can see that I removed the user “tom” using the Ubuntu terminal. However, in this method, the home directory will still exist after deleting the user. Moreover, you can check whether the home directory is still on the machine or not by running the
 In the above image, you can see that the home directory is deleted along with the user.
Give Root Privileges to an Existing User in Ubuntu
Root privileges in Ubuntu provide unrestricted access to system commands and files. The root user, or superuser, can perform critical tasks like installing software and modifying system configurations.
If you’re a root user or you’ve root privileges in Ubuntu, you can give root privileges to another existing user by adding it to the sudo group. Check the given instructions to do it:
- First, open the Ubuntu terminal.
- Next, type the following command into the command prompt:
sudo usermod -aG sudo tomEXPLANATION- usermod: Modifies an existing user account.
- -aG: Adds a user to the specific group.
- Then, press ENTER.
- After that, provide the password of the currently logged-in user.
- To check whether the user is added to the sudo group run the
groups tomcommand. -
Finally, press ENTER again.
 In the above image, you can see that I have given the user “tom” root privileges by adding it to the sudo group. Furthermore, I checked its group by using the groups command and tested its elevated powers by using the ls command.
 In the above image, you can see that I have given the user “tom” root privileges by adding it to the sudo group. Furthermore, I checked its group by using the
 Conclusion
Creating a new user account using the terminal is pretty simple and time efficient compared to that of using the graphical user interface (GUI). By following this article, you will be now able to easily add new users to your Ubuntu system. In simple words, you just need to follow the series of some simple commands and provide the necessary information and set up a strong password and you’re good to go.
People Also Ask
Can I create multiple users in Linux at once?
Yes, you can create multiple users at a time in Linux directly using a simple bash script. Here’s an example:
#!/bin/bash

for username in user1 user2 user3
do
useradd $username
echo "Password1234" | passwd --stdin $username
done
Replace the usernames and passwords as you need.
How do I get the list of users in the command prompt?
You can check the /etc/passwd files from the command prompt to view the users. Furthermore, you can run the cut -d: -f1 /etc/passwdcommand to get the list of users.
What is the admin account?
The admin account is a privileged user account that typically has elevated permissions and control over a computer system, network, or application. It is often used for system administration tasks, allowing the user to configure settings, install software, and manage other user accounts.
What is a local admin account?
A local admin account in Ubuntu is a user with elevated privileges for system-level tasks, like software installation and configuration changes. It enables users to manage the system effectively, performing crucial administrative functions. By default, the first user created during the Ubuntu installation is considered as the local admin account.
What is a regular user of Linux?
In Linux-based systems, users without root privileges are considered as normal/regular users. Regular users can only perform non-administrative tasks like managing files, running programs and using networks etc.
What is a service user of Linux?
A service user in Linux refers to a system account specifically created to run a service or application. It is designed to enhance security and manage permissions by allowing the service to operate with minimal privileges. Service users help isolate and safeguard the system, preventing potential security vulnerabilities.
Can I create two users with the same name in Linux?
No, in Linux, you cannot create two users with the same name. Usernames must be unique to avoid conflicts and ensure proper user identification and management.
Can two users have the same UID in Linux?
No, two users cannot have the same UID (User ID) in Linux. Each UID must be unique within the system, as it is a fundamental attribute used by the operating system to identify and manage user accounts. Having duplicate UIDs can lead to confusion and access control issues.
How to delete a user in Ubuntu?
If you are a root user or have root privileges, you can delete a user from the settings>users or you can do it using the sudo userdel <username> command from the terminal.
Relaed Articles
- How to Create User and Add to Sudo in Ubuntu? [2 Methods]
- 2 Ways to Create a User With Access to a Drive in Ubuntu
- How to Create a New User in Ubuntu by GUI? [Step-by-Step]
- Create FTP User for Specific Directory in Ubuntu [4 Steps]
- How to Create Home Directory for Existing User in Ubuntu
- Create User with UID and GID in Ubuntu? [3 Scenarios]
- How to Create a Sudo User in Ubuntu? [Step-by-Step]
FUNDAMENTALS A Complete Guide for Beginners


Great post! I found the two methods you outlined for creating a user account in Ubuntu very helpful. The step-by-step instructions were clear and easy to follow. Thanks for sharing!
Great post! I found the terminal method very straightforward. It’s nice to have clear instructions for creating user accounts in Ubuntu. Thanks for sharing these two methods!