While working with the open-source database management system MySQL, you may feel the need of creating a new MySQL user. As an open-source server, it is easily available to deploy and gives the user access to Linux distributions. Using the Structured Query Language (SQL) you can manage a MySQL server from your Linux OS.
In this article, I will show you ways to create a MySQL user from Ubuntu.
Requirements to Create MYSQL User in Ubuntu
- Need to have MySQL installed on Ubuntu.
- Have to be a root user or have root/sudo privileges to install MySQL.
Process Flow Chart to Create MYSQL User in Ubuntu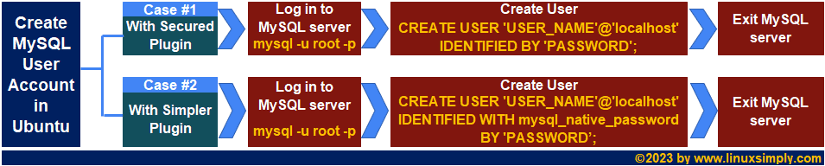 Distro Used Throughout the Tutorial: Ubuntu 22.04.1 LTS
2 Cases to Create a New User in MySQL in Ubuntu
After installing the MySQL server on your system, you will have a root MySQL user that has ultimate access to the server. When you have logged in as the root user of your MySQL server, you can create new users as per your requirement.
Furthermore, you can differentiate the ways of creating a new user depending on the user’s authentication plugin. You can either choose to use a plugin while creating a user or leave out the option to use the default plugin. In this section, you will get to learn about both of the approaches to creating a new MySQL user.
You can read our Comparative Analysis of Methods to distinguish between these two methods and best pick one for your need.
Case 01: Create a New MySQL User in Ubuntu Using Default Secured Plugin
To create a new MySQL user from Ubuntu, you will need to log in to the MySQL server and then run the “CREATE USER” SQL command. You will be able to set the user’s password with this command as well.
While creating a new user, you can simply remove the plugin option from your command and it will use the default caching_sha2_password plugin. It will enable you to create a new user with a login password.
In this example, I will create a new MySQL user named “jerry” and assign the localhost as its host. You can follow the steps below to do the same:
- At first, open the Ubuntu terminal.
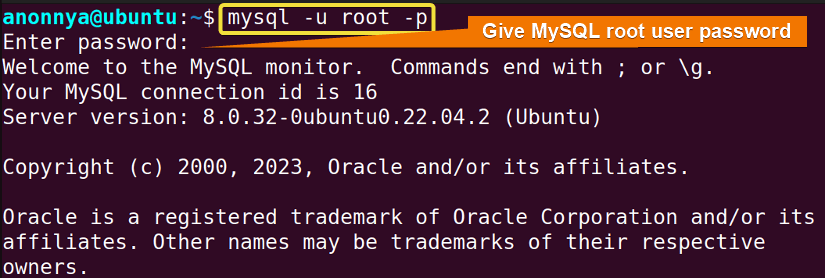
- Now, log in to your root user account of MySQL server using the command below:
mysql -u root -pEXPLANATION- mysql -u: Logs in to the MySQL server with the specified username.
- root: Username of the MySQL account.
- -p: Asks for the password for the user account.

- Then, type the following SQL command to create a new user and press ENTER:
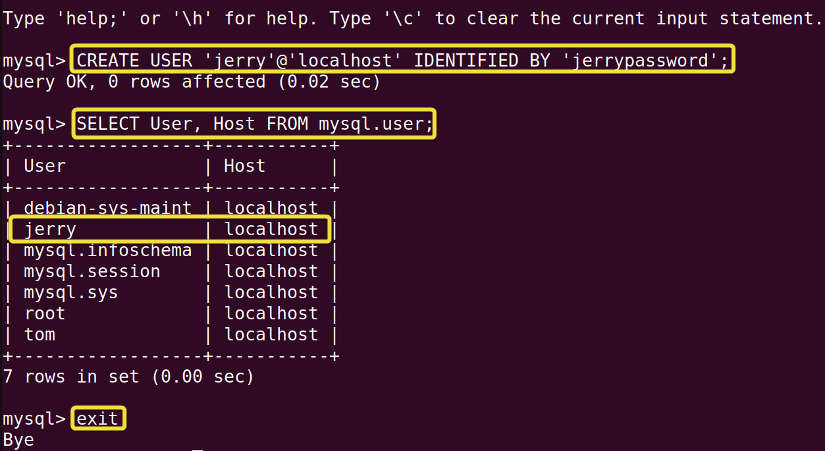
CREATE USER 'jerry'@'localhost' IDENTIFIED BY 'jerrypassword';EXPLANATION- CREATE USER: Creates a new MySQL user.
- ‘jerry’@’localhost’: Username and hostname for the MySQL user.
- IDENTIFIED BY: Specifies the password for the user.
- ‘jerrypassword’: Given password to be set for the user account.
- Finally, to verify if the new user is created or not run the given SQL query and hit ENTER:
SELECT User, Host FROM mysql.user;EXPLANATION- SELECT: Query to view data from MySQL tables.
- User, Host: Column names selected from the specified table.
- FROM: Indicates the table name to run SQL.
- user: Name of the database table to run the query.
- To exit the MySQL server run the command below:
exitEXPLANATION- exit: Exits from the MySQL server.
 Upon completion of the aforementioned steps, a new MySQL user will be created with the default caching_sha2_password plugin. As you can see in the above image, you can view the newly created user and its host by running the SELECT query on the “mysql.user” table.
 Upon completion of the aforementioned steps, a new MySQL user will be created with the default caching_sha2_password plugin. As you can see in the above image, you can view the newly created user and its host by running the SELECT query on the “mysql.user” table.
Case 02: Create a New MySQL User in Ubuntu Using Simpler Plugin
A second approach to create a new MySQL user is by using the “mysql_native_password” plugin. It is a less secure plugin than the default plugin option. However, it is widely used as it is supported by most MySQL applications.
In this example, I will create a new MySQL user using the “mysql_native_password” plugin. I will name the user “tom” and assign the localhost as its host. You can follow the process below to do the same:
- At first, launch the Ubuntu terminal.
- Then, log in to your root user account of MySQL server using the command below:
mysql -u root -pEXPLANATION- mysql -u: Logs into the MySQL server with the specified username.
- root: Username of the MySQL account.
- -p: Asks for the password for the user account.
- Now, type the following SQL command to create a new user and press ENTER:
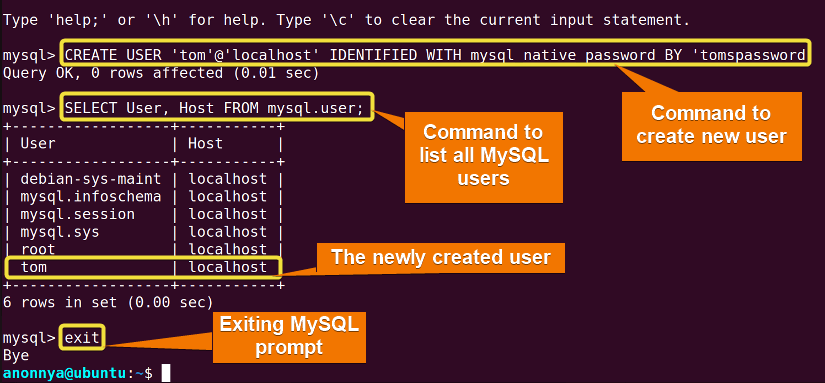
CREATE USER 'tom'@'localhost' IDENTIFIED WITH mysql_native_password BY 'tomspassword’;EXPLANATION- CREATE USER: Creates a new MySQL user.
- ‘tom’@’localhost’: Username and hostname for the MySQL user.
- IDENTIFIED WITH and BY: Specifies the authentication plugin and password for the user.
- mysql_native_password: Name of the authentication plugin to be used.
- ‘tomspassword’: Given password to be set for the user account.
- Finally, to verify if the new user is created or not run the given SQL query and hit ENTER:
SELECT User, Host FROM mysql.user;EXPLANATION- SELECT: Query to view data from MySQL tables.
- User, Host: Column names selected from the specified table.
- FROM: Indicates the table name to run SQL.
- user: Name of the database table to run the query.
- To exit the MySQL server run the command below:
exitEXPLANATION- exit: Exits from the MySQL server.
 In the image above, you can see that I have created a new MySQL user with the “mysql_native_password” plugin. Inside the MySQL server, you can run the SELECT query on the “mysql.user” table to view the newly created user and its host.
 In the image above, you can see that I have created a new MySQL user with the “mysql_native_password” plugin. Inside the MySQL server, you can run the SELECT query on the “mysql.user” table to view the newly created user and its host.
- How to Create Multiple Users in Linux? [2 Methods]
- Create a User in Ubuntu as Read-Only Access to Log Folder
- How to Create User Account in Ubuntu with Public Key
- Create A User in Ubuntu that Runs a Script and Logs Out [4 Steps]
Comparison of 2 Cases to Create MYSQL User
Since this article introduces multiple cases for a single task, you might get confused about which one to pick. Therefore, in this section, I am presenting a comparative analysis between the two different approaches for your convenience. You can learn the advantages and disadvantages of both scenarios and choose what is the best for you.
| Cases | Pros | Cons |
|---|---|---|
| Case 1 |
|
|
| Case 2 |
|
|
To sum up, it can be said that both scenarios come with their pros and cons. The suitable method varies from user to user. If you want a more secure database server and to be protected from certain types of attacks you can choose the 1st Approach. However, if security is not that crucial and you want to deploy older MySQL clients and applications, you can go for the second approach.
Install MySql on Ubuntu
You can easily download and install the open-source database management system MySQL on your Ubuntu operating system. While installing you can create a root MySQL user that will have all the administrative privileges on the MySQL server.
For a secure and easy installation of the MySQL server on your Ubuntu machine go through the given process.
Step 1: Installing MySQL Server on Ubuntu
To install MySQL server on Ubuntu follow the steps below:
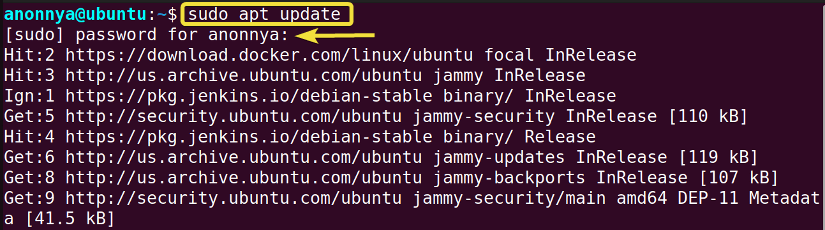
- Open the terminal and update the packages on your machine with the command below:
sudo apt updateEXPLANATION
- Give the password for your current logged-in user and press ENTER.
- Then, install the MySQL server package using the following command:
sudo apt install mysql-serverEXPLANATION- apt: Manages available packages on the system.
- install: Installs packages on the system.
- mysql-server: Package name of the open-source MySQL server Edition.

- To start the mysql server type the given command and hit ENTER.
sudo systemctl start mysql.serviceEXPLANATION- systemctl: Manages system services.
- start mysql.service: Starts the MySQL service.
- Furthermore, you can check the MySQL server status with the command below:
sudo systemctl status mysql.serviceEXPLANATION- systemctl: Manages system services.
- status mysql.service: Checks the status of the MySQL service.
 In the above image, you can see that the MySQL server is successfully installed and running on my Ubuntu distribution.

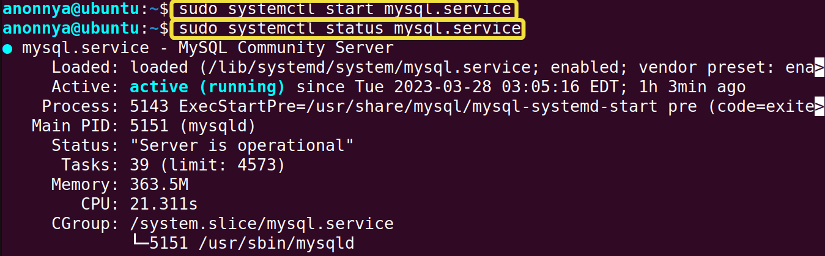 In the above image, you can see that the MySQL server is successfully installed and running on my Ubuntu distribution.
- How to Create an FTP User in Ubuntu? [Step-by-Step]
- Create a New SFTP User in Ubuntu with a New SSH Key
- How to Create Group and Add User in Ubuntu? [2 Cases]
- Create FTP User for Specific Directory in Ubuntu [4 Steps]
Step 2: Adjusting MySQL Root User on Ubuntu
Now before using the mysql_secure_installation script for securing the MySQL service on your machine, adjust the root user authentications by following the below process:
- Open the mysql command prompt with the given command:
sudo mysqlEXPLANATION- mysql: The MySQL client program.
- Now, set a password for the existing root MySQL user by running the following SQL command:
ALTER USER 'root'@'localhost' IDENTIFIED WITH mysql_native_password BY 'password';EXPLANATION- ALTER USER: Updates existing MySQL user account.
- ‘root’@’localhost’: Username and hostname for the MySQL user.
- IDENTIFIED WITH and BY: Specifies the authentication plugin and password for the user.
- mysql_native_password: Name of the authentication plugin to be used.
- ‘password’: Given password to be set for the user account.
- Exit the mysql monitor with the command below:
exitEXPLANATION- exit: Exits from the MySQL server.
 Upon completion of this section, the root MySQL user will be adjusted and the MySQL server will require the given password for accessing the server.
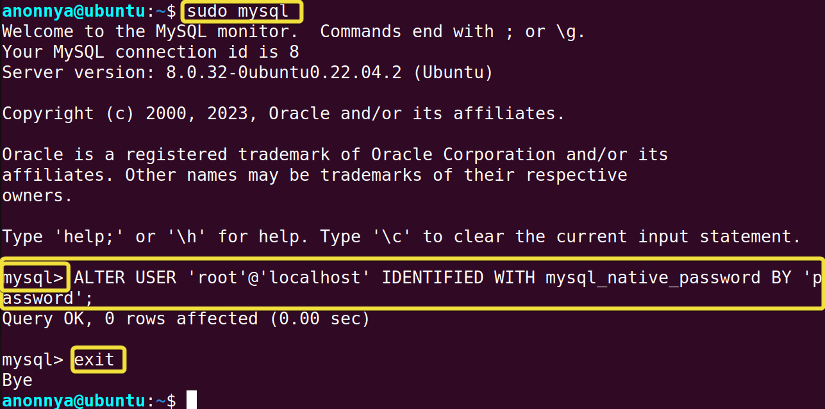 Upon completion of this section, the root MySQL user will be adjusted and the MySQL server will require the given password for accessing the server.
Step 3: Securing MySQL Server on Ubuntu
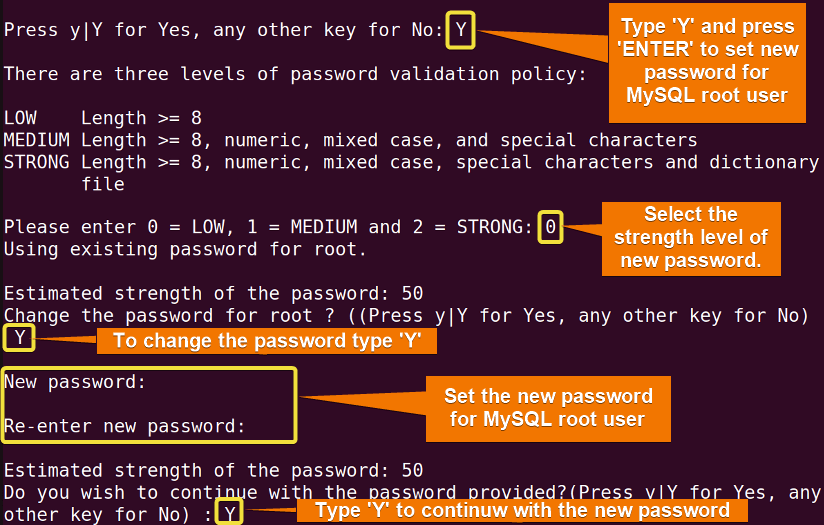
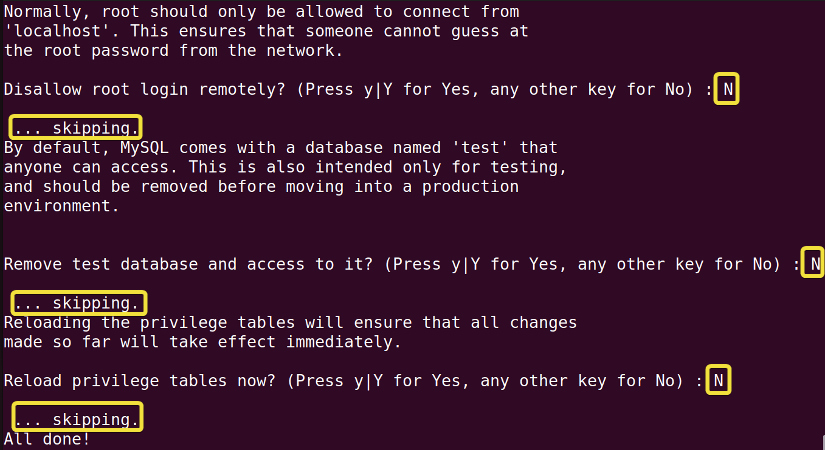
To ensure your MySQL installation is secure and protected against potential security threats you can run the “mysql_secure_installation” script on your machine. The script lets you complete a set of security tasks including setting password for the MySQL root user. The process to secure MySQL server on your ubuntu system is as follows:
-
Run the security script with the following command:
sudo mysql_secure_installationEXPLANATION- mysql_secure_installation: The script to run to secure MySQL installation.
- Now, give the ‘root’@’localhost’ password previously altered within the mysql command prompt and hit ENTER.

- Set a new password for the mysql root user by typing “Y” and selecting the password strength level.

- Furthermore, skip the addition steps by pressing any key and then hitting ENTER.
 As you can see in the above image, after following the aforementioned steps the MySQL server is finally installed in my Ubuntu operating system.
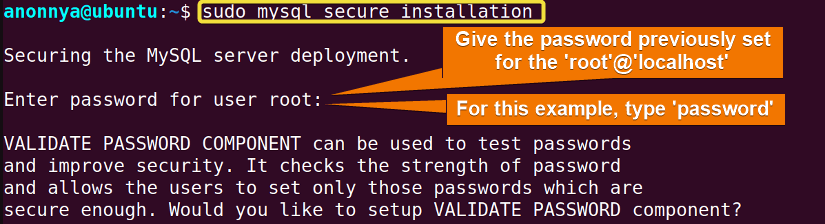
 As you can see in the above image, after following the aforementioned steps the MySQL server is finally installed in my Ubuntu operating system.
Grant All Privileges to a MySQL User from Ubuntu
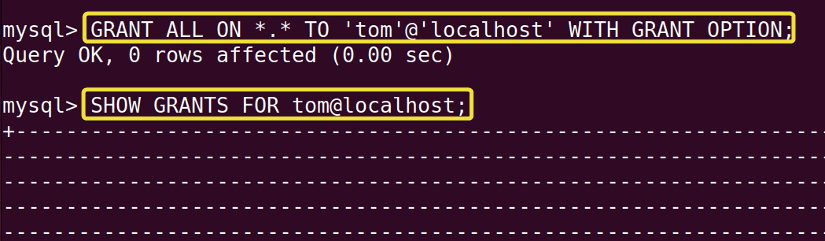
You can grant database privileges to a MySQL user if you are logged in as the root user of the server. In this example, I will grant all the privileges to the newly created user “tom”. To do so, you can follow the process below:
- At first, launch the Ubuntu terminal.
- Then, log in to your root user account of the MySQL server using the command below:
mysql -u root -pEXPLANATION- mysql -u: Logs in to the MySQL server with the specified username.
- root: Username of the MySQL account.
- -p: Asks for the password for the user account.
- Now, run the following command to grant all the database privileges to the user “tom”.
GRANT ALL ON *.* TO 'tom'@'localhost' WITH GRANT OPTION;EXPLANATION- GRANT: Grants privileges on databases to the users.
- ALL: The list of privileges of the user.
- ON: Specifies the object on which the privileges are granted.
- *.*: Indicates all databases and all tables in the databases.
- TO: Specifies the user to whom the privileges are granted.
- ‘tom’@’localhost’: Username and hostname for the MySQL user.
- WITH GRANT OPTION: Allows the user to perform any action on any database on the MySQL server.
- Additionally, view the updated grants of the user with the given command:
SHOW GRANTS FOR ‘tom‘@‘localhost‘;EXPLANATION- SHOW GRANTS: Displays the list of privileges of a specific user.
- FOR: Indicates the specified user.
- ‘tom‘@‘localhost‘: Username and hostname for the MySQL user.
 In the image below, you can see that all the updated database privileges of the user “tom” are displayed on the command line.
- To exit the MySQL server run the command below:
exitEXPLANATION- exit: Exits from the MySQL server.
 In the image below, you can see that all the updated database privileges of the user “tom” are displayed on the command line.
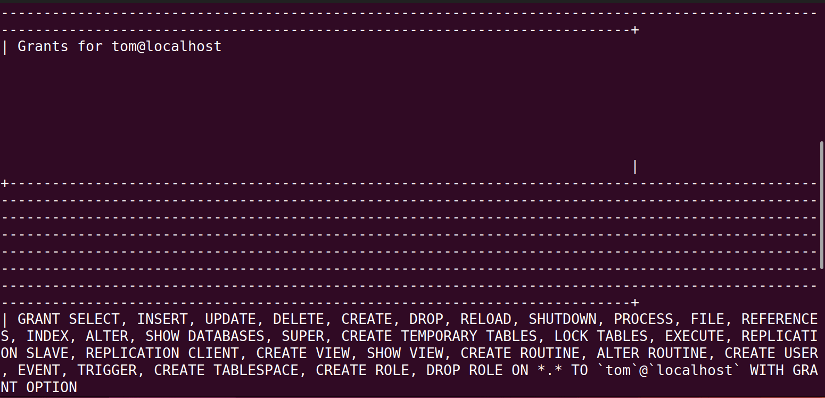
- How to Create a Jenkins User on Ubuntu? [2 Methods]
- How to Create a Root User in Ubuntu [Step-by-Step]
- Create User Without Home Directory in Ubuntu in Just 3 Steps
- How to Create a User in Docker Container Without Docker File?
Conclusion
In this article, I have demonstrated the basic concepts of the open-source MySQL service. This tutorial will enable you to install MySQL on your Linux machine and alter the existing root MySQL user for further usage. After logging in as the root user, you will be able to add new users to the server and grant database privileges as per your requirement. I hope this article will help you get familiar with the MySQL service in Linux and improve your overall experience.
People Also Ask
How to create MYSQL user in Ubuntu using the command line?
To create a MYSQL user in Ubuntu using the command line, first, run the command mysql to enter the MYSQL server. Then run the command CREATE USER 'new_user'@'localhost' IDENTIFIED BY 'password';. Replace new_user and password with the actual username and passcode to create the MYSQL user.
What is the default username for MySQL?
The default MySQL username is “root”. The root account exists without any password amd allows you to set its password with the ALTER USER statement.
How to set user and password in MySQL in Ubuntu?
You can set a new user and password using the CREATE USER command. However, if the user is already created, you use ALTER USER to set or update its password. In both of the cases, you will need to use the IDENTIFIED BY clause to specify the password.
How do I find my MySQL root username and password in Ubuntu?
To find the MySQL root’s password, at first you will need to log in as the sudo user in your Ubuntu system. Then, view the my.cnf file contents located in the path /etc/mysql.
Can I view all the MYSQL users?
Yes. To view all the users in a MYSQL instance, use the select command with the following format:
mysql> SELECT * FROM mysql.user;How do I login as a specific user in MySQL?
You can log in to the MySQL server as a specified user using the mysql -u command. The syntax is as follows: mysql -u <username> -p
How to get users and host in MySQL?
You can get the users and corresponding hostnames from the mysql.users table. In this case, you can run the SELECT query on the User and Host columns.
How to get users and privileges in MySQL?
You can view the privileges for each user using the SHOW GRANTS statement. In this case, you will need to follow the syntax: SHOW GRANTS FOR ‘<username>’@'<hostname>’;
Where is MySQL user stored?
The MySQL users are stored in the user table table of the server named mysql.user. It contains all the user information along with username and host name.
What is MySQL user table?
The MySQL user table is the mysql.user table that contains all the information about users that can access the MariaDB server, and their global privileges.
Relaed Articles
- How to Create User and Add to Sudo in Ubuntu? [2 Methods]
- 2 Ways to Create a User With Access to a Drive in Ubuntu
- How to Create a New User in Ubuntu by GUI? [Step-by-Step]
- 2 Ways to Create User Account in Ubuntu Using Terminal
- How to Create Home Directory for Existing User in Ubuntu
- Create User with UID and GID in Ubuntu? [3 Scenarios]
- How to Create a Sudo User in Ubuntu? [Step-by-Step]
FUNDAMENTALS A Complete Guide for Beginners


