Ubuntu is a popular multiuser Linux distribution used by many system administrators. One common task of the OS is creating a new user with specific permissions. In this article, I will discuss how to create a user in Ubuntu as read-only access to the log folder. In some cases that is very useful to provide limited access to system logs while maintaining security and control over the system. So let’s begin the process where you will find the steps to create a new user, give it read-only access to the log folder, and also verify the access.
Process Flow Chart to Create User as Read-only to Log Folder: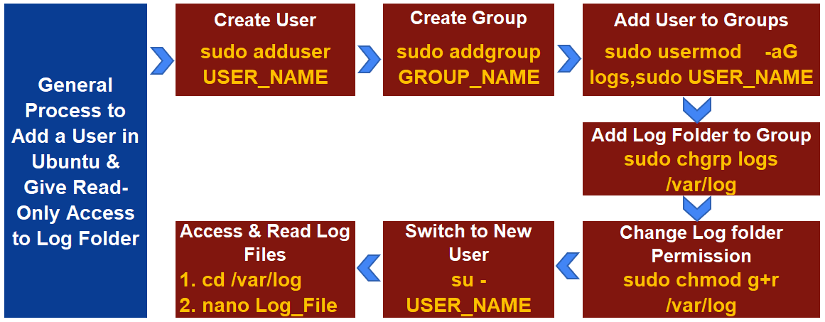
[Distro Used Throughout the Tutorial: Ubuntu 22.04.1 LTS]
7 Steps to Create a User as Read-Only Access to Log Folder
Learning to create a new user and configure the necessary permissions for files & folders is a must-know knowledge for Ubuntu users. Since it assures security, system integrity, resource management, and personalization options while sharing specified files between multiple users, one key step may be to create a user as read-only access to the log folder.
In the following article, I will explain step-by-step processes to create a user with read-only access to the log folder in Ubuntu.
Step 1: Create a User in Ubuntu
The distribution provides two different commands to create a new user. First, create a user using the adduser or useradd command. Here, I will create a user using the adduser command which is the first step to create a user in Ubuntu as read-only access to the log folder. Follow these steps to do the same:
- Open your Ubuntu terminal application.
- Type the following command (the syntax is
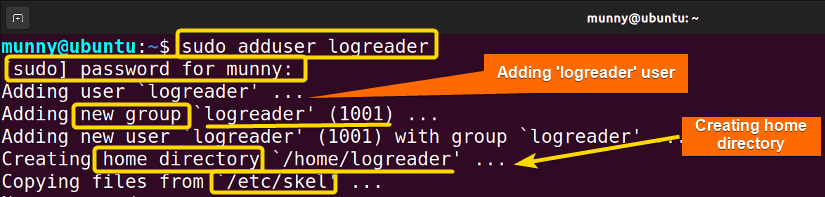
sudo adduser user_name) in your command prompt to create a user:sudo adduser logreaderEXPLANATION- sudo: permits administrative privileges.
- adduser: creates a new user.
- logreader: name of the newly created user.
- Tap the ENTER key.
- Next, give the currently logged-in user password.
- Then, hit the ENTER button again.
 EXPLANATION
After entering the password, the command will add the new user to a new group, with the same name as the username, ‘logreader’. Moreover, it will create a home directory for storing the new user’s data.
After that, the command copies the contents of the “/etc/skel” directory to the new user’s home directory. The “/etc/skel” directory contains a set of default files and directories which provide a basic set of files and settings for the user.
-
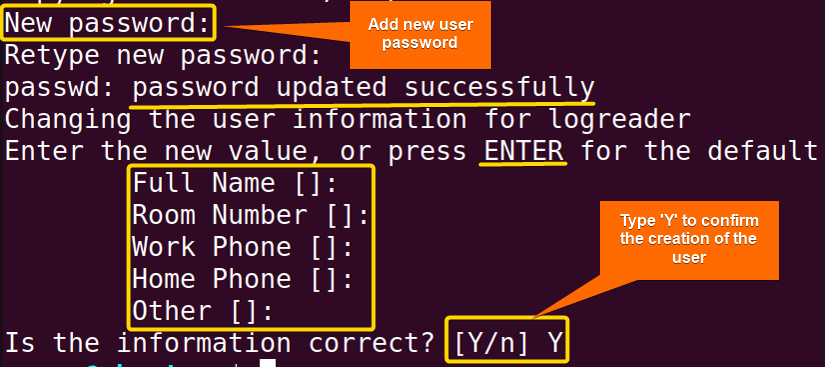
Afterward, type & retype the new user password with other information. However, you can skip setting other information by pressing ENTER each time.
-
Finally, press the ‘Y’ & then the ENTER key to confirm the new user creation:
 There you go, you have successfully created a new user.
 There you go, you have successfully created a new user.
Step 2: Create a Group in Linux
Next, create a group using the addgroup command. Creating a group and adding the user to that group is necessary. Since it helps to assign read-only access to the log files to that specific user of the group, instead of giving access to all users on the system. Follow the below steps to create a group:
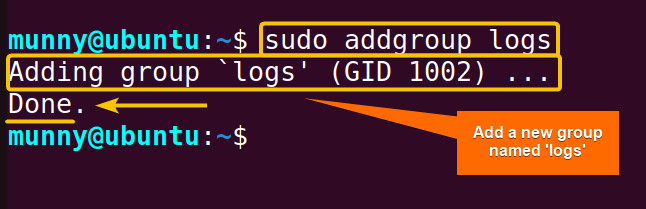
- Write the following command in the command prompt to add the new group named “logs”:
sudo addgroup logsEXPLANATION- sudo: permits administrative privileges.
- addgroup: Create a new group.
- logs: Name of the group.
- Press the ENTER key.
 The addgroup command creates a new group named ‘logs’.
 The addgroup command creates a new group named ‘logs’.
Step 3: Add the User to the Groups in Ubuntu
Afterward, add the user to the ‘logs’ group using the usermod command. Now by default, a new user is only a member of their own group. But to give the user any type of access permission or let modify any files or folders, in addition to the “logs” group you have to add it to the “sudo” group. So that it can have administrative privileges. Go through the below steps:
- Write the following command in the command prompt to add the new user to the groups “logs” & “sudo” using the syntax
sudo usermod [Options] GROUP_NAMEs USER_NAME:sudo usermod -aG logs,sudo logreaderEXPLANATION- usermod: Modifies assigned attributes to the user.
- -aG: This option of the usermod command adds the user to an additional group.
- logs: Name of the group.
- logreader: User name.
- Press the ENTER key.
 The command after execution modifies the logreader user by adding it to the “logs” & “sudo” groups.
 - Then, type the below command, to see if you have successfully added the user to the groups:
id logreaderEXPLANATION- id: Finds the identity of the specified USER.
- Finally, tap the ENTER button.
 The id command output shows the UID, and GID of the new user, along with the groups (27 & 1002) it belongs to.
 The command after execution modifies the logreader user by adding it to the “logs” & “sudo” groups.
 The id command output shows the UID, and GID of the new user, along with the groups (27 & 1002) it belongs to.
- How to Create a Jenkins User on Ubuntu? [2 Methods]
- How to Create MySQL User in Ubuntu? [2 Cases]
- Create User Without Home Directory in Ubuntu in Just 3 Steps
- How to Create a User in Docker Container Without Docker File?
Step 4: Add the Log Folder to the Group
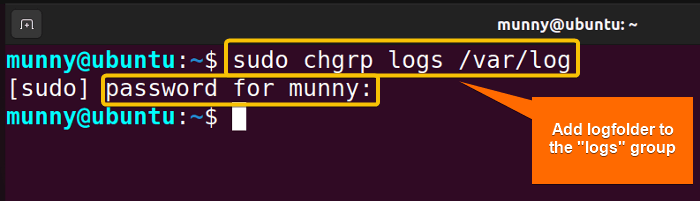
After you have added the new user to the log group, add the log folder to that group too using the chgrp command. Hence follow the below steps and command syntax:
- Type the following command (syntax:
sudo chgrp GROUP_NAME /path/to/Log_Folder
) in the command prompt to set permissions to the drive:sudo chgrp logs /var/logEXPLANATION- chgrp: Alters group to which files or directories belong.
- logs: Name of the group.
- /var/log: Location path of the log folder.
- After that, press the ENTER button.
- Afterward, give the password and press ENTER again.
 The chgrp command adds the log folder to the “logs” group.
 The chgrp command adds the log folder to the “logs” group.
Step 5: Change the Log Folder Permission
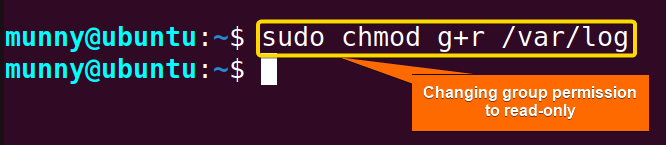
In this step, set the log folder permission as read-only for the group. For that use the chmod command. You can use the command in either absolute (numeric such as 750, 777) or symbolic mode ( with symbols like +, -, u, g, o, r, w, x) to set permissions to the folder. Here, I will use symbols with logical operators as command parameters. Check the below command syntax with the following steps:
- Type the following command in the command prompt to set permissions to the drive using the standard syntax
sudo chmod +Permissions /path/to/the/drive:sudo chmod g+r /var/logEXPLANATION- chmod: Changes access permission of files & directories.
- g+r: Adding (+) Read-Only (r) permission for the Groups (g).
- /var/log: Log Folder location path.
- Next hit the ENTER button.
 The chmod command adds read-only permissions to the group for the log folder and the logreader user is a member of that group.
 The chmod command adds read-only permissions to the group for the log folder and the logreader user is a member of that group.
Step 6: Switch to New User in Linux
After you have given the new user read-only access to the log folder, next let’s switch to the new user account to verify if you can access those files & read them. Therefore act according to the below steps:
- First, write the following command to switch to the new user account:
su - logreaderEXPLANATION- su: Substitutes User ID.
- – or -l or –login: Log-in option of the su command.
- logreader: User name.
- Next, press the ENTER key.
 Upon execution, the su command switches to the ‘logreader’ user’s home directory.
 Upon execution, the su command switches to the ‘logreader’ user’s home directory.
- How to Create Multiple Users in Linux? [2 Methods]
- How to Create a Root User in Ubuntu [Step-by-Step]
- How to Create User Account in Ubuntu with Public Key
- Create A User in Ubuntu that Runs a Script and Logs Out [4 Steps]
Step 7: Access Log Folder & Read Log Files of Ubuntu
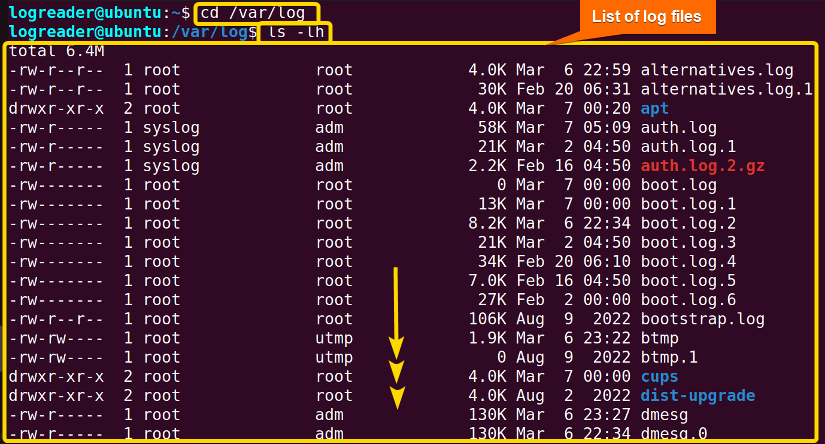
After switching to the new user, try to access the log folder using the cd command. Check the folder files list and then try to read them. Follow the below steps:
- Write the following command to change the working directory to the log folder:
cd /var/logEXPLANATION- cd: Changes working directory.
- /var/log: Location path of the log folder.
- Press the ENTER key.
- Next, check the log folders list using the ls command:
ls -lhEXPLANATION- ls: Lists directory contents.
- -l -h or -lh: Options of the ls command where -l gives long lists & -h shows output in human-readable size.
- Tap the ENTER key.

- After that try to open any of the log files to read using the nano text editor, write the below comments:
nano syslogOR,
nano bootstrap.logEXPLANATION- nano: Text editor for Unix-like systems.
- syslog: One of the Log files.
- log: One of the Log files.


- Hit the ENTER key after typing each command:
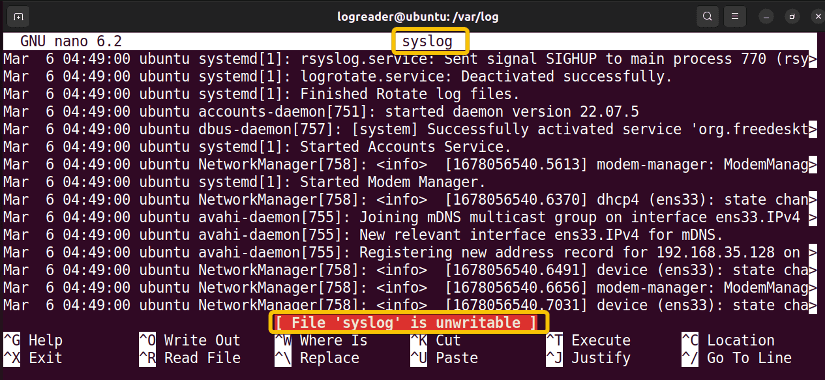
 The nano editor will pop up right away with the specified log file, as you can see from the upper pictures of the syslog file & bootstrap.log file that are opened in the editor.
 The logreader user can read these files but can’t write or modify them. Check the bottom note showing the message, “[File ‘syslog’ is unwritable]”. Since the user has only read-only access to these files.


 The nano editor will pop up right away with the specified log file, as you can see from the upper pictures of the syslog file & bootstrap.log file that are opened in the editor.
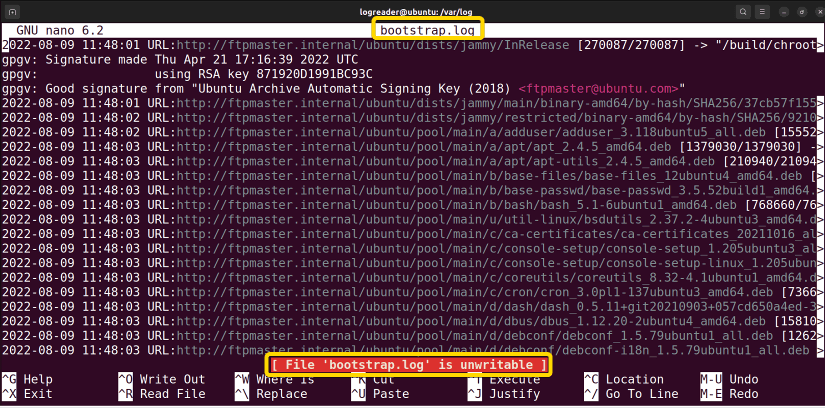 The logreader user can read these files but can’t write or modify them. Check the bottom note showing the message, “[File ‘syslog’ is unwritable]”. Since the user has only read-only access to these files.
Remove Read-Only Permissions from the Log Folder in Linux
So far you know how to give read-only access to the newly created user, now what if you want to remove the granted access? Check out the below steps to learn the process:
- First, open your terminal & switch to the new user by typing the below command:
su - logreaderEXPLANATION- su: Substitutes the USER account.
- – or -l or –login: Log-in option of the su command.
- logreader: User Name.
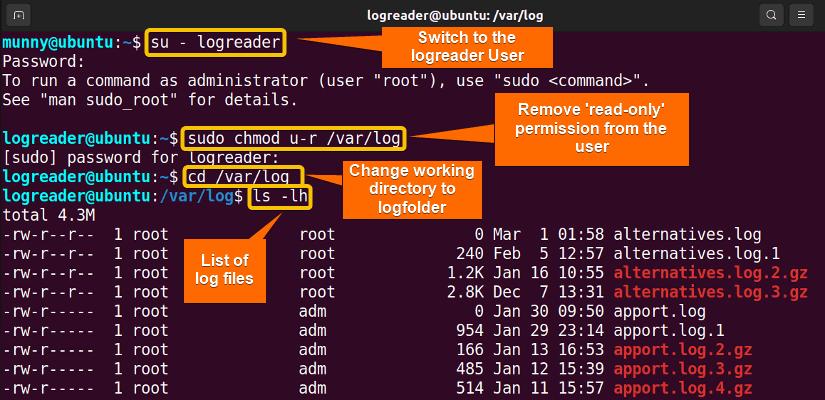
- Then, remove read-access from the user for the log folder using the following command:
sudo chmod u-r /var/logEXPLANATION- chmod u-r: The chmod command with symbolical operators (u-r), where ‘u’ is for the user and ‘r’ is for read permission. And the minus ‘-’ sign is used for removing.
- Next, change the current working directory from the user’s home directory to the log folder directory and see the list of log files:
cd /var/logls -lhEXPLANATION- cd: Changes working directory.
- /var/log: Log folder location path.
- ls: Lists directory contents.
 EXPLANATION
See the output image, the su command is substituting the user for the logreader. After that, when you are logged in with the logreader user, remove the read-only access permission from the user (u-r) for the log folder. Then cd into the log folder and view the files list with the ls command.
- From the list of files, try to open & read any of the log files in the nano editor. Let’s try to open the syslog file:
nano syslogEXPLANATION- nano: Text editor for Unix-like systems.
- syslog: One of the Log files.
- Finally, Press the ENTER button.
 The syslog file is unreadable. The user has no read permission for the log folder, thus it won’t be able to read or open any of the log folder files. Hence, you have successfully removed the read permission from the logreader user.

 The syslog file is unreadable. The user has no read permission for the log folder, thus it won’t be able to read or open any of the log folder files. Hence, you have successfully removed the read permission from the logreader user.
- How to Create an FTP User in Ubuntu? [Step-by-Step]
- Create a New SFTP User in Ubuntu with a New SSH Key
- How to Create Group and Add User in Ubuntu? [2 Cases]
- Create FTP User for Specific Directory in Ubuntu [4 Steps]
Give Read-Only Permission to a Specific Log File in Linux
In the upper example, you have read about giving the newly created user read-only access to the log folder. Now, what if you just want to give him/her read access to a specified file from the folder instead of the entire folder? In that case, the process is almost the same except that now you have to mention the path of the file inside the log folder so that you can successfully create a Ubuntu user with read-only access to the log folder with specificity.
For the process add the specified log file to the ‘logs’ group instead of the entire folder. And then change permission for that file. Read through the below steps where I will give the user read-only access to the “syslog” file:
- In your Ubuntu terminal write the following command to change the “syslog” file group to “logs”:
sudo chgrp logs /var/log/syslogEXPLANATION- chgrp: Alters group to which file or directory belongs.
- logs: Group name.
- /var/log/syslog: Location path of the log file “syslog”.
- Press the ENTER button.

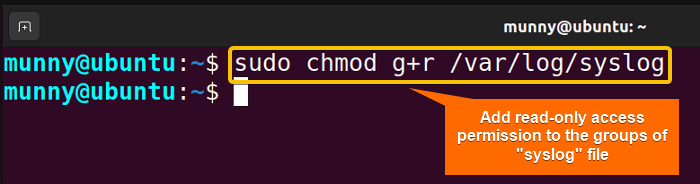
- After that, change the ‘syslog’ file permission using the below command:
sudo chmod g+r /var/log/syslogEXPLANATION- chmod: Changes access permission of files & directories.
- g+r: Adding (+) Read-Only (r) permission for the Groups (g).
- /var/log/syslog: Location path of the log file “syslog”.
-
Next, tap the ENTER button.
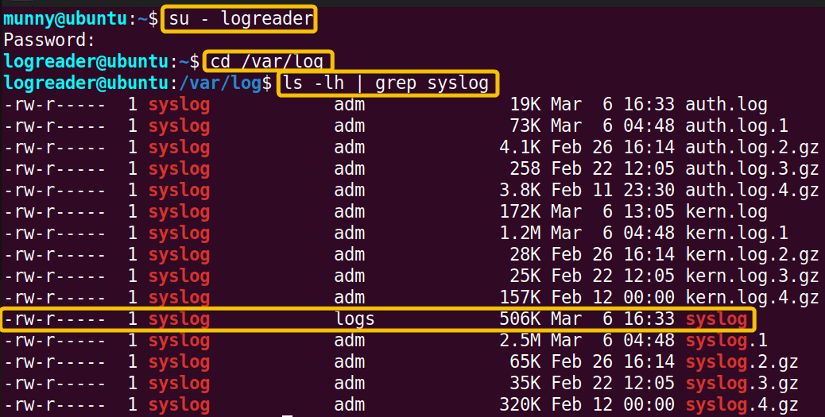
 Then follow “Step 6: Switch to New User in Linux” to switch to the logreader user.
-
After switching to the new user, change the working directory from the user’s home to the log folder using the cd command and check the “syslog” files list using the grep command to the output of the ls command. Type as follows:
cd /var/logls -lh | grep syslogEXPLANATION- ls: Lists directory contents.
- -l -h or -lh: Options of the ls command where -l gives long lists & -h shows output in human-readable size.
- grep: Looks for a specific pattern given to it as an argument.
- syslog: One of the log files.
 From the output, you can see the “syslog” file is situated inside the “logs” group. And, from the permissions parameter (-rw-r—–), you can also notice that the group has only read permission to the file.
 - Afterward, try to open the syslog file with the nano editor:
nano syslogEXPLANATION- nano: Linux text editor.
- syslog: One of the log files.
- At this point, Hit the ENTER button. See from the nano editor, that the logreader user can read the “syslog” file but can not write or modify it. Since the user only has read access.
-
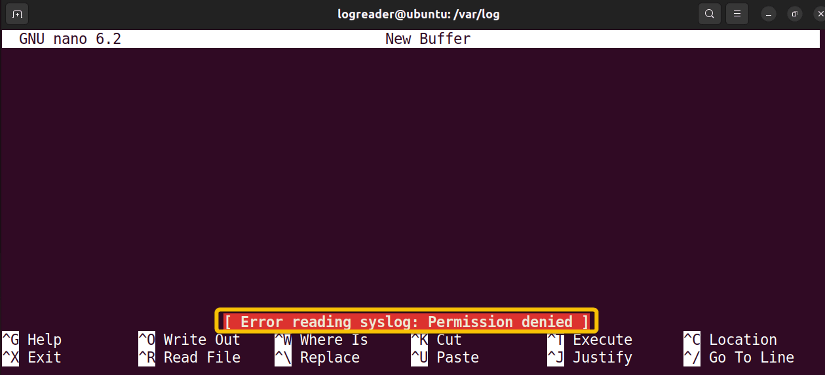
Afterward, let’s try to open any other file to which the user doesn’t have read access. For example, open the syslog.1 file using the nano editor.
nano syslog.1EXPLANATION- nano: Linux text editor.
- syslog.1: One of the log files.

- Finally press the ENTER key again.
 EXPLANATION
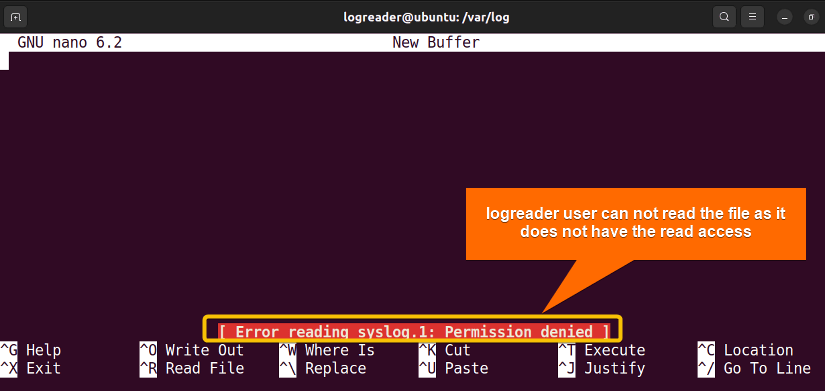
After the nano editor opened the “syslog.1” file, as you can see from the output picture, it showed the message “ERROR reading syslog.1: Permission denied”. Since the user does not have read permission for this file or any other files from the log folder, only the syslog file.

 From the output, you can see the “syslog” file is situated inside the “logs” group. And, from the permissions parameter (-rw-r—–), you can also notice that the group has only read permission to the file.
 See from the nano editor, that the logreader user can read the “syslog” file but can not write or modify it. Since the user only has read access.
Conclusion
In conclusion, the process of creating a new user in Ubuntu as read-only access to the log folder is a simple yet effective security measure. It allows the user to view system logs without being able to modify them since it is helpful for troubleshooting & monitoring purposes. Throughout the article, I discussed the process with practical examples. Besides, I added some complementary info that will be helpful to gather some extra knowledge. Hope the article helps you learn how to create a user as read-only access to the log folder in Ubuntu and make you a better Linux user.
People Also Ask
What does chmod 644 mean?
“chmod 644“ is a Linux command that sets the file permissions to read and write for the file owner, while read-only for the group owner and others. Where 6 (binary 110) is indicating r-w for the owner & the next two 4 (binary 100) indicate read-only for the group & others.
How do I restrict the user from being able to log into Linux?
To restrict a user from being able to log into Linux, you can modify the user’s login shell to a non-existent shell. Hence, find out the user’s login shell using the “getent passwd user_name” command & then change the shell using the usermod command with the –shell option & set ‘nologin’. Use this command syntax “sudo usermod -s /sbin/nologin user_name”.
How do I restrict access to a folder in Ubuntu?
You can restrict access to a folder in Ubuntu by changing its permissions using the ‘chmod’ command. Hence, use any symbols or absolute values with the command as per your need for permission settings. For example, “chmod 700” sets permission rwx for the owner & no permission for groups & others.
How do I restrict a user to a specific directory in Linux?
You can restrict a user to a specific directory in Linux by setting their home directory to the directory you want to restrict them to. Therefore create the user by specifying the home directory that is by providing the directory location path. Next, change the directory owner to the owner & set the permission for the directory to 700.
How do I give a user permission special in Linux?
To give a user special permissions in Linux, you can use the “sudo” command. Sudo stands for “superuser do”, and it allows a user with administrative privileges to execute a command as another user or with elevated privileges. After creating a user, add it to the “sudo” group, which allows the user to use the “sudo” command.
What are ACL permissions in Linux?
ACL stands for Access Control List. They are used to extend the standard Linux file permission system by allowing specific permissions for individual users or groups. With ACLs. you can set permissions such as read, write, execute, and delete and specify which users or groups have access to the file or directory.
How do I give someone permission for a command?
To give someone permission in Linux, you can use the “sudo” command. As you need to be a root user or superuser to run some commands, the sudo command elevates that. Thus, add the user to the sudo group. That way, the user will be able to use the sudo command before other commands.
How do I switch user in Ubuntu?
To switch user in Ubuntu, use the su command followed by the user name you want to switch to. Open the terminal and type su username, replace the username with the name of the target user, and enter the user’s password to successfully switch the target user’s environment.
How do I chmod to a specific user?
It is not possible to use the ‘chmod’ command to assign permissions to a specific user. Instead, you can use the ‘chown’ command to change the ownership of a file or directory. By changing the ownership, you can assign permissions to a specific user or group.
Relaed Articles
- How to Create User and Add to Sudo in Ubuntu? [2 Methods]
- 2 Ways to Create a User With Access to a Drive in Ubuntu
- How to Create a New User in Ubuntu by GUI? [Step-by-Step]
- 2 Ways to Create User Account in Ubuntu Using Terminal
- How to Create Home Directory for Existing User in Ubuntu
- Create User with UID and GID in Ubuntu? [3 Scenarios]
- How to Create a Sudo User in Ubuntu? [Step-by-Step]
FUNDAMENTALS A Complete Guide for Beginners


