The root user is the supreme user in a Linux operating system. It has access to everything on the machine and can do any tasks and open any files. To execute any administrative work in Linux you need to be the root user. In this article, I will show you how to create a root user in Ubuntu with different methods.
What is a Root User in Ubuntu?
The root user is the superuser or administrator with elevated privileges, enabling them to execute commands and make changes to the system that regular users cannot. The root user has unrestricted access to all files and commands, making it a powerful but potentially risky account. In Linux, any user ID assigned with entity ‘0’ is the root user. It can read, write and perform any operation on the system as the superuser.
4 Steps to Create a Root User in Ubuntu
In the following example, I will create a root user in Ubuntu named “abir”. I have illustrated the full process in the following 4 steps:
1. Create a New User
You can create a new user from the terminal using the adduser command. Check the below steps to see how it works:
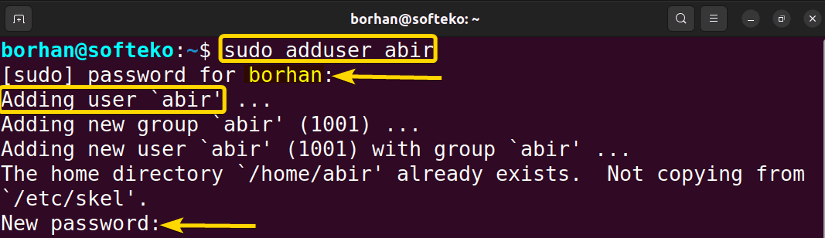
- First, open your terminal by pressing CTRL+ALT+T.
-
Type the following command:
adduser abirEXPLANATION- adduser: Adds a new user
- abir: Creates a new user named abir.

- You have to be a root user to execute the
addusercommand. You can easily do this by using this command:sudo adduser abirHere the sudo command grants administrative privileges.

-
Now, provide a password for the newly created user and retype it. Here, You can skip the data-filling step by pressing the ENTER button each time and finally press Y to confirm.

- Finally, you can check whether the user has been created or not by typing the following command.
getent passwd | grep abirEXPLANATION


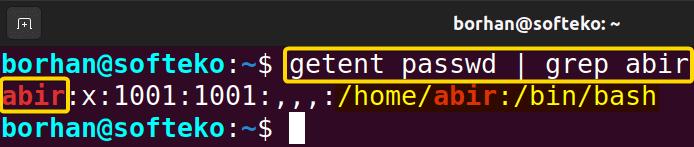
You can see in the above picture that a new user named abir has been created.
2. Add User to the Sudo Group to Create a Root User
Adding a user to this sudo group means this user will now possess privileged powers. To add your newly created user “abir” to the sudo group type the following command:
sudo usermod -aG sudo abir- usermod: Modifies an existing user account.
- -aG: Adds a user to the specific group.
groups abir command.
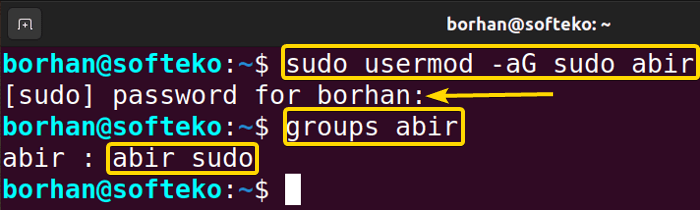 You can see in the above picture that abir is added to the sudo group.
3. Verify User privileges to Create a Root User
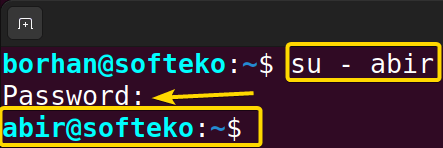
To verify user privileges for my newly created user abir, I need to switch to that user from my current one. To do so:
- Type the following command:
su - abir - Type your password and you will be in the new user’s shell as shown in the below picture.

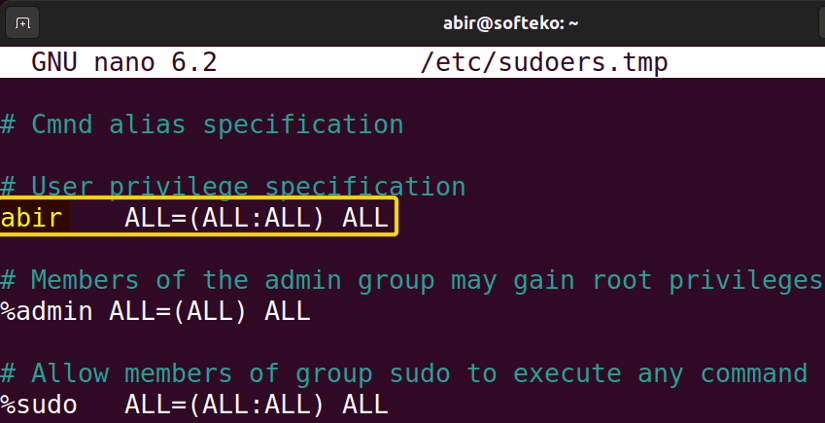
- Now, type
sudo visudocommand to open the sudoers file in your nano text editor. - Go to the user privilege specification line and replace the username with root.
- Save the file by pressing CTRL+ X and then the Y buttons.
- Press the ENTER button. Your user privileges will be set.

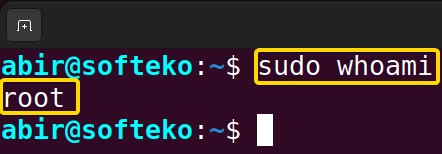
- Finally, to check the user privileges you can just type the
sudo whoamicommand.
 It shows that you are the root user of this machine.
 It shows that you are the root user of this machine.
- How to Create a Jenkins User on Ubuntu? [2 Methods]
- How to Create MySQL User in Ubuntu? [2 Cases]
- Create User Without Home Directory in Ubuntu in Just 3 Steps
- How to Create a User in Docker Container Without Docker File?
4. Log in as a Root User in Ubuntu
Before logging in as a root user, you need to change the root password to get access. To do so you just type the following command:
sudo passwd rootFirst, you need to give your user password and then set the new password for the root.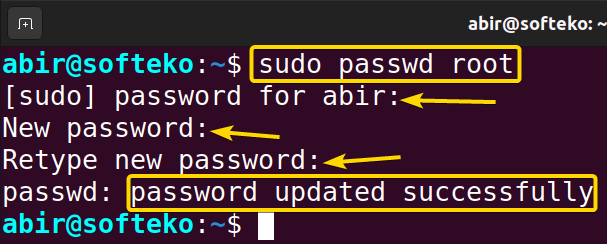
You can see in the below picture that the password has been updated successfully. Now you can log in to the machine as a root user at any time by giving this password.
To log in as a root user in Ubuntu by various methods. Here are some of the useful ones for your better understanding:
1. Using the “sudo” command
To log in as a root user you can just type the below command:
sudo bashAfter pressing the ENTER button, you will see that your command prompt and terminal will change as shown in the below picture. I am the root user of this machine.

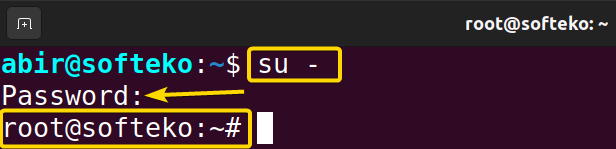
2. Using the “su” command
You can log in as a root user by just typing the below command:
su -After pressing the ENTER button, you will see that your command prompt and terminal will change as shown in the below picture. I am the root user of this machine.
- How to Create an FTP User in Ubuntu? [Step-by-Step]
- Create a New SFTP User in Ubuntu with a New SSH Key
- How to Create Group and Add User in Ubuntu? [2 Cases]
- Create FTP User for Specific Directory in Ubuntu [4 Steps]
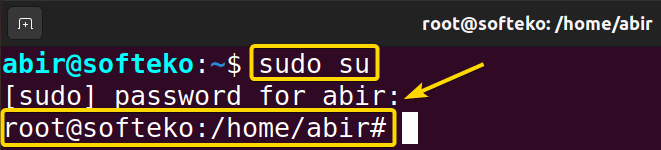
3. Using the “sudo su” command
If you want to log in as a root user you can just type the below command:
sudo suAfter pressing the ENTER button, you will see that your command prompt and terminal will change as shown in the below picture. I am the root user of this machine now.
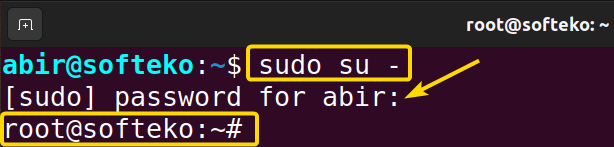
4. Using the “sudo su -” command
By typing the below command you can log in as a root user:
sudo su -After pressing the ENTER button, you will see that your command prompt and terminal will change as shown in the below picture. Now I am the root user of this machine.
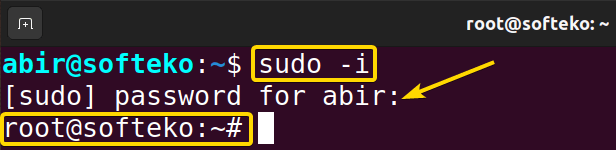
5. Using the “sudo -i” command
You can use the sudo -i command to log in as a root user. After pressing the ENTER button, you will see that your command prompt and terminal will change as shown in the below picture. Now I am the root user of this machine.
- How to Create Multiple Users in Linux? [2 Methods]
- Create a User in Ubuntu as Read-Only Access to Log Folder
- How to Create User Account in Ubuntu with Public Key
- Create A User in Ubuntu that Runs a Script and Logs Out [4 Steps]
6. Using the “sudo -s” command
Run the sudo -s command to log in as a root user. After pressing the ENTER button, you will see that your command prompt and terminal will change as shown in the below picture. Now I am the root user of this machine.
Check If a User is a Root User in Ubuntu
I have shown you how to create a root user in Ubuntu. Now, you can inspect whether a user is a root user or not by using the following process:
- First, open the Ubuntu Terminal.
- Type the
sudo whoamicommand in the command prompt. - Now, press the ENTER button.


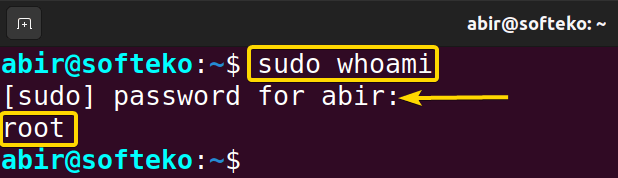
In the above images, I have examined two users named “softeko” & “abir” respectively. Between them, softeko is not a root user but abir is a root user.
Conclusion
The root user can read, write and perform any operation on the system as the superuser. Hence, It is very important to create a root user and do any administrative job to change the inside and outside environment of the machine while needed. After completing this article, you will be able to create a root user in Ubuntu.
People Also Ask
What is the root user used for?
The root user is used for performing critical system-level tasks, such as installing or removing software, configuring system settings, and managing user accounts. This elevated level of access allows the root user to make changes that can impact the entire system, making it a powerful but potentially risky account.
It is recommended to use the root user account judiciously to minimize the risk of unintended system alterations.
What is the difference between a root user and a normal user?
The root user and a normal user differ in their levels of system privileges. The root user, also known as the superuser or administrator, has unrestricted access to all files and commands on a computer. This user can modify system-critical files, install software, and perform administrative tasks.
In contrast, a normal user has limited access and can only modify files and settings within their designated user space. Root access is typically required for system-wide changes, while normal users operate within predefined boundaries to ensure system security and stability.
How do you know if a user is a root user in Linux?
To determine if a user is a root user in Linux, you can check their user ID (UID). The root user typically has a UID of 0. Use the id -u command in the terminal. If the output is 0, the user is the root user; otherwise, they are not.
How do I find the root user in Linux?
To find the root user in Linux, you can use the whoami command. This command will display the current username, and if you are the root user, it will output “root.”
Alternatively, you can find the root user in Linux by executing the cat etc/passwd command in your Ubuntu Terminal. This will open a file containing the list of all users. In that list, you will find the root user on your machine.
Is a root user the same as the admin?
Yes, the root user in Linux is the same as the admin. In fact, the root user is the admin of the operating system who can do any kind of administrative job without anyone’s interruption.
Why do we need a root user and when to use it?
The root user in Linux is necessary for:
- Managing user accounts and configuring system settings.
- Installing or removing software that requires system-wide changes.
- Performing operations on protected files and directories.
- Creating, modifying, or deleting user accounts.
- Conducting system updates, backups, and resolving critical issues.
Use the root user in Linux when:
- Installing or removing software that requires system-wide changes.
- Configuring system settings and making adjustments that impact the entire system.
- Performing file system operations like creating, deleting, or modifying protected files and directories.
- Managing user accounts, including creating, modifying, or deleting accounts.
- Conducting system maintenance tasks such as updates, backups, and resolving critical system-related issues.
Why log in as a root user?
Root account provides full system access for crucial operations, enabling modifications, software installations, and configuration changes. However, frequent use poses serious risks, including potential errors or malicious activities. To enhance system stability and security, it is recommended to avoid regular root account usage and perform tasks with limited privileges.
What are the 3 types of users in Linux?
There are primarily three kinds of users in Linux based on their permission privileges. They are:
- The Regular user
- The Root user
- The System user
What is the difference between root and sudo user?
The root user and the sudo user serve distinct purposes in Unix-like operating systems:
| Root User | Sudo User |
|---|---|
|
|
|
|
|
|
Relaed Articles
- How to Create User and Add to Sudo in Ubuntu? [2 Methods]
- 2 Ways to Create a User With Access to a Drive in Ubuntu
- How to Create a New User in Ubuntu by GUI? [Step-by-Step]
- 2 Ways to Create User Account in Ubuntu Using Terminal
- How to Create Home Directory for Existing User in Ubuntu
- Create User with UID and GID in Ubuntu? [3 Scenarios]
- How to Create a Sudo User in Ubuntu? [Step-by-Step]
FUNDAMENTALS A Complete Guide for Beginners


