One of the most important tasks that Ubuntu users often need to perform is accessing their accounts safely from remote locations. You can create a user account with the public key to do this easily. In this article, I’ll demonstrate how to create a user account with the public key in Ubuntu.
Requirements to Create User Account with Public Key
- A server computer (Ubuntu installed in VMWare Workstation).
- A client computer (Ubuntu installed in Windows Subsystem for Linux).
- You must log in to both the server and client computer.
- You must be a root user or have root/sudo access in Ubuntu.
- You must connect both computers to the internet.
- You must install the OpenSSH-server.
Process Flow Chart to Create User Account with Public Key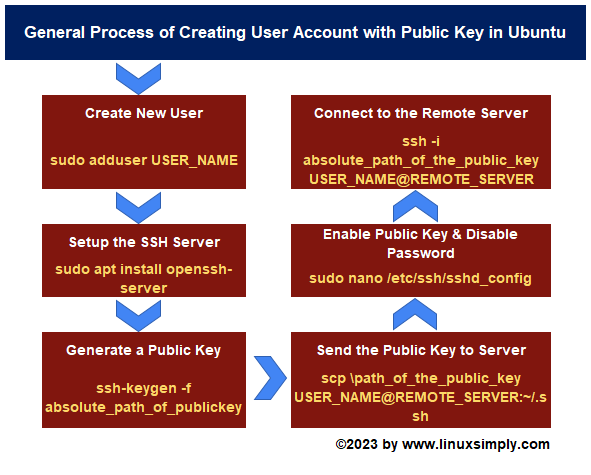
Distro Used Throughout the Tutorial: Ubuntu 22.04.1 LTS
Create a User Account with Public Key in Ubuntu
You can instantly create a user account in Ubuntu with the public key. Make sure you are logged in as the root user. The following guide will help you create a user account with the public key in Ubuntu.
Case A: Client Windows User & Server Ubuntu User
Among all the operating systems, I am using windows for my client computer and Ubuntu for my server computer here. You can do the same by following the process below.
Step 1: Create a User Account in Ubuntu
I will create a new user named “august” using the terminal. This will be my remote server. To know more about creating users from the terminal, follow this article. Also, to create a user using the GUI, you can follow this article. For better understanding, follow the steps below:
- To initiate, press CTRL+ALT+T to open the Ubuntu Terminal.
- Then, copy the command below:
sudo adduser august - After that, press the ENTER button.
 EXPLANATION
A new user account with the name “august” is created. It will then assign it to the new “august” group which is created with the same name.
The command then creates a home directory at “/home/august” for the new user. The user’s private data and settings will be kept in this directory.
Lastly, the command moves the contents of the “/etc/skel” directory to the new user’s home directory. In order to provide new user accounts with a basic set of files and settings, the “/etc/skel” directory provides a collection of default files and folders.
- Now, Enter a password for the newly created user and other required information.By repeatedly hitting ENTER, you can, however, ignore entering further information.
Warning: Try to create a strong, unique password. If you don’t, you’ll get a warning message like “BAD PASSWORD” as shown in the image below.
- Finally, press Y to confirm your given information.
By selecting Y, you have created a new user as you have confirmed all the information provided. You can now use this instruction to create a new user anytime.


Step 2: Setup the SSH Server in Ubuntu
Without setting up the SSH server, you can not generate the public key and log in to the remote server. Follow the instructions below to set up the ssh-server:
- Open up the Ubuntu Terminal on the server computer.
- Execute the following command into the command prompt:
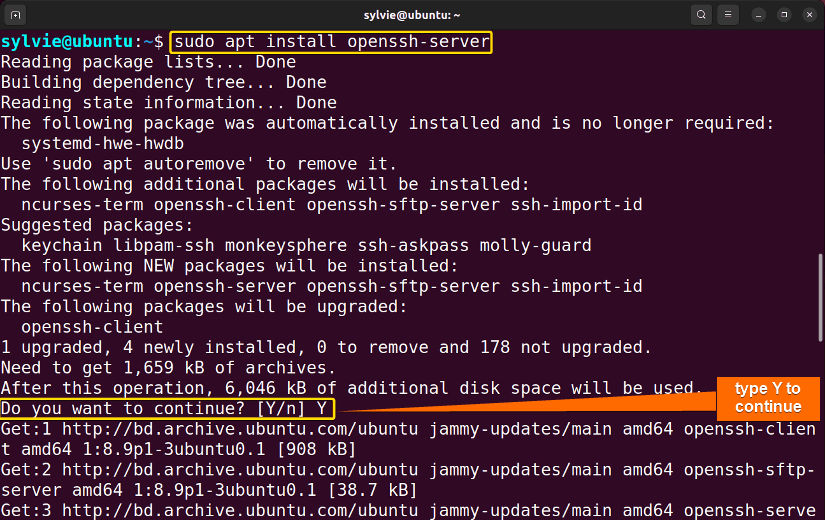
sudo apt install openssh-serverEXPLANATION- sudo: Grants administrative privileges.
- apt: Manages software packages.
- Install: Copies files to a specified destination.
- openssh-server: Securely connects to a system.
- Now, press the ENTER button.
- Then, type Y and hit the ENTER button to continue the process:
 In the above image, you can see that the openSSH-server is successfully installed.Follow the same process to set up the openSSH-server in the client computer.
 - Now switch to the new user August. Follow this guide to learn more about the steps to switch users.
-
If you haven’t turned on your server, type the following commands in the command prompt and press the ENTER key to turn on your server and see the status:
sudo service ssh startsudo service ssh statusEXPLANATION- sudo: Grants administrative privileges.
- service: Starts, stop, and restart services.
- ssh: Enables computers to communicate.
- start: Starts the server.
- Status: Shows the status of the server.
 As you can see, the server is active.
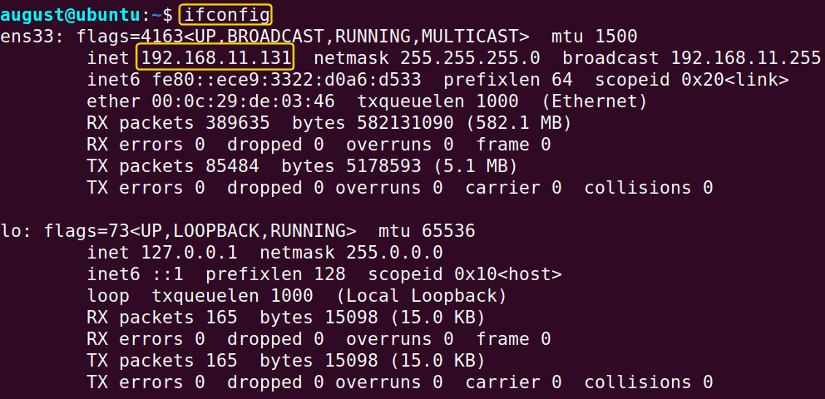
 - Now, execute the following command in the command prompt to find the IP address of the server:
ifconfigEXPLANATION- Ifconfig: Used to find the IP address of the server.
 In the above image, you can see the IP address of the server.
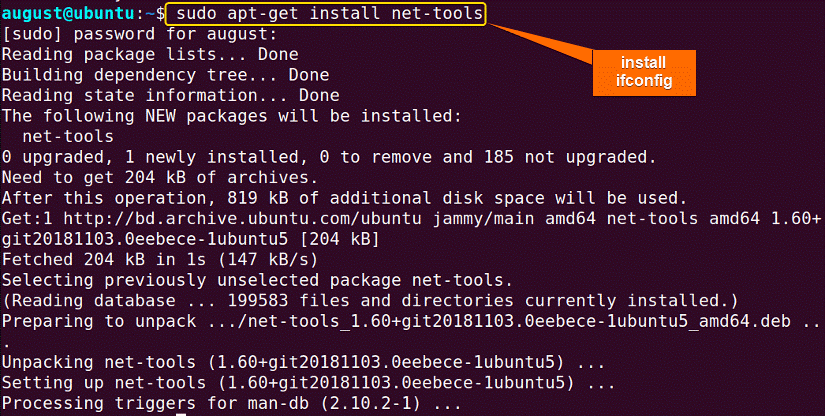
If your device does not have the ifconfig, write the following command to install it and tap the ENTER button.
sudo apt-get install net-toolsEXPLANATION- sudo: Grants administrative privileges.
- apt-get: Advanced package tool.
- net-tools: The collection of base networking utilities.

 In the above image, you can see that the openSSH-server is successfully installed.Follow the same
  As you can see, the server is active.
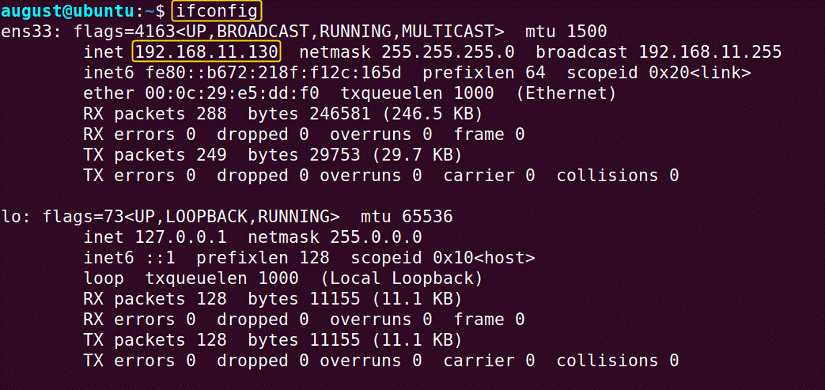 In the above image, you can see the IP address of the server.
Step 3: Generate a Public Key
You can use the public key to authenticate the remote server. You need to generate a public key in the client computer. I am using Windows for my client computer. You can use any operating system of your choice. Here, in the following, I will be generating a public key so that I can use that to create my remote user account:
- Start by opening the Windows Powershell on your local machine.
- Now create a directory named ssh in the C drive on your local machine.
- To generate keys, enter the command shown below:
ssh-keygen -f C:\ssh\mykeyEXPLANATION- ssh-keygen: Generates a pair of public and private keys.
- option -f: Used to generate keys in the defined location.
- C:\ssh\mykey: Absolute path of the public key.
- After that, tap the ENTER button.
-
For the key pair, you will be prompted to enter a passphrase. So, type the passphrase you want and press the ENTER button:
 Note: The key pair is more secure with this passphrase, yet it isn’t required. If you don’t want to use a passphrase, you can press ENTER to leave the field blank.
 The key pair is generated and saved in the selected location once the passphrase has been entered (or left blank).
You can follow this section to verify the generated public key.
The key pair is generated and saved in the selected location once the passphrase has been entered (or left blank).
You can follow this section to verify the generated public key.

 The key pair is generated and saved in the selected location once the passphrase has been entered (or left blank).
- How to Create a Jenkins User on Ubuntu? [2 Methods]
- How to Create MySQL User in Ubuntu? [2 Cases]
- How to Create a User in Docker Container Without Docker File?
Step 4: Send the Public Key to Server
To use the public key, you need to send the public key to the server. You need to send the public key for logging into the remote server. But before doing this log in as the newly created user with the password.
Follow the steps below to send the public key to the server using the scp command:
- First open the Windows PowerShell.
- To send the public key, enter the command using the below syntax:
scp absolute_path_of_the_public_key USER_NAME@REMOTE_SERVER:~/.sshscp C:\ssh\mykey.pub [email protected]:~/.sshEXPLANATION- scp: Transfers files.
- C:\ssh\mykey.pub: Absolute path of the public key.
- august: Name of the user.
- 168.11.130: IP address of the remote server.
- After that, tap the ENTER button.

- Open the Ubuntu Terminal on the server computer.
-
Log in as the newly created user with the password if you haven’t already. Follow this guide to learn more about the steps to switch users.
- To check if the public key is sent, execute the following command:
ls .sshEXPLANATION- ls: Lists contents of directories.
- .ssh: A directory name .ssh.
 In the image above, you can see the public key is found in the server.
 - Type the following command into the command prompt to restart the server and hit the ENTER button:
sudo service ssh restartEXPLANATION- sudo: Grants administrative privileges.
- service: Starts, stop, and restart services.
- ssh: Used to configure OpenSSH.
- restart: Restarts sshd service.
 One public key is sent to the server using the above syntax and steps.
 - Now, delete the public key from client computer following the instructions shown in the image below:
 Don’t forget to remove the public key. As you have already sent the public key to the remote server, you don’t need this in the client computer anymore.

 In the image above, you can see the public key is found in the server.
 One public key is sent to the server using the above syntax and steps.
Step 5: Enable Public Key Authentication & Disable Password Authentication
To access the remote server without a password, you need to enable public key authentication & disable password authentication. For better understanding, follow the instructions below:
- Open the Ubuntu Terminal on the server computer.
- Write the following command to the command prompt and strike the ENTER button:
cat ~/.ssh/mykey.pub >> ~/.ssh/authorized_keysEXPLANATION- cat: Used to view contents of the file(s).
- ~/.ssh/mykey.pub: Absolute path of the public key.
- >>: Used to append to a file.
- ~/.ssh/authorized_keys: Absolute path of authorized_keys file.
 In the above image, you can see the public key is added to the authorized_keys file.
Note: If the file does not exist, it will create a file called authorized_keys.
In the above image, you can see the public key is added to the authorized_keys file.
Note: If the file does not exist, it will create a file called authorized_keys.
- Run the following command in the command prompt:
sudo nano /etc/ssh/sshd_configEXPLANATION- sudo: Grants administrative privileges.
- nano: It is a text editor.
- /etc/ssh/sshd_config: Used to configure OpenSSH.

- After that, tap the ENTER button.
- Type the password of the user account and press the ENTER button.
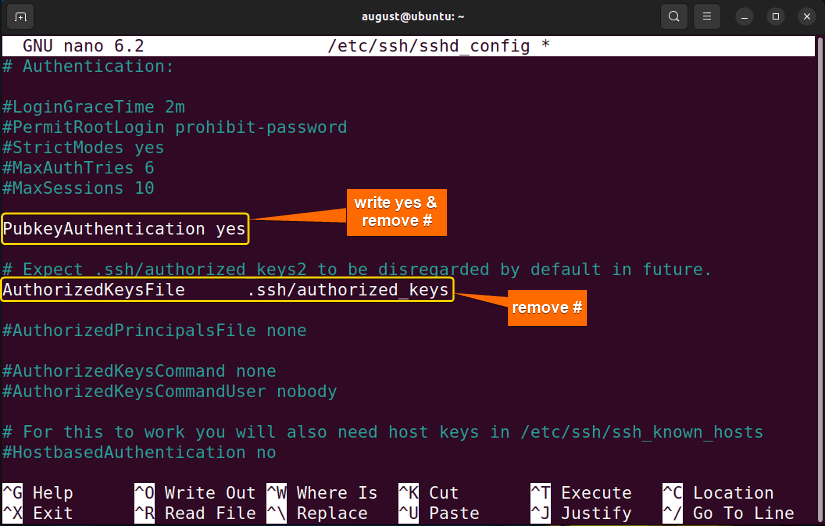
- Change the permission of the PubkeyAuthentication from no to yes, and remove # from this line, and the following line of the file:
AuthorizedKeysFile .ssh/authorized_keys
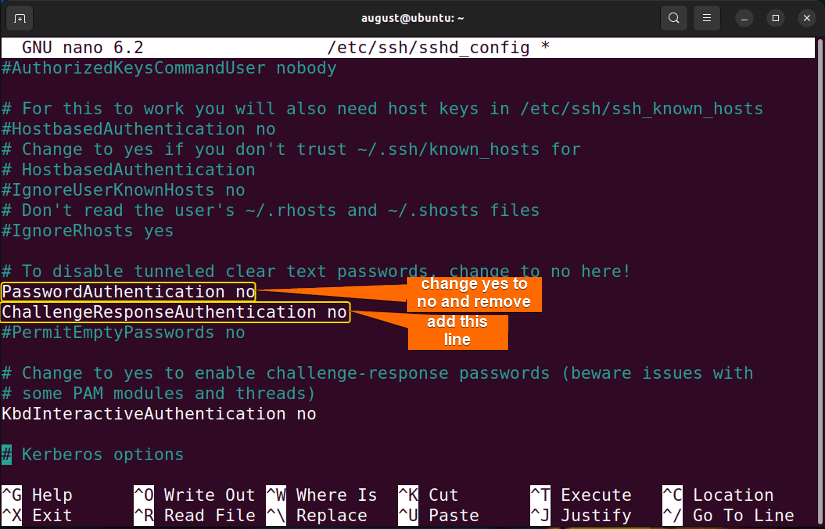
- To disable password authentication, change the permission of the Password Authentication from yes to no and remove # from this line and add the following line to the file:
ChallengeResponseAuthentication no
- Save the text file using CTRL+O and exit it by using CTRL+X
- To activate the changes, restart the sshd service by executing the command below:
sudo systemctl restart sshEXPLANATION- sudo: Grants administrative privileges.
- systemctl: Enables particular service.
- restart: Restarts sshd service.
- ssh: Used to configure OpenSSH.
- Finally, strike the ENTER button.
Thus, I have enabled the public key authentication and disabled the password authentication of the remote server. While working, you can get an error stating “username is not in the sudoers file. This incident will be reported”.
You can follow this guide to Fix USER is Not in the Sudoers File in Linux.
 In the above image, you can see the public key is added to the authorized_keys file.

Step 6: Connect to the Remote Server
Now, it’s time to connect the client computer to the remote server using the public key. Follow the simple syntax ssh -i absolute_path_of_the_public_key USER_NAME@REMOTE_SERVER and steps below to learn more:
- Start by opening Windows Powershell.
- Run the following command in the command prompt:
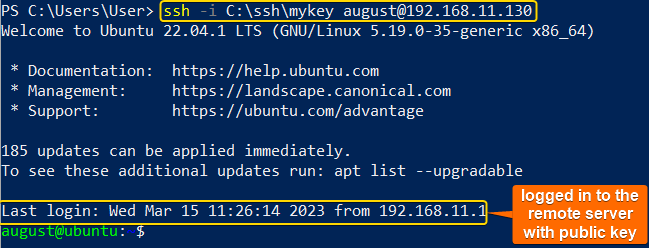
ssh -i C:\ssh\mykey [email protected]EXPLANATION- ssh: Enables computers to communicate.
- -i: Selects a file for public key authentication.
- august: Name of the user.
- 168.11.130: IP address of the remote server.
- C:\ssh\mykey: Absolute path of the public key.
- Finally, tap the ENTER button.
 As you can see in the above image, I have logged in to the remote server from the client computer.
 As you can see in the above image, I have logged in to the remote server from the client computer.
- How to Create an FTP User in Ubuntu? [Step-by-Step]
- Create a New SFTP User in Ubuntu with a New SSH Key
- How to Create Group and Add User in Ubuntu? [2 Cases]
Case B: Client & Server both Ubuntu User
I am using Ubuntu among all the operating systems for both my client & server computer here. You can do the same by using the following procedure.
Step 1: Create a User Account in Ubuntu
I will create a new user named “august” using the terminal. This will be my remote server. Follow the steps for better understanding:
- Start by pressing CTRL+ALT+T to open the Ubuntu Terminal.
- Then, write the command below:
sudo adduser augustEXPLANATION- sudo: Grants administrative privileges.
- adduser: Adds a new user.
- august: Name of the user to be created.
- After that, hit the ENTER button.EXPLANATION
A new user account with the name “august” is created. It will then assign it to the new “august” group which is created with the same name.
The command then creates a home directory at “/home/august” for the new user. The user’s private data and settings will be kept in this directory.
Lastly, the command moves the contents of the “/etc/skel” directory to the new user’s home directory. To provide new user accounts with a basic set of files and settings, the “/etc/skel” directory provides a collection of default files and folders.
- Now, Enter a password for the newly created user and other required information.By repeatedly hitting ENTER, you can, however, ignore entering further information.
Warning: Try to create a strong, unique password. If you don’t, you’ll get a warning message like “BAD PASSWORD” as shown in the image below.
- Finally, press Y to confirm your given information.
By selecting Y, you have created a new user as you have confirmed all the information provided. You can now use this instruction to create a new user anytime.
Step 2: Setup the SSH Server in Ubuntu
Without setting up the SSH server, you can not generate the public key and log in to the remote server. Follow the instructions below to set up the ssh-server:
- Open the Terminal in Ubuntu.
- Run the following command into the command prompt:
sudo apt install openssh-serverEXPLANATION- sudo: Grants administrative privileges.
- apt: Manages software packages.
- Install: Copies files to a specified destination.
- openssh-server: Securely connects to a system.
- Now, press the ENTER button.
- Then, type Y and hit the ENTER button to continue the process.In the above image, you can see that the openSSH-server is successfully installed.
- Now switch to the new user august.Follow this guide to learn more about the steps to switch users.
-
If you haven’t turned on your server, type the following commands in the command prompt and press the ENTER key to turn on your server and view the status:
sudo service ssh startsudo service ssh statusEXPLANATION- sudo: Grants administrative privileges.
- service: Starts, stop, and restart services
- ssh: Enables computers to communicate.
- start: Starts the server.
- status: Shows the status of the server.
As you can see, the server is active. - Now, execute the following command in the command prompt to find the IP address of the server:
ifconfigEXPLANATION- Ifconfig: Used to find the IP address of the server.
 In the above image, you can see the IP address of the server.
If your device does not have the ifconfig, write the following command to install it and tap the ENTER button.
sudo apt-get install net-toolsEXPLANATION- sudo: Grants administrative privileges.
- apt-get: Advanced package tool.
- net-tools: The collection of base networking utilities.
 In the above image, you can see the IP address of the server.
Step 3: Generate a Public Key
Public key can be used to authenticate the remote server. You need to generate a public key in the client computer. I am using Ubuntu for my client computer. You can use any operating system of your choice. Here I will be generating a public key so that I can use that to create my remote user account:
- Start by opening the Terminal on your local machine.
- To generate keys, enter the command shown below:
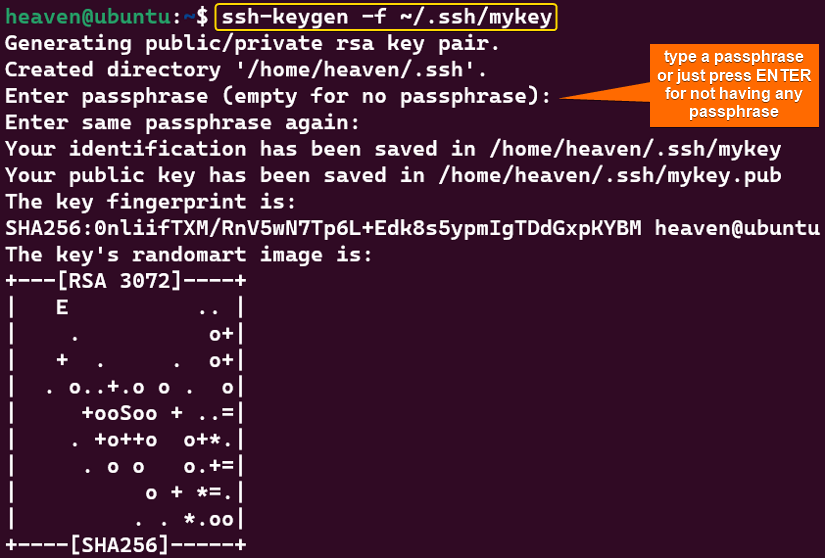
ssh-keygen -f ~/.ssh/mykeyEXPLANATION- ssh-keygen: Generates a pair of public and private keys.
- option -f: Used to generate keys in the defined location.
- ~/.ssh/mykey: Absolute path of the public key.
- After that, tap the ENTER button.
-
For the key pair, you will be prompted to enter a passphrase. So, type the passphrase you want and press the ENTER button:
 Note: The key pair is more secure with this passphrase, yet it isn’t required. If you don’t want to use a passphrase, you can press ENTER to leave the field blank.
 As you can see, a directory named .ssh is created and a key pair is generated and saved in the selected location once the passphrase has been entered (or left blank).
You can follow this section to verify the generated public key.
As you can see, a directory named .ssh is created and a key pair is generated and saved in the selected location once the passphrase has been entered (or left blank).
You can follow this section to verify the generated public key.
 As you can see, a directory named .ssh is created and a key pair is generated and saved in the selected location once the passphrase has been entered (or left blank).
- How to Create Multiple Users in Linux? [2 Methods]
- Create a User in Ubuntu as Read-Only Access to Log Folder
- User Without Home Directory in Ubuntu in Just 3 Steps
Step 4: Send the Public Key to Server
To use the public key, you need to send the public key to the server. You need to send the public key for logging into the remote server. But before doing this log in as the newly created user with the password. Follow the steps below using the scp command to send the public key to the server:
- First open the Terminal both in Ubuntu Client Computer & Server Computer.
-
Now log in as the newly created user with the password in the server computer if you haven’t already.
Follow this guide to learn more about the steps to switch users.
- To send the public key, enter the command to the client computer using the syntax shown below:
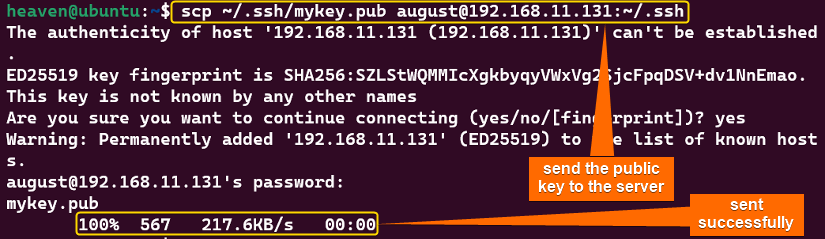
scp absolute_path_of_the_public_key USER_NAME@REMOTE_SERVER:~/.sshscp ~/.ssh/mykey.pub [email protected]:~/.sshEXPLANATION- scp: Transfers files.
- ~/.ssh/mykey.pub: Absolute path of the public key.
- august: Name of the user.
- 192.168.11.131: IP address of the remote server.
- After that, tap the ENTER button.

- To check if the public key is sent, execute the following command in the server computer:
ls .sshEXPLANATION- ls: Lists contents of directories.
- .ssh: A directory name .ssh.
In the image above, you can see the public key is found in the server. - Type the following command into the command prompt to restart the server and hit the ENTER button:
sudo service ssh restartEXPLANATION- sudo: Grants administrative privileges.
- service: Starts, stop, and restart services
- ssh: Used to configure OpenSSH.
- restart: Restarts sshd service.
One public key is sent to the server using the above syntax and steps. -
Now, delete the public key from client computer. For this, first navigate to the .ssh folder and then remove the key by typing the following commands in the terminal in the client computer:
cd .sshrm mykey.pubEXPLANATION- cd: Changes directory.
- .ssh: The folder where the keys are saved.
- rm: Used to remove files/folders.
- pub: The public key.
- To check if the public key is deleted, execute the following command in the client computer:
lsEXPLANATION- ls: Lists contents of directories.
 As you can see, the public key does not exist.
Don’t forget to remove the public key. As you have already sent the public key to the remote server, you don’t need this in the client computer anymore.
 In the image above, you can see the public key is found in the server.
 As you can see, the public key does not exist.
Step 5: Enable Public Key Authentication & Disable Password Authentication
To access the remote server without a password, you need to enable public key authentication & disable password authentication. For better understanding, follow the instructions below:
- Open the Ubuntu Terminal on the server computer.
- Write the following command to the command prompt and strike the ENTER button.
cat ~/.ssh/mykey.pub >> ~/.ssh/authorized_keysEXPLANATION- cat: Used to view contents of the file(s)
- ~/.ssh/mykey.pub: Absolute path of the public key.
- >>: Used to append to a file.
- ~/.ssh/authorized_keys: Absolute path of authorized_keys file.
In the above image, you can see the public key is added to the authorized_keys file.
Note: If the file does not exist, it will create a file called authorized_keys. - Run the following command in the command prompt:
sudo nano /etc/ssh/sshd_configEXPLANATION- sudo: Grants administrative privileges.
- nano: It is a text editor.
- /etc/ssh/sshd_config: Used to configure OpenSSH.
- After that, tap the ENTER button.
- Type the password of the user account and press the ENTER button.
- Change the permission of the PubkeyAuthentication from no to yes, and remove # from the following line of the file:
AuthorizedKeysFile .ssh/authorized_keys - To disable password authentication, change the permission of the Password Authentication from yes to no and remove # from this line and add the following line to the file:
ChallengeResponseAuthentication no - Save the text file using CTRL+O and exit it by using CTRL+X.
- To activate the changes, restart the sshd service by executing the command below:
sudo systemctl restart sshEXPLANATION- sudo: Grants administrative privileges.
- systemctl: Enables particular service.
- restart: Restarts sshd service.
- ssh: Used to configure OpenSSH.
- Finally, strike the ENTER button.
Thus, I have enabled the public key authentication and disabled the password authentication of the remote server. While working, you can get an error stating “username is not in the sudoers file. This incident will be reported”.
You can follow this guide to Fix USER is Not in the Sudoers File in Linux.
Step 6: Connect to the Remote Server
Now, it’s time to connect the client computer to the remote server using the public key. Follow the syntax and steps below to learn more:
- Start by opening the terminal in the ubuntu client computer.
- Run the following command in the command prompt:
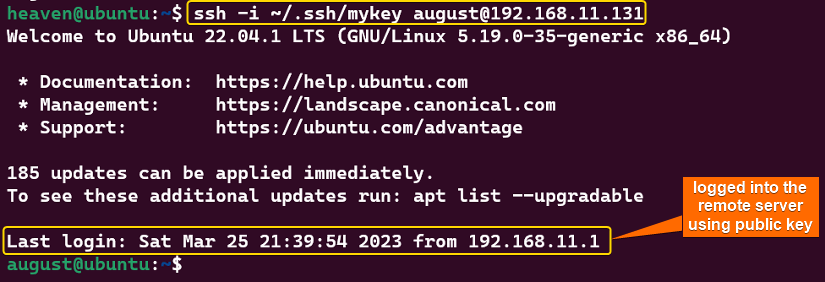
ssh -i ~/.ssh/mykey [email protected]EXPLANATION- ssh: Enables computers to communicate.
- -i: Selects a file for public key authentication.
- august: Name of the user.
- 168.11.131: IP address of the remote server.
- ~/.ssh/mykey: Absolute path of the public key.
- Finally, tap the ENTER button.
 As you can see in the above image, I have logged in to the remote server from the client computer without even using a password.
 As you can see in the above image, I have logged in to the remote server from the client computer without even using a password.
- How to Create a User in Docker Container Without Docker File?
- Create A User in Ubuntu that Runs a Script and Logs Out [4 Steps]
- Create FTP User for Specific Directory in Ubuntu [4 Steps]
What is a Public Key?
Let’s take a quick look at the public key. A public key is also known as a cryptographic key which can be utilized to encrypt and decrypt data. It is a part of asymmetric cryptography, widely known as a public key encryption technique. Each user in this system has both a public key and a private key. Although the private key is used to decrypt data, the public key is used to encrypt data.
A user encrypts data before sending it to another user using the recipient’s public key. Using the private key, the recipient may then decrypt the data. To prevent data from being captured by unauthorized parties, this system is used to ensure that data is transferred safely.
How to Switch Users in Ubuntu Terminal
You can switch users with some easy steps. For this, you need to use the su command, which stands for “substitute users”. Here I am providing the syntax and the steps to switch users:
- Launch the Ubuntu Terminal.
- Copy the following command in the command prompt:
su - augustEXPLANATION- su: Used to switch the user.
- august: Name of the user.
- Now, tap the ENTER button.
- Then, type the password of the user and hit the ENTER button.
 In the above image, you can see that the user is switched to the user august using the Ubuntu terminal.
 In the above image, you can see that the user is switched to the user august using the Ubuntu terminal.
How to Verify Generated Public Key in Ubuntu
You can verify whether the public is generated or not using the ls command. If you find the file in the .ssh directory where the public key is saved, you can consider that the public key has been generated successfully. Here I am providing the steps to verify the generated public key:
- Open up the Ubuntu Terminal.
- Type the following command into the command prompt:
ls ~/.ssh/id_*EXPLANATION- ls: Lists contents of directories.
- ~/.ssh/id_*: The file where the public key is saved.
- After that, tap the ENTER button.
- Then, type the password of the user and hit the ENTER button:
 In the above below, you can see that the public key is successfully generated.
 In the above below, you can see that the public key is successfully generated.
- How to Create Home Directory for Existing User in Ubuntu
- Create User with UID and GID in Ubuntu? [3 Scenarios]
- How to Create a Sudo User in Ubuntu? [Step-by-Step]
Common Challenges in Creating User Account with Public Key
You may face some difficulties while following the steps. Here, I have discussed one with an explanation.
Fix USER is Not in the Sudoers File in Linux
An error stating “username is not in the sudoers file. This incident will be reported” may appear when you attempt to disable password authentication, as shown in the image below. Some easy steps like below can help you overcome such a situation:
- Launch the Terminal in Ubuntu.
- Switch to administrator user just like the image below.

- Run the command below into the command prompt:
sudo visudoEXPLANATION- sudo: Grants administrative privileges.
- visudo: Used to edit the configuration file.
- Now, press the ENTER button.

- Then, type the password and tap the ENTER button.
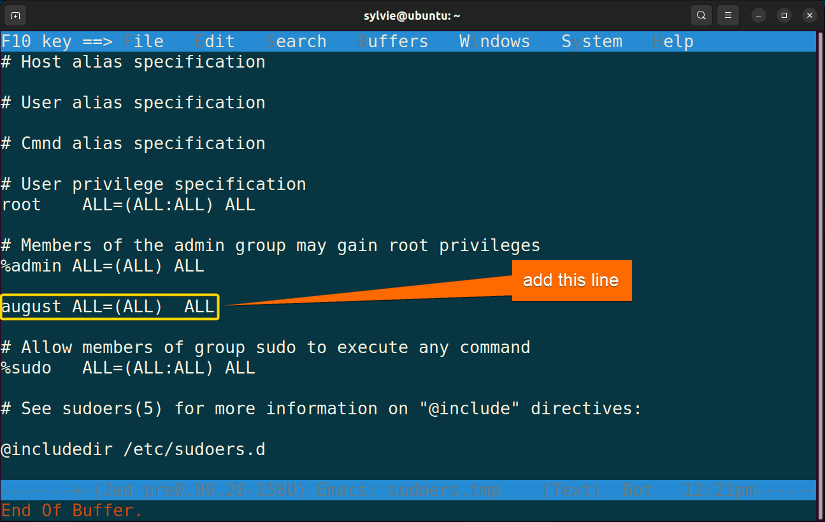
- After that, type the following line after admin to the configuration file just like in the image below:
august ALL=(ALL) ALL
- Now, switch to the previous user and execute the following command:
sudo nano /etc/ssh/sshd_configEXPLANATION- sudo: Grants administrative privileges.
- nano: It is a text editor.
- /etc/ssh/sshd_config: Used to configure OpenSSH.
And this is how you will be able to add the user in the sudoers file.


Conclusion
Adding a public key to the new user account is a major safety measure that helps in keeping unauthorized access outside your Ubuntu system. You can create a user account with the public key in Ubuntu and guarantee the security of your server by following the instructions provided in this article.
People Also Ask
What is a Private Key?
A private key is one of the two keys that are generated as a key pair when using SSH key authentication. The private key is kept on the user’s personal computer or device. It is used to decrypt messages that have been encrypted using the corresponding public key.
How do I manually copy the public key?
To copy public keys manually type the following commands consecutively and press the ENTER key every time.
cat ~/.ssh/id_rsa.pubmkdir -p ~/.sshecho public_key_string >> ~/.ssh/authorized_keys
In the 3rd command, replace the public_key_string with the output string of the 1st command. And this is how you can copy the public key manually.
What is OpenSSH used for?
For remote login and file sharing, OpenSSH provides secure encryption. Among the tools it offers ssh, a z/OS client program is for accessing a z/OS shell. It can also be used to sign into the other platforms of the Linux terminals.
What is the full form of the SSH key?
Secure Shell (SSH) Key, also called Secure Shell Management, is a form of authentication used in the SSH protocol to securely identify and establish a connection between two computers.
Can I delete OpenSSH?
Yes, you can delete the OpenSSH server and its configuration using the following command in Ubuntu.
sudo apt-get purge openssh-client
How to Check the Status of SSH?
To check the status of SSH in Ubuntu by following the command below:
sudo service ssh status
It will show active status if SSH runs.
How to Resolve “su: Authentication failure”?
To resolve the error saying “su: Authentication failure”, at first, run sudo -i command and press the ENTER button. Then execute su - USER_NAME command and tap the ENTER button.
How to Enable Password Authentication?
To enable password authentication: First, open the Ubuntu Terminal, then execute sudo nano /etc/ssh/sshd_config to open the configuration file. Finally, change the permission of the password authentication from no to yes and save the file.
Related Articles
- How to Create User and Add to Sudo in Ubuntu? [2 Methods]
- 2 Ways to Create a User With Access to a Drive in Ubuntu
- How to Create a New User in Ubuntu by GUI? [Step-by-Step]
- 2 Ways to Create User Account in Ubuntu Using Terminal
FUNDAMENTALS A Complete Guide for Beginners


