Ubuntu is a popular open-source Linux distribution based on Debian. It is very well known for its user-friendliness, community support, and extensive software repositories. It is officially released in multiple editions such as Desktop, Server, core for Internet of Things (IoT) devices, and Robots. The installation steps of Ubuntu are almost the same for every OS. In this article, I’ll show you how to install Ubuntu on your machine in detail.
There are various ways to install Ubuntu on your PC:
- Install Ubuntu in VMware or VMware Player.
- Install Ubuntu in Virtualbox.
- Dual-boot installation of Ubuntu.
- Replace the current OS with Ubuntu.
In this tutorial, I’ll show you the 4th method.
Requirements for Installing Ubuntu Desktop
- A laptop or PC with at least 25GB of storage space.
- System running on Windows/MacOS.
- A USB flash drive of 12 GB or above.
- RAM 2GB.
- 64-bit processor of minimum 1GHz clock speed.
Install Ubuntu on Windows and MacOS
Because of the attractive features or for a special purpose, you may need to install Ubuntu. The installation steps of Ubuntu are almost the same for every OS. Here, I’m demonstrating each of the steps to install Ubuntu on Windows and MacOS:
1. Back-up Your Data
While replacing your current OS with Ubuntu, make sure you have a backup of your important files to prevent data loss before proceeding to the installation steps.
2. Download an Ubuntu ISO File
The first and easiest step of any OS installation is to download the ISO file. You can download Ubuntu from their official site. I’ve downloaded Ubuntu 22.04.1 LTS. Don’t worry if you are downloading any other version. The later installation steps are the same for any version of Ubuntu.
3. Create a Bootable USB Flash Drive
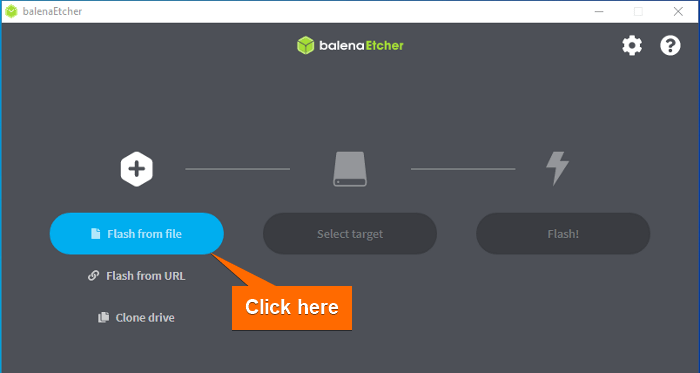
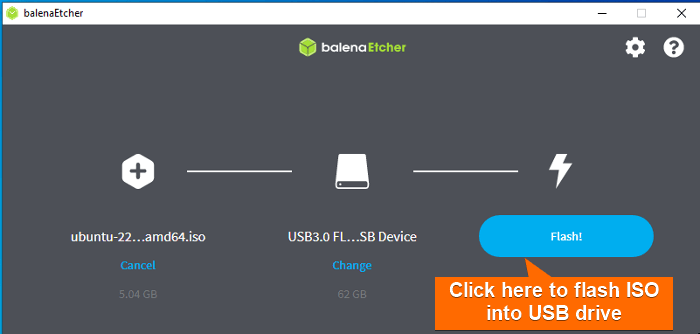
To create a bootable USB flash drive with the ISO file, I’ll use Etcher which is a free and open-source application. First, Install Etcher on Windows or MacOS. Then, follow these steps to learn how to use Ethcer to create a bootable drive for installing Ubuntu:
- Open Etcher and select “Flash from File”.

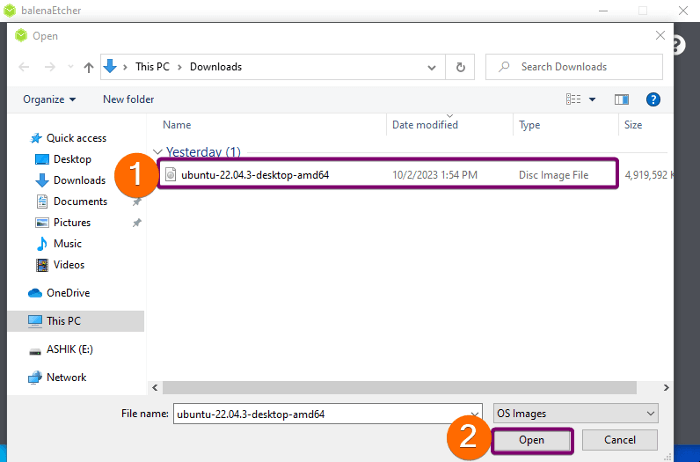
- Select the ISO file from the location you’ve downloaded.

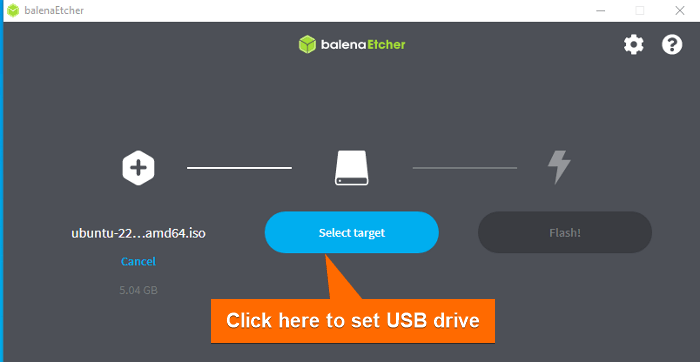
- Plug in your USB pen drive to the PC.
- Click on Select target.

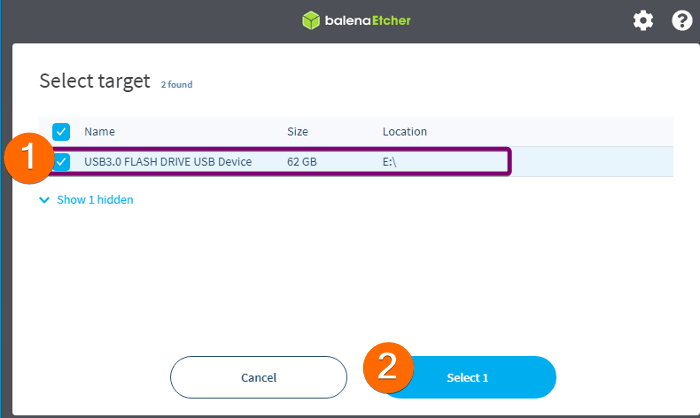
- Select your USB drive.

- Click on Flash to start flashing the ISO file into the USB drive.
 After that, Etcher will flash the ISO file into your USB drive and make it bootable.
 After that, Etcher will flash the ISO file into your USB drive and make it bootable.
4. Boot From USB Flash Drive
After creating the bootable USB flash drive, plug it into the PC where you want to install the Linux distro. Then power on the PC. It will automatically launch the setup window like this.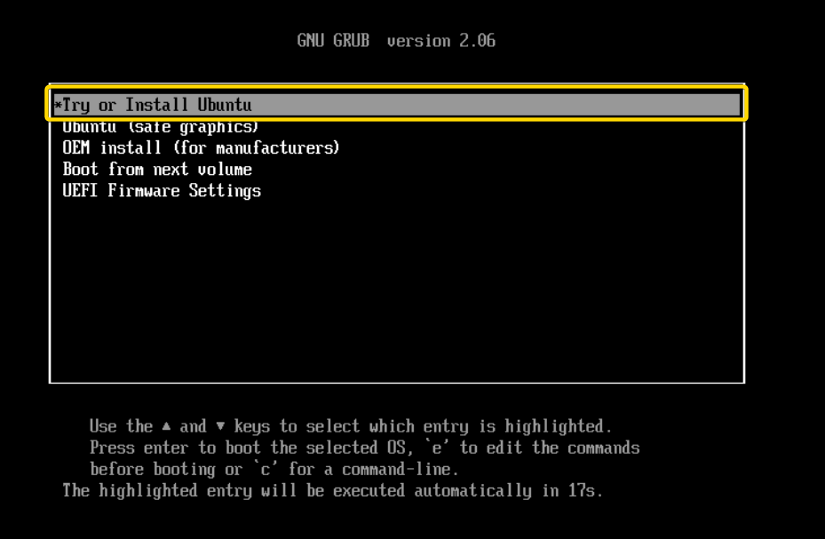
If the window doesn’t appear, restart your PC and press the BIOS key according to your device. F12 is the most common BIOS key, but ESC, F2, and F10 are alternatives for some devices. Keep “Removable Devices” at the top in Boot menu using + key .
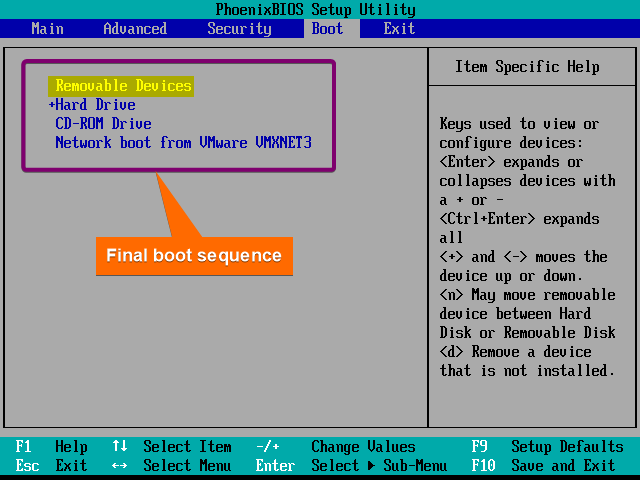 After configuring the boot serial as above, press F10 to save and exit.
For MacOS, hold down the COMMAND(⌘) + R or OPTION (⌥) key immediately after turning your screen like this: 
5. Start Installation
Now, a prompt will appear that allows you to choose between “Try Ubuntu” and “Install Ubuntu”. Click on Install Ubuntu.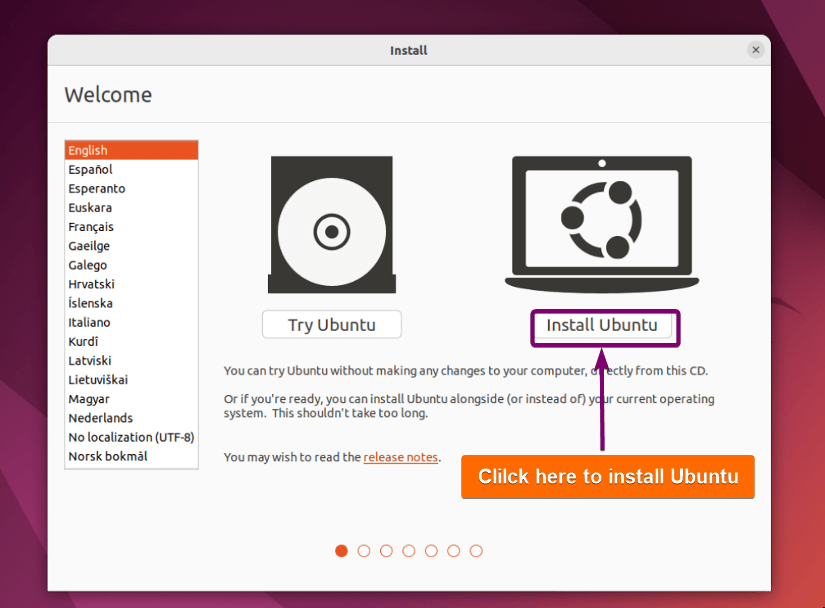
6. Select the Keyboard Layout
From the keyboard layout window, select the keyboard layout according to your preference. I’m selecting English (US). Then click on Continue.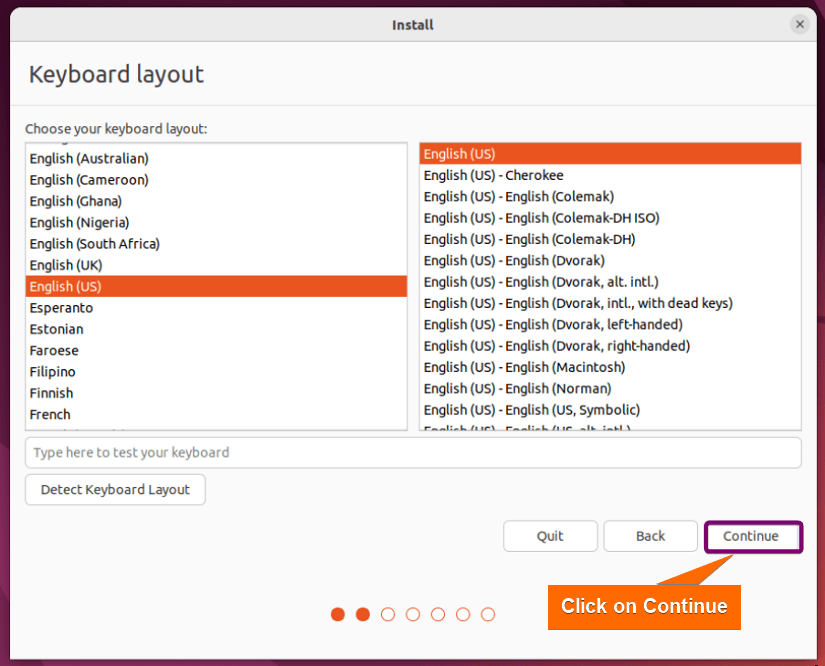
7. Installation Setup
Now, a prompt will appear allowing you to choose between the Normal installation and Minimal installation options. The normal installation offers a full-featured desktop environment with pre-installed software and a familiar user interface, choose the normal installation. On the other side, Minimal installation only installs a web browser and some very basic utilities. If you are a beginner, I recommend choosing Normal installation.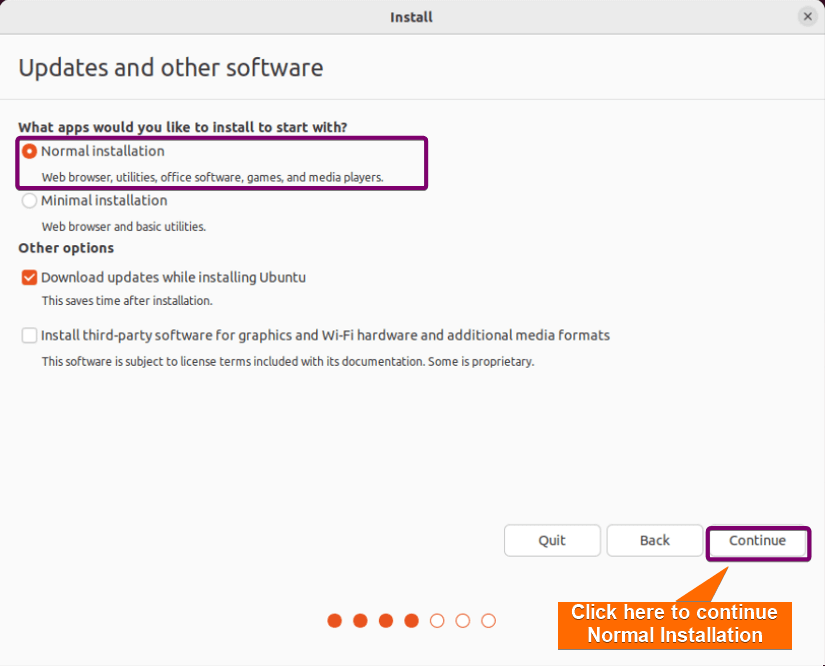
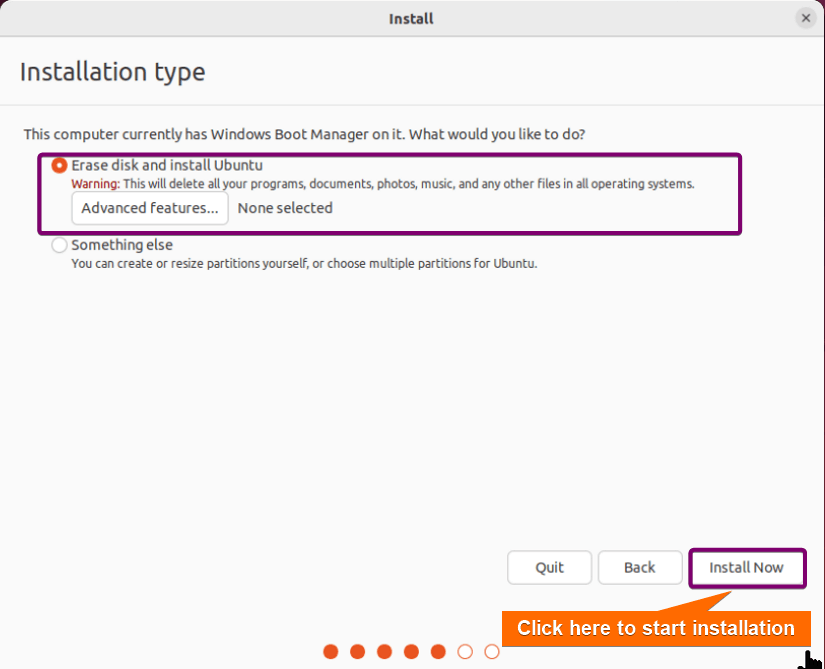
8. Installation Type
Here, select what type of installation you want – single installation or dual boot. Select the Erase Disk and Install option for wiping out the previous OS.
Warning: It will erase the disk of your current system and install Ubuntu in your system. Make sure you have a backup of your important files before proceeding to the next step.
9. Set Your Location
At this stage, you have to set your location. This information will be detected automatically if you are connected to the internet. However, you can select your location and time zone from the drop-down menu on the map screen. Click on Continue.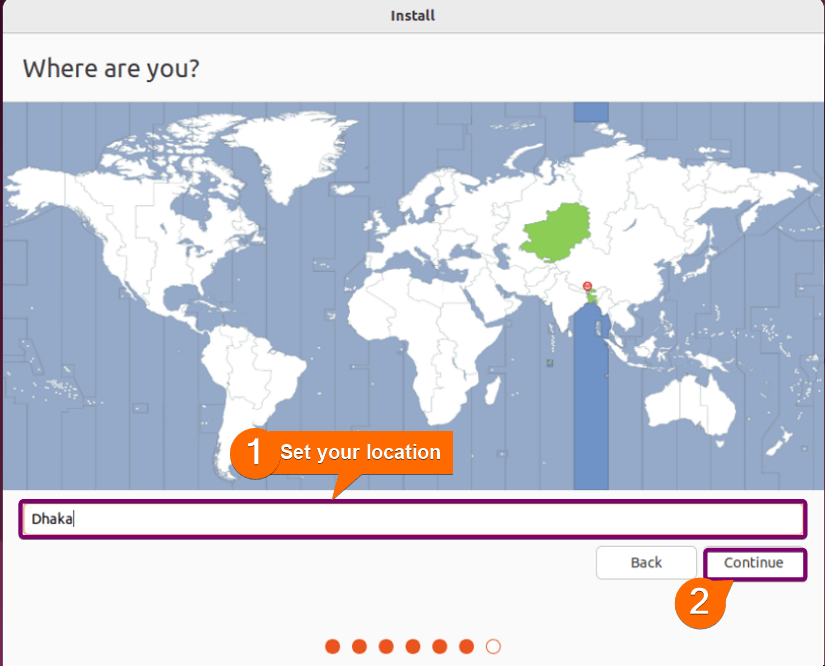
10. Create Login Credentials
On this screen, you will be asked to enter your name and the name of your computer as it will appear on the network. Then, create a username and a strong password. Finally, select the login method. “Log in automatically” will not require a password when you start your PC. However, “Require my password to log in” will ask for the password you set every time you power on your PC.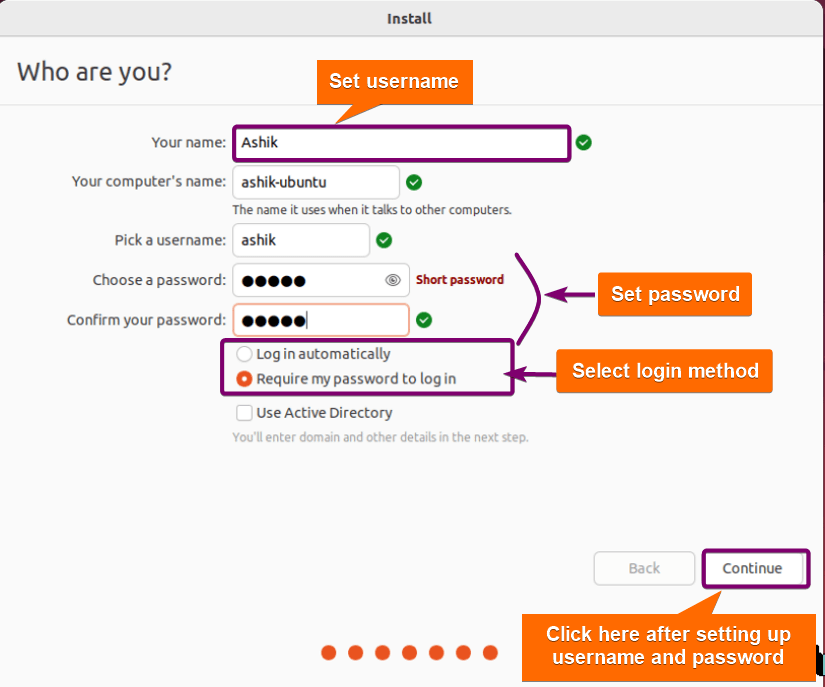
11. Restart the PC to Complete the Installation
Now, it will take a moment and complete all the necessary setup automatically.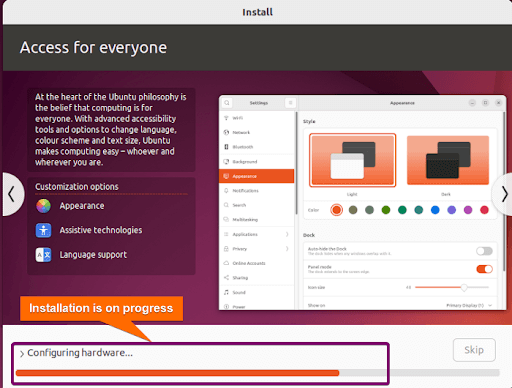 At last, a restart prompt will appear. Click on Restart Now.
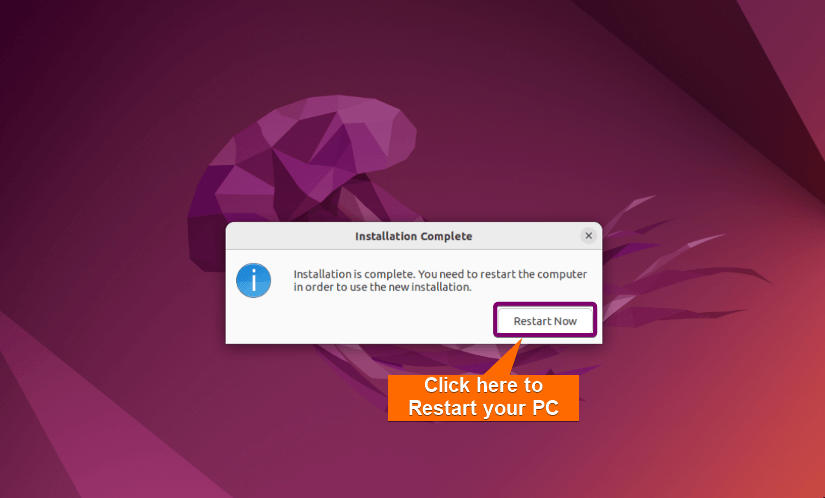 After restarting, you can use Ubuntu with all its features on your PC. Now before going full-on using Ubuntu, it is better to update the Linux system to get the latest features software, and security updates.
Why Users Choose Ubuntu?
Users choose Ubuntu for various reasons. The distribution offers several benefits that make it a popular choice for desktop and server environments. Here are some of the key benefits of Ubuntu:
- Free and Open Source: Free to use, modify, and distribute. It is built on open-source principles, which means users have access to the source code and can customize it to suit their needs.
- User-Friendly: Known for its user-friendly interface, making it accessible to both beginners and experienced Linux users. The GNOME desktop environment used by default provides an intuitive and polished user experience.
- Enriched Software Repository: Software repositories offer access to a vast library of applications and packages. Users can easily install software using the Package Management system, and updates are regularly provided.
- Security: Takes security seriously and provides timely security updates to protect users from vulnerabilities. The community works to maintain a secure ecosystem.
- Community and Support: Has a large and active community of users and developers. Users can seek help, share knowledge, and find solutions through forums, mailing lists, and other community resources. Canonical offers commercial support for organizations that require it.
- Cross-Platform Compatibility: Compatible with a wide range of hardware, and it supports many popular file formats and protocols. This makes it suitable for both older and newer hardware and ensures compatibility with various software applications.
- Developer-Friendly: Offers tools and resources for software developers, including support for multiple programming languages, development libraries, and containerization technologies like Docker.
- Regular Updates: Users receive regular updates that include not only security patches but also new features and improvements.
These benefits, combined with the active community have contributed to Ubuntu’s widespread popularity and adoption across various use cases, from personal computers to enterprise servers and cloud computing.
Common Problems That May Arise While Installing Ubuntu
When installing Ubuntu, you may encounter various common issues. Here are some of the typical problems people face during the installation process and how to address them:
- No Bootable Device Found: This error can occur when the system can’t detect a bootable device. Ensure that you’ve set the correct boot order in your BIOS/UEFI settings and that your installation media (USB or DVD) is bootable.
- Graphics Issues: Some users may experience graphical glitches or a blank screen during installation. This can often be resolved by using the “nomodeset” kernel parameter. Press E on the boot menu, add “nomodeset” after “quiet splash,” and press F10 to boot.
- Disk Space: Ensure you have enough disk space (25 GB minimum) for the installation. Running out of space during installation can lead to errors.
- Installation Hangs or Freezes: Installation may freeze due to various issues, including hardware compatibility. Try booting with “nomodeset” or “acpi=off” kernel parameters to work around these problems. Running a memory test from the boot menu can also identify hardware issues.
If you encounter problems during the installation process that you can’t resolve, consider seeking help on Ubuntu forums or communities.
Conclusion
During the Ubuntu installation process, you can choose various options and settings, such as partitioning your disk, selecting software packages, configuring the user account, and more. However the exact steps for installing Ubuntu may vary depending on your hardware, but the general process is the same for all platforms.
People Also Ask
How to install Ubuntu step by step?
To install Ubuntu, follow these steps: 1. Back up Your Data 2. Download an Ubuntu ISO File 3. Create a Bootable USB Flash Drive 4. Boot From USB Flash Drive 5. Start Installation 6. Select the Keyboard Layout 7. Installation Setup 8. Select Installation Type 9. Set Your Location 10. Create Login Credentials 11. Finally, Restart the PC to Complete the Installation.
Can I install Ubuntu for free?
YES, Ubuntu is free to use, modify, and distribute. It is built on open-source principles, which means users have access to the source code and can customize it to suit their needs.
How to install in Ubuntu command?
When you install Ubuntu, its commands are automatically installed with the package managers. However, to install Ubuntu by command in your Windows system, open Windows Powershell and run the command: wsl –install -d Ubuntu.
Why to install Ubuntu?
Ubuntu is well-known for its user-friendliness, community support, and extensive software repositories. The benefits, combined with the active community, have contributed to Linux’s widespread popularity and adoption across various use cases, from personal computers to enterprise servers and cloud computing. Moreover, Ubuntu is full of graphical interfaces suitable for beginners in Linux.
How to install Ubuntu OS in Windows?
To install Ubuntu OS in Windows, use the following three basic steps:
- Install a bootable device creator software such as Etcher (Windows, MacOS, Linux) or Rufus (Windows).
- Create a bootable device.
- Install the Ubuntu OS by following the steps on the screen.
Related Articles
- How to Install Debian 12 (Bookworm) [A Complete Guide]
- How to Install Kali Linux [Step by Step]
- How to Install Ubuntu Server?
- How to Install Kubuntu [A Step-by-Step Guide]
- How to Install Lubuntu [Step-by-Step]
- How to Download & Install Xubuntu [Easiest Guide]
- How to Install Linux Mint 21.2 Victoria [Easy Guide]
- How to Install Zorin OS 16 [Easiest Guide]
- How to Install Red Hat Enterprise Linux [Simple Guide]
- How to Install Fedora [A Step-by-Step Tutorial]
- How to Install CentOS 9 [Easiest Guide]
<< Go Back to Linux OS Single Installation | Linux OS Installation Guide | Learn Linux Basics
FUNDAMENTALS A Complete Guide for Beginners


