Ubuntu stands out as one of the most widely embraced and user-friendly Linux distributions. Whether you are an experienced Linux enthusiast or a newcomer eager to delve into the realm of open-source software, installing Ubuntu on VMware offers a practical means of immersing yourself in the operating system without the need for a complete installation on your physical hardware. This guide will lead you step by step through the procedure for setting up Ubuntu on VMware.
Requirements for Installing Ubuntu on VMware
- You must have VMware Workstation installed on your computer.
- Your computer needs to own a 64-bit x86 processor with virtualization technology (VT-x or AMD-V) support.
- You would require a computer with RAM of at least 2GB or more for a smooth performance.
- You have to allocate at least 20 GB of disk space for your Ubuntu VM.
What is Ubuntu in Linux?
Ubuntu is a widely recognized Linux distribution celebrated for its user-friendly approach and robust features. Built upon the Debian operating system, Ubuntu boasts a GNOME-based desktop environment for an intuitive user experience. Its software management relies on the reliable APT package manager, simplifying application installation and updates.
Moreover, Ubuntu offers an extensive repository of free and open-source software, while Long-Term Support (LTS) releases ensure stability and security for extended periods. This versatile Linux distro, supported by an active community and Canonical Ltd., excels in desktop computing, server deployments, and cloud environments, embodying the spirit of open-source collaboration and accessibility.
What is VMware Workstation?
VMware Workstation is a virtualization software that allows users to create and manage virtual machines (VMs) on their desktop or laptop computers. Its key features include VM management, snapshots for easy backups and rollback, cloning for rapid VM replication, integration with host and guest OSes, networking configuration options, 3D graphics support, remote access capabilities, and broad compatibility with various guest operating systems, making it a versatile tool for developers, IT professionals, and testers.
Steps to Install Ubuntu on VMware
Installing Ubuntu on VMware is a practical way to run Ubuntu alongside your existing operating system. VMware provides a user-friendly virtualization platform for this purpose. In this guide, I’ll walk you through the installation process of Ubuntu on VMware. It involves three major tasks. One is downloading the Ubuntu iso Image, creating a virtual machine on VMware, and installing Ubuntu on the virtual machine.
1. Download Ubuntu ISO Image
Installing Ubuntu on VMware is a straightforward process. The very first step of this is to download the Ubuntu iso file on your computer. You can follow the steps below:
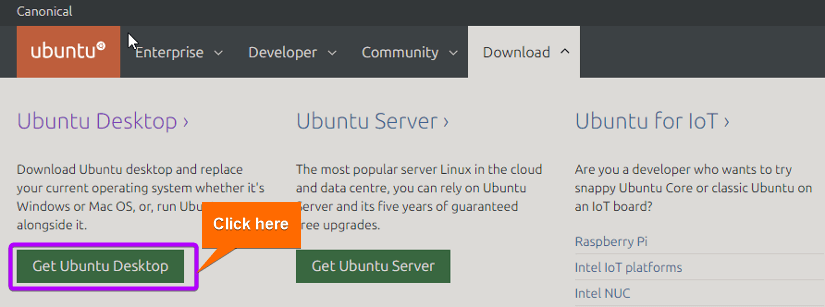
- Go to the Ubuntu download page.
- After that, click on the Get Ubuntu Desktop.

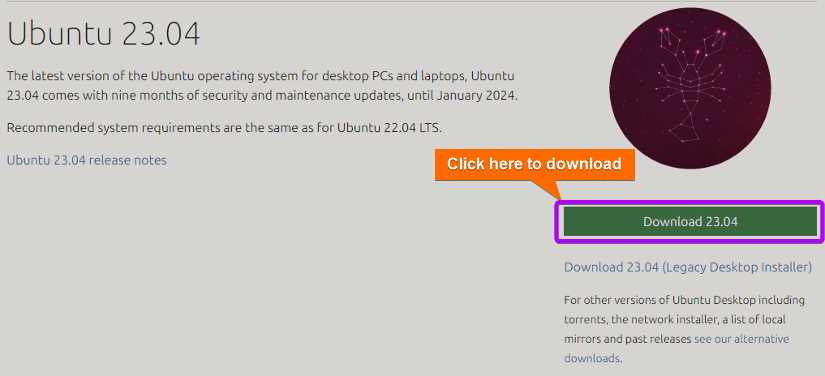
- Now hit the Download 23.04 option to download the Ubuntu ISO Image. You can choose any other version of Ubuntu from there as you need.
 In this location, you can observe the ISO image for Ubuntu-23.04, with 23.04 denoting the Ubuntu version.
 In this location, you can observe the ISO image for Ubuntu-23.04, with 23.04 denoting the Ubuntu version.
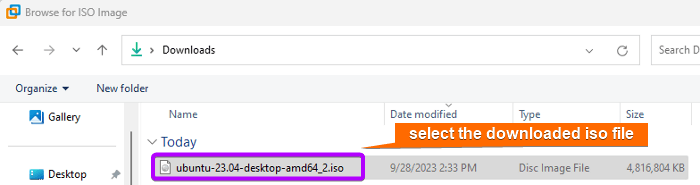
Now keep this ISO image intact for later use.
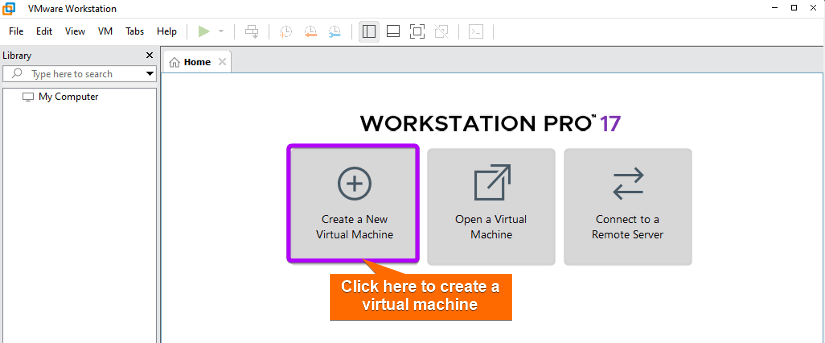
2. Create a Virtual Machine on VMware
VMware is a virtualization platform that allows you to run virtual machines on a computer. Creating a virtual machine(VM) using VMware is a valuable means of operating numerous operating systems on a single physical computer. Follow the steps below to create a virtual machine using VMware:
-
Open VMware and click on the option Create a New Virtual Machine.
 Note: You can do this by accessing the “File” option located in the upper-left corner of VMware. In this scenario, simply follow the instructions as follows: File > New Virtual Machine.
 - Select the first checkbox called Typical (recommended) and click on the Next button.

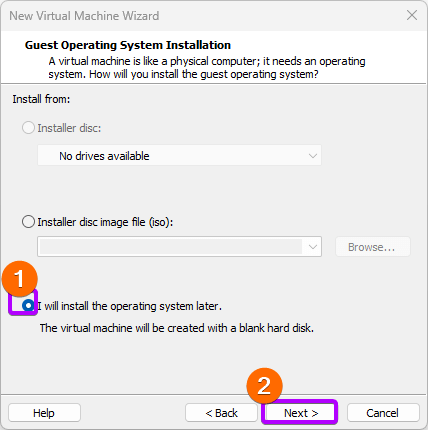
- Select the “I will install the operating system later” option and click Next.

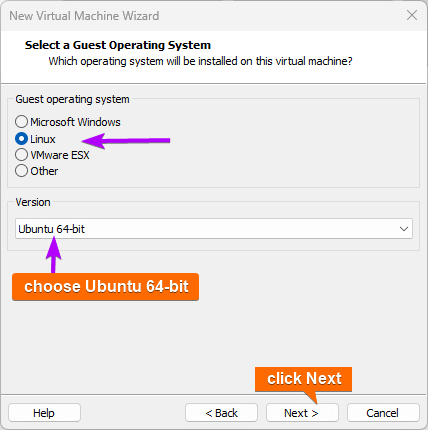
- Now, choose Linux as a Guest Operating System, and after that select Ubuntu 64-bit in the version option.
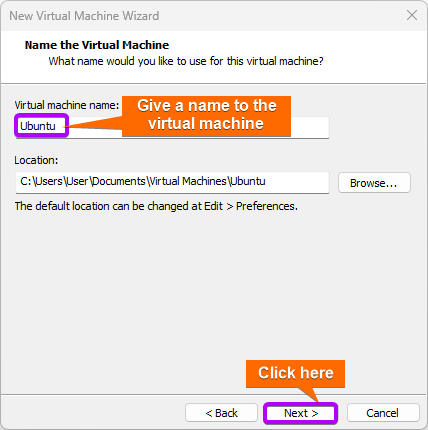
- At this moment, assign a Virtual Machine Name and hit the Next button.
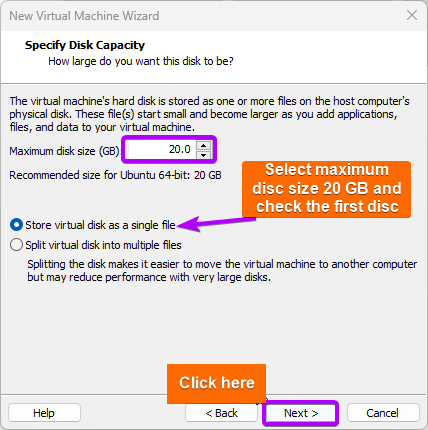
- To specify disk capacity, set 20 GB at least as the maximum disk size (recommended) and also select the option “Store virtual desk as a single file”. Then click on Next to move forward.
- In this instant, click Finish. After completing all the steps mentioned above, a virtual machine will be created as below.


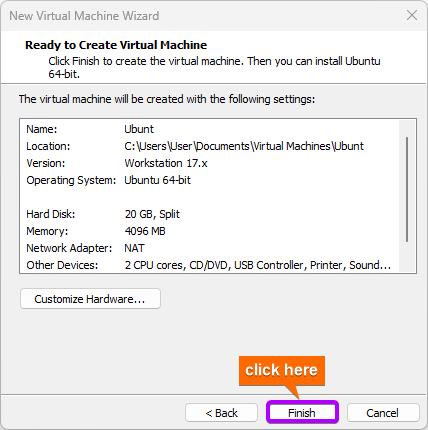 After completing all the steps mentioned above, a virtual machine will be created as below.
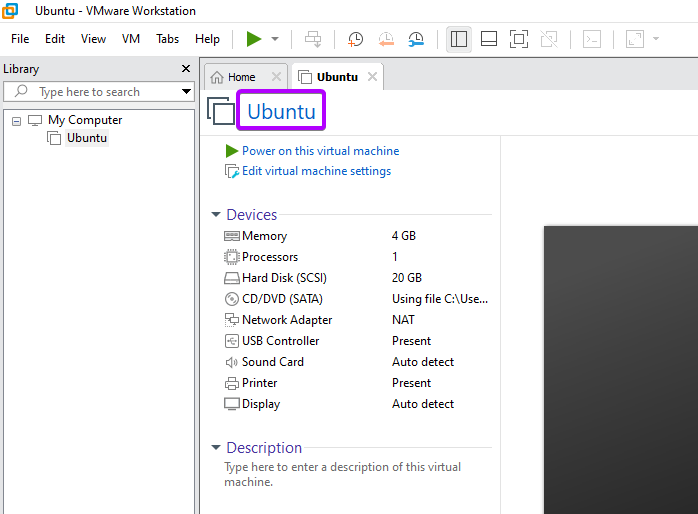
3. Install Ubuntu on the Newly Created Virtual Machine
Once a virtual machine is established in VMware, the next step is to install Ubuntu on the newly created VM. To proceed with the installation of Ubuntu on VMware, adhere to the following outlined steps.
-
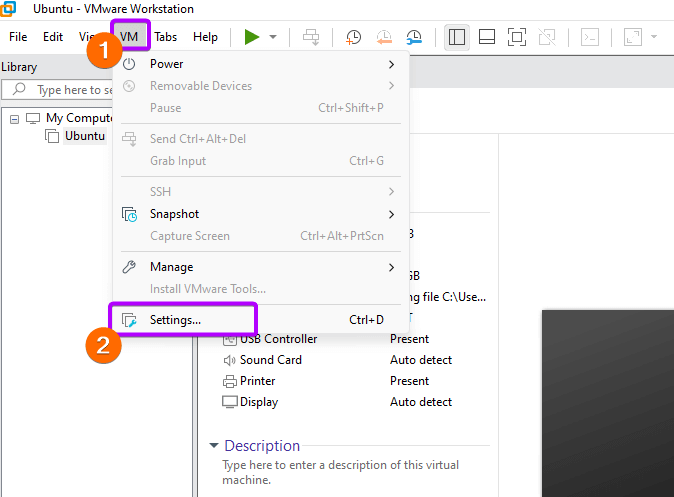
At first, go to the VM option and then click on the Settings.

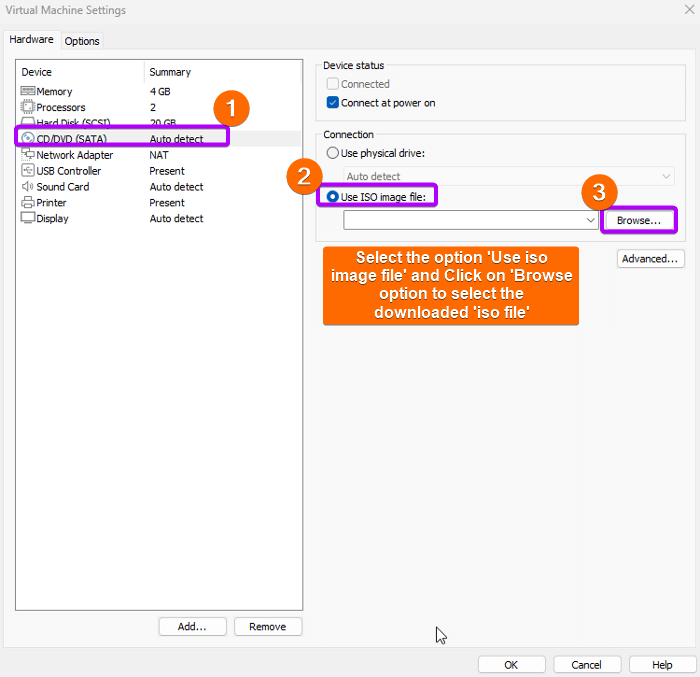
- Now, from the CD/DVD(SATA) option in Settings, choose the “Use ISO image file” option and click on the Browse option to select the downloaded ISO Image file of Ubuntu from the file manager. At the end, click on OK option.
 Here you can see the Ubuntu ISO image file has been selected.
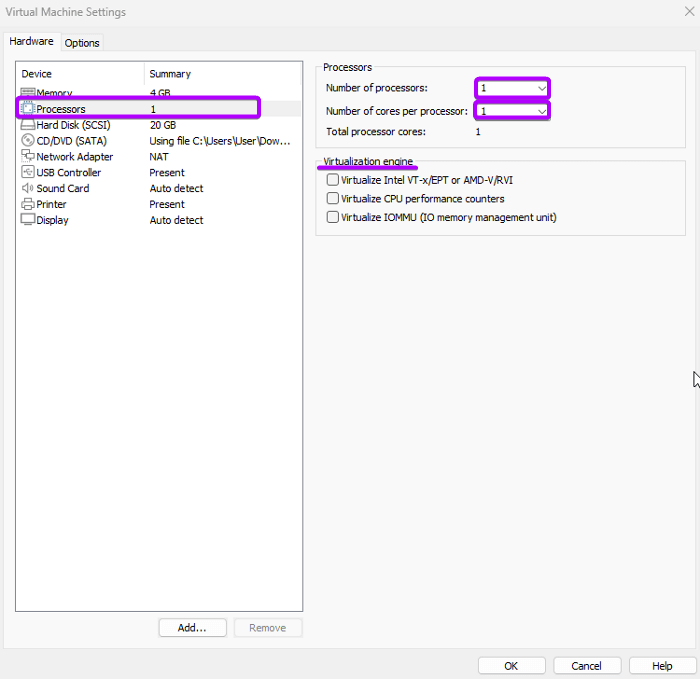
- Now, go to Memory settings. and set RAM for the virtual machine as you need. In my case, 4 GB of memory is selected by default and I kept it so.
- In the Processor settings, you can choose the number of processors you want to set for the virtual machine. Use 1 in the processor and 1 or more in the core processor.

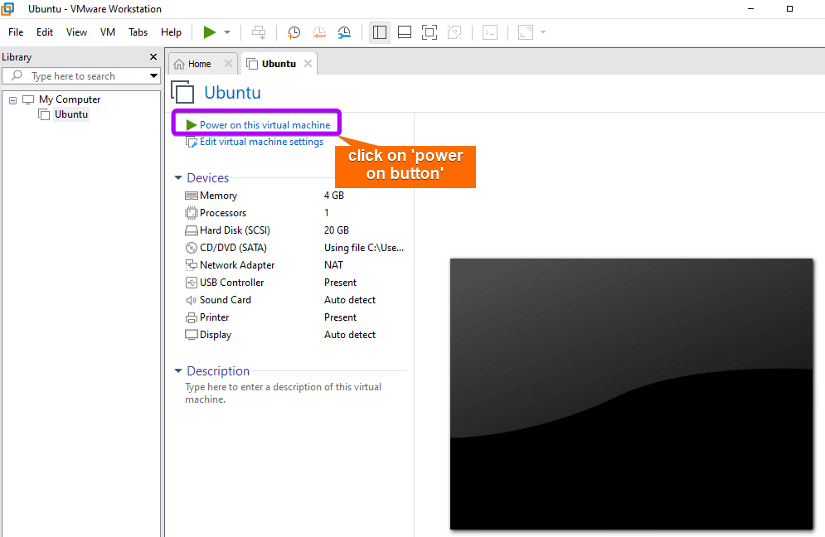
- Click on the Power on this virtual machine option.
 The virtual machine Ubuntu has started from the ISO file.
  Here, you can see the home of the Ubuntu virtual machine.
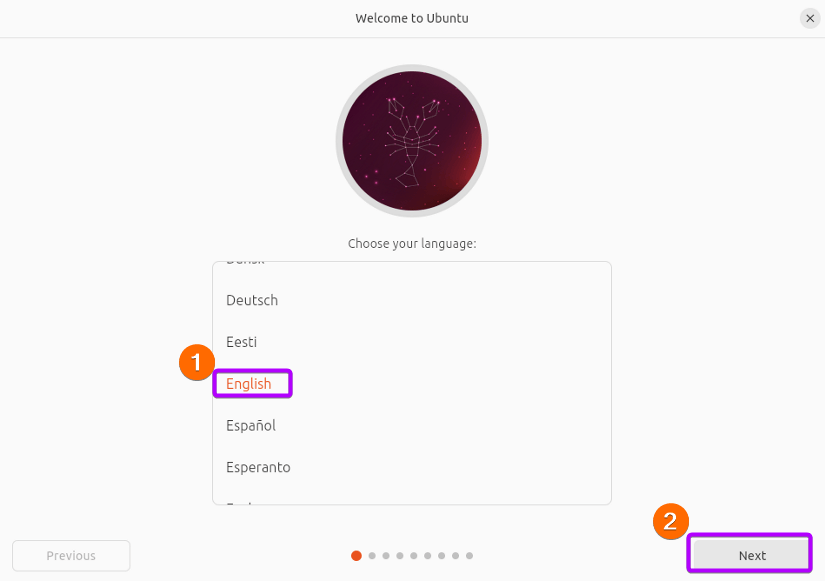
 - Select the language you prefer. Then click on Next.

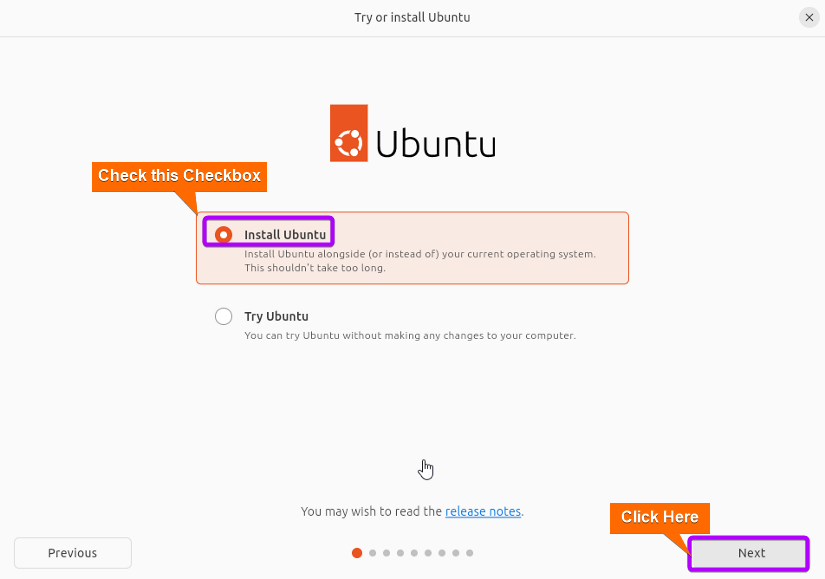
- Select “Install Ubuntu” and click on Next.

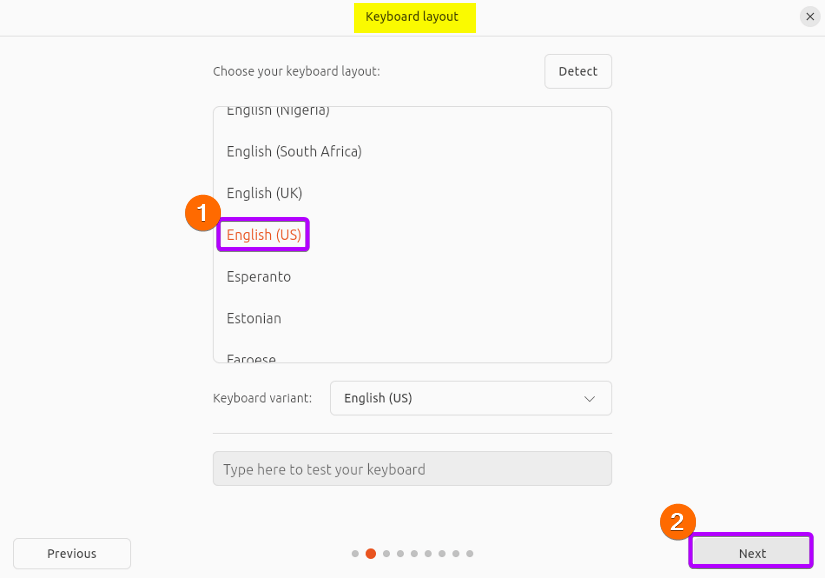
- Select your keyboard layout and go to Next.

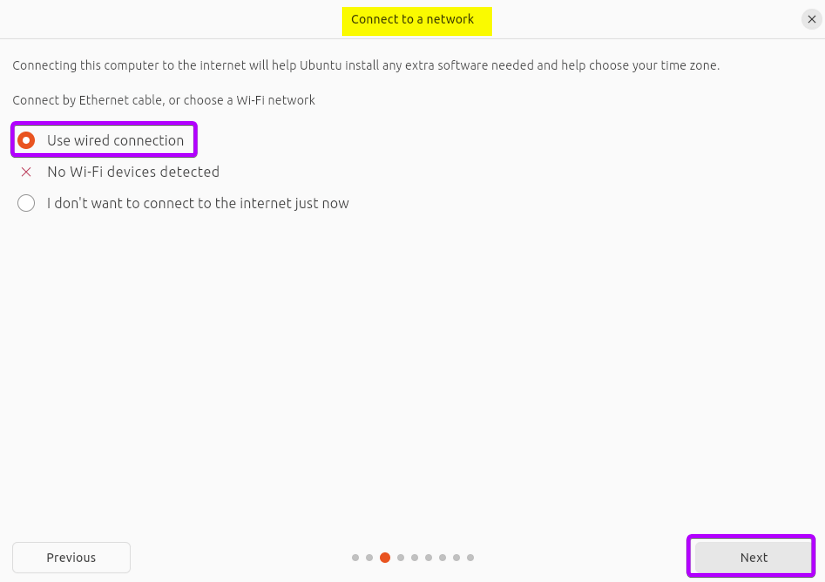
- Choose the Use wired connection from the Connect to a Network Window and click on Next.

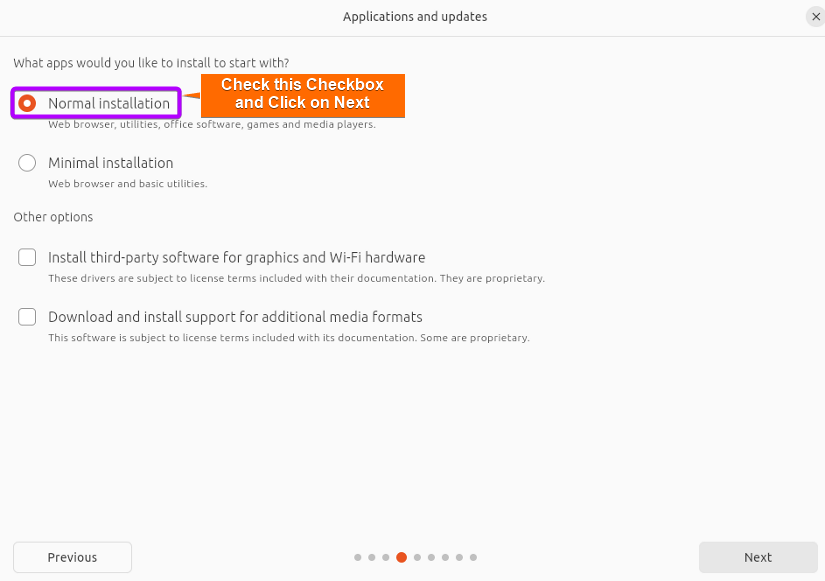
- Choose the Normal installation option.
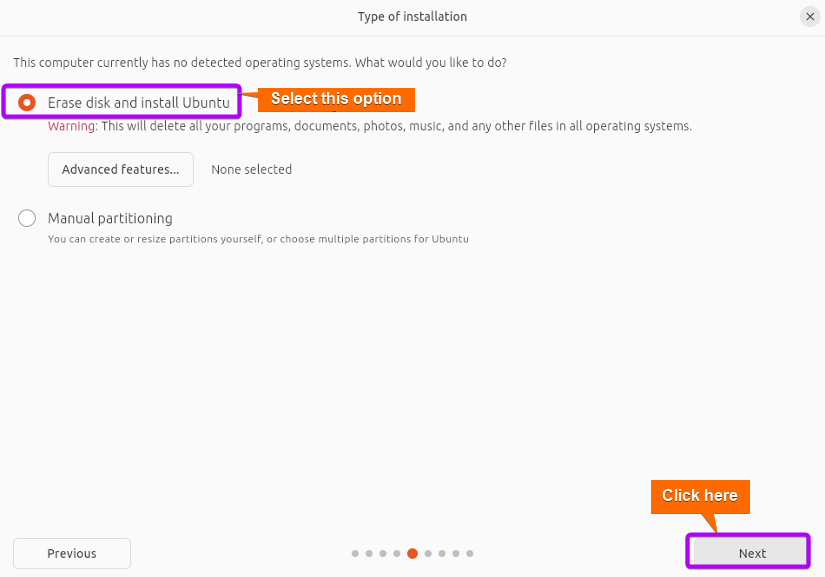
- Select the Erase disk and install the Ubuntu.

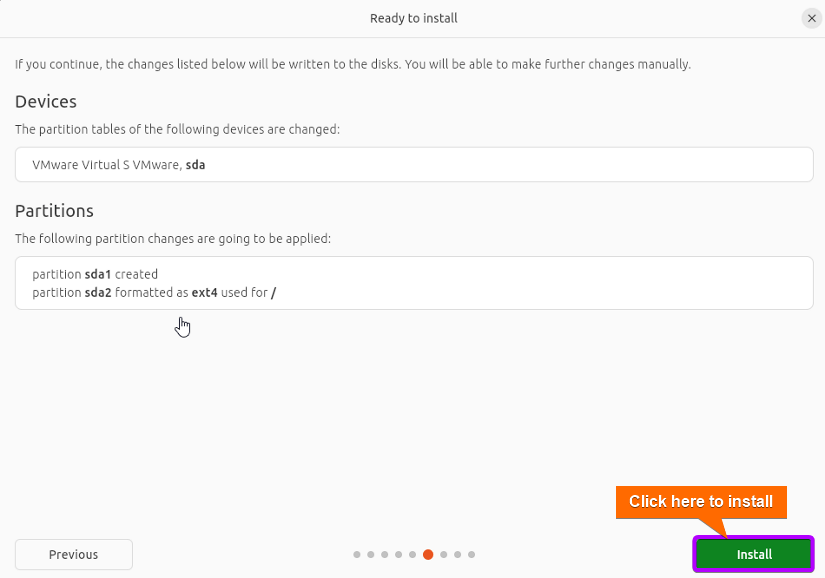
- Finally, Click on the Install button to begin the Ubuntu installation.
- Choose your timezone and go to Next.
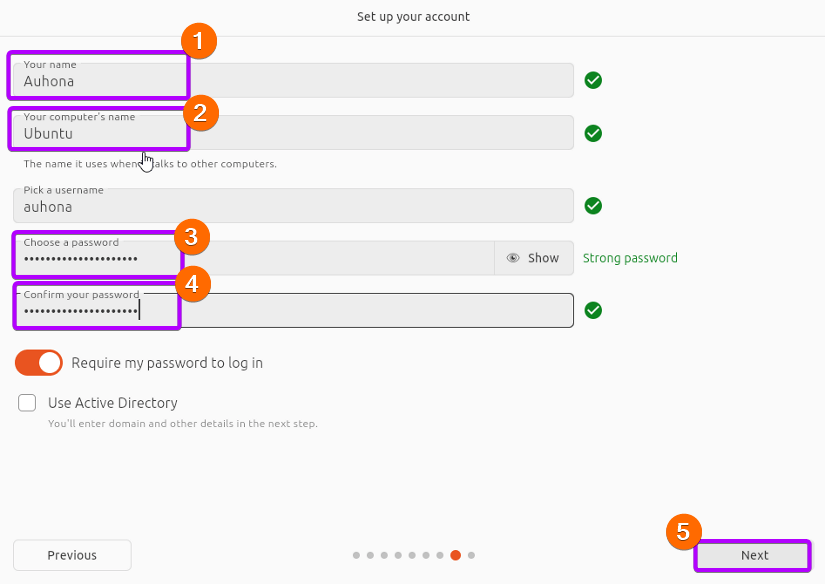
- To set up your account, provide your name, and computer’s name and pick a password at your convenience. Then click on the Next.

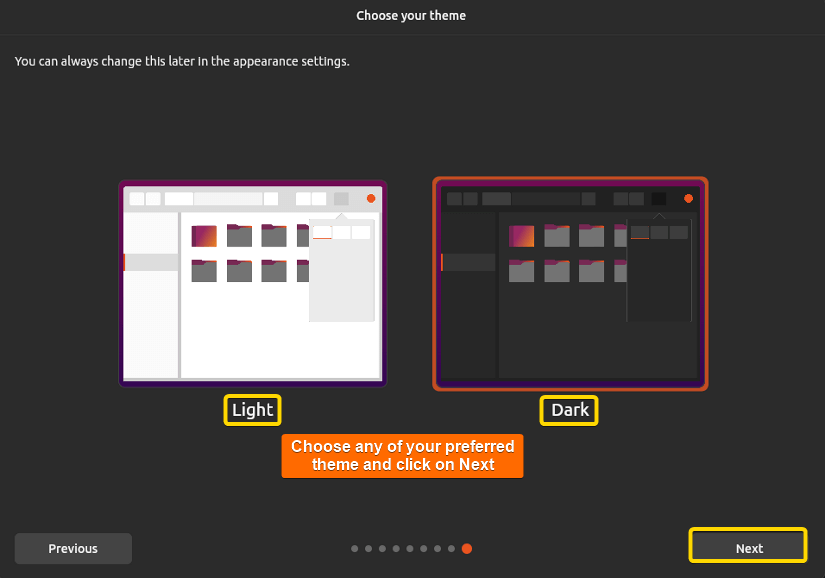
- Choose the theme you prefer. I’ve selected the Dark theme here. Immediately you click on Next after the previous step, the Ubuntu installer starts installing Ubuntu. It may take some time to finish the installation.

- As the installation completes, Click on the Restart Now button.
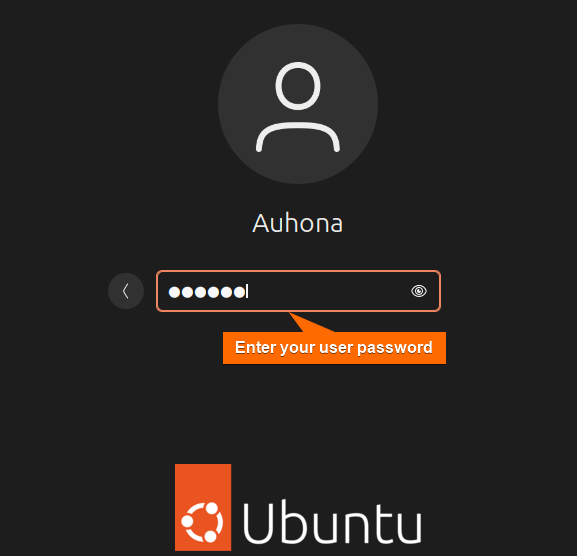
 After the restart of the VM, a Login screen will appear with the previously created username.
 - Click on the user name and then provide the user password as you’ve set before. Then press Enter.

 Here you can see the Ubuntu ISO image file has been selected.
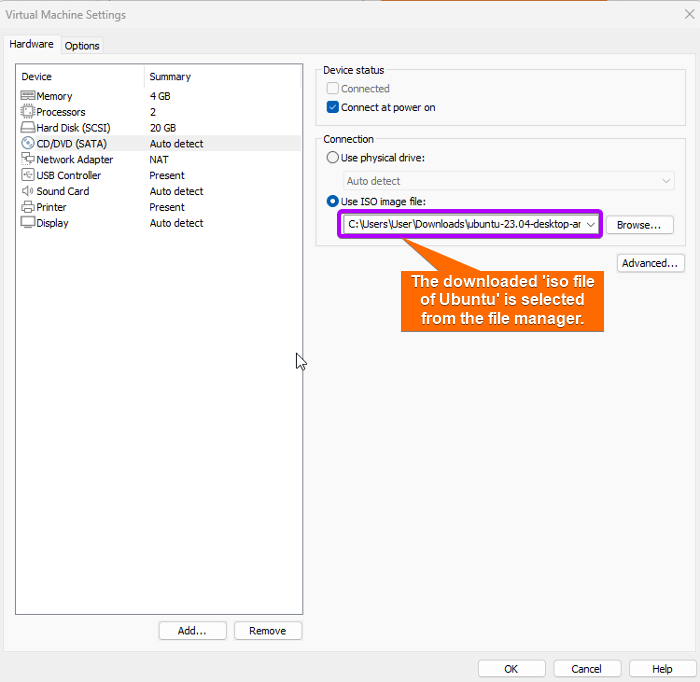

 The virtual machine Ubuntu has started from the ISO file.
  Here, you can see the home of the Ubuntu virtual machine.
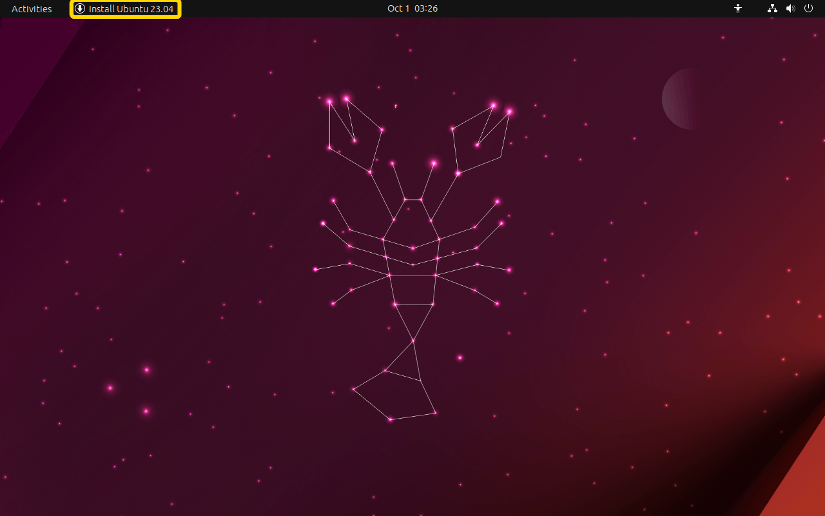

 Immediately you click on Next after the previous step, the Ubuntu installer starts installing Ubuntu. It may take some time to finish the installation.
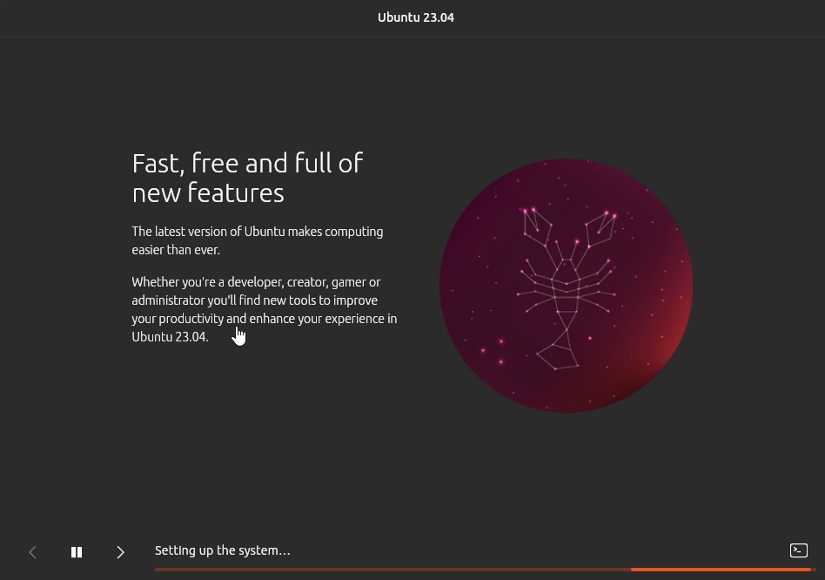
 After the restart of the VM, a Login screen will appear with the previously created username.
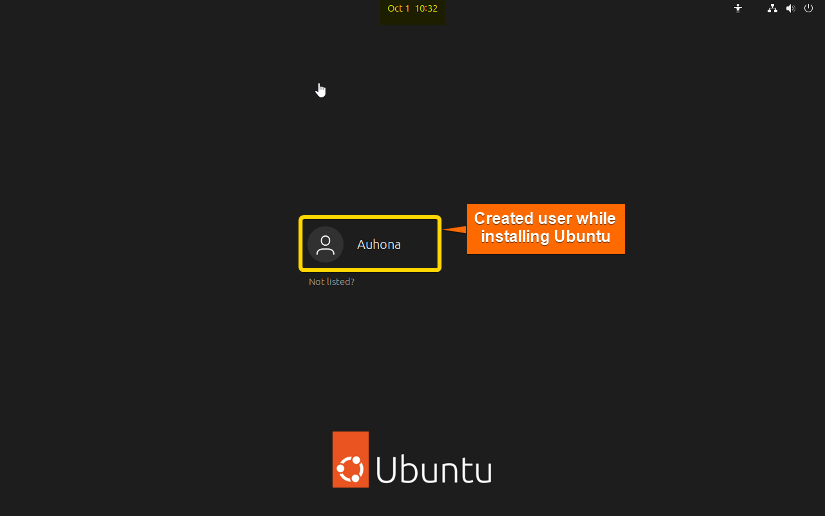
Now explore Linux using this Ubuntu on VMware. Feel free to delve deeper into Linux with practical exploration, without any hesitation to experiment and try out new things. Any errors or issues that may arise won’t affect your primary operating system in any way, since the OS (ubuntu) is running as a virtual machine.
The benefits of Running Ubuntu on VMware
Virtual machines generally pertain to distinct operating system installations on a single computer, each allocated a portion of the computer’s available system resources. Utilizing VMware to operate Ubuntu serves as an exemplification of this concept. You can operate Linux by installing Ubuntu in a VM alongside your Windows PC. It’s feasible for multiple operating system installations to coexist concurrently on the same physical machine. Besides these, VMware helps to manage storage, security, networking, and resources.
In summary, running Ubuntu on VMware offers flexibility, scalability, and management advantages, making it a popular choice for various use cases including testing, development, and efficient resource utilization.
Conclusion
In conclusion, installing Ubuntu on VMware Workstation is a straightforward and powerful process to experience the Ubuntu Linux distribution on your existing operating system. This step-by-step guide has provided you with the knowledge to create and configure a virtual machine, customize its settings, and perform a smooth Ubuntu installation, virtual machine, customize its settings and perform a smooth Ubuntu installation.
People Also Ask
How to get the Ubuntu ISO file for VMware?
First, go to the Ubuntu official download page. Then, click on the Get Ubuntu Desktop. Now press the Download 24.04 LTS option to download the Ubuntu ISO Image. You can choose any other version of Ubuntu like 20.04 LTS, 22.04 LTS, or 23.04 from there as you need.
Can I run Ubuntu in VM on Windows?
Yes, you can run Ubuntu in a virtual machine (VM) on Windows using virtualization software like VMware, VirtualBox, or Hyper-V.
What is better Hyper-V or VirtualBox?
Hyper-V is generally considered a more robust and feature-rich virtualization solution, especially for enterprise environments, offering better performance and scalability, while VirtualBox is a user-friendly, open-source option suitable for smaller-scale or personal virtualization needs. The choice between the two depends on the scale of your virtualization project.
Which VM should I use for Ubuntu?
For running Ubuntu as a VM, VirtualBox is a popular choice due to its user-friendly interface for most personal or small-scale visualization needs. If the scale of the virtualization is high, VMware can be an option for Ubuntu.
Why install Linux on a Virtual Machine?
Installing Linux on a Virtual Machine (VM) allows you to run a Linux operating system alongside your primary OS, providing a safe and isolated environment for tasks like software development, learning Linux, or testing applications without affecting your main system.
Related Articles
- [Solved] VMware tools not running
- A Comprehensive Guide on Installing Kali Linux on VMware
- Installing Arch Linux on VMware [Easiest Guide]
- VMware Shared Clipboard [Enable Copy-Paste & Folder Sharing]
- Installing Ubuntu on VMware Player [Easiest Guide]
- [Fixed] Operating System Not Found on VMware
- VMware Workstation Pro vs VMware Player [Ultimate Comparison]
<< Go Back to Virtual Machine Installation Guide | Linux OS Installation Guide | Learn Linux Basics
FUNDAMENTALS A Complete Guide for Beginners


