Kali Linux is a popular operating system for ethical hacking, cyber security, or digital forensics used by cybersecurity professionals and enthusiasts worldwide. Kali Linux offers various valuable tools and features for security operations. To run Kali Linux on your operating system like Windows or macOS, a Virtualization platform like VMware can allow this privilege. I will guide you through each step of installing Kali Linux on VMware in this comprehensive guide.
Requirements to Install Kali Linux on VMware
- You must have VMware Workstation installed on your computer.
- To install Kali Linux a minimum of 4GB RAM is recommended.
- A minimum of 20 GB of hard drive space is a mandate.
- You must have VMware installed on your OS.
What is Kali Linux?
Kali Linux is an open-source Linux distribution designed for cybersecurity and penetration testing purposes. It’s a Debian-derived Linux distribution that provides a wide range of tools and resources for ethical hackers, and security professionals. Kali Linux comes equipped with an extensive arsenal of more than 600 penetration testing tools. These include utilities such as Namp for port scanning, Aircrack-ng for testing wireless LANs, and web application security scanners like Burp Suite.
Kali Linux undergoes development within a highly secure environment, where a limited number of trusted individuals have the privilege to contribute, and each package is authenticated through the developer’s signature. In particular, Kali features a specialized kernel modified to support injection.
Why Do People Choose Kali Linux?
Kali Linux stands out as a top choice for conducting cybersecurity and information security tasks. Users choose Kali Linux due to its powerful security assurance. If you have an interest in ethical hacking or desire to learn the art, you’ve undoubtedly come across Kali Linux. This operating system boasts a wide array of functionalities and tools, yet the question often arises of why hackers use Kali Linux for cybersecurity-related tasks. Here I’ve tried to sum up some of the reasons behind that:
- Extensive penetration testing tools: Kali Linux includes 600+ essential penetration testing tools for ethical hacking, vulnerability assessment, and security testing tasks.
- Customization: Kali Linux is highly customizable for diverse cybersecurity tasks; users can modify tools, configurations, and scripts to suit their needs.
- Multilingual support: Kali Linux is multilingual, offering global accessibility for users from diverse regions.
- Wireless Device compatibility: Kali Linux supports various wireless devices, which is ideal for Wi-Fi security assessments like penetration testing and monitoring.
- Security and Reliability: Kali Linux prioritizes security and reliability, developed in a secure environment, and features packages signed by trusted developers for authenticity.
- Custom Kernel injection: Kali Linux’s custom kernel supports vital wireless security tests with easy packet injection.
What is a VMware Workstation?
VMware Workstation is a virtualization software that enables users to run multiple operating systems on a single physical computer. It provides a virtualized environment where you can create and manage virtual machines. It is a valuable tool for software development, testing, and running different operating systems simultaneously on a single host machine. VMware Workstation is known for its stability, performance, and flexibility, making it a popular choice among professionals and enthusiasts for virtualization needs
Installing Kali Linux on VMware
The process of installing Kali Linux on VMware comprises three essential steps. These tasks include initially downloading Kali Linux’s ISO file, followed by creating a Virtual Machine (VM), and ultimately proceeding to install Kali Linux within the VM. Follow these detailed steps to successfully install Kali Linux on VMware.
Step 1: Download Kali Linux’s ISO File
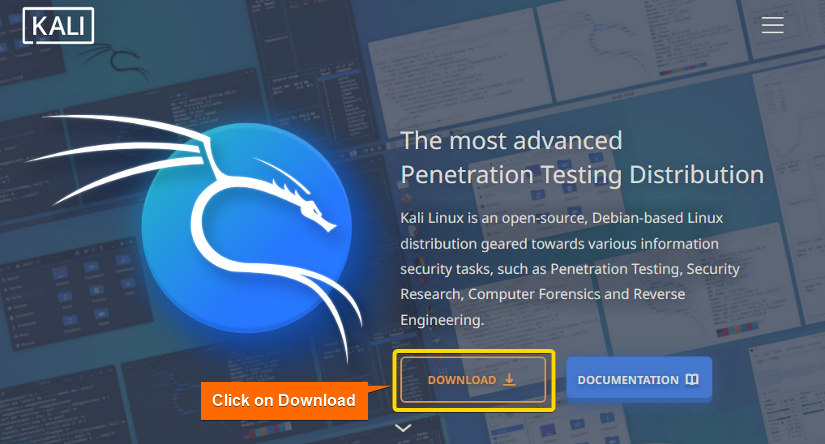
The first step to install Kali Linux is to download Kali Linux’s iso file from its original website. Follow the below steps for overviewing the entire process practically:
- Go to the official website of Kali Linux. Click on the “DOWNLOAD” option.

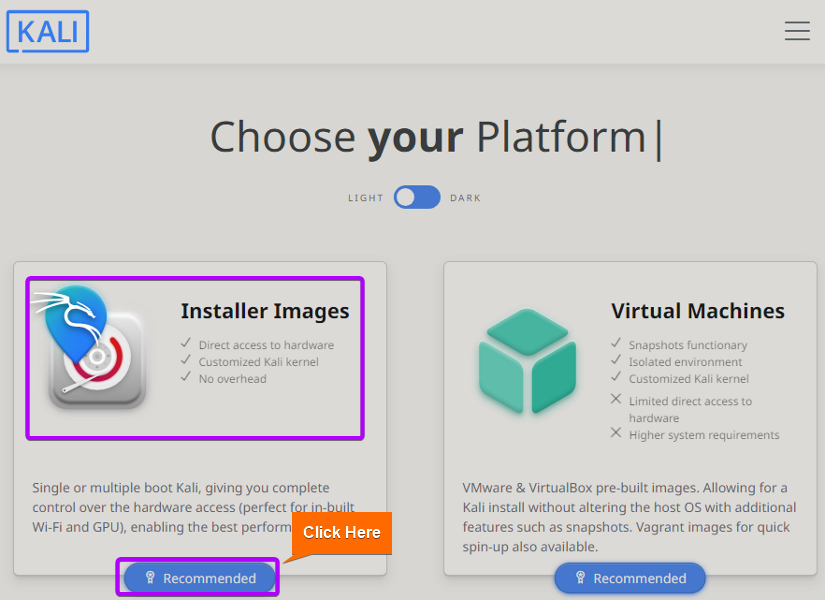
- Now, select the Installer Images and click on it.

- Here, select 64-bit Kali Linux and hit the download arrow.

- This is the downloaded iso file of the Kali Linux in the file manager. For now, keep this file intact for later use.


Step 2: Create a Virtual Machine (VM)
It’s time to create a virtual machine in VMware where Kali Linux will be installed. To do that keep following the steps instructed below:
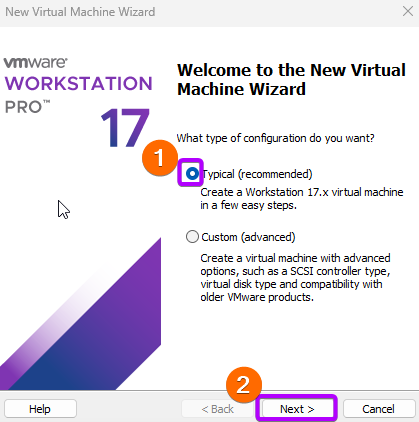
- Open VMware and click on “Create a new virtual machine”. On that, a Virtual Machine Wizard will appear. Here select Typical as a type of configuration and click on Next.

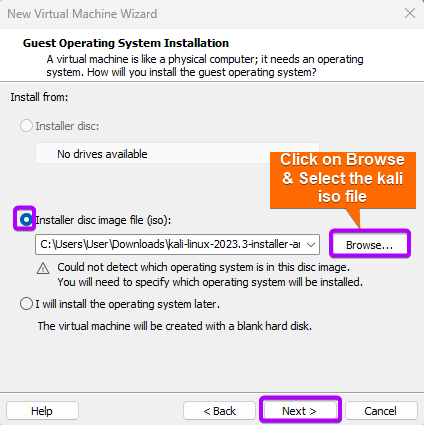
- Now, choose the second option and browse the previously downloaded iso file of Kali Linux from the file manager.

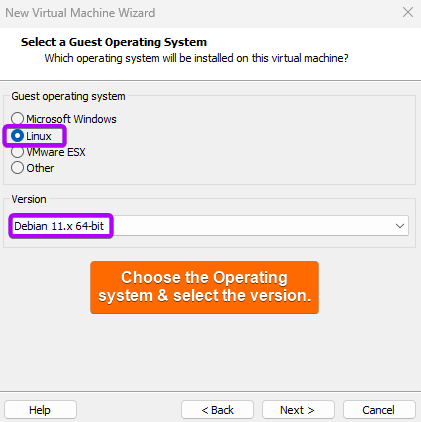
- Select Linux as a guest operating system and choose the version of it. I’ve chosen Debian 11.x64-bit.

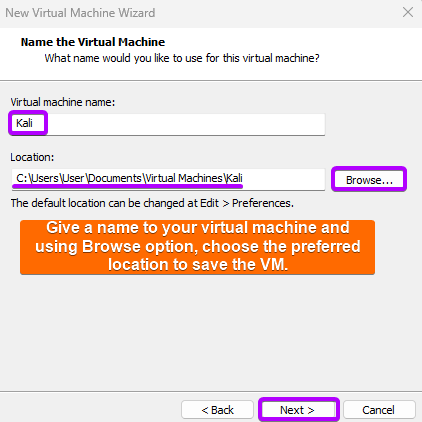
- Give a name to the machine and browse the location where you want to keep the VM.

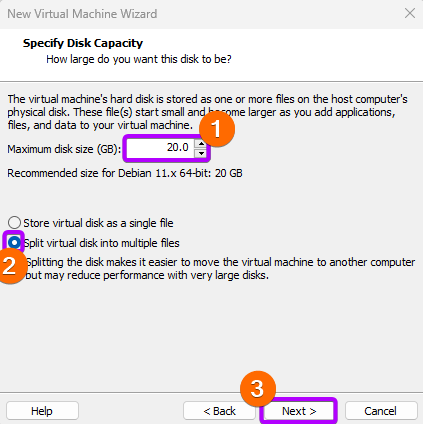
- Specify the disk capacity with a minimum of 20 GB of disk size and choose to “Split virtual disk into multiple files”.

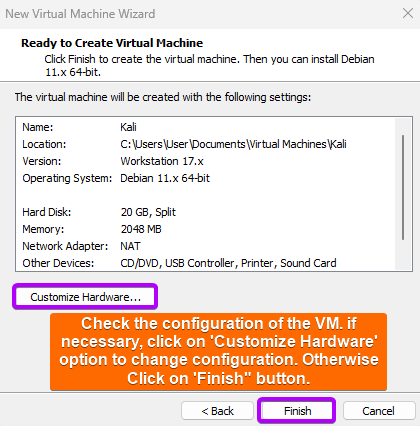
- This prompt shows the whole configuration of the virtual machine newly created. If you want any change there, click on the Customize Hardware option.

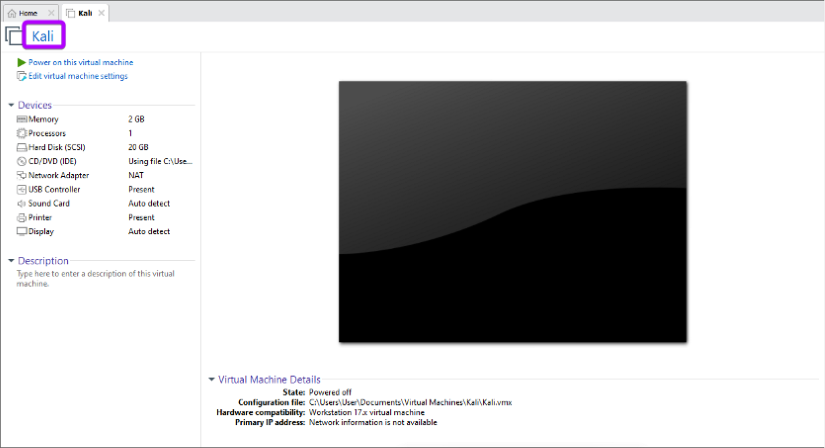
- Finally, this is the newly created virtual machine named Kali.

Step 3: Install Kali Linux on the VM
The ultimate task is to set up Kali Linux on the recently created virtual machine within VMware. To achieve that, continue following the steps outlined below:
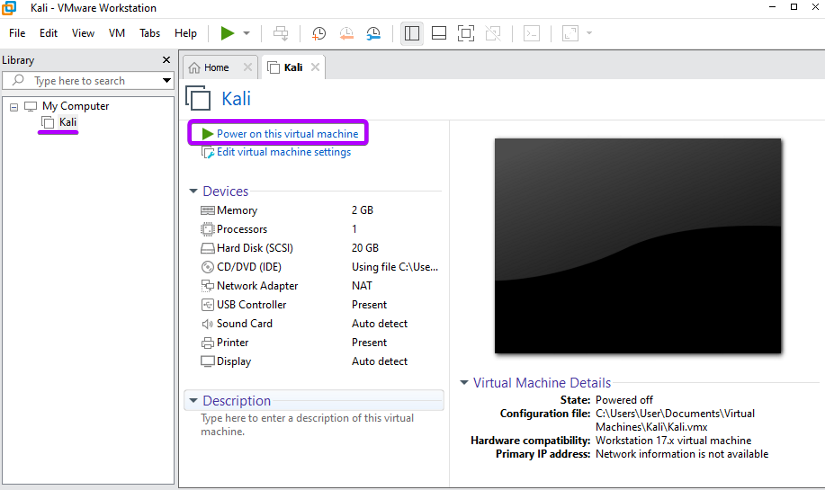
- Click on “Power on this virtual machine” to run the virtual machine. If it’s necessary, you can edit virtual machine settings by clicking on the “Edit virtual machine settings” option.

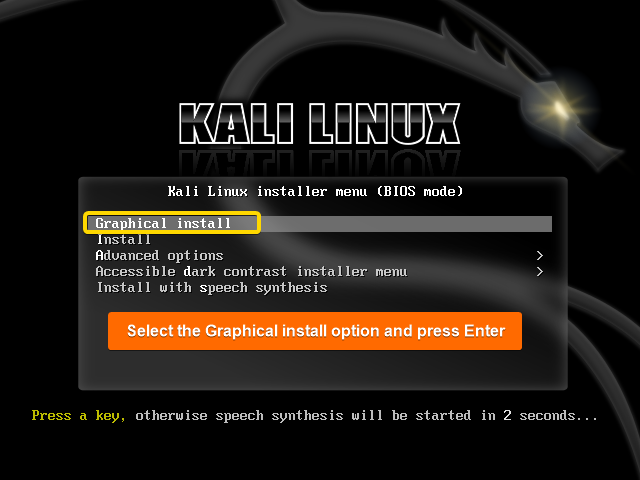
- At first, press any key, then select the Graphical install option, and finally press Enter.

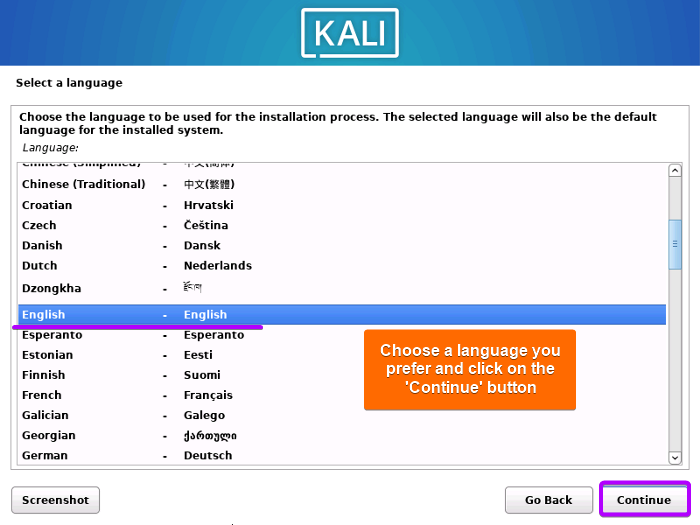
- Select a language convenient for you and press ‘continue’. I’ve selected English as my language.

- Select your location to set your time zone correctly.
- Configure your Keyboard layout by selecting your preferred option and continue.
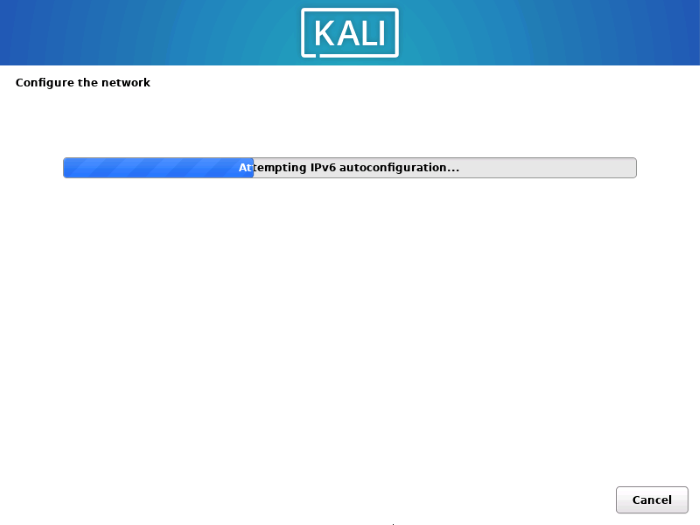
- After continuing, the next is configuring the network. For that wait a while.
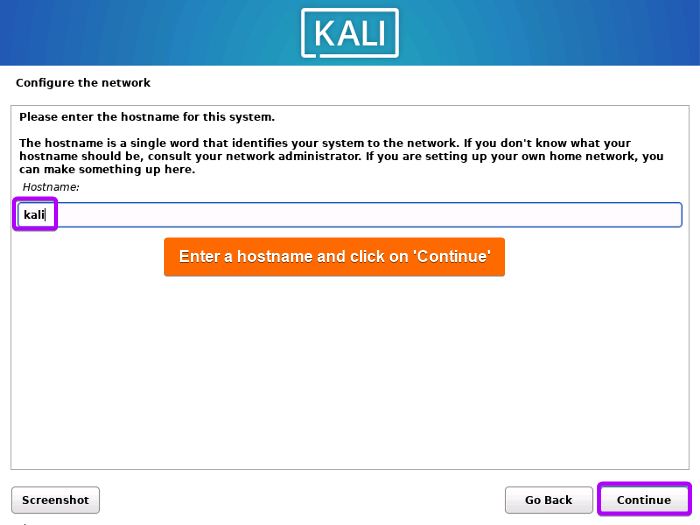
- To configure the network, enter a hostname.
- Now enter a domain name for your system.
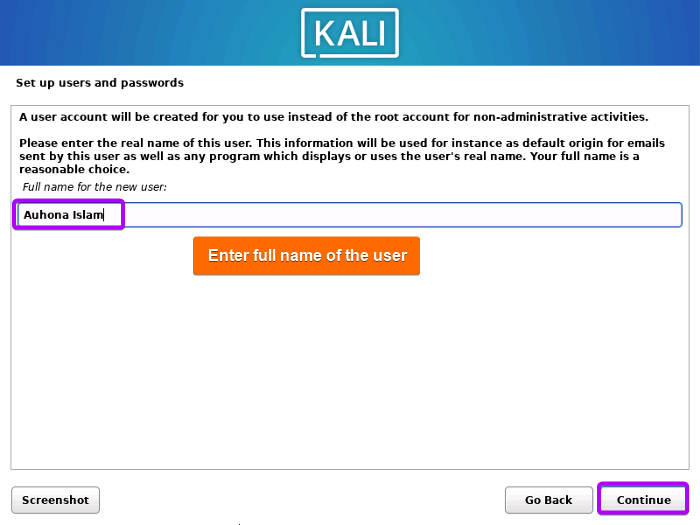
- Now, to create an account, type your full name and click on continue. Please note this for later use.
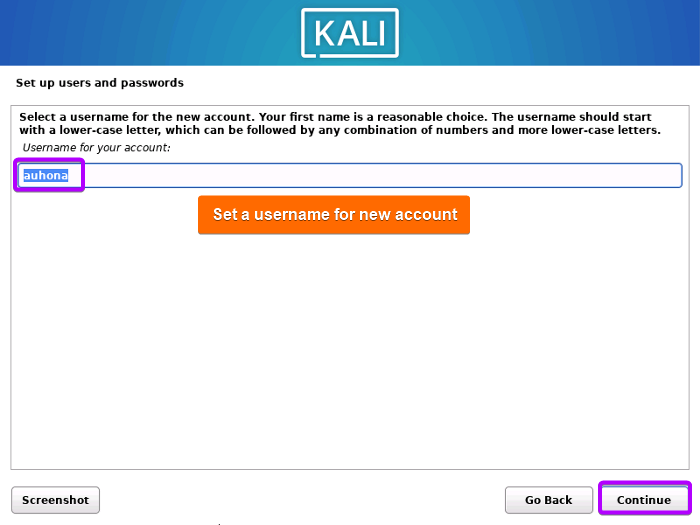
- Set a user name for your account.
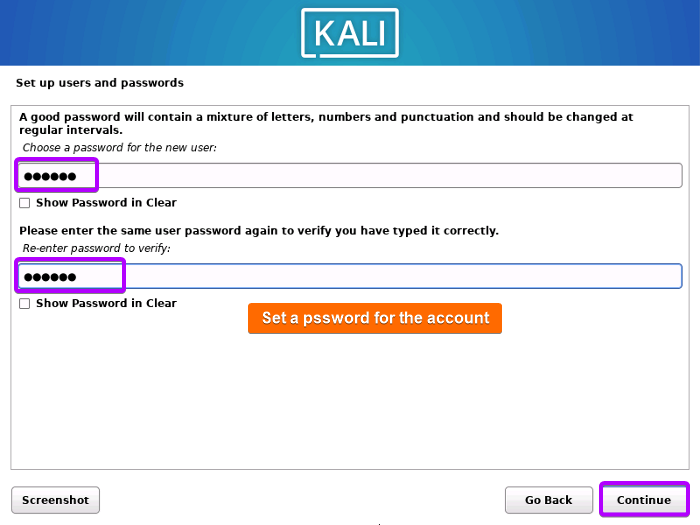
- To log in with a username and password, set a strong password.
- To configure the clock, select your timezone and continue the process.
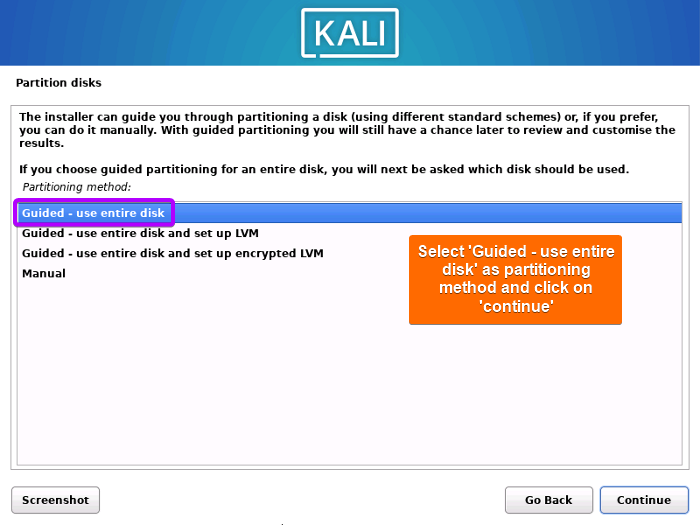
- To partition the disk, select Guided partitioning as shown below. You can do it manually too.
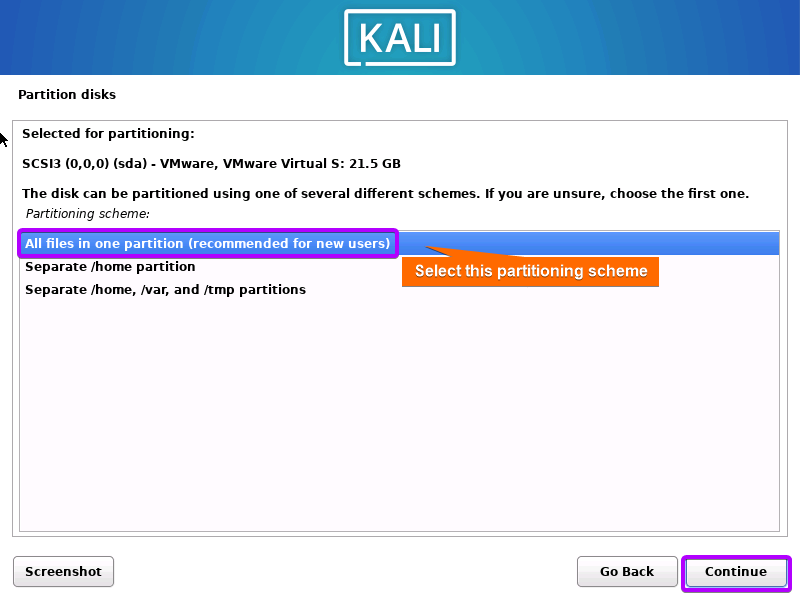
- As a partitioning scheme, Choose the first option and continue.

- This prompt shows the summary of the configured partition. Now, click the Finish partitioning and write changes to disk option.
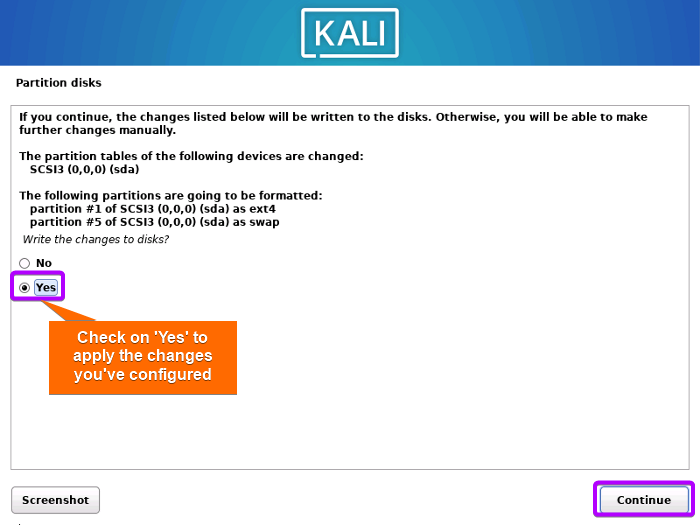
- Check the Yes option to write the changes to the disks mentioned in the prompt.
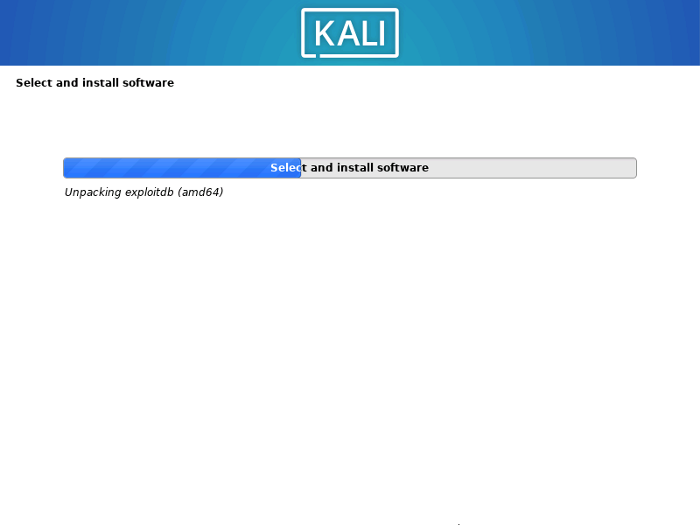
- Now, the installation starts actually. It shows the installation of the base system. The installation process will take some time. So wait for a while.
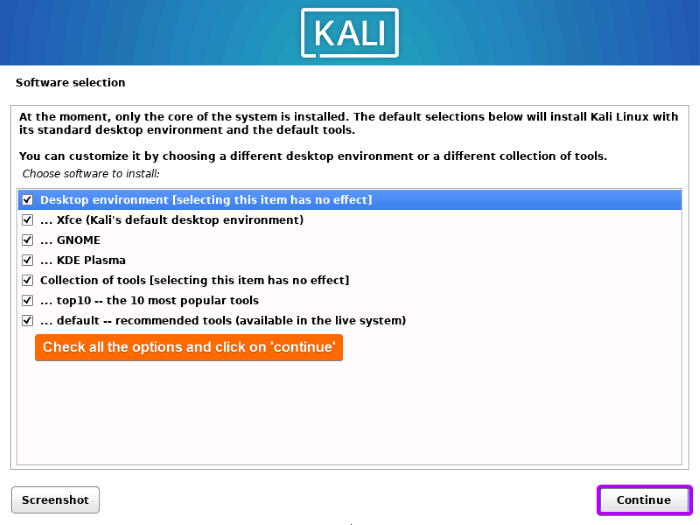
- Here, select the software you want to install while Kali Linux installation. I’ve selected all the software for installation. The software installation is going on.
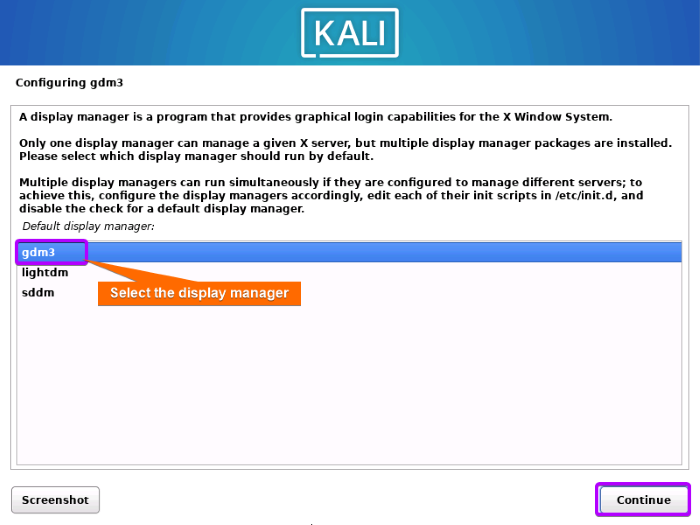
- As display manager select gdm3 and click on Continue.
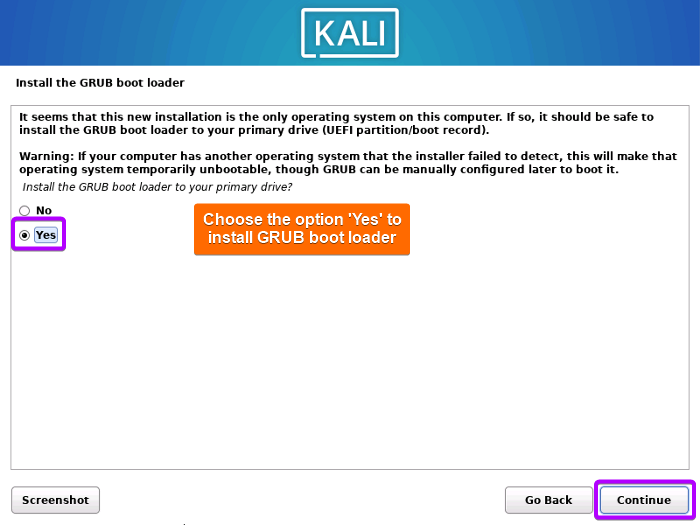
- To install the GRUB Boot Loader check the Yes option and click on Continue.
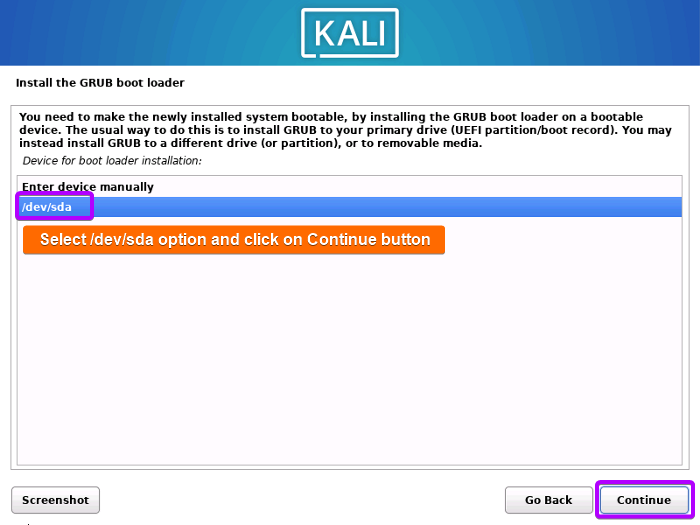
- Select ‘/dev/sda’ as the boot loader device to install GRUB and click on Continue. After continuing, the installation again proceeds.
- As installation is completed, click on continue to reboot your system.
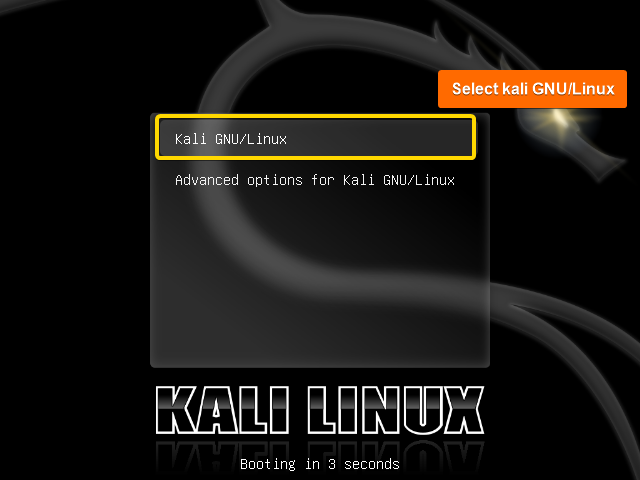
- After reboot, when the VM starts, select Kali GNU/Linux and press Enter.
- Click on the account name listed here.


 It shows the installation of the base system
 I’ve selected all the software for installation. The software installation is going on.
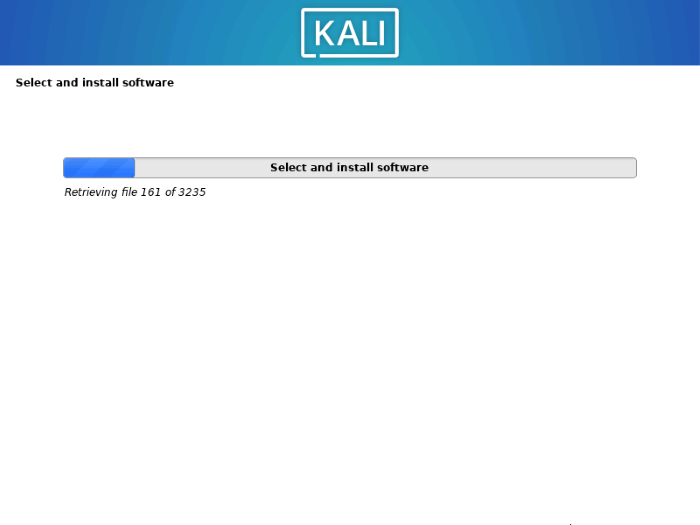
 After continuing, the installation again proceeds.


Login with the credentials created previously. Enter the user password. 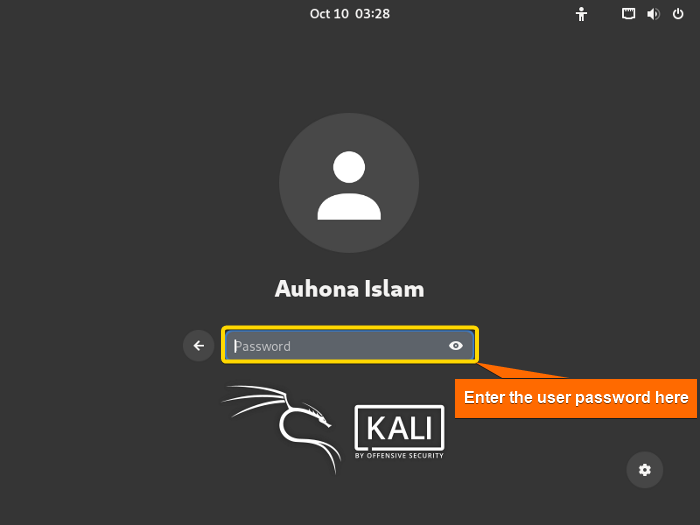 Here, you can see the home page of Kali Linux running on the virtual machine.
 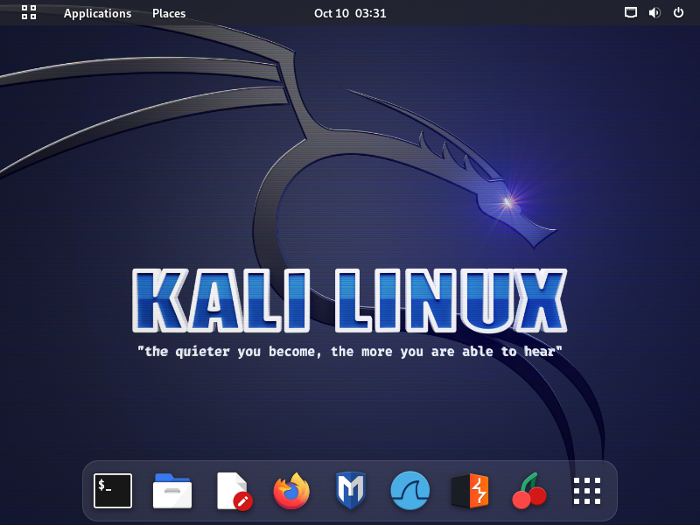 The VM is now your place to play and explore Kali Linux as deeply as you can as there is no barrier to harm to your physical computer.
Conclusion
Installing Kali Linux on VMware is a convenient way to harness its capabilities for penetration testing and security assessments. By following this guide, you can set up a Kali Linux VM quickly and easily. Hope this guide helped you to enter the universe of Kali Linux.
People Also Ask
Can I install Kali Linux on VMware?
Yes, you can install Kali Linux on VMware to create a virtualized environment for testing and learning purposes. Using the following three simple steps, you can install Kali on VMware.:
- Download Kali Linux’s ISO file.
- Create a new virtual machine (VM).
- Install Kali Linux on the VM.
Is Kali Linux VMware free?
Yes, VMware offers a free version of its virtualization software called ‘VMware Player’. VMware Player allows you to create and run virtual machines on your computer. It is available for personal, non-commercial use at no cost.
How do I install Kali on VMware?
To install Kali Linux on VMware, follow the below steps one by one:
- Download Kali Linux’s ISO file.
- Install VMware.
- Create a new virtual machine (VM).
- Select Kali Linux ISO.
- Configure virtual machine settings.
- Start the virtual machine.
- Install Kali Linux on the VM.
- Install GRUB bootloader.
- Complete installation and login.
Which is better Kali or Ubuntu?
The argument on which is better merely depends on the preference of the user. Kali plays an amazing role in cybersecurity, ethical hacking, or penetration testing due to its pre-installed tools and features. Whereas, Ubuntu serves in general computing by providing a user-friendly interface.
Why do hackers prefer Kali Linux?
Kali Linux is purpose-built for cybersecurity tasks due to a wide range of pre-installed hacking tools. Its user-friendly interface and extensive documentation make it a go-to choice for hackers.
Is Kali Linux risky?
Kali Linux itself is not risky, but how it’s used can be. It’s a powerful tool for ethical hacking and security testing, but using it for malicious purposes can have legal and ethical consequences.
How much RAM does Kali Linux need?
Kali Linux typically requires a minimum of 1 GB of RAM for a basic installation. However, for smooth performance, especially when running multiple security tools, it’s recommended to have at least 2GB or more of RAM.
Related Articles
- Installing Ubuntu on VMware Workstation [Easiest Guide]
- [Solved] VMware tools not running
- Installing Arch Linux on VMware [Easiest Guide]
- VMware Shared Clipboard [Enable Copy-Paste & Folder Sharing]
- Installing Ubuntu on VMware Player [Easiest Guide]
- [Fixed] Operating System Not Found on VMware
- VMware Workstation Pro vs VMware Player [Ultimate Comparison]
<< Go Back to Virtual Machine Installation Guide | Linux OS Installation Guide | Learn Linux Basics
FUNDAMENTALS A Complete Guide for Beginners


