Linux is a family of open-source and Unix-like operating systems based on the Linux kernel. The Linux kernel is the core component of the Linux operating system. However, it has a rich history and continues to be a vibrant operating system. Additionally, its flexibility, performance, and open-source nature make it a popular choice for a wide range of applications from personal computing to enterprise-level servers and embedded systems. In this Linux OS Installation Guide, I’ll show you different aspects of how to install Linux in your computer system.
Requirements for Linux OS Installation
- System running on Windows/MacOS.
- Hard drive of storage 20GB.
- RAM 2GB.
- 64-bit processor of minimum 1GHz clock speed.
What is a Linux Distribution?
A Linux distribution, often referred to as a “Linux distro”, is a version of the Linux operating system that includes the Linux kernel, various system libraries, software packages, and other components necessary to create a complete and functional operating system. It is an open-source Unix-like operating system built to provide a complete computing environment for users.
Typically, Linux software is customized to fit the distribution’s specifications and is then organized into software packages by the distribution’s maintainers. These software packages are accessible via online repositories, which act as the storehouse of packages.
Common Features of Linux OS
Linux distributions vary widely in terms of their specific features and characteristics. Still, there are some common features and components that you can typically find in almost every Linux distribution. These features include:
- Package Management: Most Linux distributions use package management systems to install, update, and remove software. Popular package managers include APT used by Debian and Ubuntu, YUM/DNF used by Fedora and CentOS, and Pacman used by Arch Linux.
- Software Repositories: Linux distributions maintain online software repositories that store a vast collection of pre-compiled software packages. Users can easily install software from these repositories using package managers.
- User Access Control: Linux distributions implement user and group management, ensuring that users have appropriate permissions and restrictions on system resources.
- Shell and Command-Line Interface: Almost every Linux distribution includes a Command-line Interface (CLI) that allows users to interact with the system using text-based commands. Bash is a common default shell.
- Graphical User Interface (GUI): Not all but many Linux distributions provide a graphical desktop environment, such as GNOME, KDE, Xfce, etc. for users who prefer a graphical interface.
- File System Hierarchy: Linux OS adheres to a standardized file system hierarchy by maintaining a file tree internally, which consistently organizes system files and directories.
- Customization and Modularity: Linux OS allows users to customize their systems by selecting different desktop environments, software packages, and configurations. Thus making it adaptable to various use cases.
- Multiuser Support: Linux is a multiuser operating system, and most distributions support multiple user accounts with different permissions and access levels.
- Community and Support: Most Linux distributions have online active communities and support forums where users can seek help, share knowledge, troubleshoot issues, etc.
These are general features commonly found in many Linux distributions. However, specific distributions may have unique characteristics and tools tailored to their intended use cases and user preferences.
Linux Kernel
A Kernel is the main component of any operating system (OS). It is the core interface that serves as the bridge between the hardware of a computer system and the software applications running on it. It acts as an intermediary, managing system resources, and hardware devices, and providing essential services that allow various software components to function.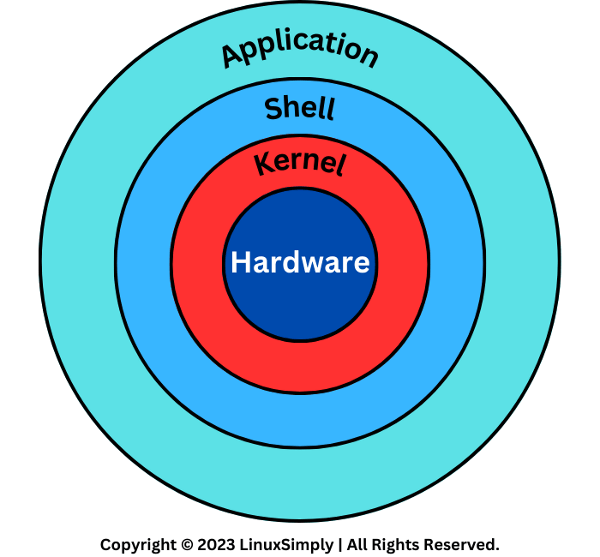 Broadly, the kernel handles 4 jobs:
- Memory management: Allocates memory for processes. It also keeps track of how much memory is being used by a process.
- Process management: Schedules which processes can use the central processing unit (CPU), when, and for how long.
- Device drivers: Act as a mediator between the hardware and software processes.
- System calls and security: Provide service to the processes.
Popular Linux OS Distributions
Each Linux distribution may have its own package manager, system configuration tools, desktop environments, and pre-installed software. Every distribution is designed for various purposes and audiences, so they may vary in terms of stability, software selection, and system administration tools.
Some popular Linux distributions include:
- Ubuntu: Ubuntu is known for its user-friendly approach and strong community support. It’s a great choice for beginners and desktop users.
- Linux Mint: Based on Ubuntu. It offers a polished and user-friendly desktop experience. It is easy to use and popular among those transitioning from Windows.
- Debian: Debian is known for its stability and commitment to free and open-source software. It’s often used as a base for other distributions, including Ubuntu.
- Fedora: Fedora focuses on using the latest technologies and software. It’s a good choice for developers and enthusiasts who want cutting-edge features.
- CentOS (Now CentOS Stream): CentOS, which used to be popular for its stability and server use, transitioned to CentOS Stream. It may still find use in certain enterprise environments.
- Arch Linux: Arch Linux is known for its minimalistic and do-it-yourself approach. It provides a high level of customization and is favored by experienced users.
- openSUSE: openSUSE is known for its robustness and configurability, suitable for both desktop and server environments.
- Red Hat Enterprise Linux (RHEL): RHEL is a commercial distribution known for its stability and long-term support. It’s widely used in business and data center
- Kali Linux: Kali Linux suites are best for cybersecurity professionals and enthusiasts. It comes with a wide range of tools for penetration testing and ethical hacking.
- Elementary OS: Elementary OS offers a beautiful and user-friendly desktop environment inspired by macOS. It’s designed to be visually appealing and easy to use.
- Manjaro: Manjaro is based on Arch Linux but aims to provide a more user-friendly and accessible experience. It’s known for its ease of installation and hardware compatibility.
- Zorin OS: Zorin OS is designed to be user-friendly and is often recommended for those switching from Windows. It offers a Windows-like interface.
- Slackware: Slackware is one of the oldest Linux distributions and is known for its simplicity and minimalism. It’s typically favored by experienced Linux users.
- Gentoo: Gentoo is a source-based distribution that allows users to compile software from source code, providing a high degree of customization.
- Puppy Linux: Puppy Linux is a lightweight distribution. So, it can run on older or resource-constrained It’s known for its small footprint and speed.
These are just a few widely used Linux distros. Besides, many more Linux distributions are available, each with unique characteristics and use cases.
Single Installation VS Dual Boot Installation of Linux
Single OS Installation and Dual Boot Installation are two methods for installing any OS. In a Single OS Installation, you install a single operating system on your computer, and this OS is the only one that runs. However, this is the simplest and most common way to set up a computer. You typically do this when you want to use only one operating system for all your computing needs. For example, you might install a single Linux distribution or a single version of Windows on your computer.
On the other side, dual boot allows setting up multiple operating systems on a single computer and you can choose which one to use each time you start your computer. This allows you to switch between different OS environments on the same machine. For example, you might have both Windows and Linux installed on your computer, and you can choose which one to boot into when you start your computer.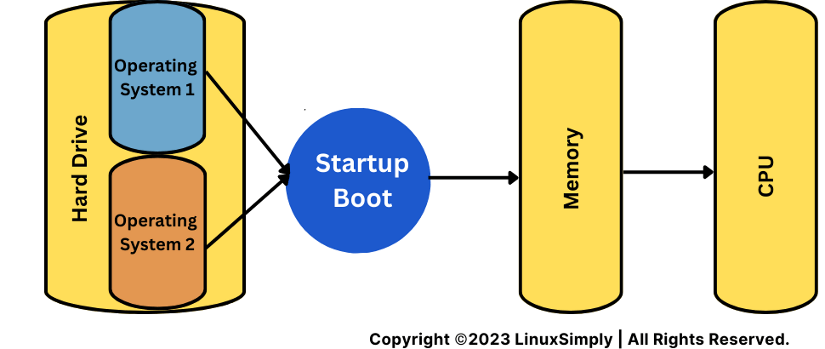 Generally, dual booting is a common choice when you want to use two or more operating systems on the same computer but want to keep them separate. However, it requires careful setup and maintenance to ensure that both OS installations coexist harmoniously.
What is an Installer?
An installer, in the context of software and operating systems, is a program or utility designed to automate the installation process of an operating system on a computer device. The primary purpose of an installer is to simplify and streamline the installation process for users, reducing the complexity and potential errors associated with manual installation. They come in various forms such as executable files, installation scripts, or bootable media for operating system installations.
Popular examples of installers include the Windows Installer (MSI), InstallShield, and package managers like APT (Debian/Ubuntu) and YUM (Fedora/CentOS) for Linux distributions.
What Happens When You Install Linux OS
When you install a Linux operating system on a computer, several significant steps and processes take place to set up the OS and make the computer functional. After starting the installation with a bootable drive, the following notable process runs in the system background sequentially:
- Partitioning: During installation, you create or select partitions on your storage device (usually your hard drive or SSD) to allocate space for the Linux operating system. Partitions are like separate containers for different aspects of the system.
- Boot Loader Installation: Linux typically installs a boot loader, such as GRUB (GRand Unified Bootloader), to the Master Boot Record (MBR) of your storage device. The boot loader allows you to choose which operating system to boot when you start your computer.
- File System Creation: Linux uses different file systems, such as ext4 or Btrfs, for organizing and managing data on partitions. During installation, it creates a file system on the root partition and additional file systems for other partitions.
- Package Managers: Linux distributions use package managers (e.g. APT, YUM, DNF) to install, update, and manage software packages and these are configured during the installation.
- System Configuration: Linux creates configuration files in the /etc directory that define system-wide settings, such as network settings, user privileges, and hardware configurations.
- Logging: Linux sets up a logging system to record system events, errors, and user activities. Logs are stored in various locations, such as /var/log.
Installation of Linux Distributions
To install Linux on your PC, an option is to create a dual-boot system where you can choose between Windows and Linux at startup. Another case is to erase Windows from the computer and install a Linux distribution instead. Whatever method you choose, you have to follow almost the same steps described below. To demonstrate the process, I’ll show you how to install Ubuntu in Windows.
A. Create a Bootable Device
Before heading into installation, you have to create a bootable USB drive flashed with the ISO file of the Linux distribution you want to install on your computer. Follow the steps for this purpose:
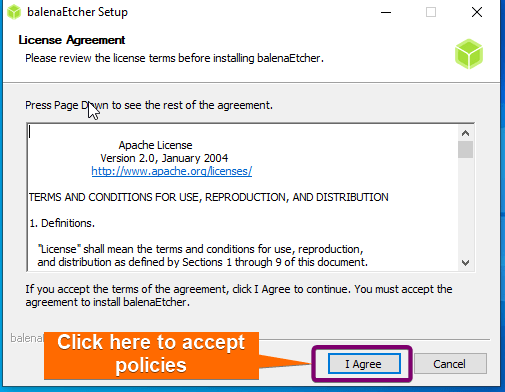
Step 01: Install Etcher on Windows
Etcher is a free and open-source software application used for creating bootable USB drives and SD cards. It is a popular tool for writing disk images, such as ISO files, to removable storage media. Follow the below steps to set Etcher on your Windows:
- Download Etcher Installer from their official site.
- Accept the license agreement.
 After that, Etcher will be installed automatically and opened in a separate window.
 After that, Etcher will be installed automatically and opened in a separate window.
Step 02: Flash Linux ISO into a USB Drive
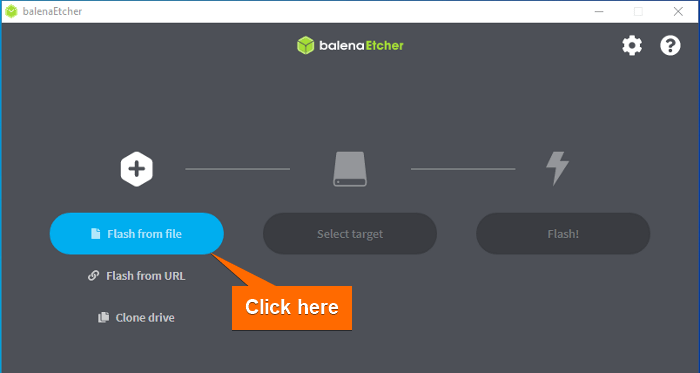
To create a bootable device for Linux installation, first, you have to download the ISO file of the Linux distribution. Then you can use Etcher to create a bootable USB device. Just follow these simple steps:
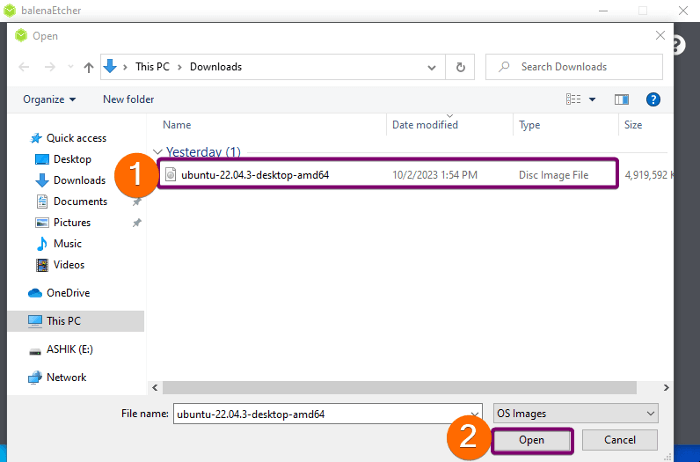
- Download Ubuntu from their official site. I’ve downloaded Ubuntu 22.04.1 LTS.
- Open Etcher and select Flash from File.

- Select the ISO file from the location you’ve downloaded.

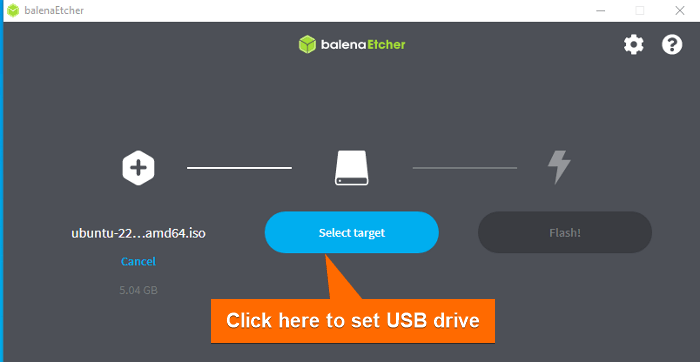
- Plug in your USB pen drive.
- Click on Select target.

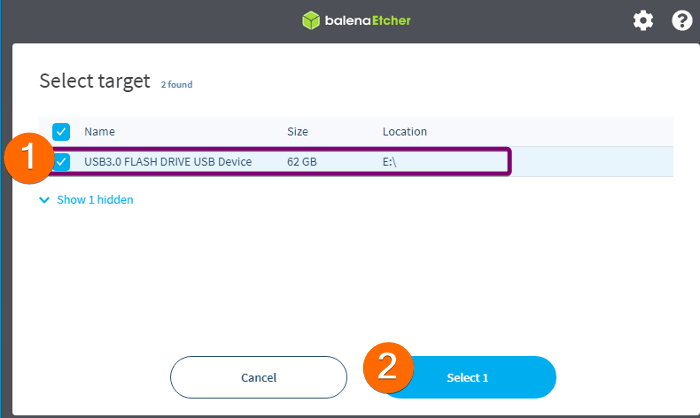
- Select your USB drive.

- Click on Flash to start flashing the ISO file into the USB drive.
 After that, Etcher will flash the ISO file into your USB drive and make it bootable.
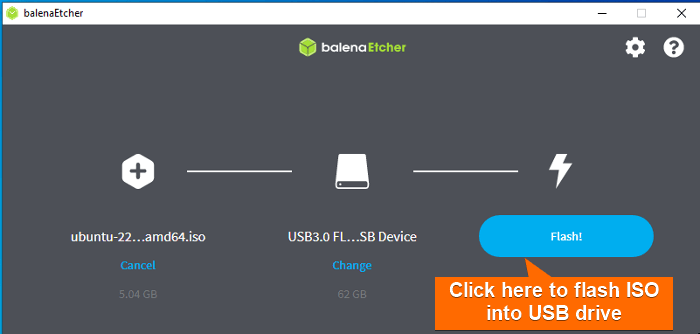 After that, Etcher will flash the ISO file into your USB drive and make it bootable.
B. Single Installation of Linux OS
Single OS Installation is the simplest and most common way to set up a computer. It installs a single operating system on your computer, and that OS is the only one that runs. However. after creating the bootable drive, plug it into the device where you want to install it. Then follow the steps for single OS installation of the Linux distro:
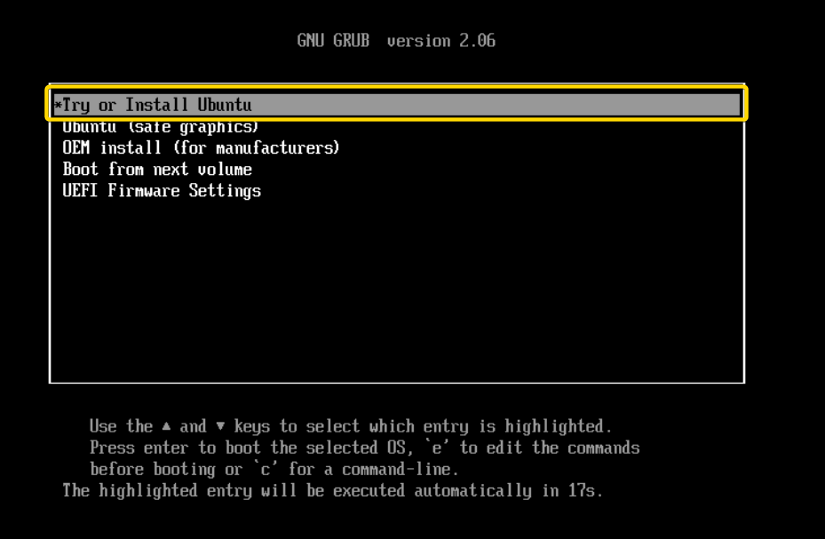
- Power on the PC. It will automatically launch the setup window like this.
 Note: If the setup window is not viewed, restart your PC and press the BIOS key according to your device. F12 is the most common key for bringing up your system’s boot menu, but ESC, F2, and F10 are alternatives for some devices.
 - Use the UP and DOWN arrow keys to navigate the menu. Keep it on Try or Install Ubuntu and press ENTER.
-
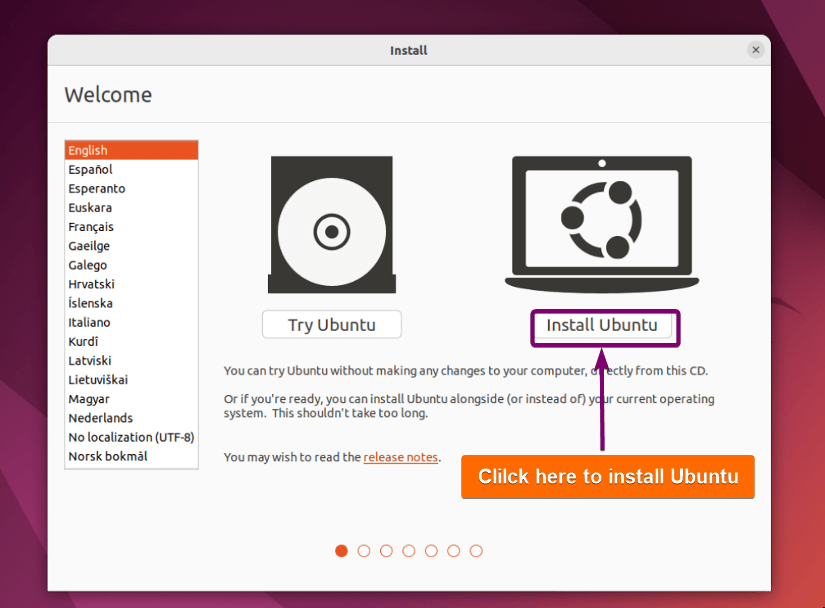
Give permission if any confirmation prompt appears at this stage. The welcome window for installation will appear within a short time.
-
The first screen of the welcome installation allows you to either try Ubuntu or install it. Click on Install Ubuntu.

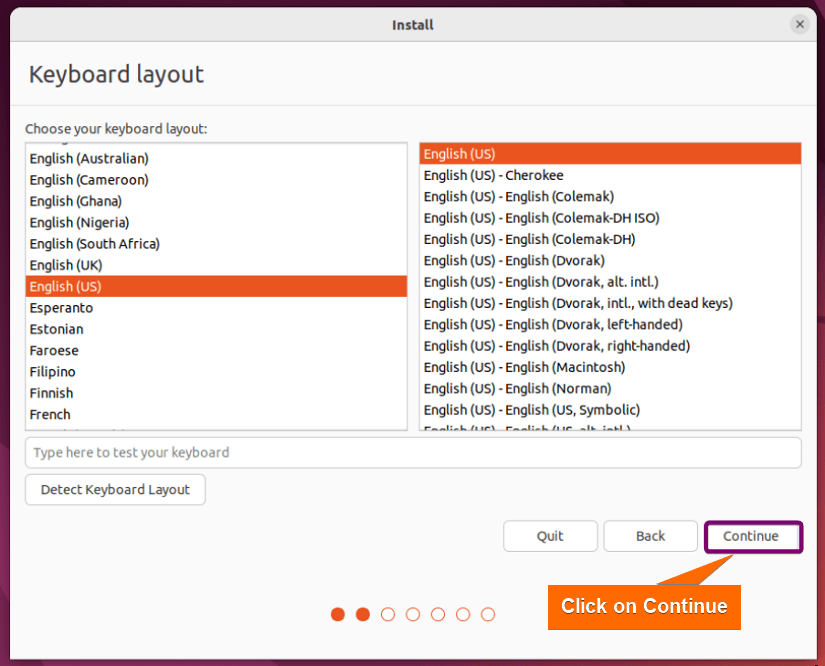
- Set the keyboard layout according to your preference. I recommend using English (US). Then click on Continue.

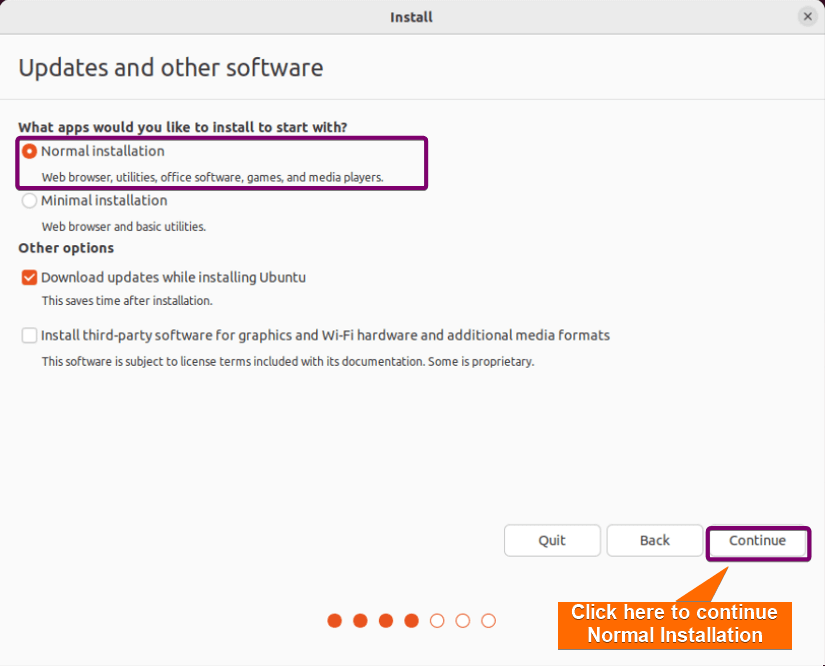
- Choose the software installation type. The normal installation offers a full-featured desktop environment with pre-installed software and a familiar user interface, choose the normal installation. On the other side, Minimal installation only installs a web browser and some very basic utilities. If you are a beginner, I recommend choosing Normal installation.
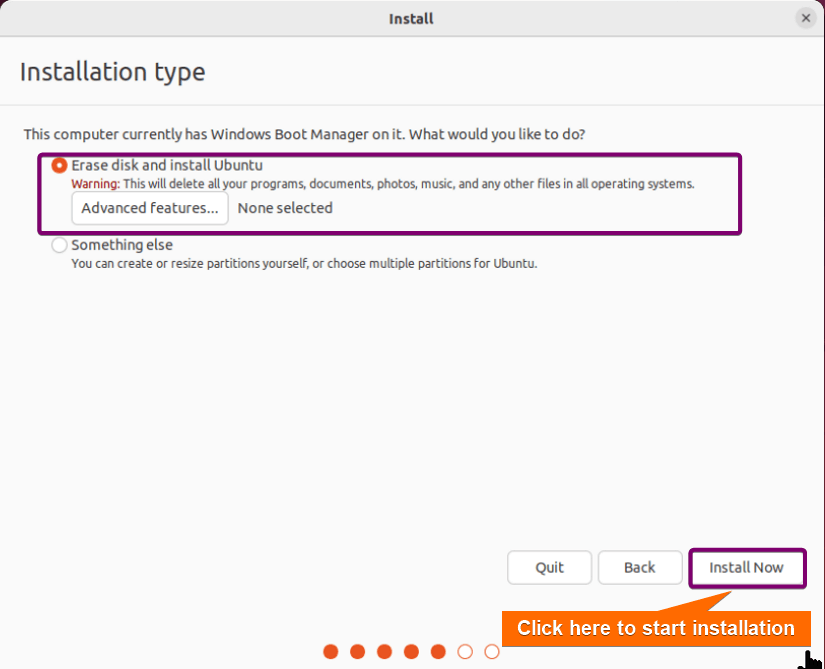
- Now, select what type of installation you want, single installation or dual boot. Select the Erase Disk and Install option for a single installation.Warning: It will erase the disk of your current system and install the Linux distro in your system. Make sure you have a backup of your important files before proceeding to the next step.

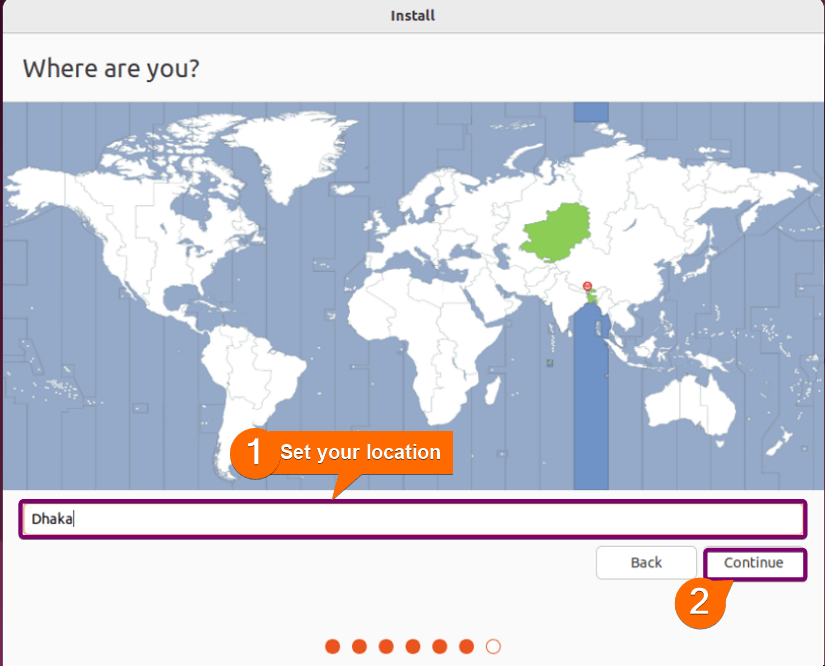
- Set your location.
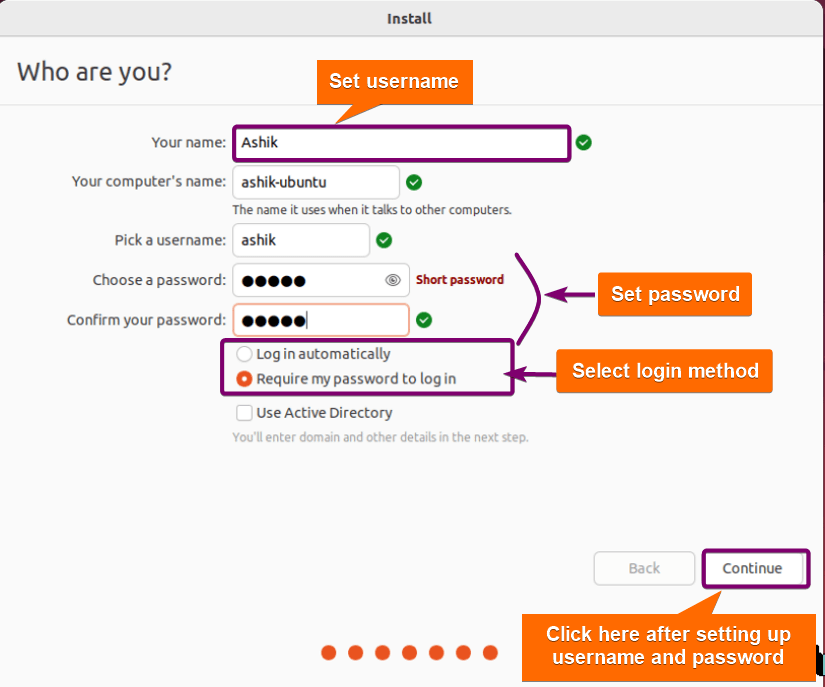
- Specify your username and password. Then, select the login method. Log in automatically will not require a password when you start your PC. However, “Require my password to log in” will ask for the password you set every time you power on your PC.
 Now, it will take a moment and complete all the necessary setup automatically. You will see a slideshow with installation progress during this time as the below image.
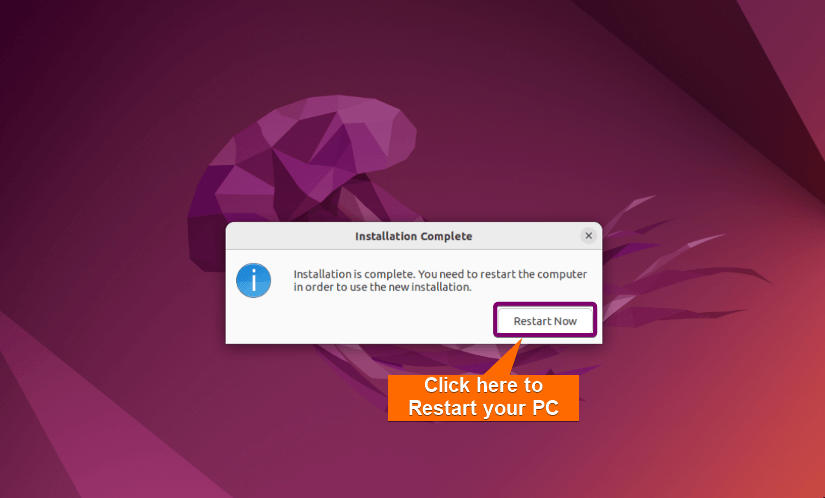
- Then a restart prompt will appear. Click on Restart Now.
 After restarting, you can use Ubuntu with all its features on your PC.
 Now, it will take a moment and complete all the necessary setup automatically. You will see a slideshow with installation progress during this time as the below image.
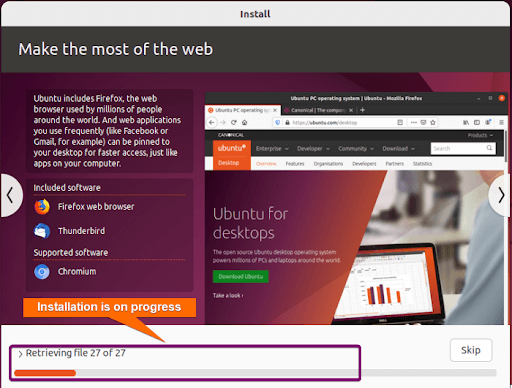
 After restarting, you can use Ubuntu with all its features on your PC.
C. Dual Boot Installation of Linux
Dual boot installation allows setting up multiple operating systems on a single computer and you can choose which one to use each time you start your computer. However. after creating the bootable drive, plug it into the device where you want to install it. Then follow the steps for single OS installation of the Linux distro:
-
Power on the PC and press the BIOS key while it is starting. Though F12 is the most common key for bringing up your system’s boot menu, yours can be different according to the PC model. Here is a list of PCs with BIOS keys, not F12:
PC BIOS Key Acer F2 or DEL ASUS, Samsung, Toshiba, Origin PC F2 Dell F2 or F12 HP ESC or F10 Lenovo Fn + F2 Lenovo (ThinkPads) ENTER + F1 MSI DEL Microsoft Surface Tablets Press and hold the volume up button It will launch the setup window like this:
- Use the UP and DOWN arrow keys to navigate the menu. Keep it on “Try or Install Ubuntu” and press ENTER. The welcome window for installation will appear within a short time.
-
On the first screen of welcome installation, click on “Install Ubuntu”.
- Set the keyboard layout to English (US). Then click on Continue.
- Choose “Normal installation” from this window. It offers a full-featured desktop environment with pre-installed software and a familiar user interface. On the other side, Minimal installation is lightweight and only installs a web browser and some very basic utilities. If you are a beginner, I recommend choosing Normal installation.
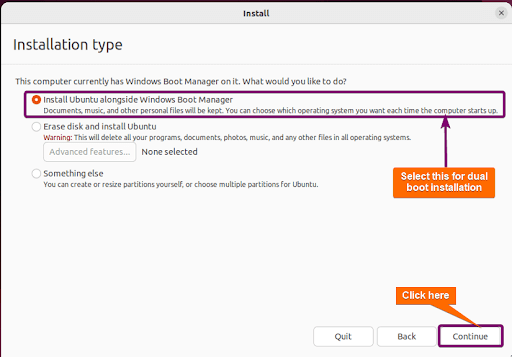
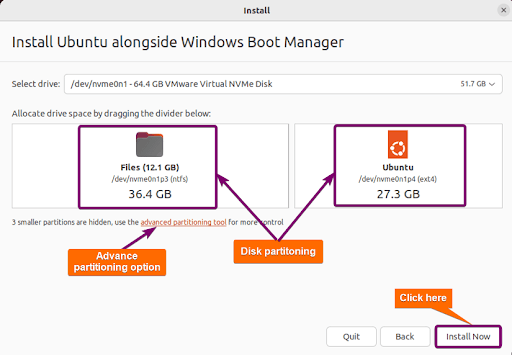
- Select “Install Ubuntu alongside Windows Boot Manager”. It will keep all the files in your current operating system separate and install Ubuntu as a dual boot.

- At this stage, a partition manager will prompt up and allocate a separate disk space for Ubuntu. You can customize this partition, but if you are a beginner, I recommend leaving it as default.
 Give permission if any confirmation prompt appears after clicking on Install Now.
- Set your location from the drop-down menu. However, it will automatically detect your location if you are connected to the internet.
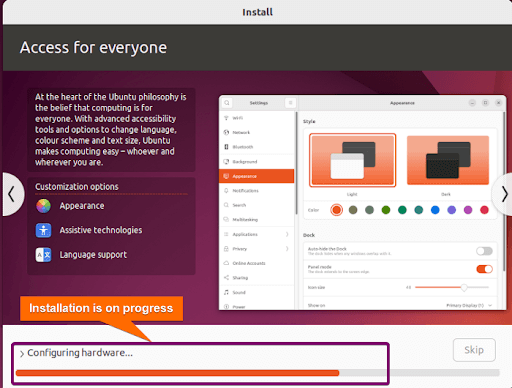
- Set your username and password. Then, select “Require my password to log in”. It will ask for the password you set every time you power on your PC. However, selecting “Log in automatically” will not require a password when you start your PC. It will take 10-15 minutes to completely install Ubuntu. A slideshow with installation progress will be shown during this time as below:
- Now, it will take a moment and complete all the necessary setup automatically. Then restart prompt will appear. Click on Restart Now. You have successfully installed Ubuntu as a dual boot. From now on, the booting choice screen will appear every time you power on the PC like the image below:
 Using the UP and DOWN arrow keys, you will be able to select which operating system you want to load.
 Give permission if any confirmation prompt appears after clicking on Install Now.
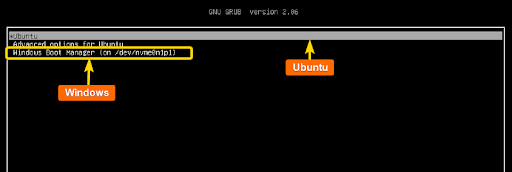 Using the UP and DOWN arrow keys, you will be able to select which operating system you want to load.
Linux Installation on Virtual Machine
A virtual machine (VM) is a software-based emulation of a physical computer or server isolated from one another and from the host system. This isolation ensures that activities in one VM do not affect the stability or security of other VMs or the host. Moreover, it allows you to run multiple operating systems and associated software applications on a single physical hardware host. Each virtual machine is complete with its own virtualized hardware components, including CPU, RAM, storage, and network interfaces. In this section, I’ll show you how to configure a virtual machine and set up Ubuntu which is a Linux OS.
Step 01: Setup Virtual Machine Software
There are many popular virtual machine software available that you can use for Linux OS installation. However, I’m using VMware Workstation Pro 17 to demonstrate how to install Ubuntu in it. Before proceeding with OS installation, install VMware Workstation on your PC.
Step 02: Configure VMware for Linux OS Installation
Before installing, you have to create a virtual machine in VMware and configure it for the Linux OS. It won’t be difficult if you follow me in the below steps:
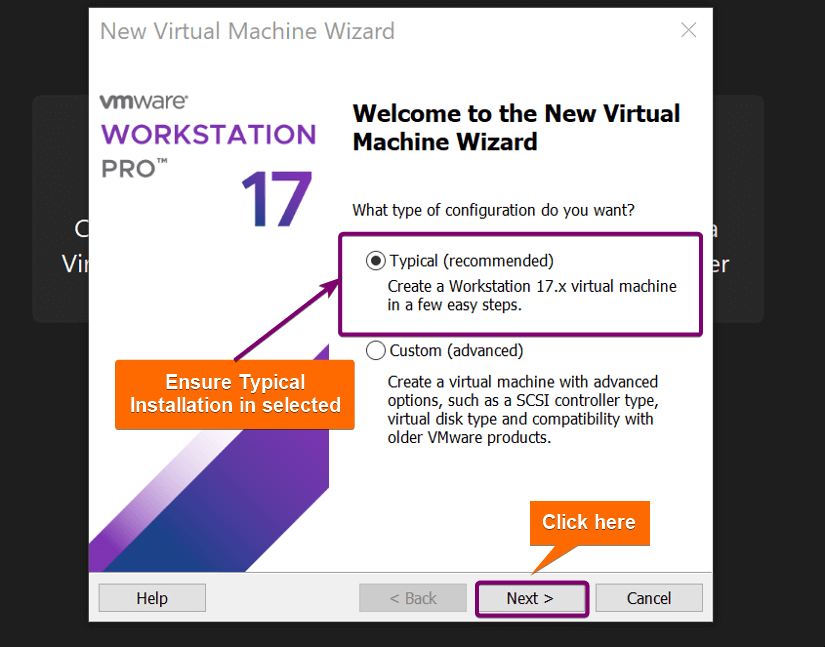
- Click the plus icon to create a new virtual machine.

- Select Typical (Recommended) configuration and click on Next >.

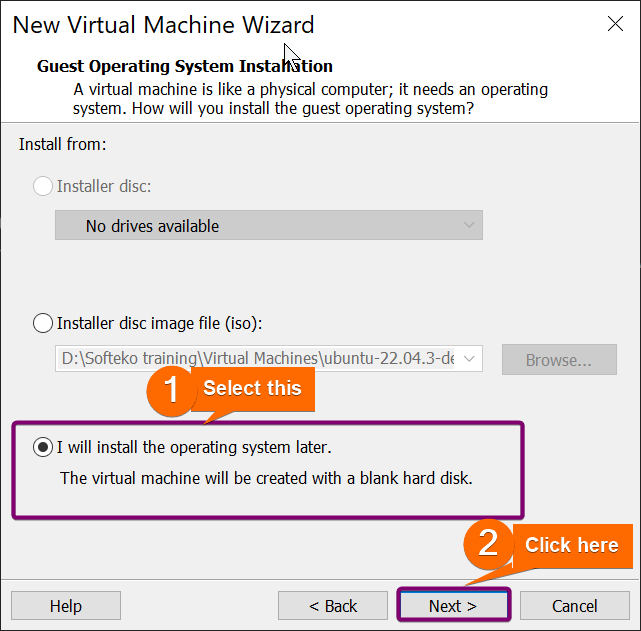
- Now, a window for operating system installation will appear. Select I will install the later option as in the below image because it’s better to set the operating system later.

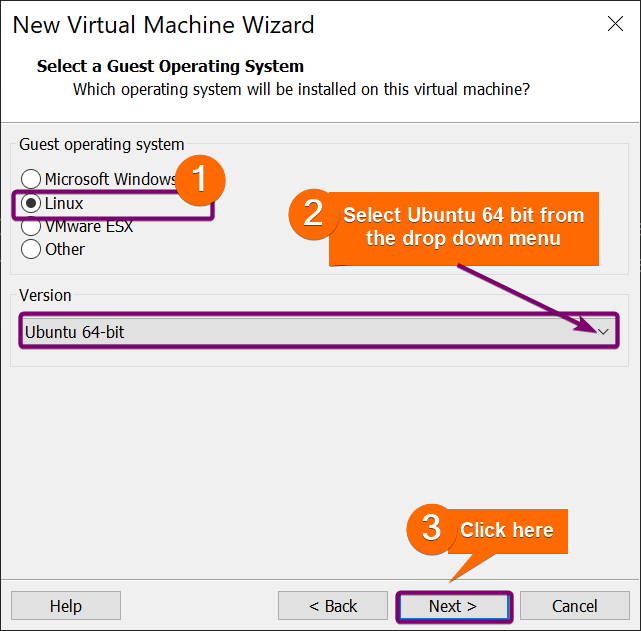
- Select Linux in the “Guest operating system” and select Ubuntu 64-bit from the drop-down menu in the “Version”. Then click on Next >.Note: If you want to install any other Linux distribution, select that from the drop-down list. The later steps will be the same for all distributions.
-
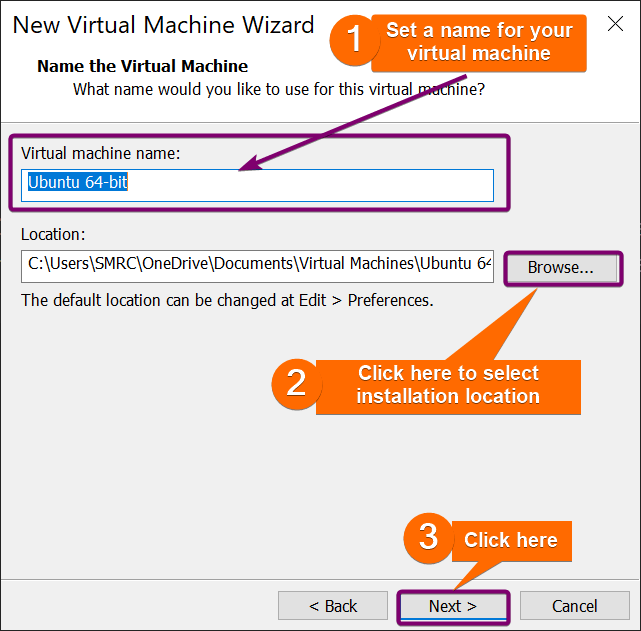
Give a name to your virtual machine. Then, select an installation location according to your preference or you can leave it as default.
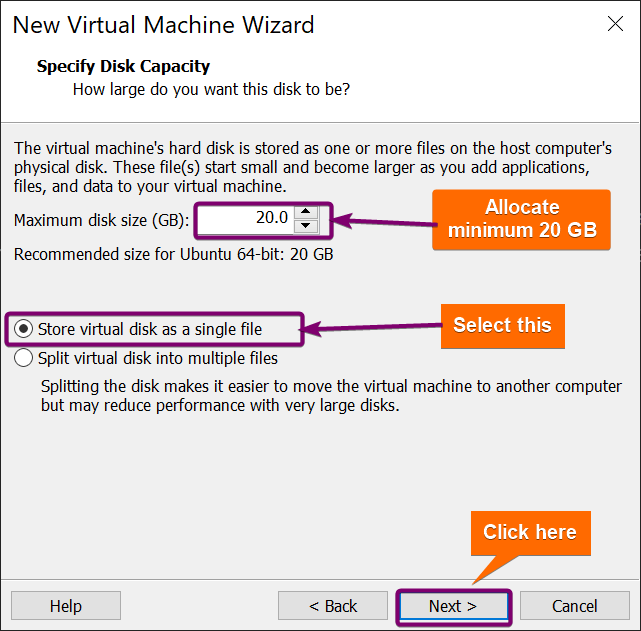
- Now, you have to specify the disk capacity for the virtual machine. Allocate a minimum of 20GB and select “Store virtual disk as a single file”.Note: If you have a shortage of memory in your system, you can choose the next option, “Split virtual disk into multiple files”
-
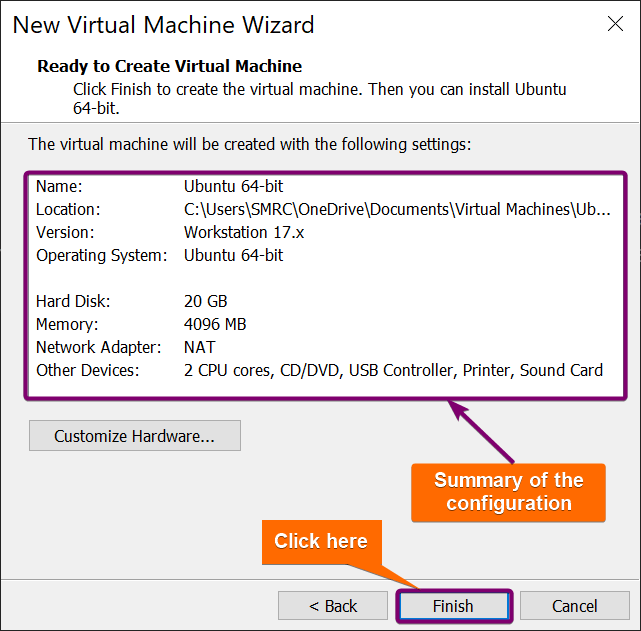
At this stage, a summary of the configuration will appear. Click on Finish to complete the configuration.
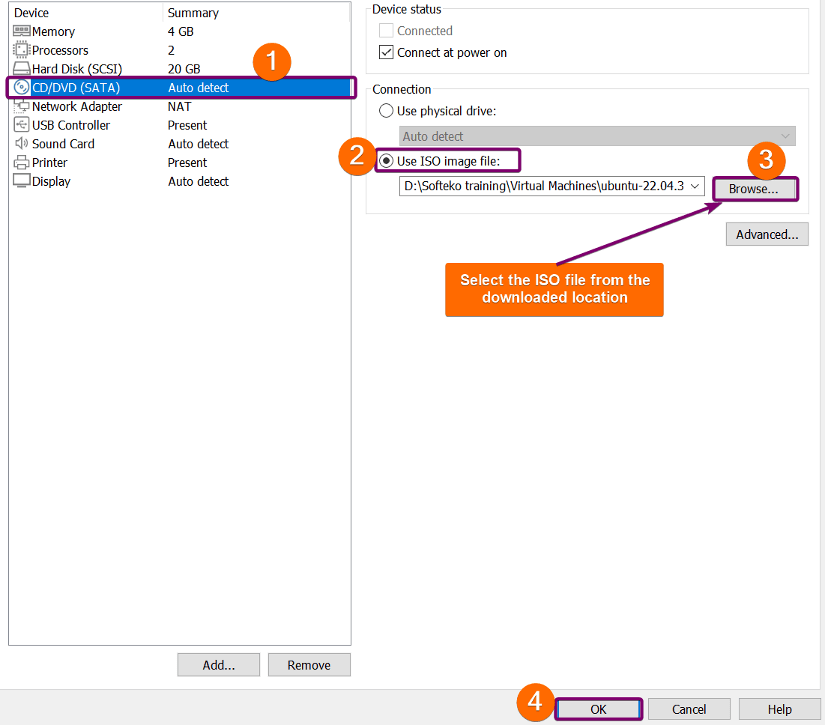
You have The virtual hardware configuration is done. Now follow the later steps to configure the ISO file. - Click on Edit virtual machine settings.

- You will find CD/DVD (SATA) option under the Device list. Click on that and check “Use ISO image file”. Then, click on Browse to select the downloader ISO file. Finally, click OK.
 Congratulations! You have successfully configured the virtual machine for Ubuntu installation.

 You have The virtual hardware configuration is done. Now follow the later steps to configure the ISO file.
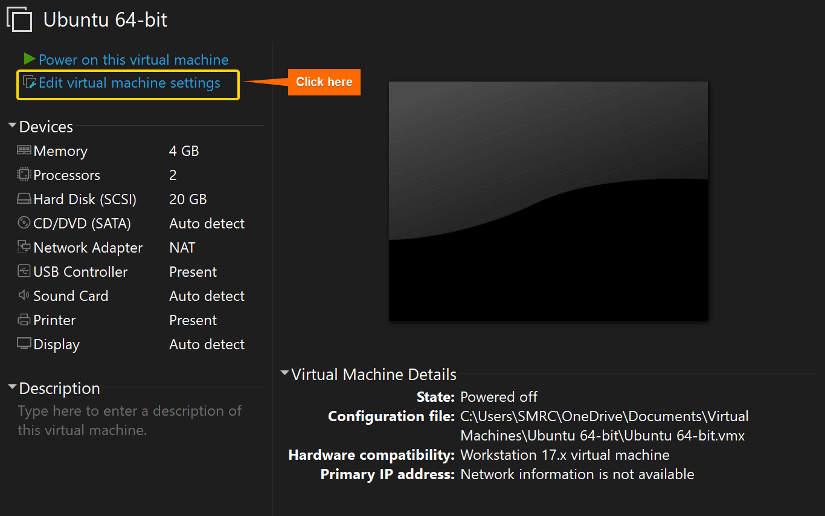
 Congratulations! You have successfully configured the virtual machine for Ubuntu installation.
Step 03: Installing Linux on VMware Virtual Machine
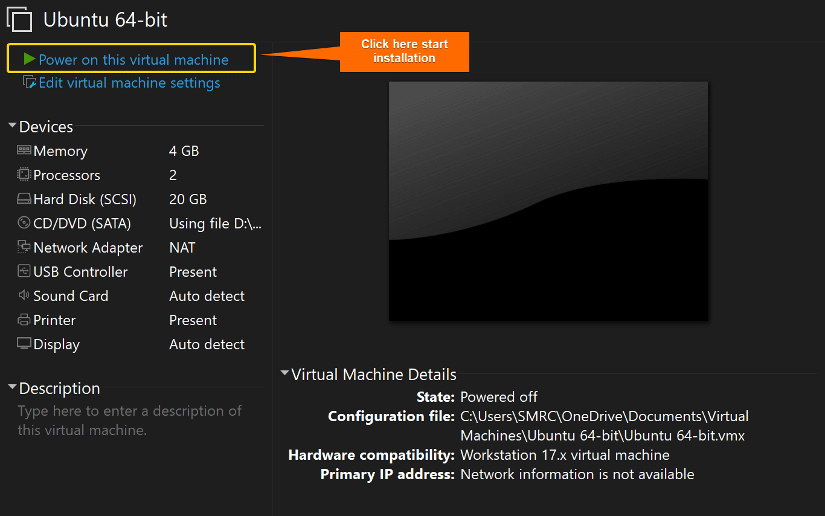
After configuring the virtual machine for Linux installation, you are just a few steps away from enjoying the Linux distribution. Follow these steps to complete the installation:
- Click on Power on the virtual machine to start the installation.
- After some time loading, a prompt like the below image will appear on your screen. Then click on Install Ubuntu.
- Set the keyboard layout, and leave it as default English (US). Then click on Continue.
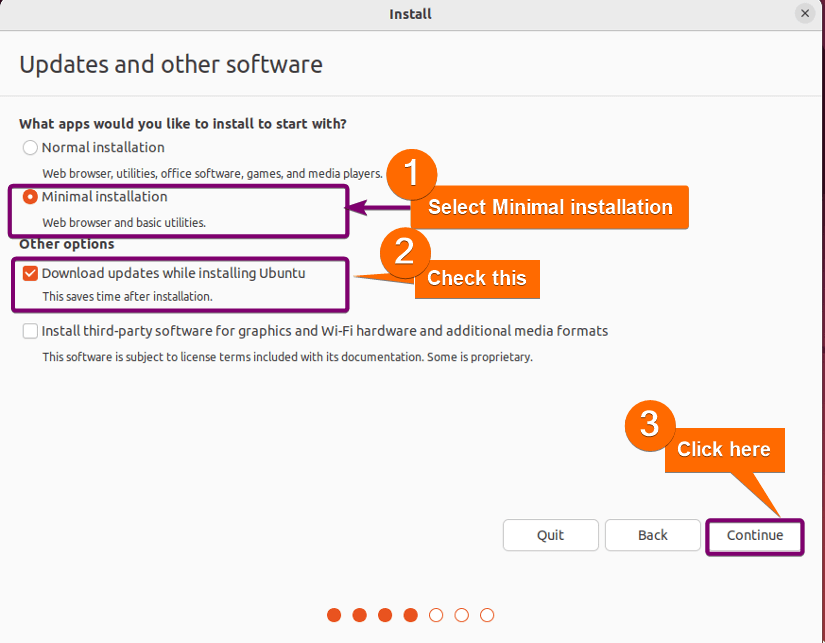
- Select Minimal installation as the installation type and click on Continue.
 Note: You can choose Normal installation as it offers a full-featured desktop environment with pre-installed software and a familiar user interface. But in the case of installing Linux on a virtual machine with allocated low storage, Minimal installation performs better as it installs some very basic lightweight utilities.
 -
Check the button of Erase disk and install Ubuntu. Don’t worry, the virtual machine will erase nothing from your main operating system. Then click on Install Now.
- Set your location and click on Continue.
- Now, set the username and password for the virtual machine. Remember the password and check Require my password to log in. Note: “Log in automatically” will not require a password when you start your PC. However, “Require my password to log in” will ask for the password you set every time you power on your PC.
- Now, it will take a moment and complete all the necessary setup automatically. Then restart prompt will appear. Click on Restart Now. After restarting, you can use Ubuntu will all its features on your PC.
Windows Subsystem for Linux Installation
The Windows Subsystem for Linux (WSL) is a compatibility layer developed by Microsoft that allows you to run a Linux distribution natively on a Windows operating system. In other words, it enables you to run a full-fledged Linux environment alongside your Windows installation without the need for dual booting or virtualization. It provides a seamless integration of Linux into the Windows environment, allowing you to run Linux command-line tools and applications directly from the Windows command prompt or terminal.
Installing Linux on WSL
You can see and install the available Linux distros in WSL through your Windows Powershell. Follow the steps for a basic installation of Linux distro with WSL:
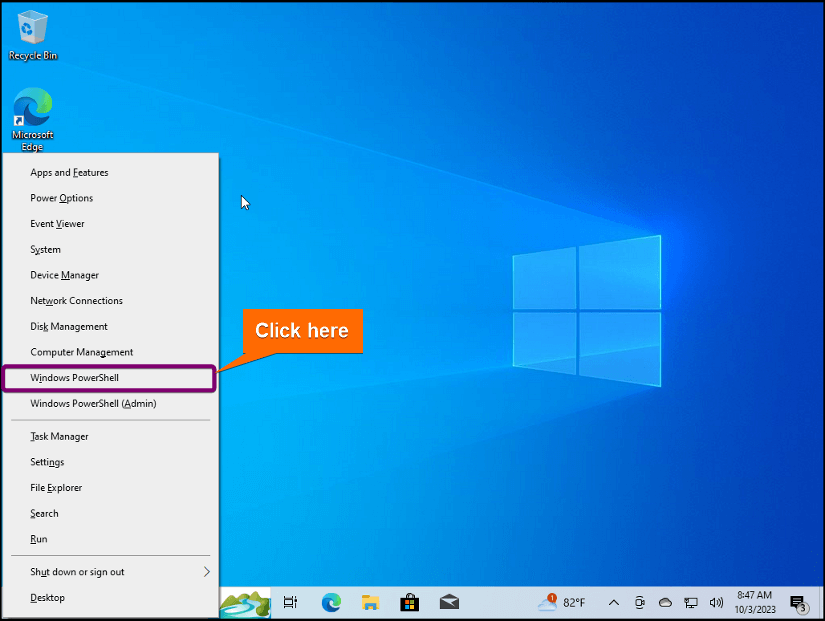
-
Open Windows Powershell. You can press WINDOWS KEY + X and choose Windows Powershell from the menu.

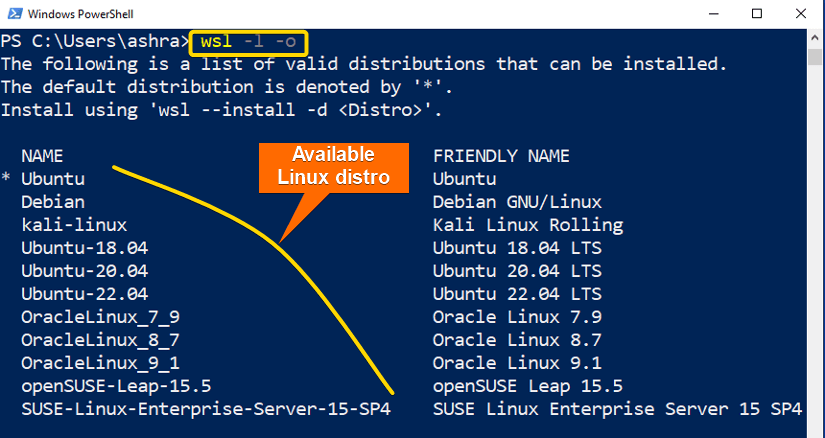
- First, let’s see the distributions available in the Microsoft Store by entering the command:
wsl -l -oEXPLANATION- wsl: Command for interacting with
- -l: This option lists the available Linux distributions on your system.
- -o: This option lists only the active Linux distributions.

- Now, run the following command to install the Ubuntu distro:
wsl --install -d UbuntuEXPLANATION- –install: This option tells WSL to initiate the installation process.
- -d: Option to specify the name of the Linux distribution you want to install.
- Ubuntu: Name of the distro you want to install.
Note: If you want to install any other distro from the available list, Replace Ubuntu in the above command with the name of the Linux distribution you want to install. -
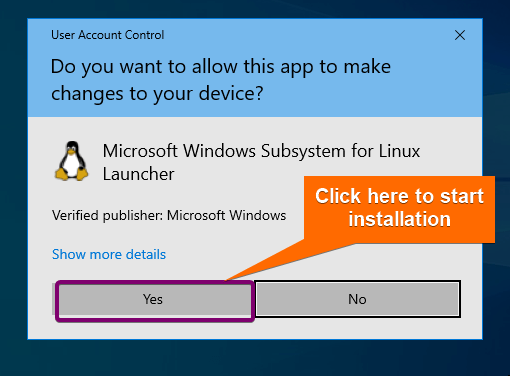
After running this command, a confirmation prompt will appear. Click Yes to start the installation.
 After this installation, you can use commands of that distribution directly from your Windows terminal.
 After this installation, you can use commands of that distribution directly from your Windows terminal.
Conclusion
These benefits, combined with the active community, have contributed to Linux’s widespread popularity and adoption across various use cases, from personal computers to enterprise servers and cloud computing. However, before installing Linux, it’s a good idea to check the official documentation and hardware requirements of the specific distribution you plan to use. Additionally, consider the intended use of the system, as more demanding tasks like gaming, video editing, or running virtual machines may require higher-end hardware configurations.
People Also Ask
How Linux installation works?
Your Linux CD-ROM/bootable drive may come with installation aids that will take you through the process of partitioning the hard drive, creating root, file system creation, package manager configuration, and setting up the system log. These boot programs may be an MS-DOS installation program (such as the redhat.exe program), a Unix script, or both.
Which Linux should I install?
Choosing Linux distribution depends on the installation purpose and personal preferences. Every Linux distribution is special for its own flexibility, performance, and customized features. However, the top 5 most used Linux distributions are Ubuntu, Debian, CentOS (now known as CentOS Stream), Fedora, and Linux Mint.
How do I install Linux on my computer?
To install Linux on your computer, firstly, download the ISO image file of the Linux distribution of your choice. Then, create a bootable USB flash drive using Ethcer or Rufus. After that, insert the flash drive into the PC and restart it. Press the BIOS key (F12 or according to the PC model) to launch the boot menu. It will launch the installation window. Then configure the Linux distribution according to your preference and install it step by step with the help of the installer.
Can I install Linux on any PC?
YES, if the PC has minimum hardware specification. The minimum hardware requirements for installing Linux can vary depending on the specific distribution and the intended use of the system. However, 2GB RAM, a 32 or 64-bit processor of 1 GHz, and at least 20GB hard drive storage is enough for a basic Linux installation.
What is Linux used for?
Depending on the feature of a Linux distribution, it can be used in many ways such as Server OS for web servers, database servers, email servers, cloud computing, and any other type of shared server. Besides, Linux supports high-volume and multithreading applications. So, large systems handling big data use Linux. And of course, it is also suitable as a Desktop OS for personal computing.
Related Articles
- Linux OS Single Installation
- Dual Boot Installation
- Virtual Machine Installation Guide
- Windows Subsystem for Linux
<< Go Back to Learn Linux Basics
FUNDAMENTALS A Complete Guide for Beginners


