Arch Linux is a distribution of Linux that is renowned for its flexibility and customizability. But its installation process can seem daunting to newcomers. Fear not! VMware is a powerful virtualization platform that offers a safe environment to explore Arch Linux without affecting your primary operating system. In this guide, I’ll navigate the straightforward steps of installing Arch Linux on VMware. Whether you’re a Linux novice or a seasoned enthusiast, this guide will help you.
Minimum Requirements to Install Arch Linux in VMware
- RAM: 512 MB (2 GB+ recommended).
- Storage: 2 GB (20 GB+ recommended).
What is Arch Linux?
Arch Linux is a lightweight, highly customizable, Linux distribution known for its minimalist approach. It’s a rolling-release system, continuously updated for users to create their tailored OS. Key features include the Pacman package manager, the Arch User Repository (AUR) for software management, and an extensive and reliable documentation source in the form of Arch Wiki.
Overall, Arch Linux is ideal for Linux enthusiasts looking for maximum control but is best suited for users with some Linux experience due to its command-line and system administration.
Key Features of Arch Linux
- Customization: Users can shape the OS to their preferences.
- Rolling Release Model: Constantly updates for features, security, and bug fixes.
- Archi User Repository (AUR): Access a vast community-driven package collection.
- Archi Wiki: Provides its extensive documentation, primarily through the Archi Wiki.
- Minimalistic Base: Build your system from a bare-bones foundation.
- Cutting-Edge-Software: Stay current with the latest software releases.
How to Install Arch Linux on VMware
To install Arch Linux on VMware using the command line interface (CLI), follow the steps below:
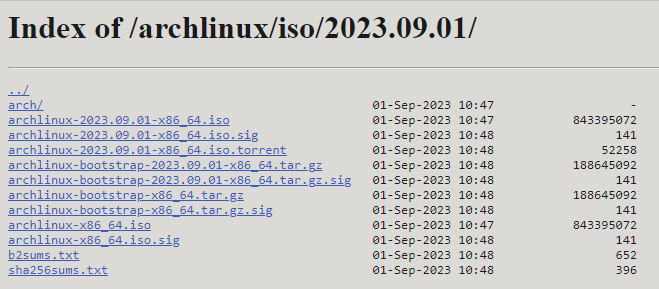
Step 1: Download Arch Linux ISO Image
To download the Arch Linux ISO image:
- Go to the ArchLInux download page.
- Select the nearest server from your current location. Then click on the latest release’s ISO file. This will start downloading the iso file in your system.

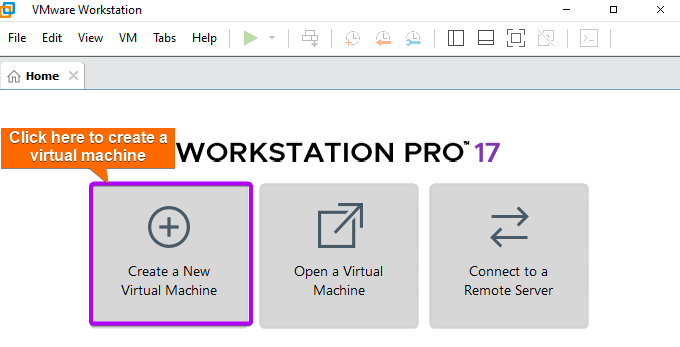
Step 2: Create a Virtual Machine on VMware
Create a virtual machine on VMware by following the steps below:
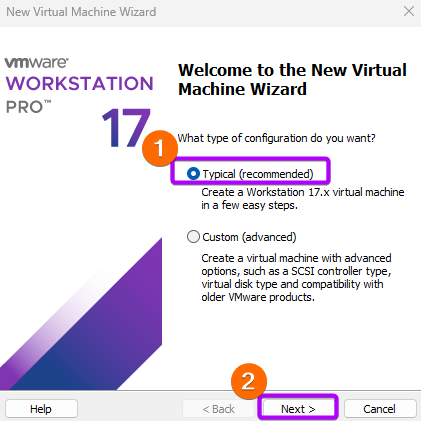
- Open VMware and click on ‘Create a Virtual Machine’.

- Choose ‘Typical(recommended)’ as a type of configuration.

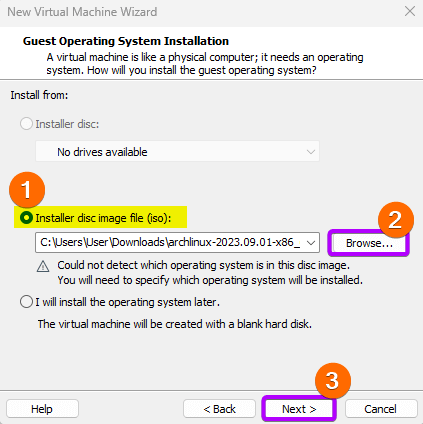
- Check the ‘installer disc image file (ISO)’ to install the OS. Then click on ‘Browse’ and select the downloaded iso file from your host operating system.

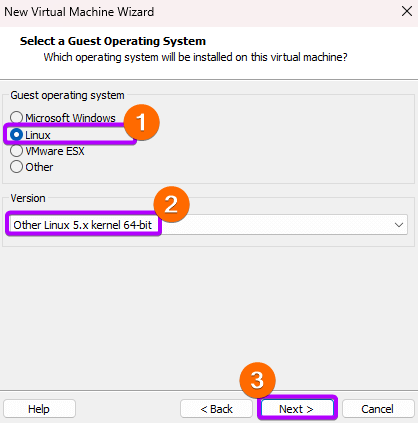
- After that, select Linux as a Guest Operating System, and select ‘Other Linux 5.x kernel 64-bit’ in the version option.

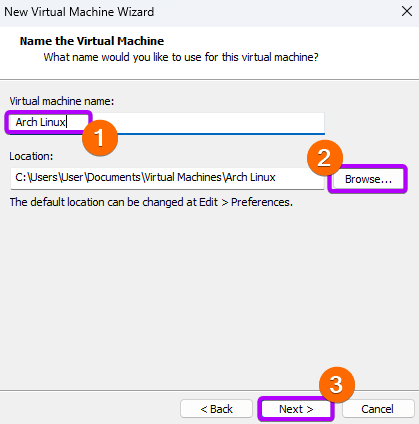
- Give a name to the virtual machine and browse the location where you want to keep the VM.

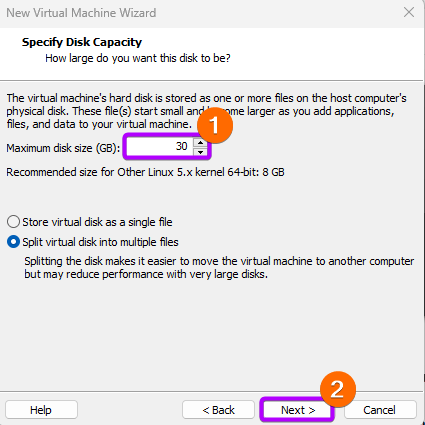
- Specify the disk capacity with a minimum of 30 GB of disk size and choose to ‘split virtual disk into multiple files’.

- This prompt shows the whole configuration of the virtual machine newly created.


If you want any change there, click on the ‘Customize Hardware’ option. Otherwise, click on Finish.
Finally, this is the newly created virtual machine named Arch Linux. 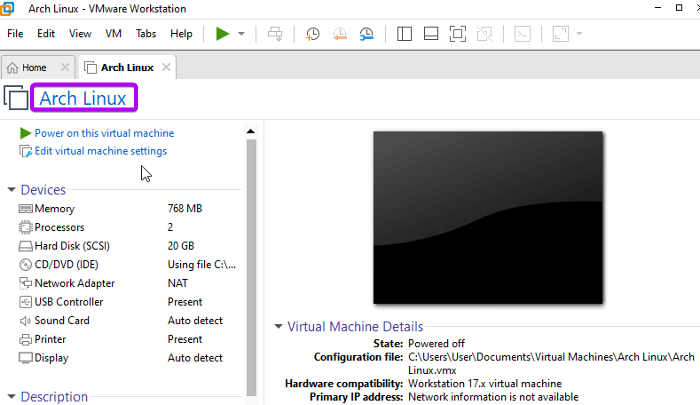
Step 3: Configure the Virtual Machine Settings
To configure the virtual machine for Arch Linux installation, follow the steps:
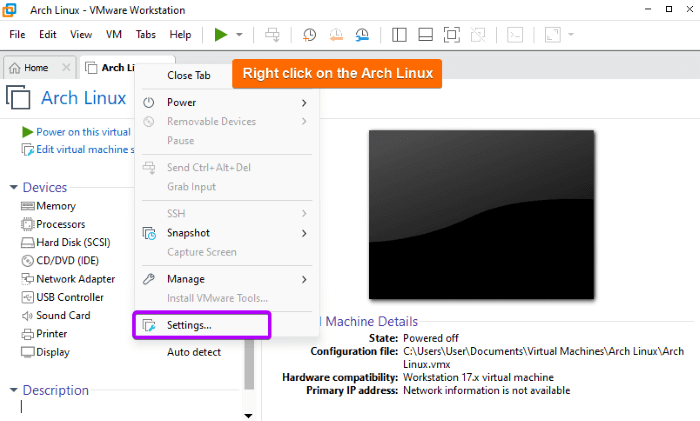
- Right-click on the virtual machine (Arch Linux), and click on Settings.

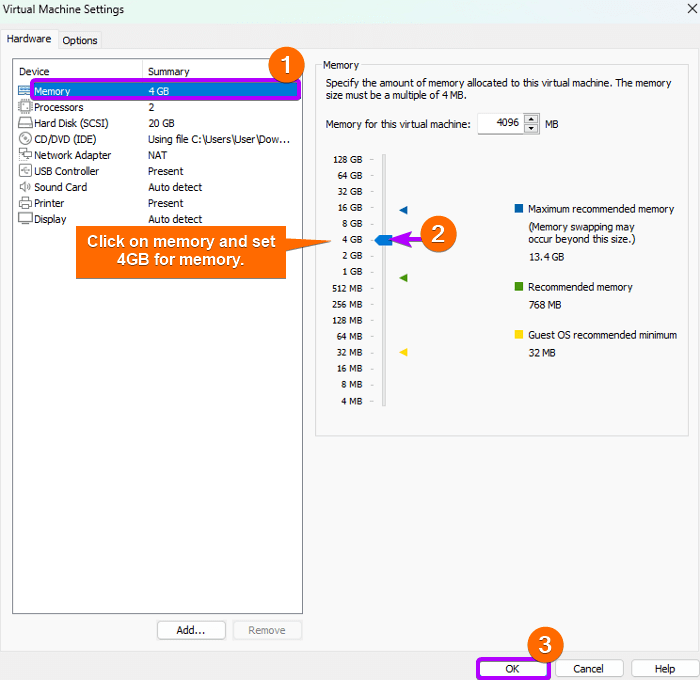
- Now, click on the Memory option and set 4GB memory space.

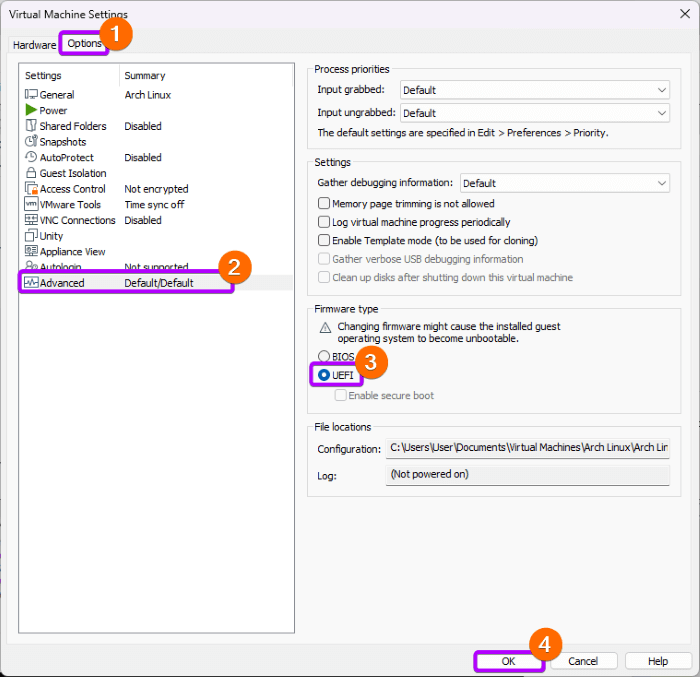
- Navigate to Options > Advanced option. Choose UEFI as the firmware type and click on OK.

Step 4: Power on the Arch Linux VM
Select the Arch Linux VM and click on the “Power on this virtual machine” option. 
Step 5: Boot and Pre-installation Setup
After booting, follow the pre-installation setup:
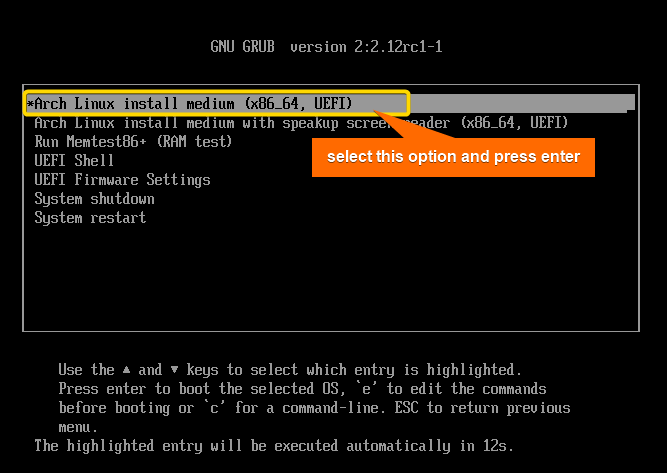
- Take the cursor over the “Arch Linux Booting interface” and click to enter into the GNU GRUB interface.
- Now, select the “Arch Linux install medium” using the DOWN Arrow key from the keyboard and press ENTER.

 After booting, you’ll see an interface like below.
  Note: If you want to change the console font while Arch Linux installation, run the command to get a list of the available console fonts:
ls /usr/share/kbd/consolefontsThen run the
setfontcommand followed by the font name which you want to set. A recommended example is:setfont ter-224b.psf.gz. - Now, to set keymaps, run:
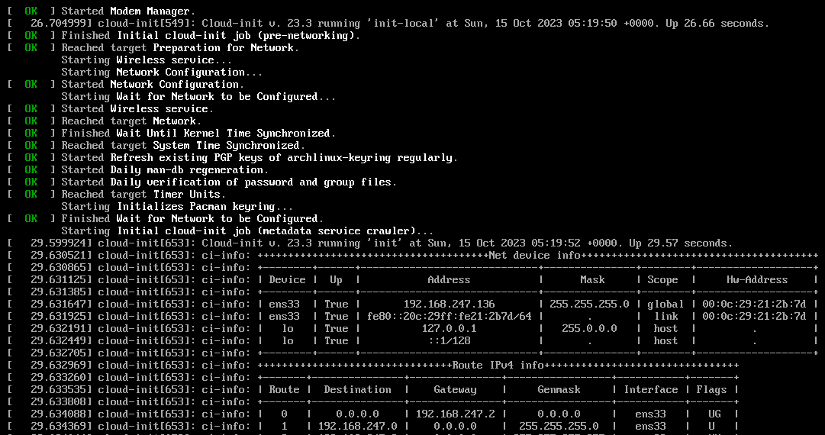
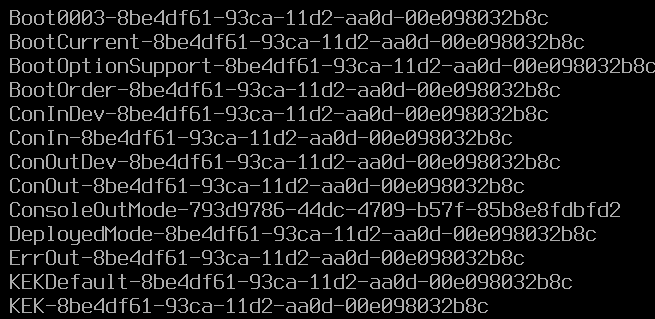
loadkeys us.map.gz - Check if the system is on UEFI boot mode using the command:
ls /sys/firmware/efivars The above output confirms the booting mode as UEFI.
 - Check the network connectivity by running
pingcommand. For example:ping -c 4 www.linuxsimply.com
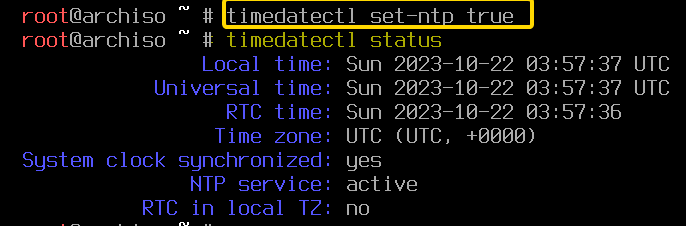
- Then, update the system clock using
timedatectl set-ntp trueAfter that, run
timedatectl status
 After booting, you’ll see an interface like below.
 The above output confirms the booting mode as UEFI.
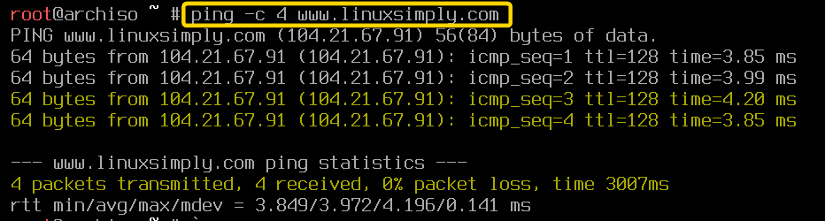
Step 6: Partitioning the Hard Disk
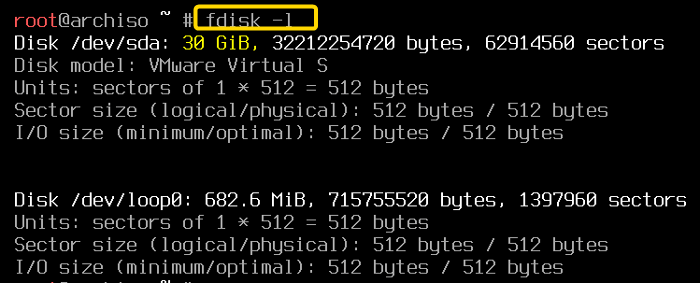
- First, to check the partitions of your storage, run the
fdisk -lcommand.
- Now, run
cfdiskto create partitions in storage.
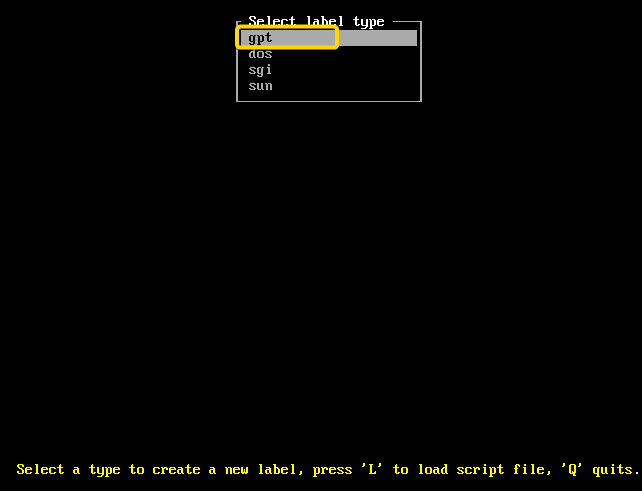
 An interface will appear showing four label types.
 - Navigate to “get” (GUID Partition Table) by using the down arrow from your keyboard. Then, Press ENTER. Here, “gpt” is a partitioning scheme of UEFI-based firmware systems.
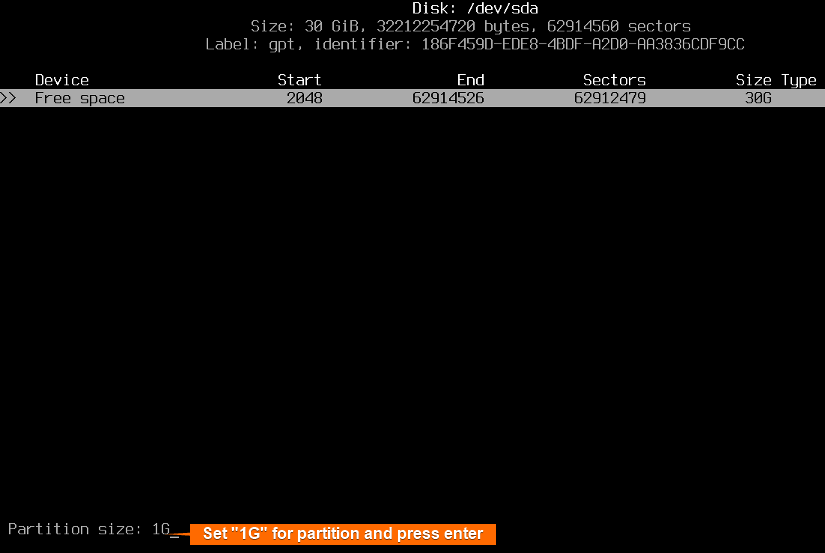
- Here, you have to create 3 partitions (Boot partition, Swap partition, and EFI system partition). To do that, select “New” and press ENTER.

- Boot partition requires a minimum size of 100MB, but 1GB is recommended. To set that, type “1G”. Then press ENTER.

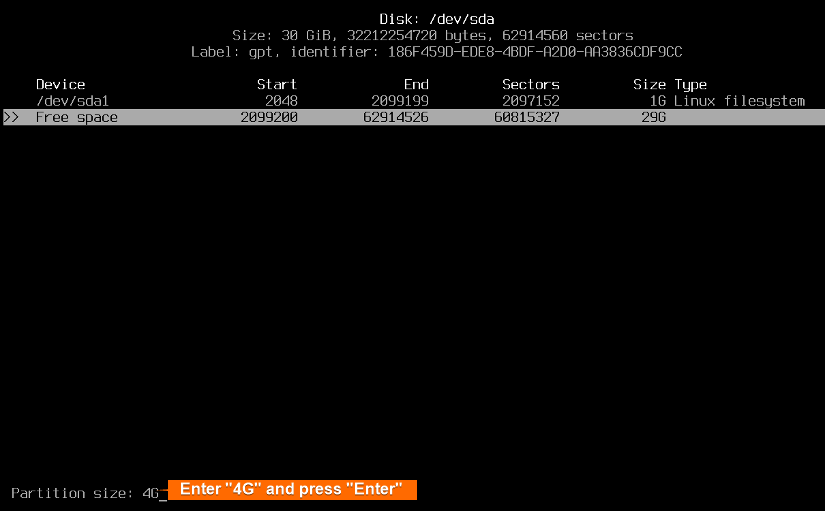
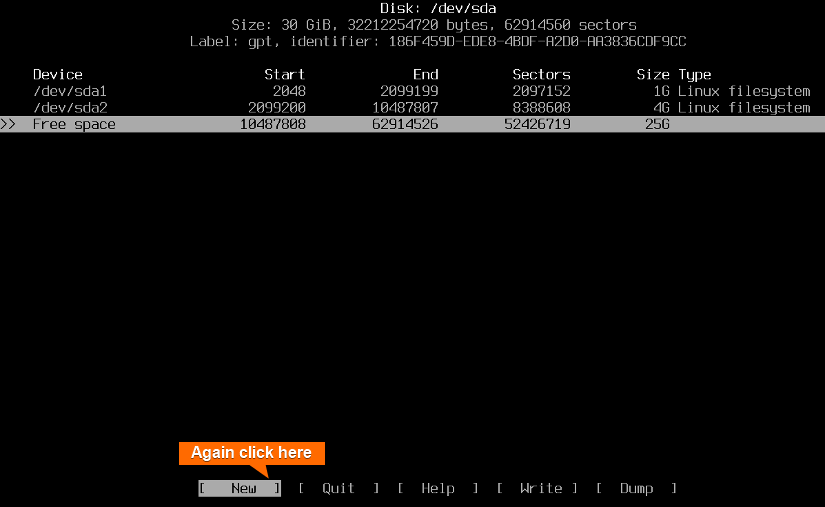
- Scroll down to “Free Space” and Select “New”. Then, press ENTER. Type “4G” as partition size and again press ENTER.

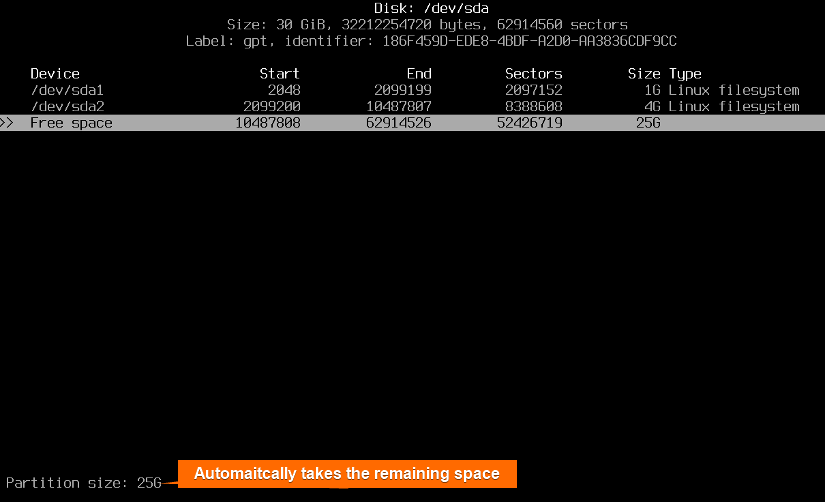
- Again, repeat the same process to create the third partition. This time, type “25G” and press ENTER.

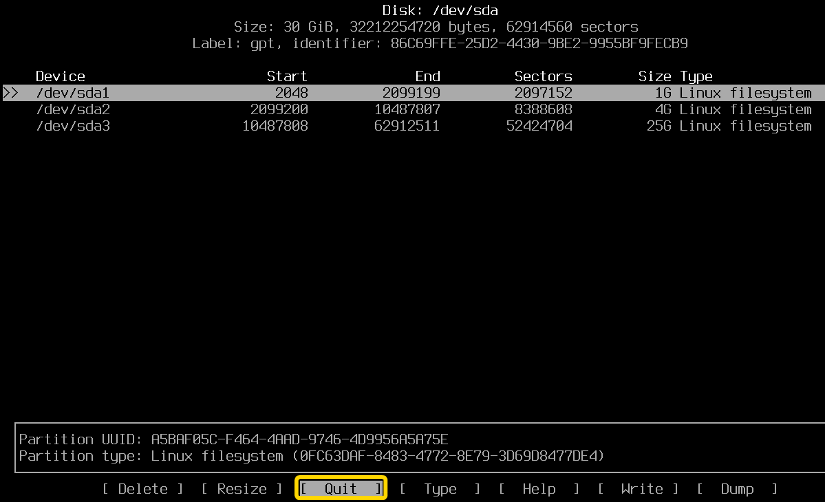
 Here, you can see the list of the newly created partitions with their size.
 - Now, select “Write” using the arrow key and press ENTER.

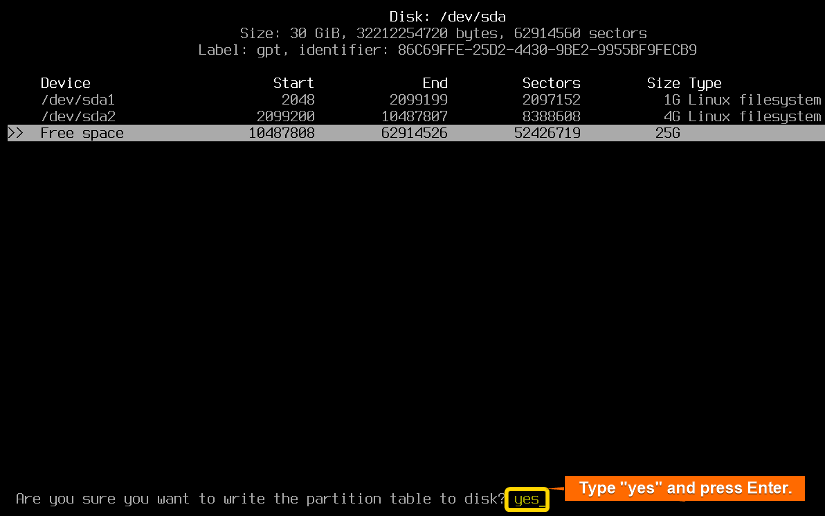
- Finally, type “yes” to write the partition table to the disk and press ENTER.

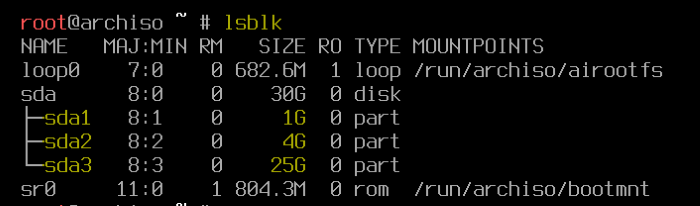
- Lastly, select “Quit” and press ENTER. To check the final partition table, run
lsblkcommand.
Step 7: Mount the Partitions
In the previous step, 3 partitions were created: sda1, sda2, and sda3. Now, to mount the partitions, you have to create the appropriate file system.
- To create and activate the swap file system, run the following commands:
mkswap /dev/sda2
swapon /dev/sda2
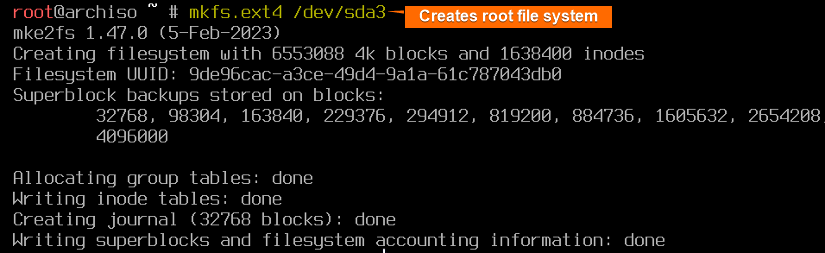
- To create the root file system, run the following command:
mkfs.ext4 /dev/sda3
- Create an EFI file system by running the following command:
mkfs.fat -F32 /dev/sda1
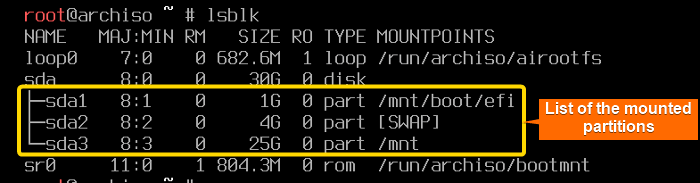
- Mount the created file systems using the commands:
- Mount root partition: Run
mount /dev/sda3 /mnt - Create boot directory: Run
mkdir -p /mnt/boot/efi - Mount boot partition: Run
mount /dev/sda1 /mnt/boot/efi
- Mount root partition: Run
To check the partitions with their mount points, runlsblk.
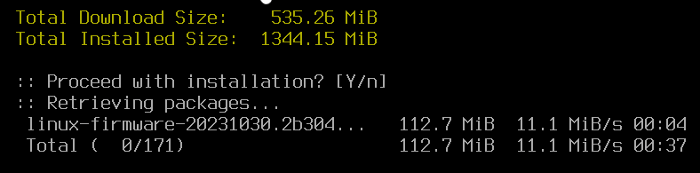
Step 8: Install the Base System
Install the Arch Linux base system using:
pacstrap /mnt base linux linux-firmware base-devel grub nano efibootmgr networkmanager

Step 9: Generate “Fstab” File
Generate an
fstabfile to instruct the system on partition mounting location during the boot process using:genfstab -U /mnt >> /mnt/etc/fstabStep 10: Change Root into the System
Run the below command to change the root environment to the newly mounted directory
/mnt.arch-chroot /mnt
Step 11: Set the Time Zone
Run the command to see the available timezones.
ls -sf /usr/share/zoneinfo/US/Eastern etc/localtimeThen, run the command below to synchronize the hardware clock:hwclock --systohc You can explore
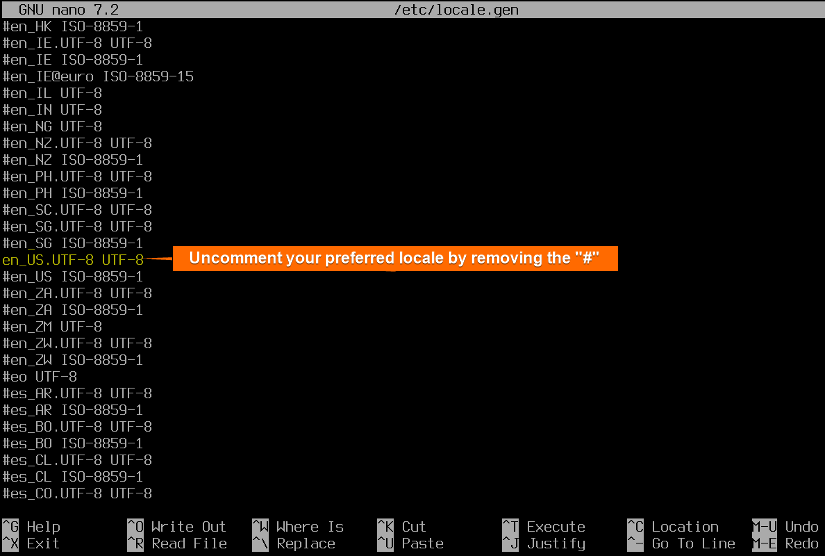
zoneinfodirectory and subdirectories to find your time zone with the help oflscommand.Step 12: Edit the “locale.gen” file
- Open the
locale.genfile using:nano /etc/locale.gen
- Remove “#” to uncomment the locale you prefer. Press CTRL+O and ENTER to save the changes. Then exit from the editor using CTRL+X.

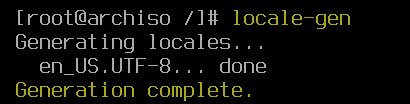
- Now, generate a locale using the command:
locale-gen
- To configure the “/etc/locale.conf” file open it using
nano /etc/locale.conf. After that, write “LANG=en_US.UTF-8”. Finally, press CTRL+O to save and CTRL+X to exit.
Step 13: Set a Hostname
Open the hostname file using:
nano /etc/hostnameThen write a name for the system.
 Press CTRL+O to save and CTRL+X to exit.
Step 14: Set the Root Password and Create User
- To set the password, use:
passwdHere, type and re-type a password for the system.

- Now, to create a user account, run the command:
useradd -m -G wheel -s /bin/bash AuhonaaReplace Auhonaa with your name in the above command.
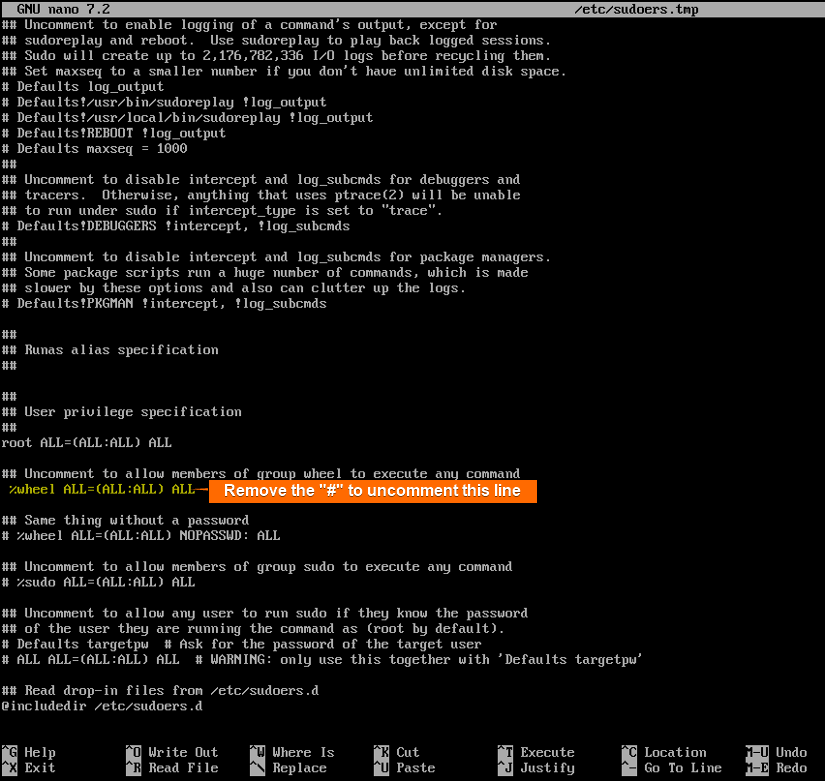
- To add the user to the sudoer file, open the file using the command
EDITOR=nano visudoThen, uncomment the line “%wheel ALL=(ALL:ALL) ALL” line by removing “%”.
 Finally, press CTRL+O and ENER. Then press CTRL+X to exit.
Step 15: Install a Boot Loader
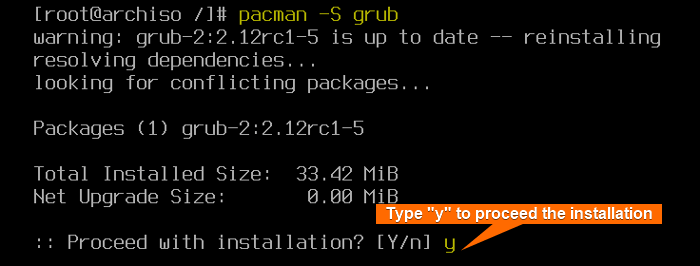
- Install GRUB package using:
pacman -S grub
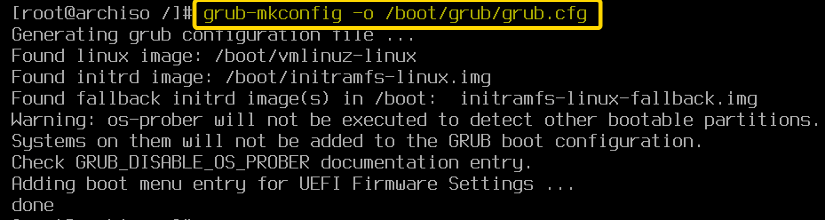
- Now, to install GRUB to the
/dev/sdadisk, run:grub-install /dev/sda
- Lastly, to generate the GRUB configuration file and save it to
/boot/grub/grub.cfg, run the command below.grub-mkconfig -o /boot/grub/grub.cfg
Step 16: Reboot the System
- Run the following command to reboot the system:
exit

reboot
- After rebooting, login to the user account by entering the username and password.

Step 17: Graphical Desktop Environment
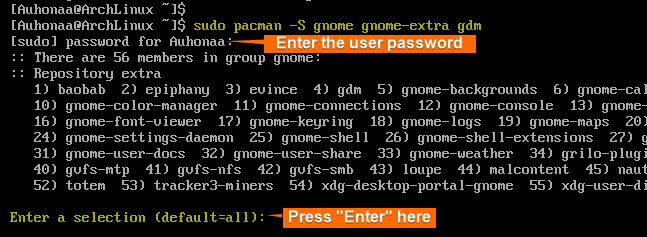
- To set the graphical desktop environment for the Arch Linux system, run the command:
sudo pacman -S gnome gnome-extra gdm
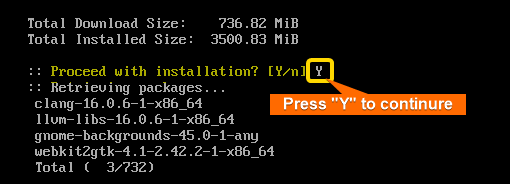
- Press ENTER multiple times to select packages. After that, type “Y” to proceed with the installation.

- To start GNOME desktop environment, run the following command:
sudo systemctl enable --now gdmThis will take you to the “User login” interface.
- Now, provide the user credentials to log in and press ENTER.

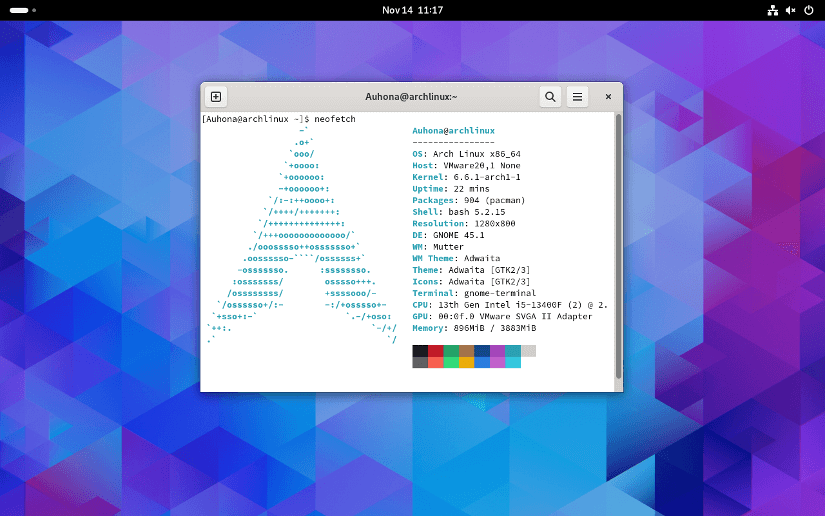
Welcome to the Ach Linux GNOME desktop environment.
To check the system details of the installed Arch Linux system, open the terminal and run the commandneofetch. Conclusion
In conclusion, installing Arch Linux on VMware offers a gateway to the world of highly customizable and minimalistic Linux distributions without the risk of affecting your primary operating system. It may require some initial efforts, but the rewards are significant. Hope you have successfully installed Arch Linux on VMware. This guide provides a solid foundation to get you started with Archi Linux.
People Also Ask
What’s the difference between Linux and Arch Linux?
The key differences between Linux and Arch Linux:
Aspect Linux Arch Linux Definition The core of an operating system. A specific Linux distribution. Type Kernel. Linux distribution. Rolling Release Not applicable. Pac-Man is used for package management. Updates Kernel updates are separate and managed by distributions. Rolling updates for the entire system. What are the powerful features of Arch Linux?
Arch Linux is often considered powerful due to its unique characteristics. Those are:
- Customization and Control: Arch Linux allows users for extensive customization and control over the components to install.
- Rolling Release Model: Arch Linux uses rolling release meaning that software is continuously updated rather than having scheduled major releases.
- Pac-Man Package Manager: This is the powerful package manager that handles package installation, upgrades, and removal.
- Arch User Repository (AUR): A vast community-driven repository that allows users to easily access and install packages not available in the official repositories.
- Documentation: The Arch wiki provides detailed guides, troubleshooting information, and documentation which make it more powerful.
- Community Involvement: Allows users to contribute to the forum, and share experiences that enhance the learning and problem-solving aspects.
What are the common issues in installing Arch Linux?
Some common issues that users might face while installing Arch Linux are:
- UEFI boot issues: Users on the UEFI system may face booth problems with the live environment. Disabling Secure Boot in the firmware settings can often resolve this issue.
- Partitioning Challenges: Understanding the partitioning scheme and file systems used by Arch Linux can be challenging, especially for users new to the distribution. Careful planning and adherence to the installation guide are essential.
- Network configuration issues: Configuring network connections, particularly wireless ones, can be complex. Users may need to install additional packages and drivers. Wireless configuration may require tools like “ip” or “iw”.
- Package Installation Issues: Installing packages on Arch Linux differs from other distributions. Users should familiarize themselves with the Pacman package manager, and understand how to update the package database, install packages, and manage dependencies. The Arch User Repository (AUR) offers additional software but requires careful review.
How to add GUI after installing Arch Linux?
To add a graphical user interface (GUI) to your Arch Linux installation,
- First, update the system using <code>sudo apcman -Syu command.
- Install the “X” server using <code>sudo pacman -S xorg command.
- Next, install a display manager using <code>sudo pacman -S lightdm command. Here, “LightDM” is a display manager.
- Now, enable the display manager by running the <code> sudo systemctl enable lightdm command.
- Lastly, run <code>sudo reboot to reboot your system to apply the changes.
After rebooting, you’ll see the LightDM login screen.
Can I install Arch Linux for use on the server?
Yes, you can install Arch Linux as a server operating system. Arch Linux is a lightweight and flexible Linux distribution that is versatile enough to suit server roles. After installing the base Arch Linux OS, you will need to configure the server to suit your needs. This may include installing additional software packages, configuring network settings, and setting up user accounts.
Is Arch Linux hard to install?
Arch Linux is known for having a more involved and manual installation process compared to some other Linux distributions. It requires users to manually configure various aspects of the system, making it a more challenging installation.
How do I boot Arch Linux from a USB?
To boot Arch Linux from a USB, you need to create a bootable USB drive with the Arch Linux ISO image. For this purpose, download the ISO file of Arch Linux and make it bootable using Etcher or Rufus. Once you have created the bootable USB drive, insert it into the computer you want to install Arch Linux on. Restart the computer and enter the BIOS settings. Change the boot order to boot from the USB drive, save the changes, and exit the BIOS settings.
Related Articles
- Installing Ubuntu on VMware Workstation [Easiest Guide]
- [Solved] VMware tools not running
- A Comprehensive Guide on Installing Kali Linux on VMware
- VMware Shared Clipboard [Enable Copy-Paste & Folder Sharing]
- Installing Ubuntu on VMware Player [Easiest Guide]
- [Fixed] Operating System Not Found on VMware
- VMware Workstation Pro vs VMware Player [Ultimate Comparison]
<< Go Back to Virtual Machine Installation Guide | Linux OS Installation Guide | Learn Linux Basics
LINUX
FUNDAMENTALS A Complete Guide for Beginners
- To create and activate the swap file system, run the following commands:
 An interface will appear showing four label types.
 Here, you can see the list of the newly created partitions with their size.
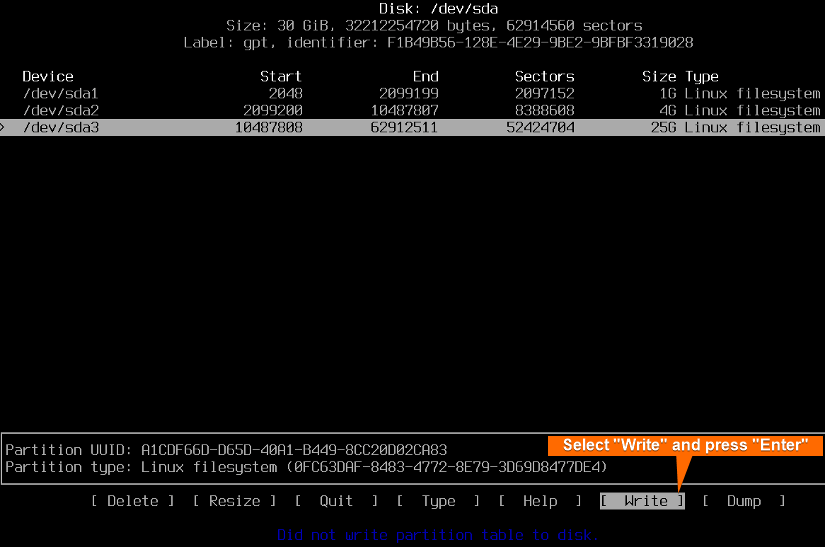


 Press CTRL+O to save and CTRL+X to exit.
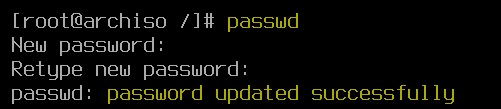


This was very helpful. Just one issue – VM was not connecting to internet after the installation and reboot. Turns out DHCP was not enabled. To get the wired network connected to internet, I found this article https://bbs.archlinux.org/viewtopic.php?id=265262 , and had to create the file: /etc/systemd/network/20-wired.network
[Match]
Name=en*
Name=eth*
[Network]
DHCP=yes
Then start:
sudo systemctl start systemd-networkd
sudo systemctl start systemd-resolved